Heat of Battle is designed to work with both vanilla BF2 or a standalone BFHD installation. The downloads are split into multiple files, so you can pick and choose which ones will best suit your needs. At minimum, you need the core files and at least one map pack to play. The additional files are not required but highly recommended!
Heat of Battle - this is the core mod.
Rush Map Pack - contains maps for the new Rush game mode!
Vanilla Map Pack - this map pack contains all the maps in vanilla BF2, tweaked and optimized for Heat of Battle. Do NOT use with BFHD, it won't work!
BFHD Map Pack - this map pack should be used with BFHD. Do not use with a vanilla BF2 installation.
SF Map Pack - this map pack will only work if you have Special Forces (xpack) content installed. If you have BF2 Revive or BFHD, this should work fine. You'll want this map pack to play all the new factions!
Custom Map Pack - contains custom maps created by the BF2 community, tweaked and optimized for Heat of Battle. You'll want this map pack to play all the new factions!
Heat of Battle Reshade - this is the Reshade I use in my screenshots and videos. You can use this with vanilla BF2 or BFHD as long as you overwrite the existing files.
HD Terrain Pack - HD terrain textures by TheObscure. Recommended for all installations.
Shader cache - necessary in order to get the weapons to look as shiny and reflective as in my screenshots.
If you're not sure which files you need, just download and install the core files and the Rush map pack!
Installing the mod
- Before you get started, you must have Battlefield 2 updated to the 1.5 patch. This is necessary to allow the mod to use 2GB of RAM and prevent crashes. If you are starting from scratch and don't have BF2, go here and install BFHD first!
- Download your desired Heat of Battle files. You need the core files and at least one map pack to play.
- In Windows, navigate to the folder that contains your BF2 installation. This folder should contain a folder called Battlefield 2. For a box copy, the folder should be called EA GAMES; for Revive, the folder should be called Revive; for BFHD, the folder should be called BF2HDRemastered or similar.
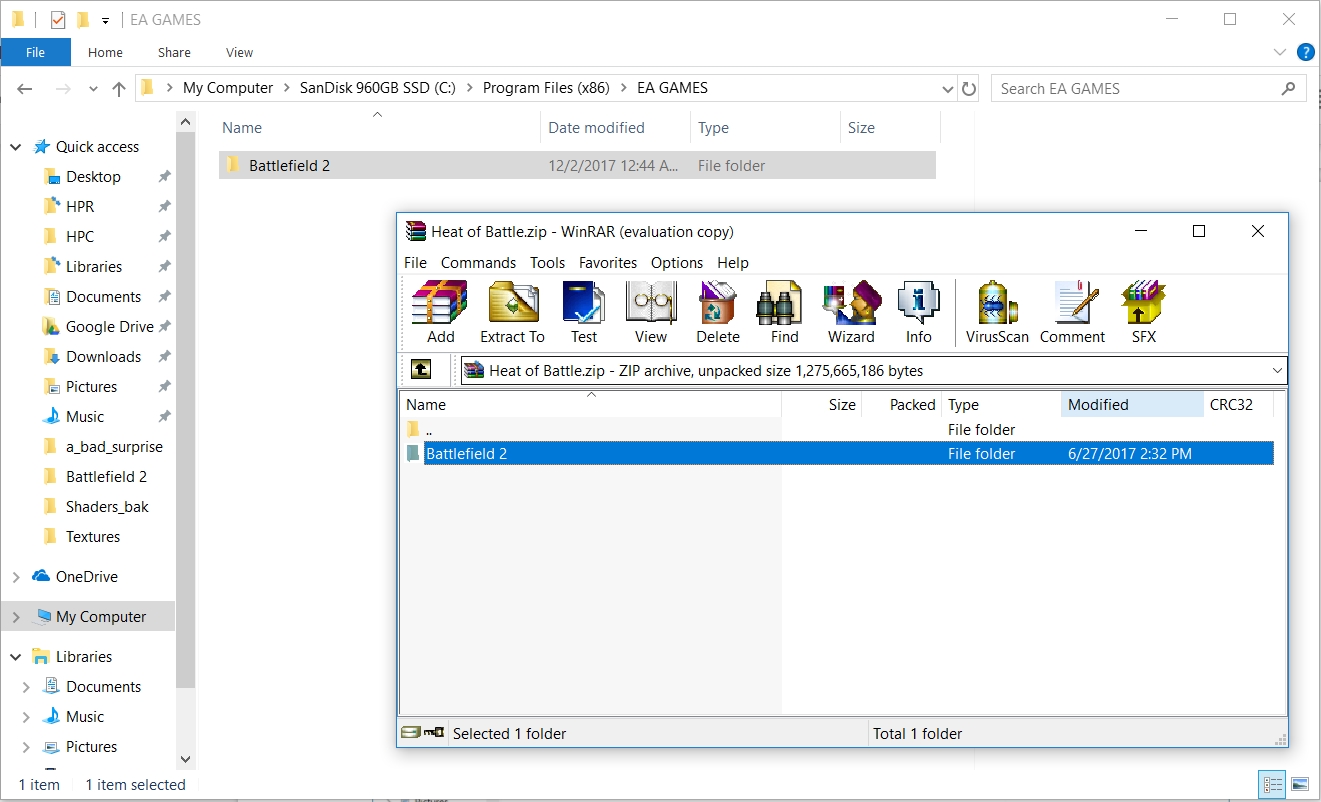
- Open Heat of Battle.zip. Drag and drop the Battlefield 2 folder from that zip into this folder. Overwrite any files. (After doing this, make sure that you have the folder ESAI in Battlefield 2/mods/bf2/ or else the game will crash on starting a map!)
- Navigate to mods/Heat_of_Battle/. Open any map packs you have downloaded. Drag and drop the Levels folder from the map pack zip into the Heat of Battle folder.
That's all you need to make the mod playable. The rest of the files are optional but they make a big difference!
Installing Reshade
Before installing this Reshade, it is recommended to remove any existing Reshade files.
To install, extract the files in your main Battlefield 2 folder. (EA GAMES\Battlefield 2 or equivalent). This is the folder that contains BF2.exe. Overwrite any files.
To install for Project Reality, extract the files in the main Project Reality folder (Project Reality\Project Reality BF2). This is the folder that contains PRBF2.exe.
YOU MUST MANUALLY SET UP THE FILE PATHS!
You can do this by modifying the d3d9.ini file or by using the in-game setup tool [SHIFT+F2]. Type in the correct file paths for the Shaders and Textures folders from wherever you installed the Reshade.
For a box copy, it should be something like C:\Program Files (x86)\EA GAMES\Battlefield 2\reshade-shaders\Shaders and C:\Program Files (x86)\EA GAMES\Battlefield 2\reshade-shaders\Textures.
For BFHD, it should be something like C:\BF2HDRemastered\BFHD\reshade-shaders\Shaders and C:\BF2HDRemastered\BFHD\reshade-shaders\Textures.

It is recommended to turn the in-game Anti-Aliasing OFF as it can cause some issues with Reshade. All presets have FXAA anti-aliasing built-in.
Installing HD terrain textures
Drag and drop the entire Common_client_hd_terrain.zip into the Heat_of_Battle folder.
Installing custom shader cache
The shader cache is what causes the “Please wait, optimizing shaders” message. It can affect the shininess and reflectivity of the weapon models. This is particularly important for Heat of Battle, since the realistic weapon lighting is highly dependent on environment map shininess. You'll want to install this shader cache if you want your weapons to look the way they do in my screenshots.
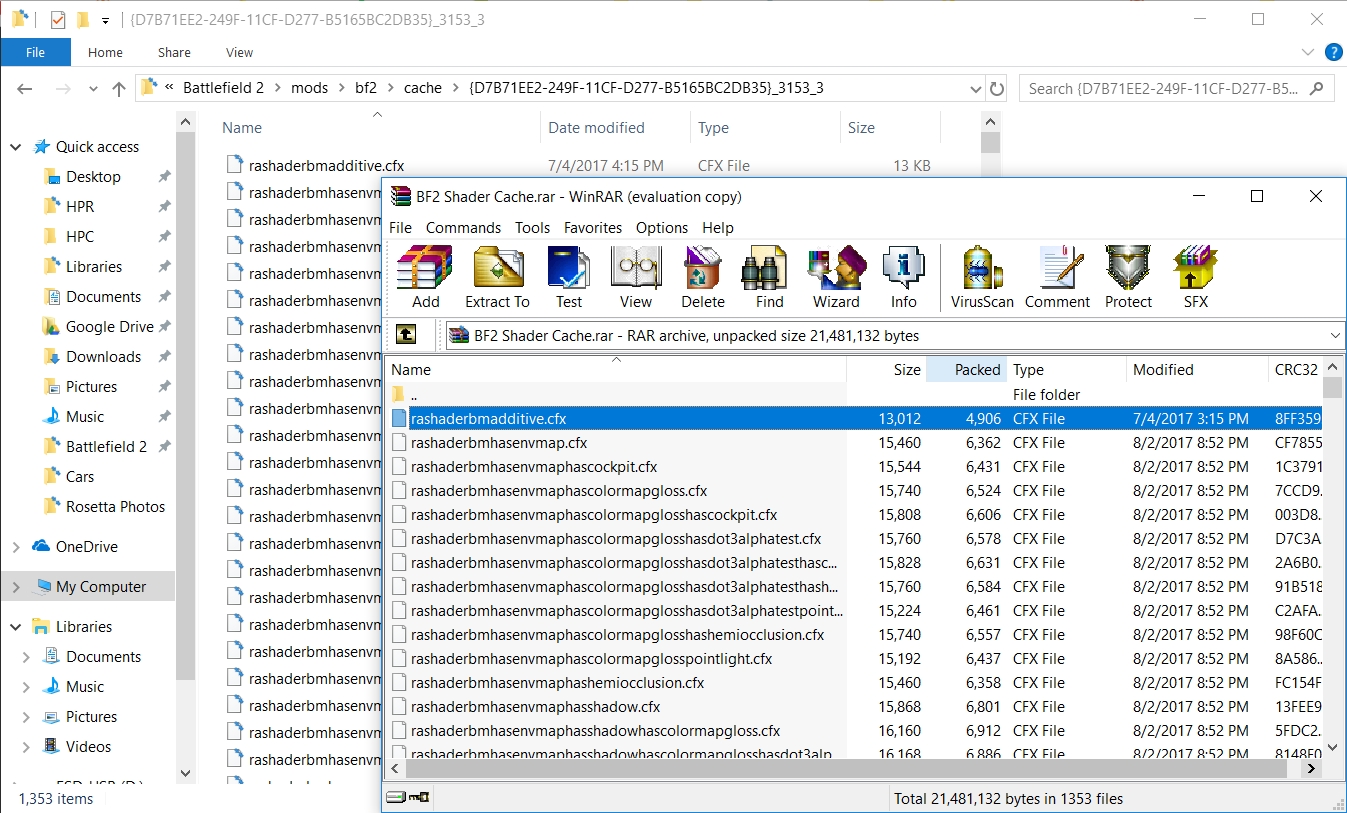
- Navigate to Documents\Battlefield 2\mods\bf2\cache.
- Open the most recently modified folder. It should be something like {D7B71... If you don't have this folder, start the game and load a map so the game can optimize shaders first, then come back.
- Open the shader cache zip. Drag the individual files in the zip into the Documents\Battlefield 2\mods\bf2\cache\{D7B71... folder. Replace everything.
- If for whatever reason it doesn't work or you don't like the results, delete the entire {D7B71... folder and load a map so the game optimizes shaders.
- In the future, if you update your graphics drivers and the game optimizes shaders again, you'll have to repeat this process so the weapons look shiny again.
Playing the mod
You can launch the mod by starting BF2.exe and going into the community tab of the launcher, then clicking “Custom Games” and “Heat of Battle”. However, I recommend creating a Windows shortcut to launch the mod quicker.
- Create a shortcut to BF2.exe, or copy and paste an existing shortcut.
- Right click the shortcut and select Properties.
- In the Target text box, add “ +modPath mods/Heat_of_Battle” (without quotes) at the end.
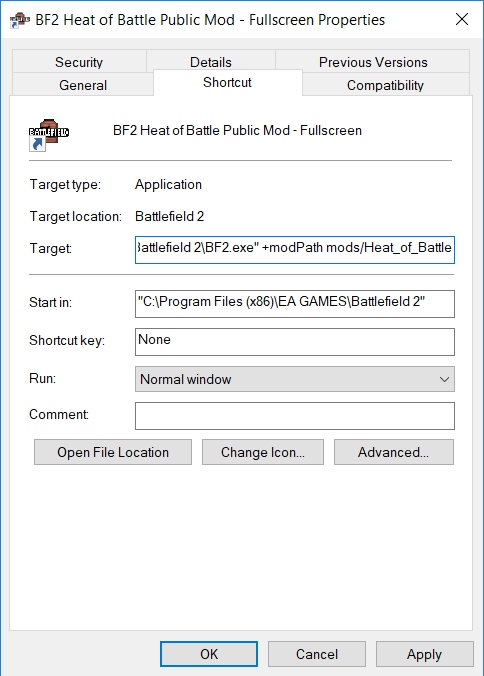
- You can also add +fullscreen 1 +szx 1920 +szy 1080 to force fullscreen or +fullscreen 0 +szx 1680 +szy 945 to force windowed with the desired resolution.
- Example: "C:\Program Files (x86)\EA GAMES\Battlefield 2\BF2.exe" +modPath mods/Heat_of_Battle +fullscreen 0 +szx 1680 +szy 945
Also, be sure to set Geometries to High to prevent random crashes in-game!
Setting up bots
Once you're in-game, I recommend playing using a Local Coop server (not Singleplayer). To do this, click Multiplayer, then Create Local. This gives you more options, so you can choose the spawn and revive time, number of bots, and bot difficulty. I recommend a 3 second spawn time, 5 second revive time, 32 bots, and bot difficulty at 70 or higher. If you want more bots, lower the max players slider.
To play with up to 48 bots, use the local coop server, set max players to 16, and slide the number of bots slider to the number you want.If you want to play with more than 48 bots, go into the mods/Heat_of_Battle/AI folder and open aiDefault.ai. Set overrideMenuSettings to 1. Then you can use AIX2's BF2SPCC or BF2 Bot Changer to set the number of bots you want. If that doesn't work, try deleting the aiDefault.ai file entirely, and use the bot changer again.
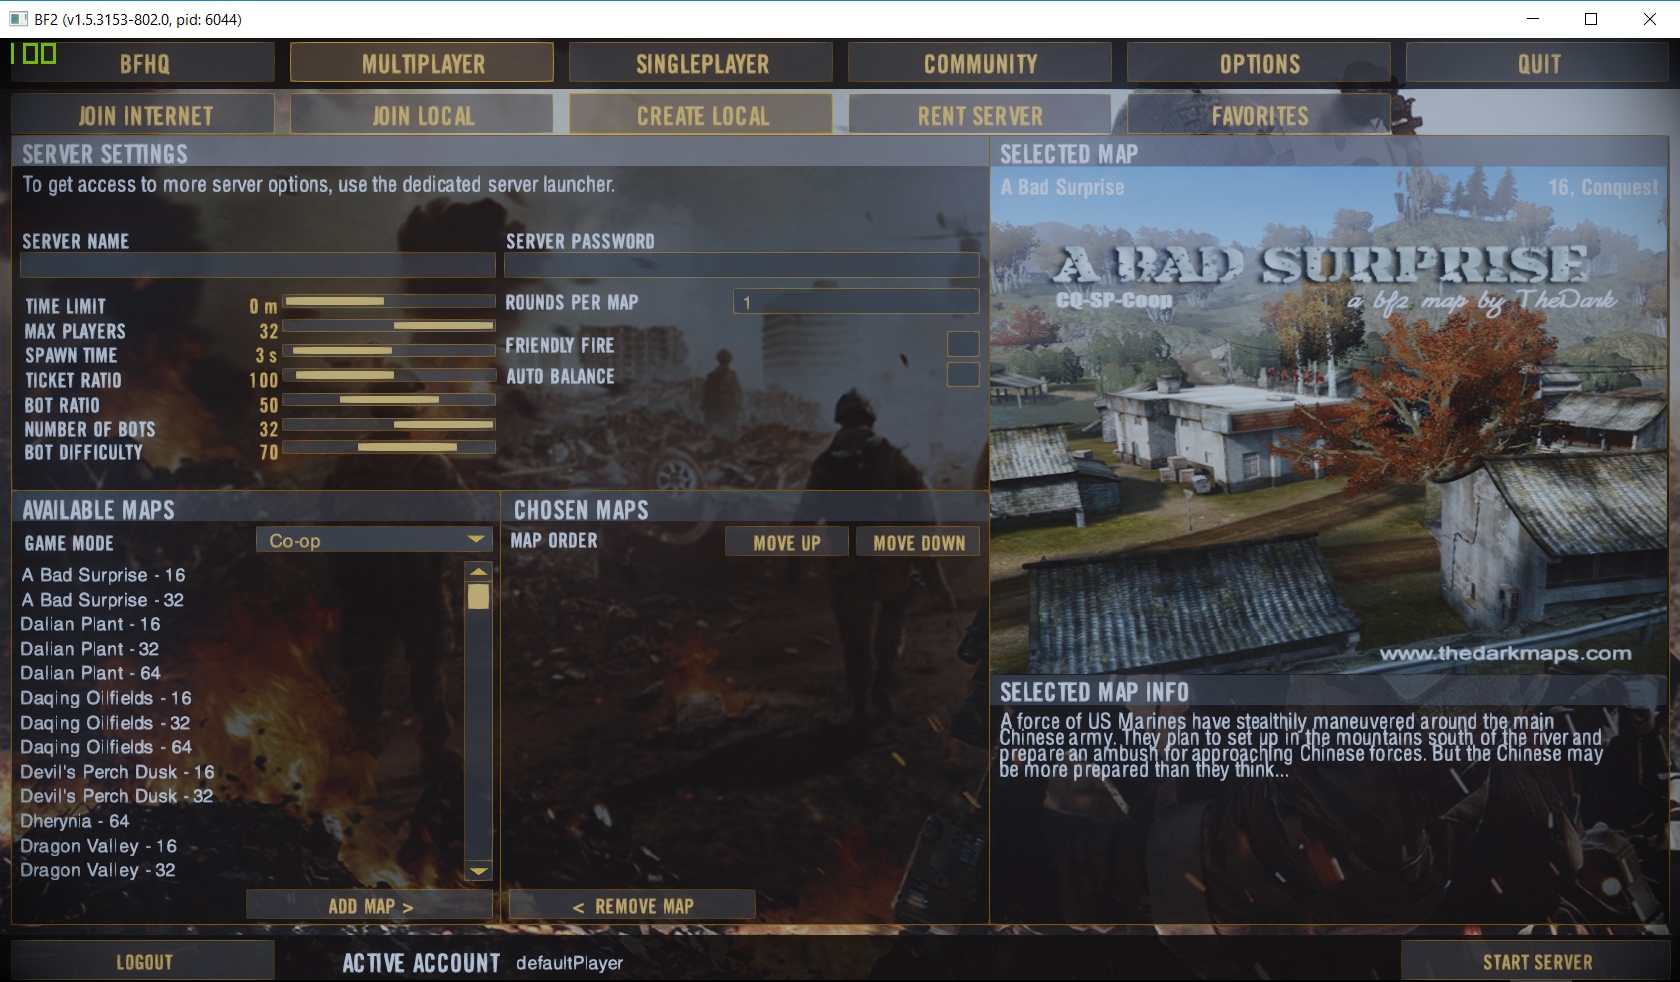
Before selecting your maps, make sure you set the game mode to Co-op! Then click start server, and you'll be on your way to feeling the Heat of Battle!
Using vehicles
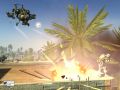
In Heat of Battle, many ground vehicles have new features. All tanks and APCs have a zoom option, activated by pressing X (or whatever your smoke launcher key is set to). They also have a coaxial machine gun, fired with the RMB. Tanks and APCs also have a new selection of ammo types. Key 1 is armor piercing, best used against armored vehicles. Their splash damage is low so not as effective against infantry. Key 2 is high explosive with lots of splash damage, good against light vehicles and infantry around walls, but not as effective against armored vehicles. Key 3 is canister (basically a large, direct-fire shotgun), which is highly effective against infantry. Key 4 for APCs is the wire-guided ATGM. Key 4 for tanks is a lock-on tank shell, which is great for hitting targets at extremely long range. However, the damage is low and ammo is limited. Pro-tip: After locking on, quickly aim high above the target so the guided round takes a high-arcing trajectory, hitting the target in the weaker top armor.
Note that there is a delay when switching between ammo types to simulate new rounds being loaded into the cannon. So you should think ahead and switch to the best ammo type for the situation beforehand!
Using Reshade
By default, use SHIFT + F2 to open the Reshade configuration menu. SHIFT + F1 to enable/disable effects. (You can change these keybinds yourself in the settings tab of the menu.)
The medium setting is enabled by default. In the home tab of the menu, the top drop down menu shows the available graphics settings. You can switch between them by selecting them from the drop down menu. You can check your FPS in the top right corner.
It is recommended to turn the in-game Anti-Aliasing OFF as it can cause some issues with Reshade. All presets have FXAA anti-aliasing built-in.
Low
The low setting adds basic color correction, lighting adjustments, and FXAA anti-aliasing. FPS impact is minimal.
Medium
The medium setting adds additional color correction and lighting improvements. FPS impact is very slightly higher than low.
High
The high setting adds bloom, reflective bumpmapping, and MXAO ambient occlusion. These effects are very graphically intensive but the visual boost is impressive, it really makes BF2 look like a next-gen game. Note the fresnel (rim/edge) lighting around the suppressor and the shadowing around the hands and grip. FPS impact is high. You'll probably need a RX580/GTX1060 to get 60fps at 1080p.
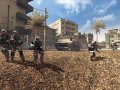
The following screenshot compares no reshade to the high setting. Note the shadowing on the hands and the sight of the RPG, this is all from the MXAO ambient occlusion effect! And the extra brightness around the edges of the models is fresnel lighting simulated by the reflective bumpmapping effect.
Using in-game anti-aliasing will disable the depth buffer which is necessary for MXAO/reflective bumpmapping, so be sure to TURN OFF ANTI-ALIASING if you want to use the High setting!
Standard vs. Warm
The medium and high settings also have a warm variant. The standard medium and high settings include a slight blue tint which I personally think makes the game look more modern. The warm variant drops the slight blue tint for those who prefer a more traditional BF2 look.
None vs. Low vs. Medium vs. High
Thanks, will download tonight!
After taking a deep look to USMC Mp5, i can say this;
Mp5 is too big!!
While reloading, check hand's location while its near bolt. As you can see, bolt is above character's hand and bolt is getting clipped trough hand.
So, i think making Mp5 a bit smaller will fix this issue.
Thanks!
Yes, I agree with TMN. That would probably be a good idea to add in the next update.
i don't seem to be able to find the "Co-op" options when i click "create local";
I am using BFHD PRO2 - PatchE, am i missing anything here?
Tried with Origin's Bf2 complete edition; does not see the "Co-op" options in the "Create Local" settings either.
umm excuse me but do i need all Heat of Battle Reshade for HD Remastered,
HD Terrain Pack, Shader cache to play the mod?
please make a tutorial how to install it because I'm still confused
please
This comment is currently awaiting admin approval, join now to view.
Great job dude, is this mod compatible with multiplayer?
In the sense, if I can play with players who have downloaded this mod
This comment is currently awaiting admin approval, join now to view.
This comment is currently awaiting admin approval, join now to view.
Hi Phale. outstanding mod, very easy to install, but I am just wondering if you'd know why your pre made Reshade qualities aren't working for me. It says Medium by default which is right since that's what you said it would do upon launching, but I am unable to change it to the High one. You mentioned to just go to drop down box and select it, problem is, looks like its opening my C:/ drive, but my Battlefield 2 along with its mods are located on my D:/ drive, but I am unable to access it via the reshade menu. Any suggestions? Cheers.
I've installed the standalone release but it always crashes when loading the map in co-op mode or driving a jet during the game :(
Does anybody have the same problem?
Me too
I got a good FPS rate, from 29 to 33, limited of course, but if I made a version without the new particle effects, like explosions and smoke and fire, it would run smooth very well, because otherwise it runs fine, I tried to exclude the folder of explosions and particles thinking that the game would use the base, but it stopped starting any map, and I wanted the clouds and thunder on the Operation Harvest map back, that clear sky was worse than the weather for rain in the BF2 Original, it changed the purpose and artistic style of the map.