Originally posted here: Planetshogo.com
Created by: A Bouquet of Flowers
Mirrored here for archival purposes
The WFG Shogo Level Building Tutorial:
Number 1, Build a Box
by A Bouquet of Flowers
Ok, kids, today we are going to learn how to create a level using the DEdit tool for LithTech games. Specific references will be made to Shogo: Mobile Armor Division, because that was the first LithTech powered game to be released. The following steps should take you from not even having DEdit installed to running around a very empty box shooting at nothing. (Don’t worry, this is only the first tutorial, we’ll do some more interesting stuff later.) This tutorial assumes that you have installed the Multiplayer Point Release(s) for Shogo: MAD.
Step 1: Download the toolkit
Note the tools are already uploaded to moddb. I suggest you check the files section.
Step 2: Unzip the toolkit
Unzip the lt-tools.zip file into your Shogo: MAD main directory with the ‘use folder names’ option turned on. The default Shogo directory is c:\games\shogo. If you have installed Shogo in a different directory, please modify this and all future references to your Shogo directory accordingly.
Step 3: Install the toolkit
Run the setup.exe file which was created in the
c:\games\shogo\Source and Tools\dist\tools
directory. These tutorials will assume that you have installed the tools in the default directory, which is
c:\games\shogo-tools.
Step 4: Unpack the Shogo game files
Open an MS-DOS prompt (usually found under programs on the start menu).
In your MS-DOS prompt window, type the following commands. The explanations as to what you are doing which are in parentheses following the commands should not be typed into your MS-DOS prompt window.
c:\games\shogo-tools\bin\lithrez xl c:\games\shogo\shogo.rez c:\games\shogo\shogo (This command uses the LithTech packing/unpacking tool to unpack the Shogo game so that you can use it as a base to build on.)
c:\games\shogo-tools\bin\lithrez xl c:\games\shogo\shogop.rez c:\games\shogo\shogo (Unpacking a patch file.)
c:\games\shogo-tools\bin\lithrez xl c:\games\shogo\shogop2.rez c:\games\shogo\shogo (Unpacking another patch file.)
c:\games\shogo-tools\bin\lithrez xl c:\games\shogo\shogop3.rez c:\games\shogo\shogo (Unpacking yet another patch file.)
exit (Close the MS-DOS prompt window.)
Step 5:(Optional) For full hard disk people
If you are running low on hard disk space, you can delete the following files:
shogo.rez, shogop.rez, shogop2.rez
WARNING! While this step is not irreversible, it is not recommended unless you absolutely need the disk space. Once you have done this, you will always have to run Shogo with some command line options until you pack the files you just unpacked back up.
Step 6: Set up a new DEdit project
Run DEdit. Select File>New Project. In the box that prompts you for a Project Directory, type:
c:\games\shogo\MyStuff. An error message will pop up which says, "Can't find class module object.dll." Click 'Ok'. When asked, "Create a new world?", click 'Yes'. Name your world MyWorld.
Step 7: Copy source to project folder
Minimize DEdit. (We're not quite ready to start making our box yet, but I promise we're getting there.) Copy the following files from c:\games\shogo\shogo to c:\games\shogo\MyStuff:
Cres.dll, Cshell.dll, Object.lto, Sres.dll
Copy the following file from c:\games\shogo\shogo\textures to c:\games\shogo\MyStuff\Textures:
Skypan.dtx
Step 8: Reopen project file
Go back into DEdit. Select File>Close Project. Select File>1 C:\Games\…\MyStuff.dep. (Look, no more "Can't find class module…" error message!)
Step 9: Explore DEdit
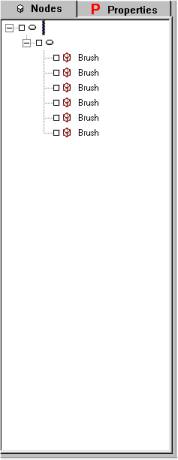
Now let's take a brief look at the various things you see in DEdit. The most interesting thing is, of course, those four dark blue squares with all kinds of lines running every which way. These four windows are, moving clockwise from the upper left, the perspective view, the top view, the left view, and the front view. These four windows are where you will be looking at the stuff you make. Along the left hand side of the DEdit window are a bunch of tabs with names like Nodes, Textures, and Worlds. These will help you make the stuff that appears in the four viewing windows do what you want. The screenshot on the left shows these components.
Step 10: Make a box! Yay! We finally made it. Select World>Add Box Primitive. Let's make the brush thickness 500 for the moment. You should now see the outlines of a box appear in the four viewing windows. On the middle of the three toolbars which appear at the top of the screen, click on the fourth icon from the left. It looks like this:![]() Brush thickness 10 is fine for the moment. You should now have an interestingly colored geometric thing in the perspective window (which is the inside of the box which we just hollowed out), and double boxes in the other three windows.
Brush thickness 10 is fine for the moment. You should now have an interestingly colored geometric thing in the perspective window (which is the inside of the box which we just hollowed out), and double boxes in the other three windows.

Step 11: Navigating the viewing windows is fun and easy, once you've had lots of practice, but is sort of hard the first couple times. Here's how to do it. Move your cursor over the center of the perspective window (upper left hand corner). Hold down the I key and move your mouse around. Now try holding the I key and the right mouse button down while moving the mouse around. Wheeee! Now, as the final piece of excitement in navigating the world you're about to create, hold down the O key (letter O, not number 0) and move the mouse. These keys have slightly different effects in the perspective view than in the other views, so you might want to experiment with both.
Step 12: Add a texture
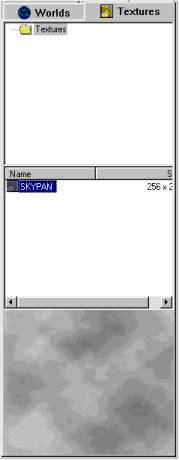
Ok, enough dizziness-inducing antics, let's make the walls of your box look pretty. Remember how we copied the Skypan.dtx file into c:\games\shogo\MyStuff? Well, it's about to come in useful. Click on the Nodes tab (seen in the screenshot on the far left) in the big bunch of stuff over on the left of your screen. Click on the little plus to expand the node tree. There should be one more plus-box-oval thingy now. Click on the little box to select the big box that we just created and hollowed out. You should notice in the viewing windows that your big box is now highlighted/selected. Click on the Textures tab. Click on the textures folder icon in the middle pane. Something named SKYPAN should pop up in the bottom white pane, with a size of 256 x 256. Click on SKYPAN. Now a greyish cloudy thing should appear in the bottom pane. (It should look like the screenshot on the immediate left.) This is the texture that you are going to apply to your box. Click on one of the viewing windows and press CTRL T. The box in the perspective view should now be all cloudy.
Step 13: Life is in the details
Now it's time to add the grungy, unexciting details which make your new map work. Right click in one of the viewing windows and select 'Add Object...'. Expand the tree which appears and scroll down to the bottom. Click on WorldProperties and then 'Ok'. A little tiny box should appear at the center of those green lines you might have been wondering about. These green lines control where something gets added to the world. When you add a new object, it is placed at the intersection of these lines.
Step 14: Add a starting point
Now let's add the point where our cute little Sanjuro or MCA will start the level. Unfortunately, if we put the starting point where the green lines intersect now, our hero will fall quite some distance, which is bad. So, we need to move our green lines. Click in the lower right hand box. Now, hold down the X key and move your cursor around. The green lines should be dancing to your little tune. After you've played with the lines for long enough, place the intersection of the green lines at the line just above the bottom of your box. We could make it even closer, but we don't want to do that, because if we get too close, our hero falls out of the world and dies a lot (which makes it hard to look at the level you've just worked for hours and hours to create). Now, add another object, except this time chose the GameStartPoint object, which is hidden under the StartPoint object. Another little box should appear in your viewing windows.
Step 15: Wow, that's a lot of details!
We're almost there, now we just have to make sure that all of the little details are taken care of. Click on the Nodes tab. Expand the tree. There should now be two things that weren't there the last time you looked at this. The GameStartPoint node should have a little red check mark in front of it. This means it is currently selected. Now, click on the Properties tab. There are a couple of things here, but what we're interested in is the GameType and PlayerMode properties. GameType determines if this is a deathmatch or single player map. For the moment let's make it a deathmatch map by putting a 1 in the GameType text field and pressing ENTER. (If you don't press ENTER, the changes don't stick, which is annoying.) Now, we have a choice of whether we want our map to be a level for humans or MCA's. If you want your map to be for humans, you can just leave the PlayerMode property set at 0. If you would like it to be an MCA map, enter 7 in the PlayerMode text field. Click on the Nodes tab again and select everything there by selecting the node at the very top of the tree pane. Click on the Properties tab. Out of the huge long list of true/false items near the top of the list, we only want two of them to be true. Make everything except FullyBright and Solid false.
Step 16: Process world
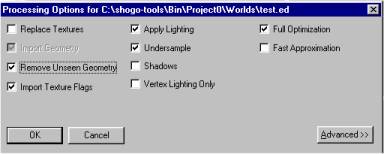
Save your project. (Hopefully you've been doing this all along, but it's especially important now.) Select World>Process World. There are a bunch of options. We want the following options (and only the following options) turned on:
Remove Unseen Geometry, Import Texture Flags, Apply Lighting, Undersample, and Full Optimization.
Click 'OK'.
This starts up the world processor, which should move fairly quickly for this simple level. Once the world processor is finished, click 'OK'. The processed level is in a file called MyWorld.dat in the c:\games\shogo\MyStuff\Worlds folder. In order for it to be available in a multiplayer game, we need to put it in the c:\games\shogo\custom folder. Move MyWorld.dat into the new folder.
Step 17: Party!
Play your level! From the Shogo Main Menu, select Multiplayer. Select 'Host a new session'. Click 'Next>' four times. In the level selection screen, scroll through the list of available custom levels until you reach 'MyWorld'. Add it to the Game Levels side and remove anything else that's currently selected. (We wanna see your world, not someone else's!) Click 'Finished' and wait in joyous anticipation for your masterpiece to arrive. Once it's loaded, shoot off all your ammo, hack the walls with your knife, etc. Do take note of how big the 500 by 500 by 500 box appears, though, as it's very helpful to quickly gain a sense of how big things you make in DEdit are in the game world.
The WFG Level Editing Tutorial Series:
Volume 2, Put Stuff in Your Box
by A Bouquet of Flowers
In the last installment, we installed the LithTech editing tools and used DEdit to create a rather boring box-shaped level. In this installment, we will change the size of our box, play with the texture on our box, and place weapons and obstacles inside our box.
Step 1: Change the size of an object
Open DEdit and load the project you created last time. (MyStuff.dep, if you did everything we told you to do.) To start off, let's change the size of our box. Did you notice last time that the box we created felt a little small? To correct that, click on the Nodes tab and select the node that contains all the pieces of our box. (You could do the following one wall at a time, but this method is easier and faster.) Zoom out (hold the O key and move the mouse away from you) in the bottom right hand viewing window (front view) until our box only takes up about one third of the window. Now click in the front view window and move your cursor to the little box in the middle of one of the left side of our box. Your cursor should change into an east-west resize cursor. (Looks sort of like this: <-->) Click and drag the wall over to the edge of the viewing window. Do the same thing for the wall on the right side of the box. Go into perspective view and see how your level is now a longer, rectangular room.
Step 2: Get more textures to use
Now we are going to prepare play with the textures on our box. The c:\games\shogo\shogo\textures folder has tons of textures. (This is where we unrezzed the Shogo retail stuff, which includes a huge variety of textures.) We will discuss three possible ways to pick some textures from here to put in your project. The first is pretty simple, but not all that useful. Simply open up the c:\games\shogo\shogo\textures folder and pick a couple textures whose names you like. Copy them into your c:\games\shogo\MyStuff\textures folder. The second method of picking textures is to close your MyStuff project and open up c:\games\shogo\shogo\riot.dep. This is the project containing everything for Shogo, so all the textures can be viewed from the Textures tab. Find a couple you like and that you think might go well together. Move them to the folder specified above and then reopen the MyStuff project. The textures you just moved should now be available on your Textures tab.
The third method, and the one I would recommend, is to simply copy the entire contents of the c:\games\shogo\shogo\textures folder into the c:\games\shogo\MyStuff\textures folder. If you've got plenty of disk space, and you don't mind wading through lots of textures each time, this is the best solution. It reduces the amount of opening/closing and moving stuff around you will have to do later and can be very nice when it comes to distributing levels later. (We believe in you! You will be able to create levels worthy of distribution!) Explanation of why this is nice later.
Step 3: Change textures
New textures firmly in hand, we will now move on to changing our box. For the moment, let's change the sides of our box and leave the top the same. To change the texture on a Brush object is fairly easy. Last time, we saw how to select an object by checking its box in the Nodes tab. Another way to select Brush objects is to hold down the T key and click on them in one of the viewing windows. If there are multiple brushes stacked on top of each other, doing this repeatedly will cycle through all the brushes under the cursor.
Select one of the walls to which you wish to apply a texture. Click on the Textures tab and select the texture that you want to use (it should appear in the bottom pane). Click anywhere in one of the viewing windows (this gives that window "focus") and press CONTROL T. If you can't see the wall you have selected in the perspective view, go ahead and check it out.
Repeat this process until you are satisfied with the look of your world. I would recommend that somewhere you keep track of which textures you use in the world (and maybe for what purpose). So far, I have not been able to discover an easy way to do this within DEdit, so you might want to write them down on paper (gasp!) or using [insert your favorite text editor]. Why bother with such tedious accounting? You'll have to trust me on this, but it can make your life a lot easier later. Explanation why.
Step 4: Add weapons
Enough playing with textures, you say? Okay, we'll move on. Now what is it that everyone likes most about a first person shooter? Guns! Big guns! Alright, let's put some guns in our level. No more of this wussy pulse rifle or pistol stuff!
Guns are another one of our object friends and we add them to the level the same way we added the GameStartPoint and WorldProperties objects. Move the intersecting green lines (hereafter to be called the green cursor) to where you would like to place the gun. It should be about the same height off the floor as your GameStartPoint is. Once you have the green cursor positioned properly, right click and select 'Add Object...". Expand BaseClass, expand PickupItem, expand Powerup, expand WeaponPowerup and then choose the gun you want. Keep in mind that while you can put an MCA weapon in an on foot level and vice versa, the player will not be able to pick up the wrong size weapon. Now let's click on the Properties tab and see what we can do with our weapon. At the moment, the only things we'll play with are RespawnTime and Ammo. RespawnTime determines how long it takes for the weapon to reappear once it has been picked up, and Ammo determines how much ammunition is in the gun when the player picks it up. Set these two variables to your desired values. (Remember to hit enter after you enter a value in the text field so that DEdit notices the change.) If you're particularly impatient, you could process your world now and go see the changes and shoot the walls with bigger guns, but if you'll be patient for a little longer, you'll have some more interesting stuff to shoot at.
Step 5: Add primitive objects to the level
Ok, let's put some neat stuff in our world. With enough patience, almost any shape can theoretically be created in Shogo. (I hereby offer a $20 prize to anyone who can build a level which is a Moebius strip on which the player can walk all the way around the strip without falling off and that is fun to play as judged by the assembled Warm Fuzzy Guys team.) However, certain shapes are easier to deal with than others. In particular, DEdit has choices to create various shape primitives easily. (The box you created at the very beginning was a box primitive.) For the moment, let's put a cylinder and a pyramid in our level. To add a shape primitive, position the green cursor approximately where you want it to be and select World>Add Cylinder Primitive... or World>Add Pyramid Primitive...
Once you have these objects in your world, you can resize them in a similar manner to the one we used in Step 1 of this tutorial. You might also want to move your object around. This can be done by selecting the object, giving focus to the window in which you want to move your object and moving the mouse over the center of the object. Your cursor should change to a thing that looks like a four way intersection and you can then just click and drag the object to its new home. Sometimes, the cursor will not change, in which case you can hold down the M key and click and drag an object from any point on it (not just the center). You might notice while you are moving your object around that you can't put it exactly where you want it. This is because DEdit uses a system known as 'snap to grid'. Every object's center has to be on an intersection of a set of the grid lines. There is a way to make the grid lines more frequently spaced however. Give a viewing window focus and then click on the icon just to the right of the hollow brush icon we used last time. This adds more grid lines. The next button in the line takes grid lines away again. Be careful about using lots of grid lines. It might make it seem easier to move stuff where you want it, but it is a really good way to end up with little tiny gaps all over the place.
Step 6: Add a complex object to the level
Now, let's learn one more way of adding objects to the world before we quit. Let's say you want to add a triangle or an L-shaped platform. You can do so fairly easily, although there are some confusing rules about more complex shapes. To draw a shape, give focus to one of the viewing windows (this works best if it is not the perspective window) and press the spacebar. Now when you move the cursor around, you should notice a line stretching back to the spot where you hit the spacebar. Each time you hit the spacebar again, you will add a vertex. When you create a vertex at your starting point, you will be asked for a brush thickness and the brush will be done. You can now treat it just like you've treated any of the other brushes you've made so far. Be warned that any brush which is concave will not work right. Basically this means that you cannot have a brush with an indentation in it. You can still make stuff with indentations, but you have to figure out a way to do so using only brushes without indentations. (Sounds fun doesn't it? If you failed the spatial recognition part of the ASVAB tests, this might be just the way to get better at it.) By the way, the third dimension of the brush that you create using this method is located at the green cursor.
Texture all your new brushes as desired.
Step 7: Rotate an object
One more thing to learn before you process your world again. Rotation. Rotation is one of those things that is easy to learn but hard to master. However, it's extremely useful, and by mastering rotation you can do lots of neat things and also build your levels a lot faster (as long as they have some symmetry). Here's how to rotate an object. Select it. Center the viewing window which contains the plane in which you want to rotate the object on the object. (A quick way to center on the selected object in every window is to click on the + icon at the far right of the middle toolbar.) Move the green cursor to the point around which you want to rotate the object. Right click and select 'Rotate Selection'. Enter a number in degrees. Positive numbers are counterclockwise and negative numbers are clockwise. Your selection should now be rotated appropriately. Experiment a little bit with rotating stuff (remember that pressing CONTROL Z will undo the last thing you did) and then select all the objects in your world and make them only Solidand FullyBright, like we did last time. Process the world using the same settings as last time. (They should come up the same, unless you fiddled around with them at some point.)
Step 8: Play with new things
Test out your level! Remember that to acess a level, you need to move the newly created MyWorld.dat file to the c:\games\shogo\custom folder.
The WFG Shogo Level Building Tutorial:
Number 3, Light Your World!
by A Bouquet of Flowers
In this installment, we will make everything in your level look a little cooler by lighting it in various ways.
Step 1: The Light Object
Add a Light object at one end of your box a little ways from the end. Change the properties on your new light so that the radius (which is displayed as a circle in the viewing windows) is large enough to touch all of the walls at the end of your box in which you have put it. You can leave all other properties unchanged for this one, so that you can see what the default looks like.
Step 2: The DirLight Object
Add four DirLight objects at the other end of your box. Change the properties so that the InnerColor's are blue, red, green and yellow. Change the BrightScale property for all of these lights to 5.0. This will give a really saturate effect. Now, the hard part about a DirLight is making sure it is pointing in the right direction. To help figure out which direction the light is pointing, we have made the four very differently colored samples. We will adjust only the yaw on two of the lights, and only the pitch on the other two. Change the Rotation property of one light so that the yaw indicator points to the right. Do this by adjusting the yaw slider to 90 (degrees). Keep track of the direction each light is pointing so that when you look at them later you can try to make sense out of it. Change the other lights Rotation so that one has a yaw of 270, one has a pitch of 90 and one a pitch of 270.
Let's mess with a few of the other useful properties of a DirLight. The FOV (Field of View) property affects how wide the cone of light created by a DirLight will be. Change the FOV property of one light to 45 and another to 180. Now set the Radius property so that the new lights touch the walls.
Step 3: The GlobalDirLight object
Place a GlobalDirlight off to the side of your box. It should be located so that if one drew a line from it to the center of your box, the line would not come very near the other lights you have already placed. (This will help you see what each of the different kinds of lights is doing.) Change the InnerColor to one that is different from any of the other colors akready used. Select the various Brush objects you placed in your box last time (or put some in now) and change the DirectionalLight property to True. (This makes it so the GlobalDirLight affects them.)
Step 4: Compile and test your level
Click on the root node to select everything and make sure the FullBright property is set to False. (Otherwise your lights won't really be noticeable.) Process your recently lit world, making sure that the Apply Lighting and Shadows options are turned on. Once you're running around in the world, try to examine all of the various lights you've placed and notice how they make things look.