Originally posted here: Planetshogo.com
Created by: The Joker®©™
Mirrored here for archival purposes
A Sky Tutorial
by The Joker®©™
This tutorial is included in the Level Editing Documentation also available for download here on PlanetShogo. We assume that you already know how to work with DEdit and know the basics of creating a level (like creating brushes and texturing them). If you don't, you should check out the less advanced and introductory tutorials first. We also assume you have the Shogo resources extracted and available in your project.
In this tutorial we're going to make a sky from scratch. This can be quite a pain if you don't know what to do, or how things work. First, we're going to make a small level to be able to test the sky. This will be just a simple platform closed in by 5 brushes which will function as the sky portals.
Here is what you need to do:
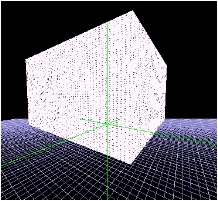
- Make a small platform (1 brush) and fill it with the texture "REDTERRAIN7" located in the "TEXTURES\LAYOUTS\3)TERRAIN_OUTDOORS" directory. In the Properties Tab, set "Solid", "Gouraudshade" and "Lightmap" to TRUE.
- Box in the platform with 5 brushes. All 5 brushes must have only the "Solid" and the "Portal" property set to TRUE. You can texture these brushes with texture "SKY" in the "TEXTURES" directory, so that you'll know that those are the sky portals.
- Add a Light in the middle and above the platform, and make sure its Radius is big enough to cover the whole platform. Set the LightColor to RGB (128, 128, 255), and the OuterColor to black.
- Add a GameStartPoint object somewhere on the platform, and set the "PlayerMode" property to 2, and the "GameType" property to 0.
- Add a WorldProperties object. Set the "EnableFog" and "SkyFog" properties to TRUE. Set "FogColor" to black.
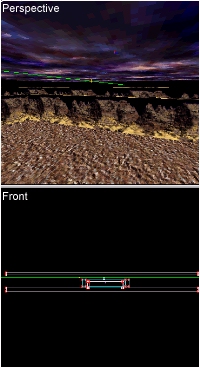
Now on to the fun part. You'll have to create your sky far outside your level, and better, below your level so that it cannot be seen through the ground of your level. The best way to start is with a brush, which will be the ground. Then, make the surroundings (mountains etc. etc.) and after that, add the sky (clouds, stars etc.) and apply lighting where you want it.
- Make a brush which will be the ground. Fill it with texture "REDTERRAIN7" located in the "TEXTURES\LAYOUTS\3)TERRAIN_OUTDOORS" directory in the Textures Tab. Set only the "Solid", "Gouraudshade" and "LightMap" properties to TRUE. Select the brush, and then select "Bind to object" from the context menu, after right-clicking on it. From the object list that appears, select "Door". A Door object will be created with the brush attached to it. After that, select the Door object and change it's name to "Ground" both in the Node Tab, and in the Properties Tab. Also select the brush which will function as the ground, and make sure its name is also set to "Ground" in the Properties Tab. Now you'll have to add a sky pointer object which points to the ground object. Choose "Add Object..." from the "World" submenu and add a DemoSkyWorld object. Select the DemoSkyWorld object after adding it, and also set its name to "Ground". In Node view you could name it "GroundSkyWorld". Set the "Index" property to 0.
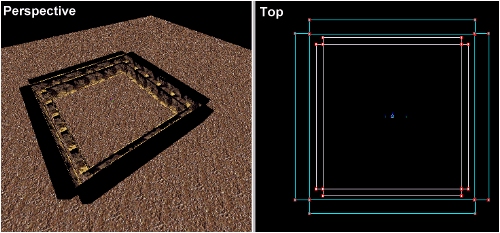
- Make the surroundings by adding 8 brushes on top of the ground forming a box (see picture). Note that the 4 brushes in the back are a bit higher than the other 4 in the middle. Fill them with the "MINTERR2" texture located in the "TEXTURES\ LAYOUTS\ MINOTAUR" directory and make sure the textures align properly by setting texture coordinates (choose "Map Texture Coordinates from the context menu to do this while having a brush selected). Also change the names of all 8 brushes to "Mountains" in the Property Tab. Select one of the 8 brushes, and bind it to a Door object like you did with the Ground brush. When the Door object is created, change its name to "Mountains" in the Property Tab, and also in Node view. In Node view, you'll see that there is one brush attached to this Door object. Bind the other seven brushes to this Door object, by dragging and dropping them on the Door object in Node view. Now you'll have to create a DemoSkyWorld object. After you've created it, change its name to "MountainsSkyWorld" in Node view and to "Mountains" in the Property Tab. Set the "Index" property to 6 (set highest number compared to other DemoSkyWorld objects because we want the Mountains to be rendered last).
- Add the clouds by making a brush, the same size as the ground brush, and place it above the ground and the mountains, but make sure the space between the mountains and the sky brush is not too big. Fill this brush with texture "SKY15" in the "TEXTURES\SKY" directory in the Textures Tab. While the brush is still selected, go to the Properties Tab, and change its name to "Clouds". Set only the "Translucent" and "Fullybright" properties to TRUE. In the "Effect" editing field type "Pan", and in the "EffectParam" editing field type "32 32". This effect will make the texture move and it will look like the clouds are moving. The "EffectParam" property sets the speed. Right click on the brush in Top View window, and select "Map Texture Coordinates" from the context menu. Set both "U scale" and "V scale" to 256 and all other properties to 0. This will double the size of the texture on the brush, and you'll have bigger clouds...Just like with all other sky objects, you'll now have to bind this brush to a Door object (just like with the Ground brush). After doing so, select the Door object and change its name to "Clouds" in both the Node view and the Property Tab. Finally you'll also have to add a DemoSkyWorld object that points to the Clouds object. Make sure the green marker is in the middle of the Mountains, and then choose "Add Object.." from the "World" sub-menu. Select DemoSkyWorld from the classlist, and add it to your world. Select the DemoSkyWorld object you just added, and change its name to "CloudsSkyWorld" in Node view, and to "Clouds" in the Properties Tab. Set the "Index" property to 3.
- Add the stars just like you've added the clouds. Make the brush the same size as the clouds brush, and put it above the clouds brush with a small space between the two brushes. Name this brush to "Stars", and also name the Door object you bind to it to "Stars" in both the Node view, and Property Tab. Make sure only the "FullyBright" and "FlatShade" properties of the stars brush are set to TRUE. Texture this brush with the "STARZ2" texture in the "TEXTURES\SKY" directory. Then add a DemoSkyWorld object for the stars object, and set its name to "Stars" in the Properties Tab so that it points to the Stars door object. Set the "Index" property to 1.
- In the same way you can add other objects to the sky like a moon etc. etc. What you need to do is add a brush, texture it, bind it to a Door object, set the names correctly, and then add a DemoSkyWorld object that points to your Door object. You'll also have to specify a unique Index value, depending on how you want the engine to render you object. Objects that should get rendered first, should have a lower Index value. In our example, the Ground would get rendered first, followed by the Stars, the Clouds and the Mountains. It is easy to understand that objects which are behind other objects should get rendered first.
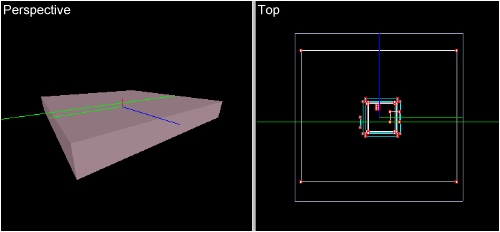
- When you're all done with adding objects, select the DemoSkyWorld object that points to the Mountains (MoutainsSkyWorld). Go to the Properties Tab, and specify the SkyDims. You'll have to set the values so that all your sky objects are closed in one box. In this example, the values 2000, 256, 2000 should do it. Note that the MountainsSkyWorld object should be in the middle of all the other sky world objects, so that everything will fit exactly in the middle of the box. The InnerPercentX, InnerPercentY and InnerPercentZ values determine how far away the sky is being rendered from your level. You can play with these values to set the distance as you like it. In this example, the values should be set to 0.100, 0.300, 0.100.
IMPORTANT: Only one DemoSkyWorld object in your world should have the SkyDims and the InnerPercent properties set.Finally, you can also put a Light in the middle of the Mountains, Ground and Clouds and set its LightColor to RGB (128, 128, 255) and its OuterColor to black. Set the LightRadius to 900. -
Now you're all set. Process the world, copy the .dat file to the Shogo Custom directory, start Shogo and run your world.