
Tutorial originally posted on Massassi.net. Mirrored here for archival purposes. The tutorial makes references to a sample file I've also mirrored here. Moddb.com
Terrain
This tutorial will demonstrate how to use the incredibly easy terrain brush system in the Serious Editor. Before attempting this tutorial, you should be familiar with all the concepts in the basic mapping tutorial. First off, some theory.
When we talk about "terrain," we mean mountains, rolling hills, valleys, etc. In Serious Sam, these terrain brushes were generally used as boundaries for levels, but there were also a couple maps that had you fight your way through a valley.
The Serious Editor doesn't force you to create these complex brushes by hand. The idea is that you create an image in any image editing program. This image must be 8bit grayscale. You use your image editing program to create what is called a "heightmap" - A heightmap is simply a black, white, and various shades of grey drawing of what you want your terrain to look like. Solid black is the lowest you can go, and solid white is the highest. So any shade of grey in between will be judged based on how close it is to black or white. It must be in .tga or .pcx format.
Don't worry about creating one right now - this tutorial isn't on how to create the images. This tutorial covers what to do once you have the image. To speed things along, please download this samples file(87KB) which contains various heightmaps that you can use to fool around with. The samples file is courtesy of Aglar.
Once you have downloaded the samples file, you will need to unzip it (try Winzip) to your Serious Sam directory.
Now to create our first "room" brush. For this tutorial, please use the following dimensions. Width = 128, Length = 128, Height = 128, Base vtx = 4. Add the room brush to the world. This should give you a fairly good sized area in which to play around.
Now, it's time to add the terrain brush. This is done with the terrain primitive button ( ). When you click it, you will be presented with a window similar to the following. Each of the boxes are explained below.
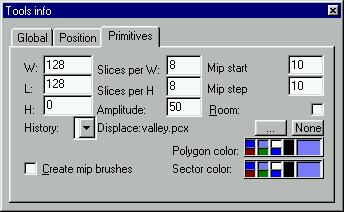

So now, simply fill in the values I have so your map will match the tutorial map. Select the "valley.pcx" file for the displacement. Since the position window isn't shown, just make sure it's at 0,0,0. Here it is again so you don't have to scroll back up.
Once you have typed in all the values (and pressed [Enter] to make it show up), you should see a nice valley running down the center of your room brush. You should also now select a texture. Terrain brushes handle textures differently than normal brushes, so you should always texture your terrain brush initially when you create it. You can select any natural texture from the list, and the texture will be spread out and aligned over all the surfaces. Later, you can change the texture, but if you change the stretch values, the textures will no longer line up.
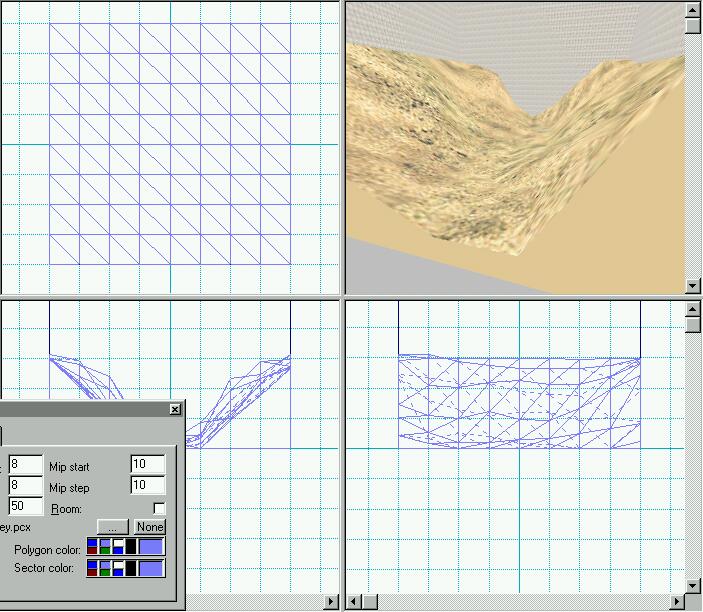
Before you actually add it to the world, experiment some. Change the slice values and watch what happens to the number of polygons. Try some of the other sample heightmaps. Experiment with the amplitude so you can see what values produce what effects.
So now, it's time to actually add it to the world. I would recommend actually adding it to the worldbase of your original room. I tried layering it numerous times, and when I did that, the whole brush would disappear from view depending on what angle I was looking at it. This happened in the editor and in the actual game.
The final step is making sure all your polygons are optimized. This is done by switching to polygon mode and double-clicking on a surface of your terrain brush. This will select all the polygons that make up the brush. Now, right-click and select the "join all possible polygons" option. This will merge together any surfaces that don't need to be clipped into such small triangles.
Honestly, that's about all there is to know about terrain brushes in Serious Sam. I have talked with a couple of people about what they use to generate their heightmaps, and they pointed out a program called Terragen. Terragen is a program that allows you to create heightmaps easily. It does a lot more than that (renders images and animations), but the other functionality doesn't really apply to Serious Sam.
As always, if you have any problems with any of the tutorials, feel free to ask questions on our forums.
- Brian


Thank you. This is very useful to me.
You're welcome. I'm glad you found it useful
But how i can use R? My terrain is a Polygon :/