Sector Splitting Tutorial
So, you want to split your sectors and see what you can do with them huh? Well, you should have a good enough understanding of the Serious Editor to create primitives, and change sector settings first, so if you haven't already, I strongly suggest you read the beginners tutorial.
I would like to start out by stating that splitting sectors has many uses, and the concepts that you will learn in this tutorial can be applied to various other techniques. I will only cover a few of the neat things you can do with splitting sectors in this tutorial. The rest is up to you.
In this tutorial we will be covering the following:
- How to split a sector using the "split sector" tool
- How to select invisible polygons
- Seamlessly applying textures to primitives containing multiple surfaces.
- Creating a sphere of water
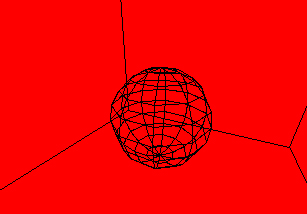
So, lets start out by introducing you to the "Split Sector" tool ![]() . This handy little bugger allows you to cut a sector into two separate parts by using a primitive to define a shape. In other words, it's basically a cookie cutter for your sectors. You can check out how the tool works by creating a room, dimensions 50x50x50, and adding it to the world base. Now create a sphere, and when you get the settings you desire, don't add it to the worldbase, but instead, press your "Split Sector" tool (make sure you have the same layer of what you're splitting selected). Don't worry about checking your "room" flag on the primitive, as both room and non room produce the same effect when splitting your sector. Now that you've split your sector, you probably won't notice any change in your level, but, if you press the [2] button on your number pad (the pad of numbers to the right of your keyboard), then you'll be able to see the new sector that was created. So you may be thinking to yourself, "Hm, that was fun, but what good does that do me?", so lets take a look at what we can do with this invisible sector.
. This handy little bugger allows you to cut a sector into two separate parts by using a primitive to define a shape. In other words, it's basically a cookie cutter for your sectors. You can check out how the tool works by creating a room, dimensions 50x50x50, and adding it to the world base. Now create a sphere, and when you get the settings you desire, don't add it to the worldbase, but instead, press your "Split Sector" tool (make sure you have the same layer of what you're splitting selected). Don't worry about checking your "room" flag on the primitive, as both room and non room produce the same effect when splitting your sector. Now that you've split your sector, you probably won't notice any change in your level, but, if you press the [2] button on your number pad (the pad of numbers to the right of your keyboard), then you'll be able to see the new sector that was created. So you may be thinking to yourself, "Hm, that was fun, but what good does that do me?", so lets take a look at what we can do with this invisible sector.
If you've already pressed [2], you'll be able to see all the polygons that make up your sector. My map looks like this so far:
Now lets make those polygons viewable so you can actually see your sector in a polygon rendering mode. If you try clicking the polygons that your invisible sector make up, nothing will happen, and your click will end up reaching the wall directly behind what you clicked. That's because the editor doesn't recognize that you're trying to select those polygons (because they're invisible). So we have to make up for that. To select invisible polygons, simply hold down the [Shift] key, and right click the polygons you need. You may want to note that splitting a sector creates polygons both inside and out of the sector you cut out, so you can go inside of your cut out sector and select the polygons on the inside as well. Remember, [Shift] + [RMB] selects the invisible polygon that's closest to your view, so if you have invisible polygons in the way, it will select those ones, not what you're aiming for. After you select all of your invisible polygon, bring up the polygon properties dialog with [q]. Under the polygon tab, make sure that the translucent, portal, passable, and link boxes are checked. We're checking translucent so that we can create the effect of water in the next step (you can make the texture plain old solid by removing all of the flags completely). You'll notice that when you check those four boxes, your invisible polygons will no longer be invisible. Now that we can see your sector, lets do something fun with it.
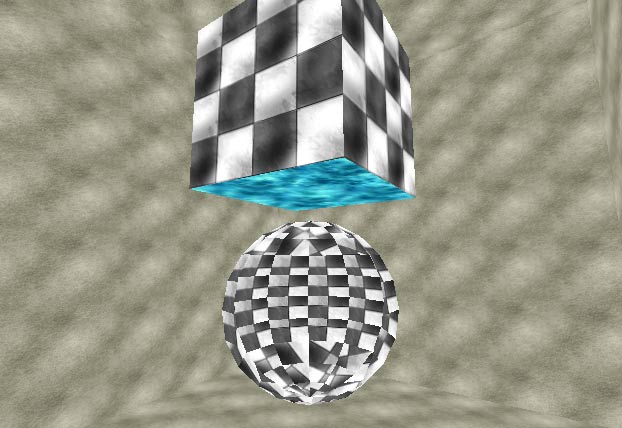
When I first got the idea to write this tutorial, I had discovered a way to create a floating ball of water in mid air, so that's what we're going to do first. You'll want to texture your ball of water, but if you haven't already noticed, SEd doesn't automatically stitch your textures so they fit seamlessly. To get a texture to match up over say, a sphere, simply create a new conus primitive (4 vertices), and give it the same dimensions as your sphere. Add it to its own layer, and then texture the polygon that's facing your sphere with the texture you desire. Your map should look like this:
Make the texture fit the way you want, and then press [Ctrl] + [C] to copy the texture, and [M] to copy the coordinates. Now double click a polygon on your sphere (to multi select all of the polygons) and press [Ctrl] + [V] to paste the texture, and [U]to match the coordinates. The final step is to delete the primitive you used for positioning the texture. This method of stitching also works well with terrain primitives. Now, reselect all of your sector's polygons (now you can simply double click one of them to multi select the rest because they're viewable), and under the texture tab, click your alpha bar (located directly left of your color bar) and drag your mouse to the left until the number that pops up reads about 90 (which I found to be a nice translucency for water). Make sure that for your texture blend mode, you have "blend" selected, otherwise the translucency won't be rendered correctly. Now your sphere should look like a ball of water floating in the air, but that's just looks. Now we have to actually make it water.
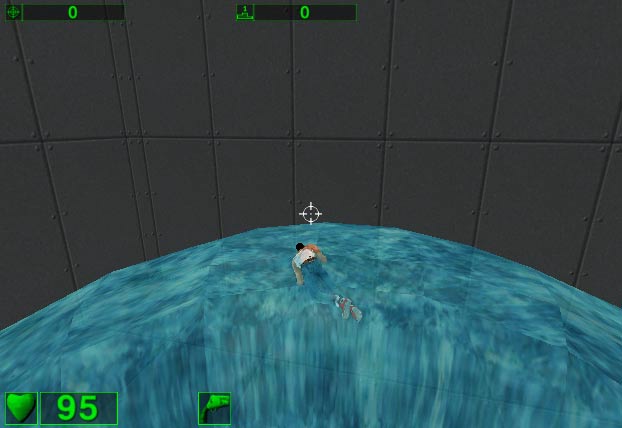
Select your sphere sector (you'll have to do some from the inside of your sector), and press [q] to bring up the sector properties dialog. Under your content tab, choose "water", and for environment, choose "underwater". Now you should be able to swim around in your sphere! Test out your map with [T] and check it out for yourself! If you position yourself directly under your sphere, you should now be able to jump straight up, and from there swim around (you have to position yourself correctly because SS has a little trouble with transition into a water sphere for some reason).
Now that we've covered making a water sphere, other ideas may have popped into your head, such as a sphere of gravity, or many other fun things to do. Just remember that your imagination is the limit on what you can do with this technique, so let your thoughts run wild!
-Hoard