Tutorial originally posted on Massassi.net. Mirrored here for archival purposes. I mirrored the example file here: Moddb.com
Multi-part Battles
Summary:
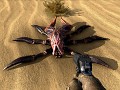
This tutorial covers several things necessary for mutiple part battles. A respawning rocket ammo spawns in a stream of 40 Kleers, killing them brings in yet more creatures. Each part of the tutorial builds on the previous. This tutorial assumes the user has basic knowledge of the editor, including creating simple rooms and placing and editing entities.
The following is a list of some important properties of items used:
Trigger
Count Use - if checked, then the trigger must be targeted "Count" of times before the trigger is fired
Count - number of times required before trigger fires
Count Reuse - if checked, count returns to Count and it can be triggered again, otherwise triggers only once
Count Tell - if checked, prints "X to go" messages
Wait - Once trigger is set to fire, waits this number of seconds before firing
Message - displays this message on the screen when the trigger is activated
Score - adds to score when trigger is hit
Enemy Spawner
Template Target - the enemy to spawn in, use template on target to get multiple copies
Patrol Target - enemies teleported in are given this target
Type - Simple: when triggered, waits "Single Delay", spawns "Group Size" enemies. If "Total Count" hasn't been reached, waits "Group Delay" and spawns another Group Size creatures, repeat until Total count reached
Triggered: Each time item is triggered, spawns in "Group Size" after "Single Delay", until "Total Count" is reached.
Enemy Marker
Blind, Deaf, Fly, Run To Marker - if True or False enemies are changed to this state, if Ignore they are left the same
Target - next place to go. Notice that the initial Patrol Target for the enemy is not used as a destination, I don't know why
Patrol Time - spend this much time at the marker, then go to next Patrol Area Inner, Outer - tries to keep within this range during patrol time
Basic geometry
The final layout looks something like this:
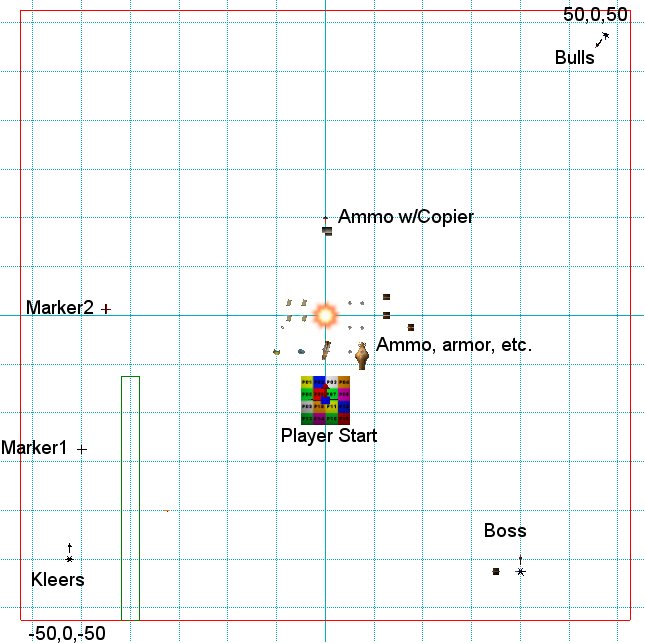
First, create a room using good ol' Conus primitive, 100x100x60 will be big enough. Place a low wall 3x40x10 at location -32,0,30 to make a small alcove. If you're lazy, just hit H for fullbright lighting. If not, you can light, texture, build skyboxes, etc. to your heart's content.
This tutorial mainly involves placing and editing lots of entities. To simplify, each entity and the appropriate properties to select are shown in order of placement. Each item starts with ROOM or HIDDEN. ROOM items should be placed near the center of the room unless coordinates are specified, HIDDEN items must be placed under the room where the player cannot see them, generally place them under the appropriate spawner or copier. If an entity is named, the name appears in parenthesis afterwards. Many properties refer to other entities, these are set in a separate list.
Part 1) Starting entities
Part 1) Starting entities
ROOM:
Player Start
Give Weap (Rocket launcher, both shotguns, chaingun, see Item by Item for more details)
Music Holder - holds level statistics and such
Weapon Item
Type: Rocket Launcher
Ammo Item (Rocket Pickups)
Type: Rockets
Trigger (Copier Trigger)
Copier - place high in air (Y > 10) over ammo item because copiers will telefrag the player, killing him instantly. You can use N to bring up a list of all entities and make sure these have the same X and Z values.
HIDDEN:
Ammo Item (Rocket Hidden Copy)
Type: Rockets
Now set the following properties for each item, remember the N key brings up a list you can select from:
Rocket Pickups
Target = Copier Trigger
Rocket Hidden Copy
Target = Copier Trigger
Copier
Target = Rocket Hidden Copy
Copier Trigger
Target1 = Copier
Wait = 5
Now test the level by pressing T. When you select the Rocket Pickups, the trigger will be tripped. In 5 seconds, the trigger fires the copier, which duplicates the Rocket Hidden Copy, including its target of the Copier Trigger. Each time you pickup, the process repeats. I've heard that you can make auto spawning items in Second Encounter, but haven't tried it personally. You can hit G to see arrows showing what triggers what, which will become very useful later.
Part 2) Enemy spawners
Now you have an endless supply of rockets, where's the challenge in that? So, lets complicate things a bit. Place the following entities:
ROOM:
Armor Item (these first items are just to make things a bit more fair)
Type = Strong (blue armor)
Ammo Item, say 6 of them
Type =Shells
Ammo Item, say 6 of them
Type = Bullets
Health Item, I put 4 of them
Type = Medium
Enemy Spawner (Kleer Spawner) - within alcove X-42 Y 0 Z 40
Group Size = 2
Total Count = 40
Group Delay = 3
Circle Outer = 10 (otherwise they sit on top of each other)
SpawnEffect= unchecked (otherwise the sound gets annoying)
Trigger (Grab Trigger)
HIDDEN:
Boneman (Kleer Template)
Template: checked
Blind: checked
And now set the following properties, note that some are changed from the earlier values:
Rocket Pickups
Target = Grab Trigger
Rocket Hidden Copy
Target = Grab Trigger
Grab Trigger
Target1 = Copier Trigger
Target2 = Kleer Spawner
Kleer Spawner
Template Target = Kleer Template
Now, when you pickup the rockets, a stream of 40 Kleers, 2 at a time are created on the other side of the wall. These Kleers are blind and not much of a threat, yet. The act of picking up the rockets requires two actions, since an item only gets one target, we needed to make a chain of triggers, thus the Grab Trigger added in. Lets make the enemies a bit more of a challenge.
Part 3) Enemy patrol
This next part involves creation of enemy markers. These can be created automatically by moving the enemy to a location and pressing D. Every time D is pressed, another marker is dropped and they're automatically chained together. For this tutorial, I'm creating each marker seperately, which makes it easier to explain what is going on. Once you're comfortable with them, use the D method.
ROOM
Enemy Marker (Marker1) - place near spawner
Enemy Marker (Marker2) - place past the wall where it is visible to the entire room
Blind = false
Run To Marker = true
Marker1
Target = Marker2
And set the following properties
Kleer Spawner
Patrol Target = Marker1
Player Marker
Give Weap (everything, you'll need it)
Now when the enemies spawn, they run directly to marker2 at which time they cease to be blind, which means they'll attack. Use your rockets wisely! Also note that they run towards Marker2, I have no idea why this should happen.
Part 4) The big guns
In Serious Sam, there are many multi part encounters where more enemies spawn in as the first ones die, lets add some of that action.
ROOM
Enemy Spawner (Boss Spawner) (X=32 Y=0 Z = 42)
Trigger (Boss Trigger)
Count = 40
Count Use= checked
HIDDEN
Beast (Hidden Boss)
Character = Big
Boss = checked
Template = checked
Now set the following properties
Boss Spawner
Template Target = Hidden Boss
Boneman Template
Death Target = Boss Trigger
Boss Trigger
Target1 = Boss Spawner
Message = Here come's the big one
The Boss Trigger simply counts the number of times it has been triggered. Each Kleer death will trigger it once, when the count reaches 40, a Reptiloid Highlander is brought in, which will probably kill you. If you like, you can tone him down a bit or add some more ammo.
Part 5) Total Chaos
The boss is teleported in after everything else is dead, where's the fun in that?
Lets add a werebull that gets added every 8 kleer deaths and bring the boss in a little earlier. We will need a lot more ammo.
ROOM
Ammo Pack = customize as you see fit
Enemy Spawner (Bull Spawner) - (X =44 Y=0 Z =-45), rotate to point into room by pressing both mouse buttons and moving
Trigger (Kleer Death Trigger)
Count = 8
Count Use = checked
Count Reuse = checked
HIDDEN
Werebull (Bull Template)
Template = checked
Now set the following properties
Bull Spawner
Template Target = Bull Template
Type = Triggered
Total Count = 5
Boss Trigger
Count = 3
Count Use = checked
Boneman Template
Death Target = Kleer Death Trigger
Kleer Death Trigger
Target1 = Bull Spawner
Target2 = Boss Trigger
Now, everytime the Kleer die, the Kleer Death Trigger fires. This trigger counts to 8 and then fires the target triggers and resets the count. The bull spawner launches a bull. Notice that the bull spawner is set to type Triggered, this means it will spawn only one group (of one) per trigger. The Boss trigger has a count set to 3, so it will fire at 8 * 3 = 24 Kleer deaths.
This should be enough mayhem for just about anybody.
I had some trouble getting multiple counts to work reliably, this was because there was a Wait on the Kleer Death Trigger. Don't put one there or it apparently can't keep the counts on the sub-triggers correctly. Also note, that an alternate arrangement would have the Kleer Death Trigger not count, and have a Bull Trigger which counts to 8 and a Boss Trigger that counts to 24.
I have included the level built with these instructions. It can be found here
This concludes the tutorial, but you can use these ideas to keep going and going. Perhaps the death of all the bulls could release a rain of frogs, just add another trigger as death target, set the count to 5 and go. This could go on forever, as some of the second encounter levels seem to prove. Triggers can also be used to open doors, change the music, or start effects (rain, etc.), just chain them together.
I hope this was useful to you, drop me an email if you have any comments.
-Kallisti