Tutorial originally posted to Massassi.net. Mirrored here for archival purposes
Hello Serious WLD
(making a minimal Serious world that can be selected and played from within the Serious game itself)
Intro
When teaching or learning a programming language, the creation of a minimal "Hello world" program (which simply runs, displays or prints a "Hello world" message and quits) is often employed, as a means of demonstrating and providing familiarity with the basic steps and tools needed to get a program created and working. This provides the foundation upon which subsequent lessons and exercises in programming can build.
This tutorial is intended to do the same for someone wishing to learn to create worlds (.WLD files, commonly referred to as maps or levels) in Serious Sam. It discusses how to prepare Serious for editing, create a minimal world and make that world available for play in the game itself. Creation of more than minimal worlds is left as an exercise for the student (see references to tutorials on this, at the end of this document).
NOTE:
Serious Sam: First Encounter is normally located in
C:\Program Files\Croteam\Serious Sam
Serious Sam: Second Encounter is normally located in
C:\Program Files\Croteam\Serious Sam - The Second Encounter
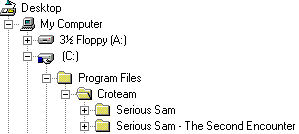
First Encounter's location will be employed in this document. Substitute Second Encounter's location if you are working with it.
Preparing Serious For Editing (first time only)
First, we need the tools (editor and modeler).
If installing Serious from scratch, when the installation autostarts (or when you manually run setup.exe from the Serious CD-ROM), select "Install"... then a bit later in the process, select "4 - Full installation" (rather than "3 - Typical).
If Serious is already installed, but you did only a "3 - Typical" install, manually run setup.exe from the Serious CD-ROM, select "Install", then "Modify", then make sure the "Serious Tools" box is checked and proceed.
Second, we need the entities, textures, sounds, etc., which are normally left in compressed .GRO files, available in uncompressed form for use in the editor. .GRO files are .ZIP files, that have been renamed to .GRO, that contain virtual directories of materials used by the game. Those materials are equally useable by the game whether located within the .GRO files (which the game knows how to read) or uncompressed and distributed throughout the C:\Program Files\Croteam\Serious Sam subdirectories (as they must be in order to be useable in the editor).
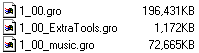
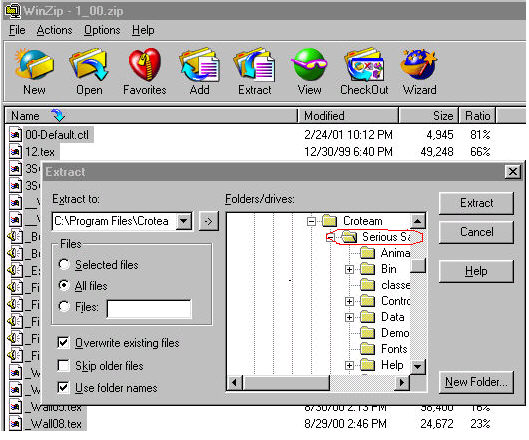
Locate the .GRO files in the C:\Program Files\Croteam\Serious Sam directory and rename (or copy) them (change their file types) to .ZIP. (1_00.GRO becomes 1_00.ZIP, 1_00_ExtraTools.GRO becomes 1_00_ExtraTools.ZIP, 1_00_music.GRO becomes 1_00_music.ZIP.) Do this also for any patch related .GRO files that are present.
Note: If disk space is tight, you might consider not doing this to the 1_00_music.GRO file, as you won't immediately have a need for its contents while learning some of the basics of editing.
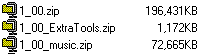
Using WinZip (or your favorite robust Zip utility (WinRAR comes highly recommended)), with the "use folder names" option selected, extract the contents of each of those .ZIP files to the C:\Program Files\Croteam\Serious Sam directory and subdirectories. (Using WinZip, I accomplish this by double clicking on a .ZIP file to open it up, doing Action | Select All to select all of the contents, then doing Action | Extract, making sure that "use folder names" option is selected (checked), making sure that C:\Program Files\Croteam\Serious Sam is specified as the "extract to" directory and then clicking Extract.)
Note: The "use folder names" option (or equivalent in your favorite robust Zip utility) assures that the contents of the .GRO/.ZIP file get extracted into the appropriate subdirectories.
If disk space is tight, you may wish to delete these .ZIP files, now that you have their contents extracted and available for use in the editor.
Creating A Minimal Serious World
Start the Serious Editor, from the Windows Start menu, by selecting Start | Programs | Serious Sam | Extras | Serious Editor. Depending on the speed of your PC, it may take a while to load.
When Serious Editor is loaded, it will appear much as any other Windows application appears when first loaded: a menu, toolbars, empty views, status bar, etc.
Start a new world, by doing File | New. You will be presented with four views: perspective (upper right hand corner), right (lower right hand corner), front (lower left hand corner), top (upper left hand corner).
Establish the new world's file name, via File | Save As and save it as HelloSeriousWorld.wld in the C:\Program Files\Croteam\Serious Sam\Worlds subdirectory.
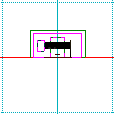
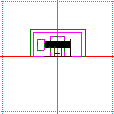
At this point, the new world is potentially either all solid or all empty, depending upon the first primitive you apply to it. Generally, that first primitive should be a very large cube (conus) "room" that carves out sufficient outdoor space to hold the entire world that you will be creating. The room's floor will serve as the ground. The room's walls and ceiling will eventually be assigned a polygon property of "portal" and used with a background (skybox) to display the sky.
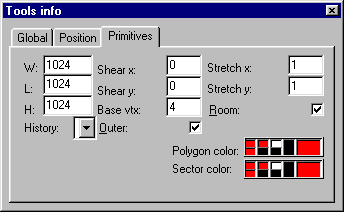
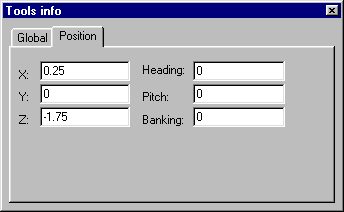
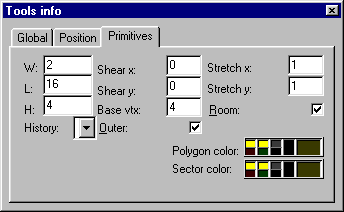
Carve this very large "room"; by clicking the Create Conus Primitive button ![]() , clicking the Primitives tab in the Tools info window, setting width length and height (W L H) all to 1024 and checking (clicking) the "Room" box, then clicking the Position tab in the Tools info window and setting X Y and Z all to 0, then clicking the Add button
, clicking the Primitives tab in the Tools info window, setting width length and height (W L H) all to 1024 and checking (clicking) the "Room" box, then clicking the Position tab in the Tools info window and setting X Y and Z all to 0, then clicking the Add button ![]()
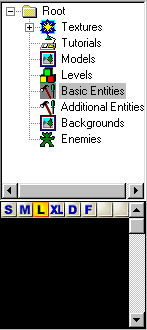
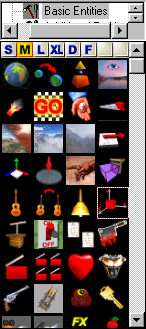
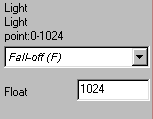
Add a temporary work light ![]() to the world by clicking on the Virtual Tree, double clicking on Basic Entities, dragging and dropping a Light into the world, hitting "Q" to bring up its Tools info, clicking the Position tab, settings X to 0, Y to 512 and Z to 0, closing the Tools info window, then clicking the Light's drop down property list (upper left hand corner or screen), selecting and setting Fall-off to 1024, selecting and setting Hot-spot to 1024, selecting and setting Type to Ambient and selecting and setting Name to "Temporary work light". Note that this light's range and ambient type will result in it lighting everything in the world, whether outdoors or indoors...which is useful for early stages of construction...but which you will eventually need to remove or change, once you start working on properly lighting your level.
to the world by clicking on the Virtual Tree, double clicking on Basic Entities, dragging and dropping a Light into the world, hitting "Q" to bring up its Tools info, clicking the Position tab, settings X to 0, Y to 512 and Z to 0, closing the Tools info window, then clicking the Light's drop down property list (upper left hand corner or screen), selecting and setting Fall-off to 1024, selecting and setting Hot-spot to 1024, selecting and setting Type to Ambient and selecting and setting Name to "Temporary work light". Note that this light's range and ambient type will result in it lighting everything in the world, whether outdoors or indoors...which is useful for early stages of construction...but which you will eventually need to remove or change, once you start working on properly lighting your level.
Drag and drop a PlayerMarker ![]()
from the Virtual Tree into the world. Hit "Q"; to bring up its Tools info, click the Position tab, set X Y and Z all to 0.
To try out the world that you have just created, hit "T" and the world will load and run in the perspective view. Not a lot to see, but you can move around and fire. Hit the Esc key to exit testing and return to editing.
Let's prepare the world so that it can be played from within the Serious game itself.
Click the World Settings ![]() (globe) button. Type "Hello Serious World" into the Level name field, click the E N H X S C D spawn flag check boxes and click OK. Those letters stand for Easy, Normal, Hard, extreme (Serious), SinglePlayer, Coop, Deathmatch.
(globe) button. Type "Hello Serious World" into the Level name field, click the E N H X S C D spawn flag check boxes and click OK. Those letters stand for Easy, Normal, Hard, extreme (Serious), SinglePlayer, Coop, Deathmatch.

Create/save the thumbnail image file (.tbn) via File | Save Thumbnail.
Save the world file (.wld), via File | Save.
Exit the editor.
Using My Computer or Windows Explorer, go to the C:\Program Files\Croteam\Serious Sam\Worlds subdirectory.
Create an identically named "visited" file (.vis), named HelloSeriousWorld.vis
(This is the mechanism that Serious uses to determine what levels can be seen This can be done by copying some other small file to that name or by creating a file of that name as an empty text file. The .vis file's presence is important, its contents are not.
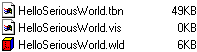
Select the three HelloSeriousWorld files (.wld, .tbn, .vis). Copy them. Move to the C:\Program Files\Croteam\Serious Sam\Levels subdirectory (or better yet, to some existing or new subdirectory within the Levels subdirectory) and paste the files there.
Play The World In The Game
Start Serious Sam.
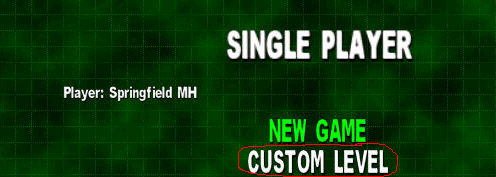
Start the custom world that we have just created via Single Player | Custom Level and selecting HelloSeriousWorld.

Yeah, But I Need To Know A Lot More About Editing Serious Worlds!
Remember, this tutorial's purpose was just to provide you the minimum necessary for you to be able to create and save a Serious world that can be played from within the Serious game itself.
Check out the Basic Mapping Tutorial tutorial on Serious Editing and the room building tutorial in the Serious Editor's own help. Mapping forums and additional tutorials are available on Seriously! and Serious Editing.
-Michael Harris
Hello Serious WLD 2
(making a minimal building having a door, window, rooms and hallway (corridor))
Prerequisite
This tutorial assumes that you are familiar with the material covered in the first Hello Serious WLD tutorial, which covered making a minimal Serious world that can be selected and played from within the Serious game itself.
More specifically, it assumes the use of the HelloSeriousWorld.wld world file that you create during that tutorial (a world consisting of an added 1024x1024x1024 conus CSG "room" that is located at 0,0,0, with a temporary work light (type: ambient, hotspot and falloff: 1024, located at 0,512,0) that allows viewing the world, and with a playermarker located at 0,0,0, with an orientation of 0,0,0).
Intro
The 1024x1024x1024 room discussed above serves as the outdoors play area for this world. Its floor serves as the ground on which the player and enemies will run around and on which building(s) will be placed. Its walls and ceiling will eventually serve as portals through which a view of the sky textures and directional "sun" light of a background (skybox) will be provided by the background's backgroundviewer.
Note: In the following, positioning of pending conus CSG primitives is accomplished via typing in coordinates. It is also possible to accomplish positioning by hovering the mouse over the pending primitive, and using Ctrl+LeftMouseButton to drag/move them.
Let's Get Started
File | Open the HelloSeriousWorld.wld file from where you stored it earlier (presumably somewhere within the Worlds subdirectory).
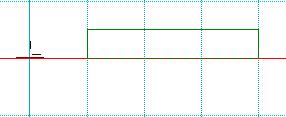
Add a Building
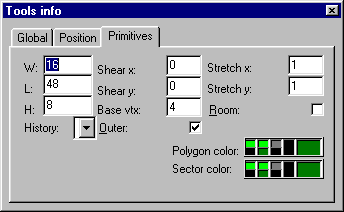
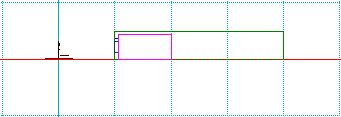
Add a solid rectangular building, on the ground (the floor of the large room), by clicking the Create Conus Primitive button ![]() setting the dimensions to W 16 L 48 H 8, unchecking the Room checkbox (so that it is empty), clicking the Position tab, setting the location to X 0 Y 0 Z -40 and orientation to 0 0 0, and clicking the Add button
setting the dimensions to W 16 L 48 H 8, unchecking the Room checkbox (so that it is empty), clicking the Position tab, setting the location to X 0 Y 0 Z -40 and orientation to 0 0 0, and clicking the Add button ![]()

This results in:
Top View
front view
Side View
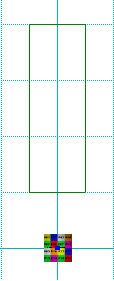
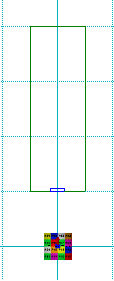
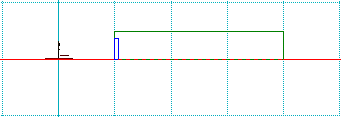
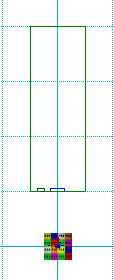
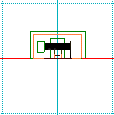
Add a Door
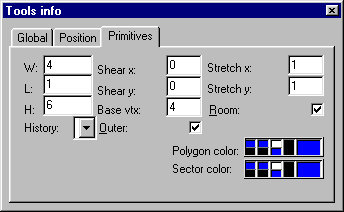
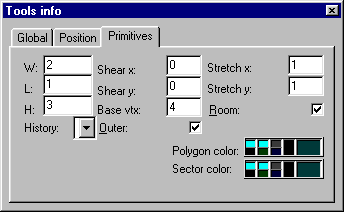
Add an empty rectangular door to the building, with its bottom flush with the ground and the bottom of the building, in the building wall facing the PlayerMarker, by clicking the Create Conus Primitive button ![]() setting the dimensions to W 4 L 1 H 6, checking the Room checkbox (so that it is filled), clicking the Position tab, setting the location to X 0 Y 0 Z -16.5 and orientation to 0 0 0, and clicking the Add button
setting the dimensions to W 4 L 1 H 6, checking the Room checkbox (so that it is filled), clicking the Position tab, setting the location to X 0 Y 0 Z -16.5 and orientation to 0 0 0, and clicking the Add button ![]()
This results in:
Top View
front view

Side View
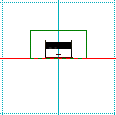
Add a Window
Add an empty rectangular window to the building, to the left of the door, in the building wall facing the PlayerMarker, by clicking the Create Conus Primitive button ![]() , setting the dimensions to W 2 L 1 H 3, checking the Room checkbox (so that it is filled), clicking the Position tab, setting the location to X -5 Y 2 Z -16.5 and orientation to 0 0 0, and clicking the Add button
, setting the dimensions to W 2 L 1 H 3, checking the Room checkbox (so that it is filled), clicking the Position tab, setting the location to X -5 Y 2 Z -16.5 and orientation to 0 0 0, and clicking the Add button ![]()
This results in:
Top View
front view
Side View
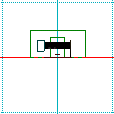
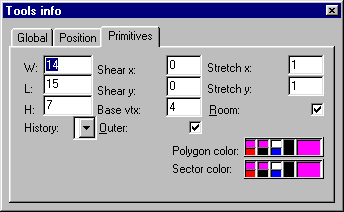
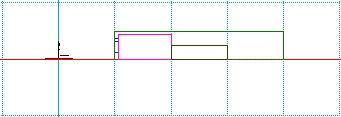
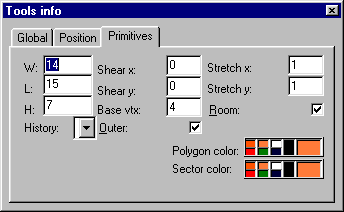
Add a Room
Add an empty rectangular room to the building, immediately inside the door, in the end of the building nearest the PlayerMarker, by clicking the Create Conus Primitive button![]() , setting the dimensions to W 14 L 15 H 7, checking the Room checkbox (so that it is filled), clicking the Position tab, setting the location to X 0 Y 0 Z -24.5 and orientation to 0 0 0, and clicking the Add button
, setting the dimensions to W 14 L 15 H 7, checking the Room checkbox (so that it is filled), clicking the Position tab, setting the location to X 0 Y 0 Z -24.5 and orientation to 0 0 0, and clicking the Add button ![]()
This results in:
Top View
front view
Side View
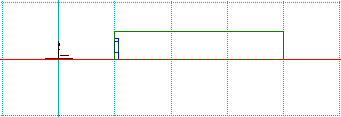
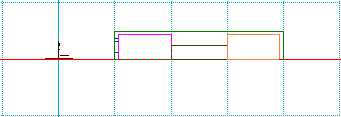
Add A Hallway (Corridor)
Add an empty rectangular hallway (corridor) to the building, leading from the first room to where the second room will be, by clicking the Create Conus Primitive button ![]() , setting the dimensions to W 2 L 16 H 4, checking the Room checkbox (so that it is filled), clicking the Position tab, setting the location to X 0 Y 0 Z -40 and orientation to 0 0 0, and clicking the Add button
, setting the dimensions to W 2 L 16 H 4, checking the Room checkbox (so that it is filled), clicking the Position tab, setting the location to X 0 Y 0 Z -40 and orientation to 0 0 0, and clicking the Add button ![]()
This results in:
Top View

front view
Side View
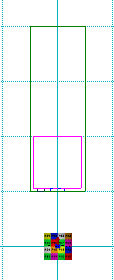
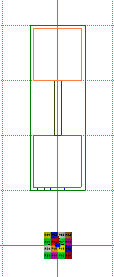
Add Another Room
Add an empty rectangular hallway to the building, immediately after the hallway (corridor), in the end of the building farthest from the PlayerMarker, by clicking the Create Conus Primitive button ![]() setting the dimensions to W 14 L 15 H 7, checking the Room checkbox (so that it is filled), clicking the Position tab, setting the location to X 0 Y 0 Z -55.5 and orientation to 0 0 0, and clicking the Add button
setting the dimensions to W 14 L 15 H 7, checking the Room checkbox (so that it is filled), clicking the Position tab, setting the location to X 0 Y 0 Z -55.5 and orientation to 0 0 0, and clicking the Add button ![]()
This results in:
Top View
front view
Side View
NOTE: Once the building itself is added, the rest (door, window, rooms, hallway) can be added in any sequence.
Update The Thumbnail And Save The World
Update the thumbnail image file (.tbn) for the world, via File | Save Thumbnail. Save the world file (.wld), via File | Save.
Test The World
Hit "T" to test. When finished, hit Esc to exit testing.
Play The World In The Game
Copy the HelloSeriousWorld .wld, .tbn and .vis file to the Levels directory (or some subdirectory within it).
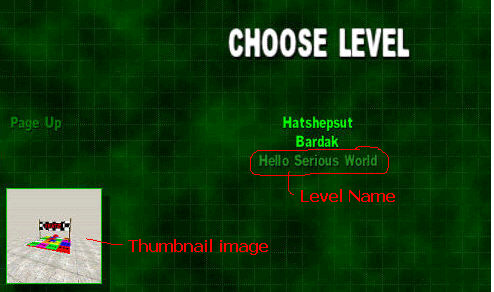
Start the game and play the world via Single Player | Custom Level | Hello Serious World.
But It Looks All Yucky!
If you have done these two tutorials exactly as written, all surfaces in the world have the same texture...... and the lighting is monotone in nature, with no shadows, etc. And there is no sky and sun. (And if you are editing on an old and/or 16 bit card, like me, you may be seeing some weird colors.)

You could hit "P" for polygon mode and then select various surfaces (ground, building walls, etc.) and assign them various ground and building-like textures. And you could resize textures.
You could hit "E" for entity mode, select the light and change its type (to "point") and hotspot value to 256 to obtain some crude shadowed lighting. And you could employ multiple lights, etc.
You could add a sky and sun by dragging and dropping a background (skybox) from the virtual tree's Background category/folder to the world, positioning it (via Ctrl+LeftMouseButton dragging or via hitting "Q" and using the Position tab) TO A LOCATION OUTSIDE OF (A DISTANCE AWAY FROM) THE LARGE OUTDOOR/PLAY AREA ROOM, setting its location to X -768 Y 1264 Z 768 with an orientation of 0 0 0, and hitting the Add button.......then hitting "P" to switch to polygon mode, selecting the large outdoor/play area room's walls and ceiling polygons, hitting "Q" for Tools Info, selecting the Polygon tab, then clicking the Portal checkbox (so that it contains a checkmark). TO SEE THE RESULT, YOU WILL NEED TO HIT "6" ON THE NUMERIC KEYPAD, THEN HIT "T" TO GO INTO TESTING. (This works in First Encounter (patched to 1.05) and Second Encounter.) When done testing, hit Esc to exit testing, then hit "0" on the numeric pad to return to the normal editing views.
To see the world to its best effect, save it, copy it, etc. and go play it in the game.
Yeah, But It Still Looks Yucky And I Still Need To Know A Lot More About Editing Serious Worlds!
Remember, this tutorial's purpose was just to provide you the minimum necessary for you to be able to add a building with a door, window, two rooms and a connecting hallway.
Check out the Basic Mapping Tutorial tutorial on Serious Editing and the room building tutorial in the Serious Editor's own help. Mapping forums and additional tutorials are available on Seriously! and Serious Editing.
-Michael Harris