Tutorial originally posted on Massassi.net. Mirrored here for archival purposes
Doors Tutorial
So you want to make doors? Well that's what this tutorial is for. We'll be making a door with two actual doors that "split apart". Before attempting this tutorial, you should be familiar with movement, adding CSG's, and dealing with entities.
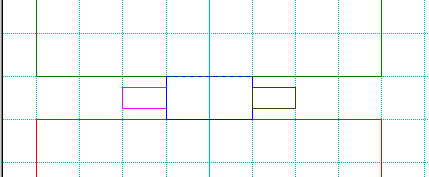
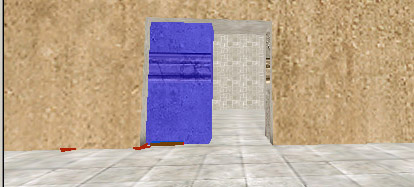
To start out, create a 16x16x16 conus primitive ( preferably place it on grid lines, its just easier that way, as well as cleaner ). Now create another 16x16x16 primitive, and then move it so it is exactly lined up with one of the first primitives sidewalls, THEN MOVE IT 2 grid squares away, then add it to the main worldbase entity. Now create a third conus primitive, 4w x 2l x 4h, and place it in between the first two, on the floor level. As they say, a picture is a thousand words, so here's my layout so far.
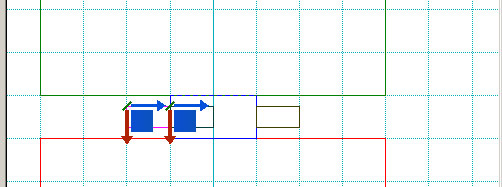
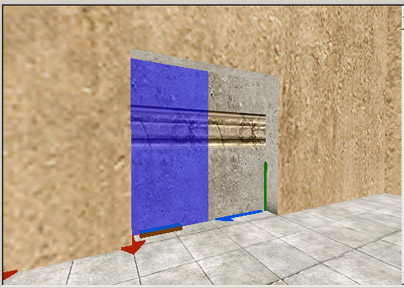
OK, now that we've got that done, its time to create the doors. We want our doors to be movingbrushes, so click on basic entities from your browser, and drag a moving brush onto the world. Now we see a world, but it has no "mass" to it ( NOTE: If you do not see a world, pressing 0 on the numpad should bring it up, or else right click in all of the windows, select view, and check off "render editor models" ). So lets add some. While the movingbrush is still selected ( if its not, select it ), create a new conus primitive, and make it 4h x 2w x 1l, room flag NOT CHECKED. Now, before we add this primitive, its important to understand that the little globe will be the basepoint for our brush. Example: if the brushes location is x1 y1 z2, that is the location of our globe. Therefore, we want to place the primitive in a spot so that the little globe is in the LOWER CORNER of the primitive, like this:

Now add it to the moving brush with [+]. Now The globe has disappeared; the CSG that was just added is a moving brush. To keep some order, lets click on our door in entities mode ( [e] ), and go to the properties section. Select the "name property", and change it to "door1left", then press [enter]. Now go down to the speed property, and change it to "0.5", then press [enter]. This means our door will take .5 seconds to move to its second marker.
Our doors need someplace to go when they move, right? Create a new conus primitive ( 4h x 2w x 1l ), and line it up to the main door corridor, on the left side. Before you add it, make absolutely sure that the worldbase layer is selected. Now create duplicate primitive and put it on the other side, adding it to the worldbase again. You should now have this:
Now to set up the doors. Serious Sam doesn't like to render lights on moving objects, so lets fix that. Enter Polygon mode ( [p] ) and select all of the polygons on the door ( double clicking one of the polygons on the door should achieve this ). Invoke the Properties dialog using [q]. On the shadows tab, check off "don't cast" and "full bright". Move the left door that we created to its closed position, right in the middle of the corridor, lined up with the little area we made for it to move to. Press the [d] button. This will drop a marker, which is like a place where the door knows it should move. Now move the door to its open position and hit [d] again. Now just to make sure, click the "Test Connections" icon on the toolbar at the top, or just hit ALT+[d]. Press it a few times if you want. The door should move back and forth. Make sure you leave it in the closed position. Here's what I have:
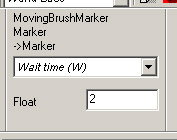
Now Select the marker representing the door being closed. In the properties section, select "wait time", change it to 0, and press [enter]. This means that the door will not wait before opening. Then select the "Stop moving" property, and check it off. Now Select the marker representing when the door will be open. Once again in the properties section, select "Wait time", change it to 2, and press enter. Now the door will stay open for 2 seconds.
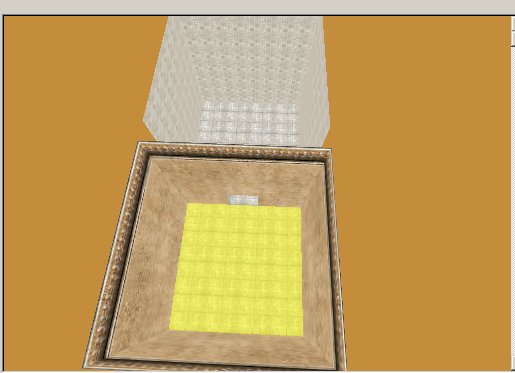
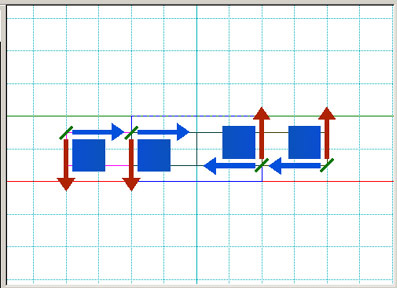
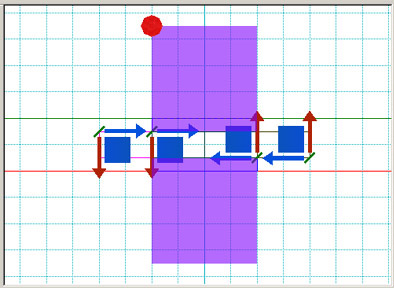
Now select the door entity and put your mouse over it, then press CRTL+[c]. Then put your mouse over a 2d window somewhere and press CRTL+[v]. Now go into the properties section and rename the door to something like "Door1right". Now Rotate the door from a top down view 180 degrees. Move the door so it is right next to the left section that we already made. Set up the markers again like you did with the first door, only this time on the other side. After all that's done, you should have this in your 3d view:
Our doors are set up, but something needs to activate them, right? This is done with a door controller. Open "Basic Entities" in your browser, and drag a door controller onto your map. In properties section, change its height and width to 4. Also in properties section, set its target1 to "door1left", and target2 to "door1right". Since you don't want to be locked out on the other side, I advise you to duplicate the door controller and place one on the other side. Don't forget to set up the door controller on the other side as well. You should have this:

Congratulations on making your first door!
-oSiRiS