
PROLOGUE
AI stands for Artificial Intelligence which is widely used in robotics, computer science and our favorite thing, games! In games every alive thing that walks and breaths and isn't controlled by player (like in multiplayer) it is controlled by AI. And exact that AI in FEAR is pretty much advanced and groundbreaking, as FEAR was nominated for best AI in videogame award back in 2005/2006. Just follow my steps and you will be all set.
SETTING UP AI NAVMESH
OK, you are done with geometry, with details, with lightning and other stuff you need to do, now AI is left. While you are in WorldEdit press right mouse button and go Add > Objects and find entity that is called AINavMesh. It should be second on the list.
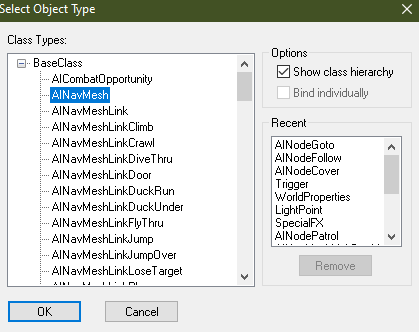
Select it and click OK. Now on the Nodes tab add new container and name it AI Infrastructure. And then drop that object (AINavMesh00) to that folder. Now add new brush (it should be plane) and it should be parallel with ground (check photo underneath).
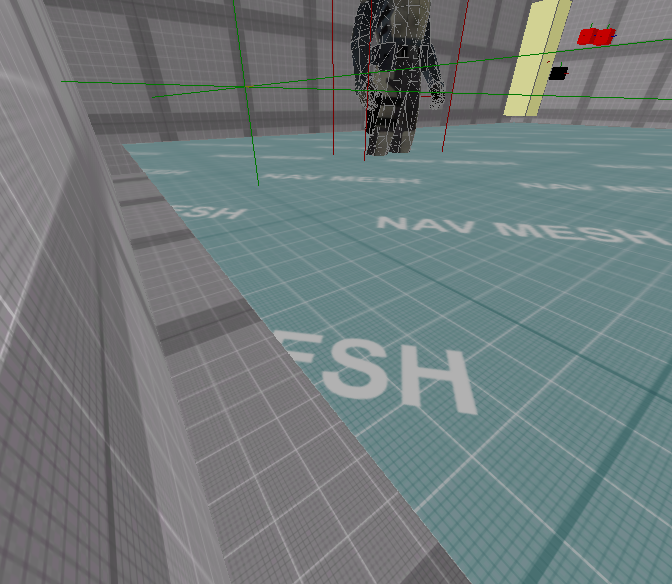
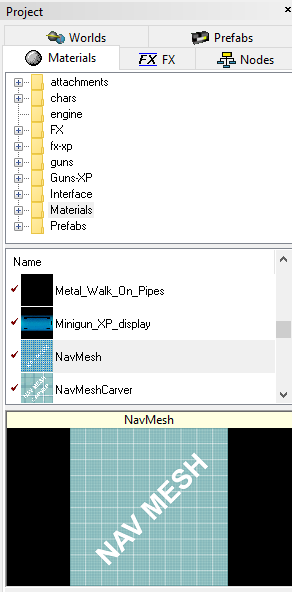
As you can see this plane with blue developer material is parallel with ground. And it should be like 10-20 cm above the ground. Now apply this material. It should be located in material folder.
Now expand it to cover entire room. Keep in mind it shouldn't pass through solid geometry including walls as AI will have weird behavior. Keep edges of these planes one-two centimeters away from walls. If one object is in middle of navmesh field, you can freely cut navmesh plane around that object. Now in Nodes tab put that plane under AINavMesh00 object you have added recently.
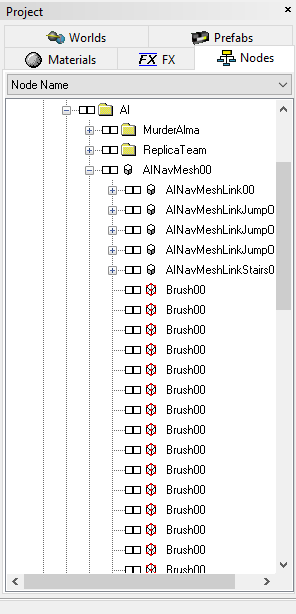
You can have as much planes as you want under AINavMesh00. Now add entity called AIRegion. AIRegions are used to group portions of an AINavMesh. Add a box now and put default material. Just like planes for Navmesh, put this box under AIRegion and expand it to cover entire navmesh system for that part of map. This box can have contact with geometry, Navmesh cannot. Don't forget to put both AIRegion00 and AINavMesh00 in that container named AI infrastructure. Now load the map and press F11 few times. In the up right corner it should write that it's showing just AINavmesh, then AINavMesh and paths, then again it should show just AIRegion and 4th time press should write it's showing AINavmesh and ARegion. 5th time clears all. Make it shows both Navmesh and Region. If it's looking like this, then it should be all right (check the photo).
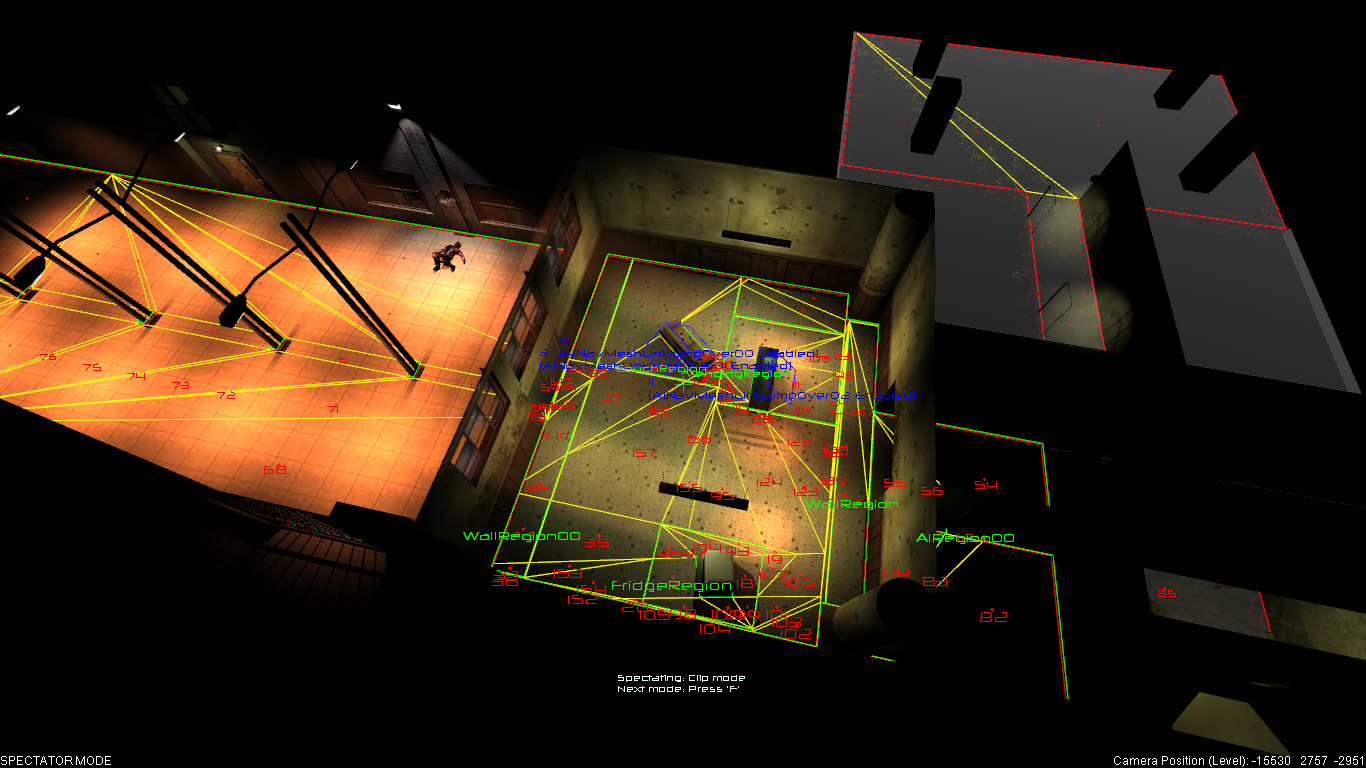
This is one map I made and it's not finished yet. Those yellow lines shows navmesh and those green lines show regions. Now you need to add AINavMeshLinks. They are used to specific AI movement activity. For example, for jumping over, for walking on stairs, for climbing and other. Simply add the AINavMesh entity from Object list and put one small piece of navmesh plane under it and put that NavMeshLink under AINavMesh in Nodes tab. Make sure that Plane goes over something that AI has interaction. For example to jump over table, put that small piece of NavMesh which is under NavMeshLink over the table. Or if you AI wants to climb up on the platform, add AINavMeshLinkClimb and put the NavMesh plane vertically over that wall so he can jump and climb up. keep in mind it should be connected with rest of navmesh.
ADDING AI
Now after AI is up and running, go back to our sweet, sweet WorldEdit and add entity that is called CAI (it's famous because of that tutorial about adding Alma I wrote some time ago). This part is identical like that tutorial, add AISpawner, add Trigger, write that command about spawning (msg nameofspawner SPAWN;), choose which model you want to use, connect it with spawner, bla bla bla, check that tutorial first! But this time, we need to configure the AI. After selecting CAI in the properties tab there is property called GoalSet. And there is tons of things to choose. If your AI is Replica, choose Patrol or Guard. If it's ally choose Partner, PartnerGuard or PartnerPatrol. If it's heavy soldier choose stuff that has heavy prefix. It's simple. isn't it? Now after choosing that, go to property that is called Configure AI.
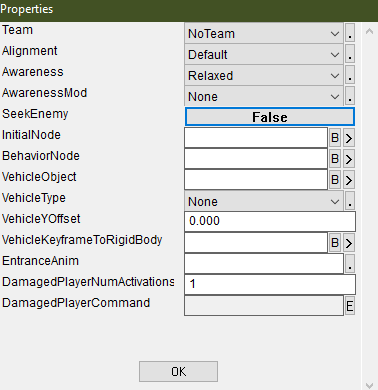
By default it is like this. Team stands for multiplayer, no need for changing. Alignment is to align AI to one specific side ingame. BadCharacter is for Replicas, Good Character is for allies, ATCSecurity is for ATC Security (of course). Neutral Character, well I have no idea for what stands, to be honest. Choose what you need. Awareness is curent mental state of your character. Relaxed stands for completly normal patrol, guard, stuff. Suspicious is when AI saw something that got his interest and going to investigate it. Alert is in state of combat. AwarenessMod stands for expansion for Awareness. It has none, ImmediateThreat which stands for immediatly attack the player and injured. Choose one or none. And set SeekEnemy to TRUE. That enables AI ability to combat enemy forces. Now you need to add AI Nodes. Click again right mouse button and go Add>Objects and find AINode and expand it's childern entities. The most important are AINodePatrol and AINodeCover. Now after adding those go again to CAI properties and ConfigureAI. You can see InitialNode and BehaviorNode. InitialNode stands for node that will used upon spawn and mostly it is used for AINodePatrol. BehaviorNode stands for node that will be used during combat and mostly it is used for Cover. For Patrol, it is required to name first Patrol Node in row because they should be connected.
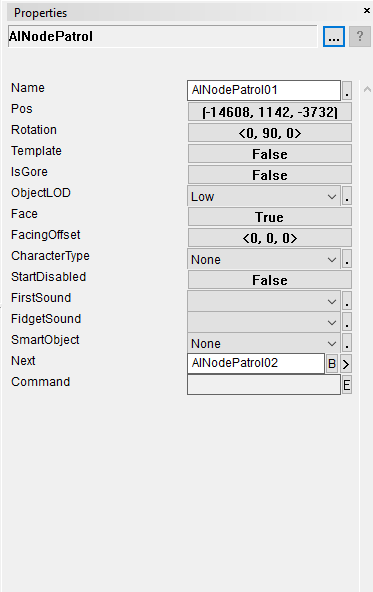
As you can see here, the Next property is for naming next PatrolNode which AI will follow. In that way you connect all AI Patrol Nodes. For Cover, you should name one random cover node and AI will first take cover there, and then he will relocate to other cover node if he has chance. Keep in mind that more cover nodes give AI more choices and with that, his behavior is more realistic. Back to CAI properties, go to Arsenal property and choose which weapons he will use. Weapon0, Weapon1, Weapon2,.... stands for weapons he will be using, so there you choose if he will use Shotgun, SMG, Assault Rifle, Nailgun,... Socket0, Socket1, Socket2,... Stands for weapon location on his body. Select LeftHand or RightHand. If you want to make ghosts in game, then select ModelTemplate to MeatPuppet, GoalSet to MeatPuppetGuard, Alignment to BadCharacter, Awarness Alerted and AwarnessMod ImmediateThreat. Now in front of AISpawner of those ghosts put SpecialFX and FXName select ghost_test2, below set ONETIME to TRUE, SMOOTHSHUTDOWN to TRUE, LOOP to FALSE and STARTON to FALSE. In the trigger type:
msg player (SLOWMO ON nightmare1-3);
msg nameoffx ON;
delay # (nameofaispawnpoint SPAWN);
delay # (msg player (SLOWMO OFF));
Again # stands for number of seconds, if you write 5 they will spawn 5 seconds after player has reached trigger. Slowmo is just for better feel of paranormal presence. For ghosts, no AINode is needed, just working AINavMesh.
EPILOGUE
If you have any questions, put them down in the comment section or join our little LithFAQ discord server where we talk about modding various Lithtech games like Aliens versus Predator 2, No One Lives Forever and others. Happy moding!


Good work
Thanks LithTechGuru