Hello and welcome to another technical post!
This time we want to talk about the GUI-System in CrossCode! Some people have asked us how we draw GUI elements and how we handle animations and all. Well today we gonna answer these questions... hopefully!
Requirements
Before we actually created a GUI system, we talked about what we want from it. It was clear that we needed a more sophisticated system since we wanted a menu that comes with lots of animations, scroll panels and also a way to handle navigation. Why Navigation? Because there are actually 3 different ways to control the menu (We don't go into detail about controlling in our GUI system, but we can make a separate post if you like!).
First, we have the mouse. This means buttons can be focused, unfocused, pressed, hovered and so on. Secondly you can use the keyboard to maneuver through menus. This requires a way to handle groups of buttons you can go through and optional buttons that can be accessed via hotkeys. The same goes for the third option which is the gamepad.
For handling the GUI elements themselves we decided on a tree structure. This means that every GUI element can have a (possible) infinite number of children, which in turn can also have an infinite number of children.
Check out this this image to get a picture of it:
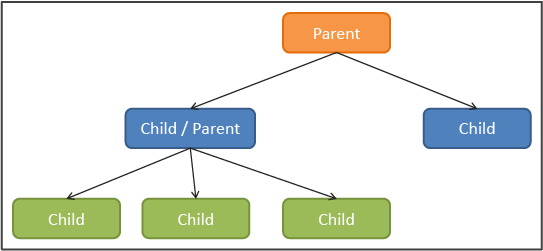
Pretty simple right? It was one of the goals to keep it simple whenever possible. There are not complex layout systems or anything. So, before we start talking about handling GUI elements, let us take a look and the outline of each GUI element.
The GUI Element
Every GUI element in our engine derives from a base class. This class contains information about the position/rotation/scaling, the animation state and etc., the GUI Manager (which we get to in a bit) needs to display the elements. The structure looks something like this (beware: pseudo-code incoming!):
pos: {x: 0, y: 0},
size: {x: 0, y: 0},
pivot: {x: 0, y: 0},
align: {x: GUI_ALIGN.X_LEFT, y: GUI_ALIGN.Y_TOP},
children: [],
zIndex: 0,
mouseOver:
clip: false,
updatePause: false,
transitions: {
"DEFAULT": {
state: {},
time: 0.5,
timeFunction: KEY_SPLINES['EASE']
},
currentState: {
offsetX: 0,
offsetY: 0,
alpha: 1,
scaleX: 1,
scaleY: 1,
angle: 0
},
currentStateName: "DEFAULT",
animState: {
targetState: null,
initState: null,
timer: 0,
maxTime: 0,
timeFunction: null
},
update: function() {},
draw: function() {},
doStateTransition: function(name) {/** set up animState */},
};
These are the basic parameters and functions required for our system to work. As you can see there are quite a lot of parameters. Let's get a quick overview about what each parameter stands for:
- pos: the position of the element relative to it's parent and the given alignment.
- size: the size of the element in pixel.
- pivot: the point around which to rotate.
- align: the alignment relative to it's parent.
- children: array for all children this element contains.
- zIndex: virtual z axis for deciding in which order the top level elements are displayed.
- mouseOver: true if the mouse hovers over this element.
- clip: true if this element should 'clip' to the size. This means that children are only visible in the rectangle of this element.
- updatePause: true if this element should be updated even when not visible.
- transitions: contains all transitions the element has (subclasses can override this). Each possible state has the following parameters:
- state: the state to transition to (contains a subset of currentState).
- time: transition time TO this state in seconds
- timeFunction: The bezier curve to use (We call them Key Splines here).
- currentState: the current state the element is in. This contains offsets to the current position, the alpha (transparency) value, the scaling and the angle.
- currentStateName: the name of the current state.
- animState: the animation state if any. Used when easing between 2 states. It contains a timer, maxTime (the time the transition takes) and the time function to use.
- update: called by the manager to update the element.
- draw: called by the manager to draw the element.
- doStateTransition: can be called to invoke a transition. The transition is handled by the manager.
Most of these parameters and methods are actually handled by our GUI manager. And that's why we will now talk about the manager class.
GUI manager - Update
The GUI manager is what brings each GUI element to life by updating it's state and calling the update and draw methods for each frame. The manager in turn is called every frame by the game. So, let's go through the different steps the GUI Manager goes through on every frame.
First, every element needs to be updated. As stated above, the top level GUI elements are added to the manager and serve as a starting point. Each top level element can have a Z-Index value to determine in which order the top level elements should be updated and drawn. We do this by simply sorting all elements with the sort method JavaScript provides:
return a.zIndex - b-zIndex;
});
This simply makes sure that the element with the highest value is updated and drawn last. After this we walk through each element and it's children recursively. However there are some steps we do to update each element:
- check if GUI element is visible
- update the state of the element (only if it's visible, except when pauseUpdate is true)
- set mouseOver to true if the mouse if over the element
- call the update method of the element (only if it's visible, except when pauseUpdate is true)
- do the same for all children
The pauseUpdate property is mostly used for the HUD, which needs to be updated even when not visible (e.g. to update the stats in the element selection view when leveling up).
Every calculation includes the current position, size, scale, rotation and clipping of the element and passes these information onto it's children. This might seem a bit over the top but it makes sure that you can't hover over a button when it's parent is not visible for instance. Also we directly skip every child of the parent if it is not visible and the updatePause parameter is false. Code-wise it looks something like this:
var visible = checkIfElementIsVisible(parent);
if(visible) {
updateState(parent);
parent.update();
for(var i = 0; i < children.length; i++) {
updateRecursive(children[i], children[i].children);
}
}
}
Of course the actual code is bit more bloated with calculations but it should give you a basic idea on what we are doing.
Also the checkIfElementIsVisible method takes an animation between states into account, to make sure we can animate a state from invisible to visible.
To animate the states we simply do the old interpolation between values trick. When setting a new state to transition to, we set the initState to the current state and the targetState to the wanted state. Additionally we set the time the transition should take as maxTime and a timeFunction used for the 'tweening'. After this we update the timer and divide it by the given maxTime. We then use bezier curves, which we set as timeFunction, to tween the result and interpolate between the target value and the initial value. This sounds pretty complicated but let's have a look at the code:
this.animState.timer += ig.system.actualTick;
var i = (this.animState.timer / this.animState.maxTime).limit(0, 1);
i = this.animState.timeFunction.get(i);
for (var key in this.animState.targetState) {
this.currentState[key] =
(1 - i) * this.animState.initState[key] +
i * this.animState.targetState[key];
}
if (i == 1) {
this.animState = null;
}
}
This is the gist of our "animation system" for GUI elements. By now some of you might notice what we're actually doing here. We basically copied the same system CSS uses. Each element has a state and we can define a new state by simply telling the system the properties of the new state. Without any extra effort the system eases between the states to create a smooth and nice animation!
By the way, we use the same system for easing between positions! We have a target and initial position and interpolate between them to create movement animations!
GUI Manager - Draw
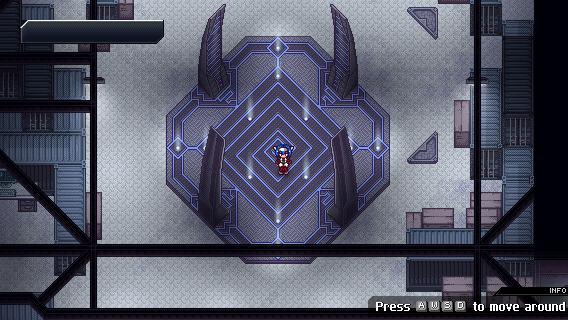
Now you might ask yourself: "Okay, and how does this look? Where is all the graphical stuff?". That's where we are going now. As with the update method we first check if the element is visible or not. If not, skip this element and all its children. Because, why drawing something that is not there, right? The fun starts when the element is visible. To translate the position, scale or rotate the GUI, we use the context which we get from the canvas we're drawing on. The context basically provides us with methods and properties to draw graphics or primitives on the canvas. Next to this, the context has some neat functions to manipulate the position, scale, rotation and so on.
So we take the position of the element and feed them to the context. Since we always take the values from the current state, we can easily archive animations just by transforming the canvas to the elements properties. The transform will be taken over to the children, so every context manipulation to the parent is also reflected in the child elements. This picture here shows how this could look:

Pretty cool, huh? And the code for this is actually really simple. The following also includes how we do the clipping, which makes sure that nothing is drawn outside of an element's rectangle:
for(var i = 0; i < children.length; i++) {
var element = children[i];
if(!var visible = checkIfElementIsVisible(element)) {
continue;
}
var state = element.currentState;
context.save();
context.translate(element.getX(parent), element.getY(parent));
if(element.clip) {
context.beginPath();
context.rect(0, 0, element.size.x, element.size.y);
context.clip();
}
var globalAlpha = context.globalAlpha *= state.alpha;
if(state.scaleX != 1 || state.scaleY != 1 || state.angle != 0) {
context.translate(element.pivot.x, element.pivot.y);
context.rotate(state.angle);
context.scale(state.scaleX, state.scaleY);
context.translate(-element.pivot.x, -element.pivot.y);
}
var drawAlpha = ig.system.context.globalAlpha * hook.localAlpha;
if(hook.localAlpha > 0){
context.globalAlpha = drawAlpha;
element.draw();
context.globalAlpha = globalAlpha;
}
drawRecursive(element, element.children);
context.restore();
}
}
Note that on the first visit of the method, we actually have no parent since we are traversing the top level elements. When translating, we first get the position of the GUI element based on the parent's position (0 if no parent is there) and the alignment (as stated in the definition of the base GUI class). Since we can "right/bottom"- or "center"-align elements, we need to position them correctly on the canvas. That's what the getX() and getY() methods do.
But wait... something is missing, right? Where do the actual graphics come from? Well...
Drawing Graphics
Each subclass of a GUI element draws it's contents before each children. For drawing these elements we use the Image class provided by impact.js. Since transformation is handled by the GUI manager, we simply draw portions of an image on the canvas using the Image's draw function. Let's go through a simple example of a button. We assume the following image is our button-asset:
And we have a button-class that looks like this:
gfx: new Image("path/to/image.png"),
init: function() {
// is called by impact for all classes
this.pos.x = 20;
this.pos.y = 20;
},
update: function() {
// here would be code to check if the button is hovered and a different
// graphic or part of the image should be used in the
// draw function
},
draw: function() {
gfx.draw(0,0);
}
});
This would result in something like this (assuming the button is a top level element):
Now this seems okay, right? We set the position to [20,20] and it was drawn correctly. But there is a problem: Scaling. A lot of GUI elements in CrossCode can have different widths and heights. We can't simply stretch them with the state scaling, that would look a bit strange, right? To make this happen we added NinePatches to the engine. These allow us to define 9 areas of which a drawable piece is made of. The edges are drawn normally while the top, left, right, bottom and center pieces are stretched to the size of the GUI element. So this asset:
turned into this:
This also means our button-class changes. We swap the Image class with our new NinePatch class which creates an image, too, but also takes extra parameters to determine how to draw the "box" using the nine "patches" (If you're interested in a technical post about NinePatches, give us a quick comment!):
ninepatch: new ig.NinePatch("media/gui/buttons.png", {
width: 16,
height: 0,
left: 8,
top: 24,
right: 8,
bottom: 0
}),
...
draw: function() {
ninepatch.draw(0,0);
}
});
To give you a better picture of what the NinePatch does, the following image shows how the button-asset is "tiled". Next to the button-asset is another box-asset that demonstrates how the NinePatch would divide a normal box into 9 pieces:
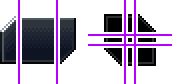
As you can see the button-asset is actually only split into 3 parts. This is done since we only need to fill the horizontal space when setting the size. The height always stays the same. But the right asset, as you can see above, is a box that can be stretched into each direction. It is just a small example to show you what the NinePatch can do.
All of these features are used to draw all the GUI elements. Even the text is just a GUI element that draws a number of characters. We extended the basic font-class to be able to draw icons too and we optimized it so it would pre-draw the text on a canvas which saves a huge amount of draw calls, especially in the menu.
This means that this:

...is nothing more than a collection of different elements drawn on the screen one after another using the Image or NinePatch class. Lots of the elements are just boxes that are stretched across the screen. Of course, not everything is as easy as it seems. As you might imagine, some GUI elements need a lot of padding and adjustment to look and feel just right.
Not that we didn't cover every inch of the GUI system here, but we wanted to give you an idea of how our system works, how we animate and draw the graphics. We will talk more about the optimization of some features and aspects of the GUI system in an upcoming post. Like the fact that the BaseGUIElement properties are actually stored in another object. But to keep it simple, we decided to show it to you the way we started it.
Phew... well that was one hell of a post. We hope you enjoyed this (really) long technical post about our GUI system. If you have any specific questions about the system or another aspect of CrossCode, do not hesitate to ask! We are happy about every comment :)
Have a nice day and see you on the next CrossCode update!


Fantastic work guys! Keep it up!
Thanks a lot!