
Well let's start [LAST UPADTE 25/01/24]
Here are the prerequisites :
- Battlefield 2 already installed with patch 1.5 (the editor won't install if you don't have the official installation, the project reality editor will not work on bf2 installation, the installer checks the registry to find out if the game is installed, if you have bf2 only installed in a "copy paste" way, I invite you to manually add the keys in the registry otherwise you will not be able to install it, here is the link if you ever have a wild installation of bf2 Link
- The good old bf2 editor that can be found here Link
- Notepad++ Link
- Winrar or any software for extract .zip
- Be careful, if you use reshade, it can freeze the editor at startup, remove it if that happens to you (then put it back afterwards if you no longer need the editor)
- I strongly recommend replacing the .exe with that of PR which makes your editor much more stable Link
Bf2 editor works perfectly on Windows 11 pro (and on older versions of Windows)
Okay now that you have that, here are the steps :
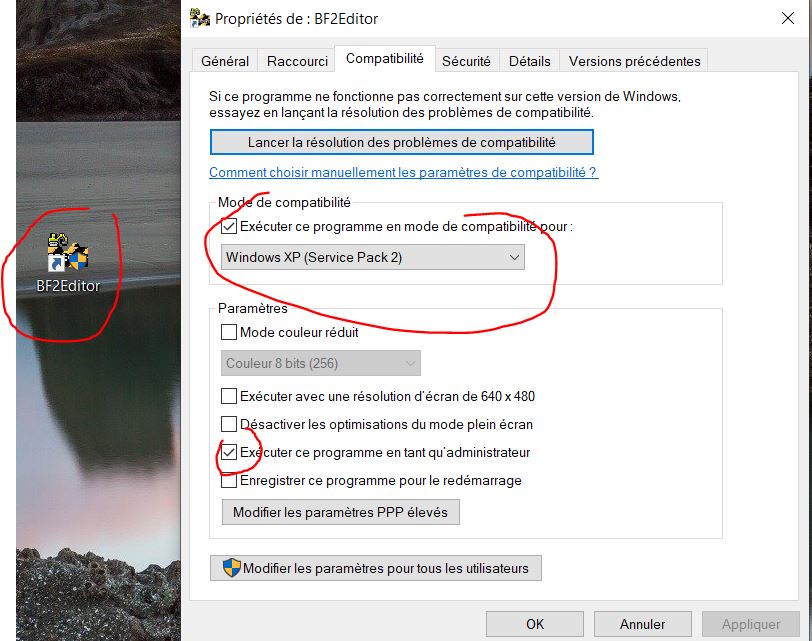
- Open your download folder, a right click on BF2_EditorSetup_v1.3.exe and do the steps and do the screenshot steps (run in windows xp sp2 [not sp3 !!] + run as administrator)
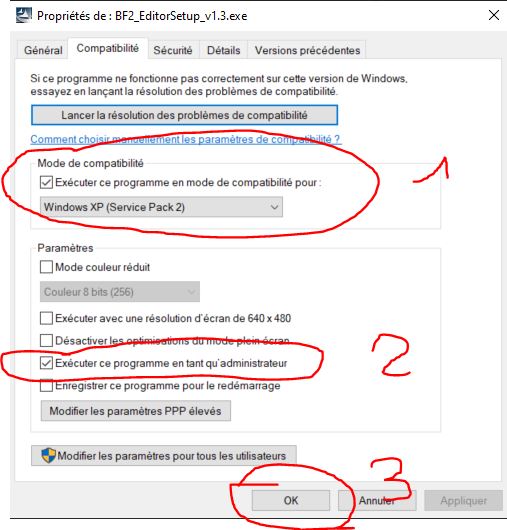
Good after that, launch the installer, if you have followed the previous steps, everything is good, otherwise you will get "bf2 is not installed" or "bf2 editor can only be installed on windows xp"
If you still can't install the software, come to my discord server and I will send you the version that works without the game installed
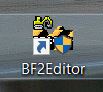
Well let's imagine that everything goes well, the installation is done without worries and you will obtain this magnificent icon
Oh don't skip steps, don't start it right away, we got things to do first !
Before launching it, we need to configure the resources we want to modify, bf2 editor is usable for almost everything, except 3d editing, hud/menu and animations
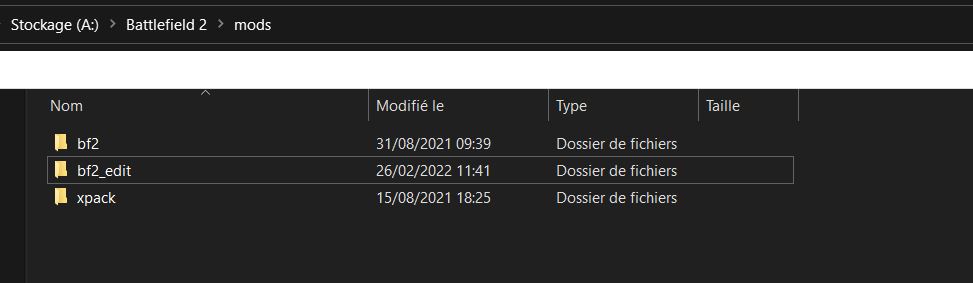
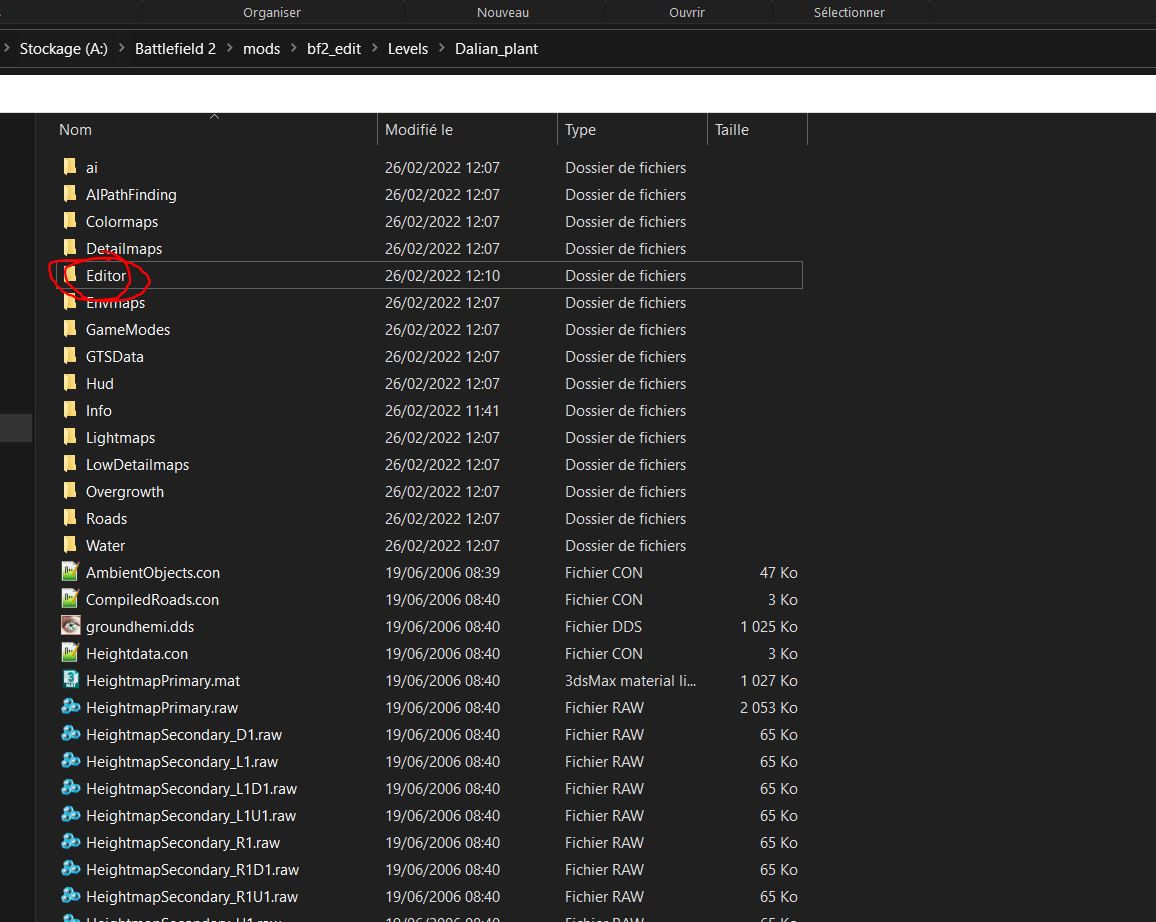
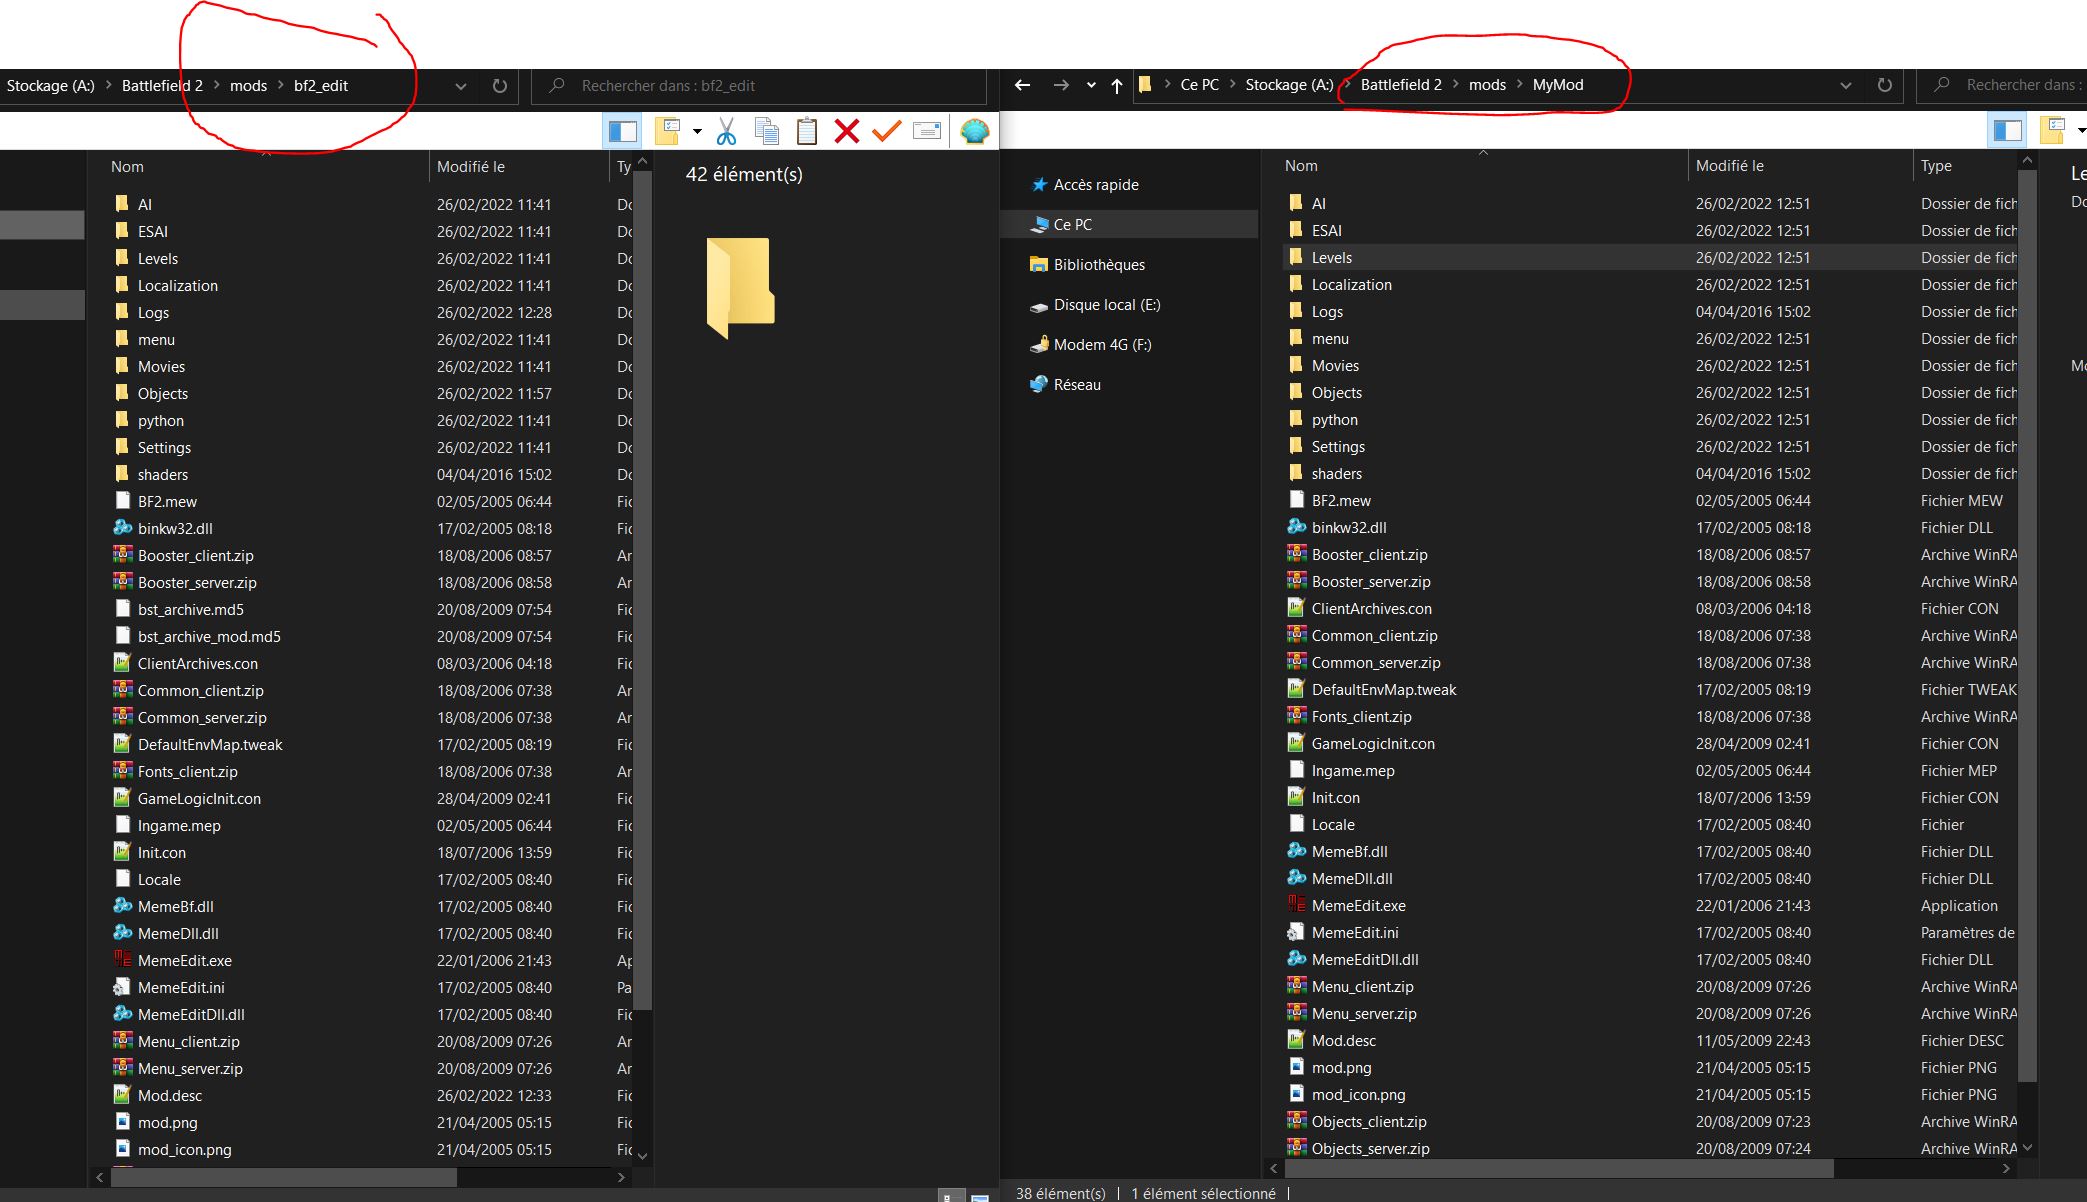
Let's go to the game folder, in my case in "A:\Battlefield 2"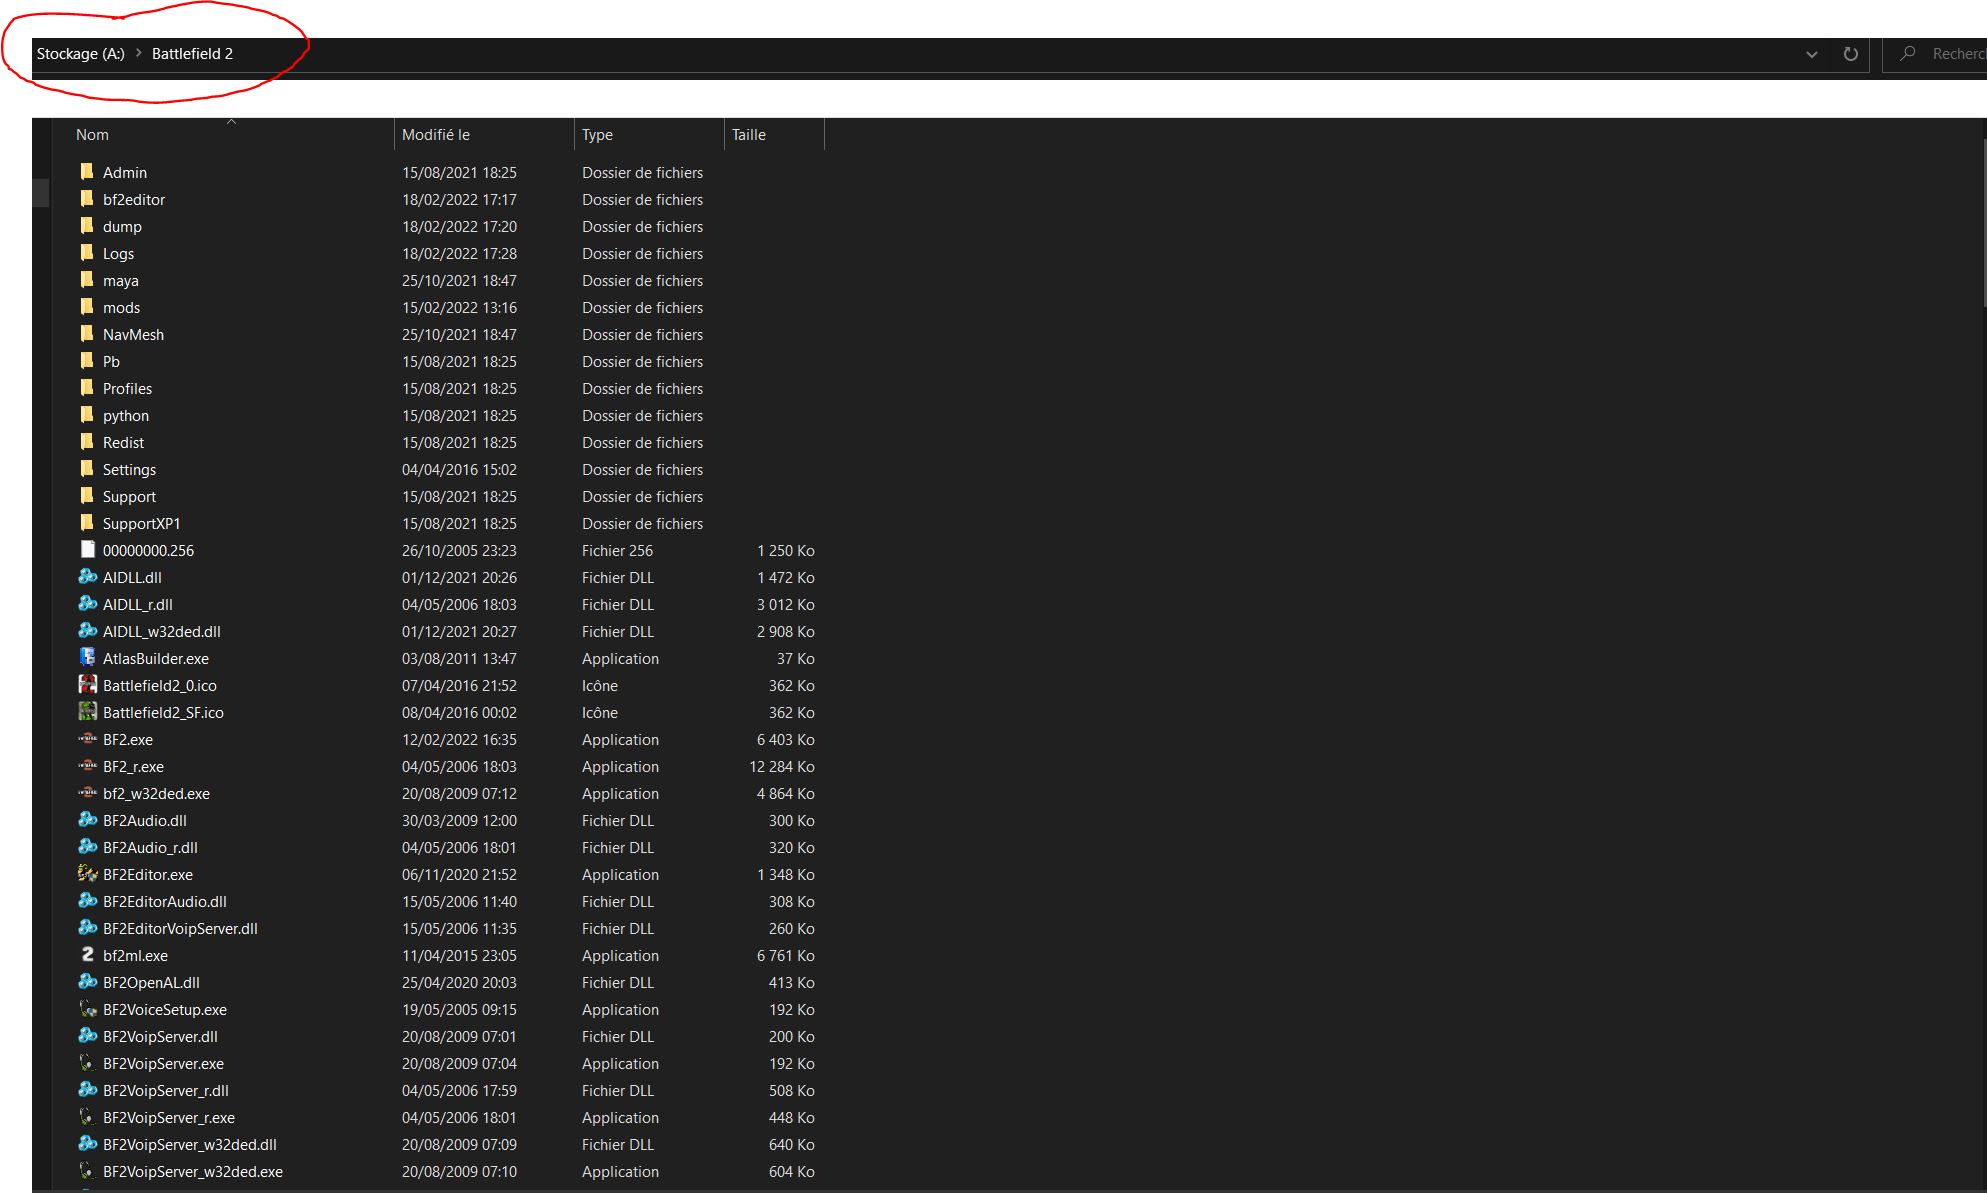
And then open the folder "mods" which contains all the game assets. Here you will see 1 or 2 folders or more if you have somes mods installed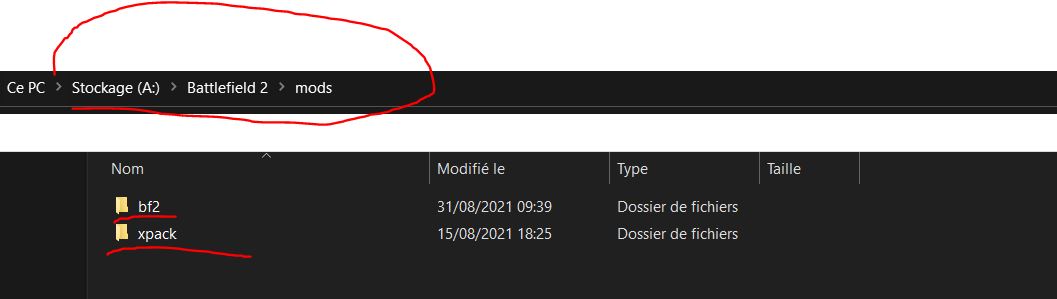
bf2 is the main game, xpack is the sf addon
rule n°1 here is never to touch bf2, why? Because it is the basis of the game and many mods also use it, if you modify anything in it, you can make the game unusable in addition to not being able to play online anymore
So if you want to modify the base game, create a copy of the mod. in my case I will call it "bf2_edit", you are free to call it what you want, just avoid putting spaces, always put a dash
Well here is our freshly copied mod,
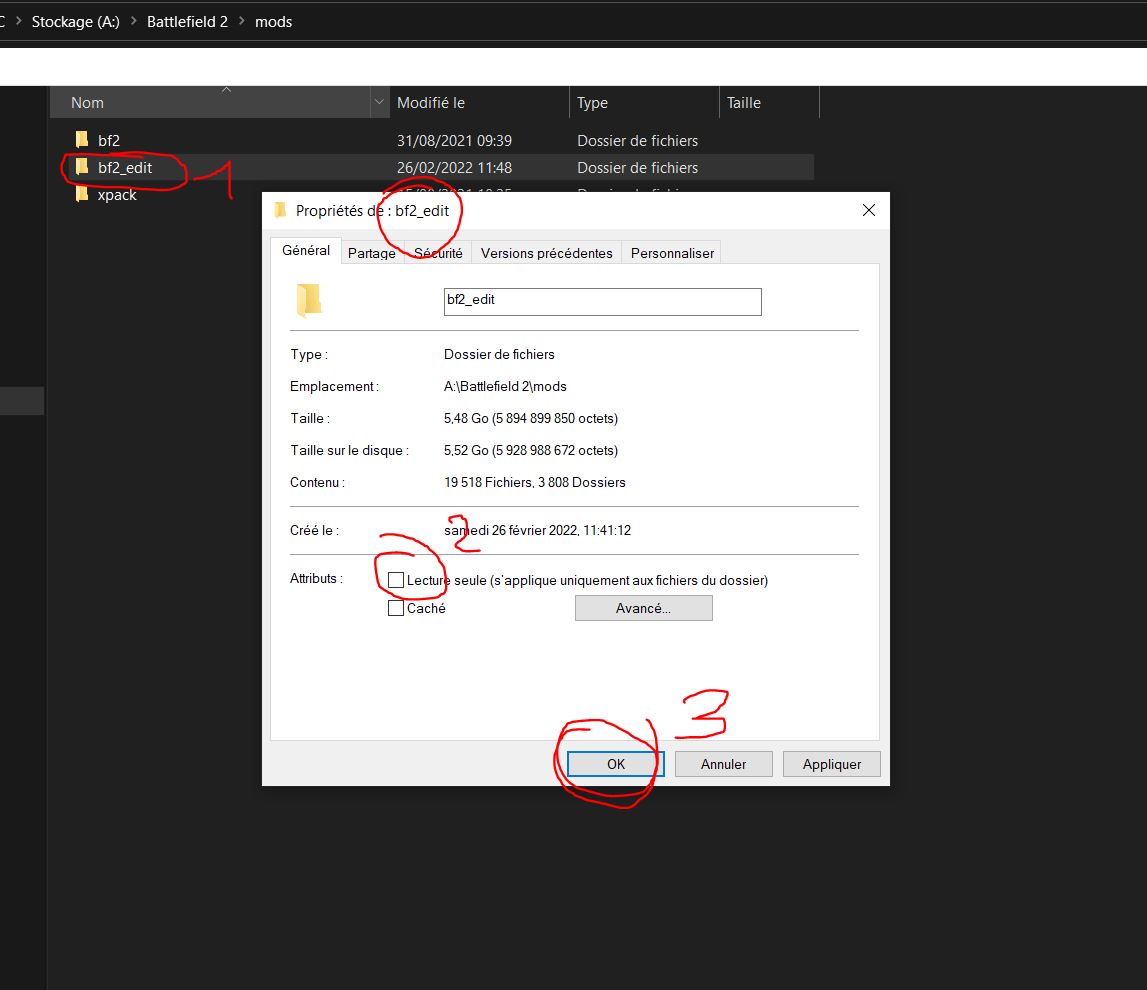
Rule n°2 here is that bf2 editor can't read files with "read only" attribute and .zip files
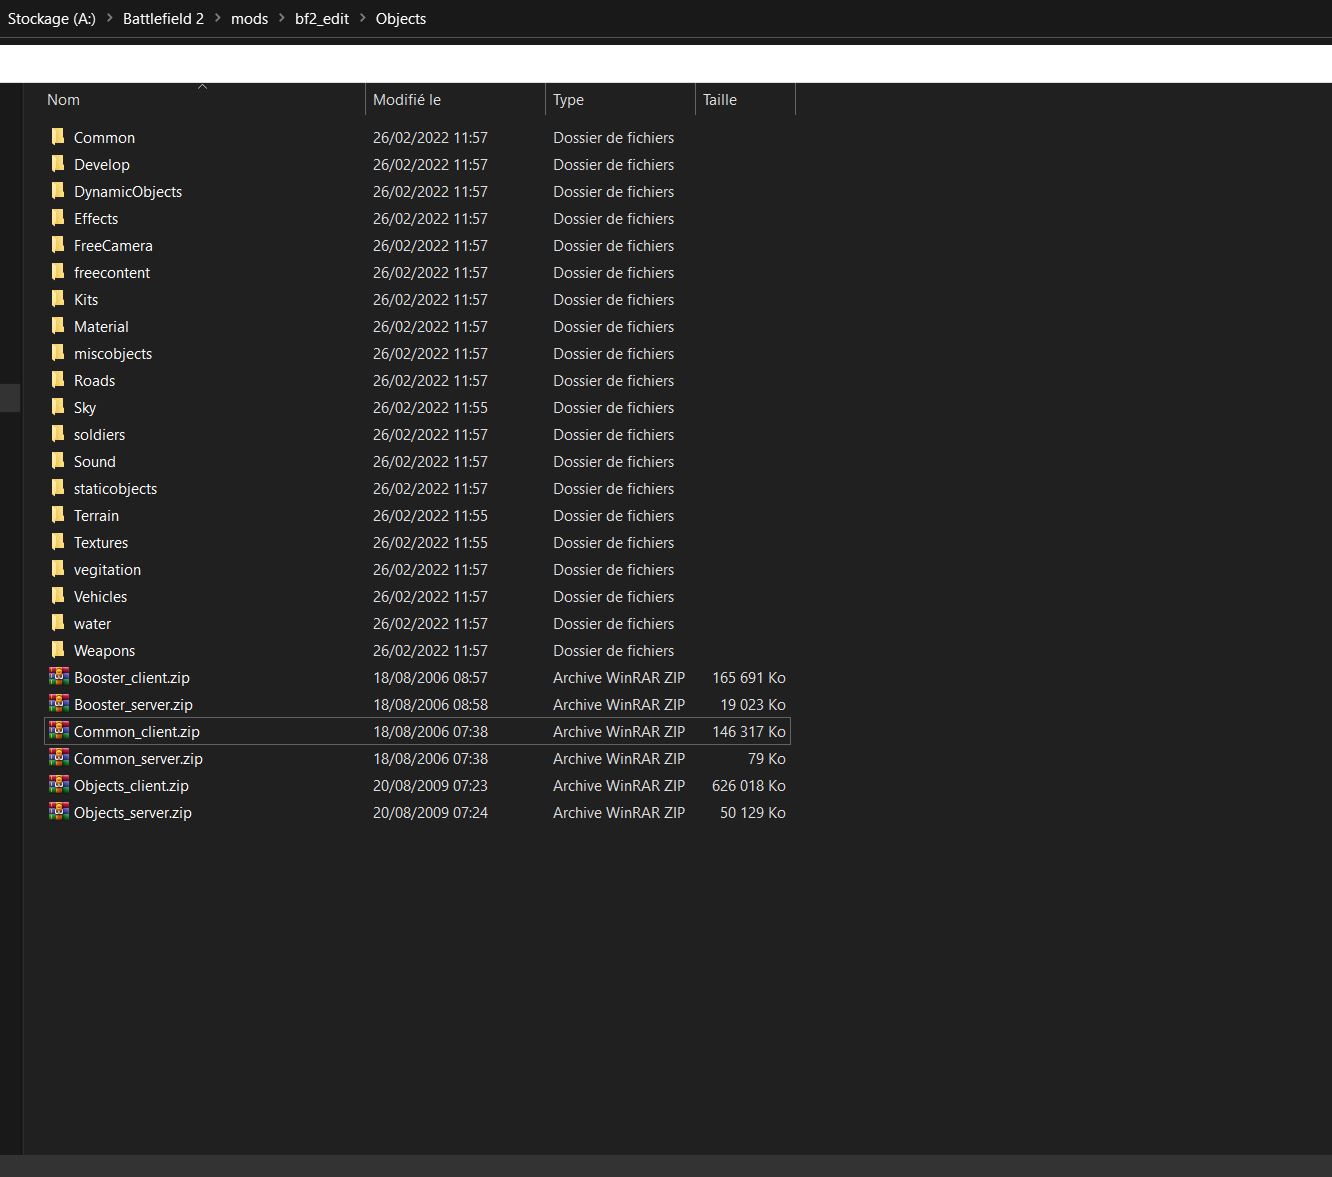
So let's make some adjustments, open bf2_edit folder, and you will see an "Objects" folder, this is where the editor will read and save the content you are going to modify, except the maps. If you don't have the "Objects" folder, create it, if you look closely, you have bst_archive.md5, std_archive.md5...
These are small files that check that the content has not been modified, delete this and quickly (delete all md5 files), otherwise you will have problems.
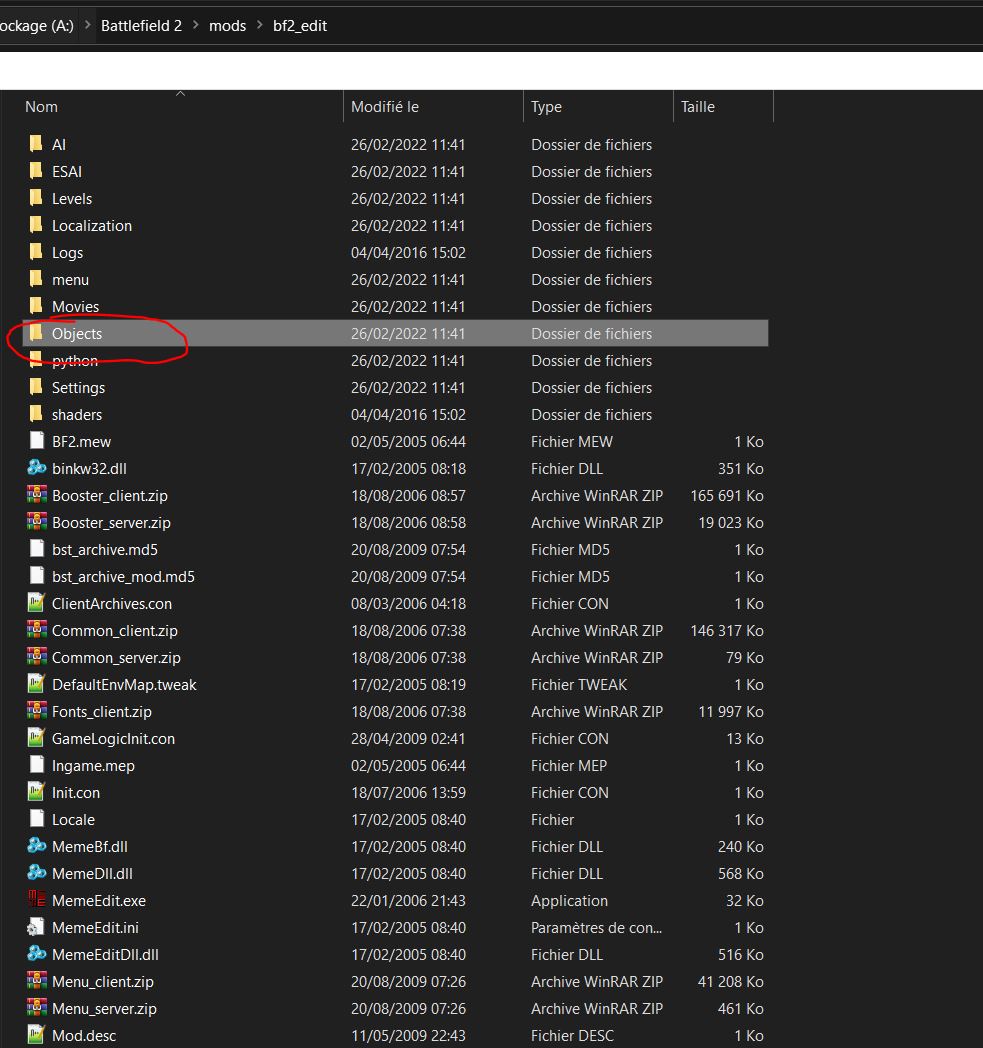
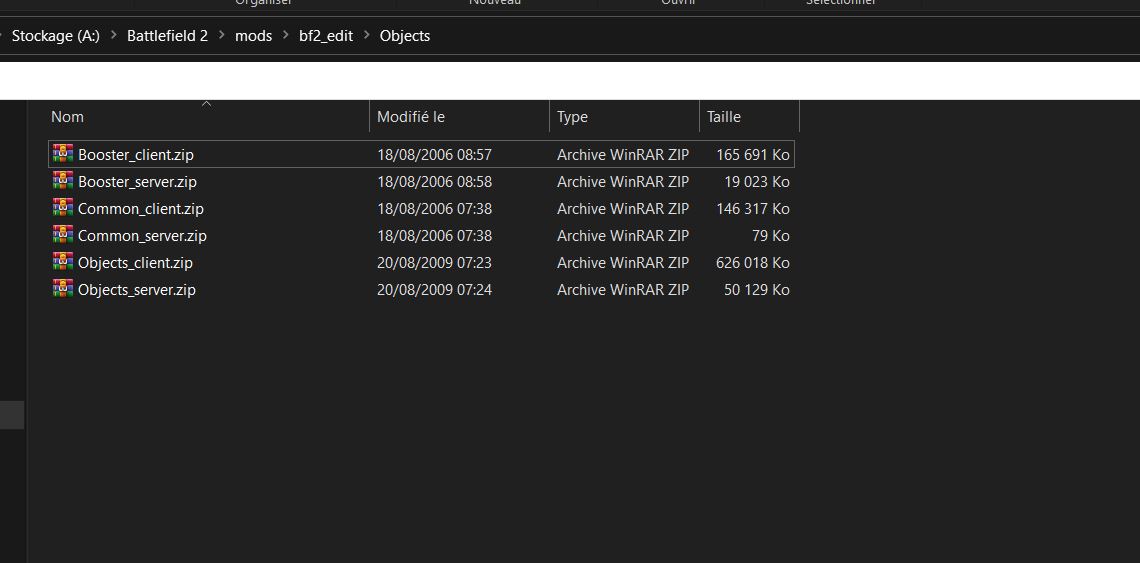
The resources are stored in zip files, copy them all in the "Objects" folder except menu_client.zip, menu_server.zip and shaders_client.zip
Note, the boosters.zip are the armored fury dlc that patch 1.5 added
And now extract all that stuff, select all, and right click, extract all
it will surely tell you that a file already exists during the extraction, it is because they are duplicated, no worries you just have to click on "yes for all" , it's gonna take a little time.
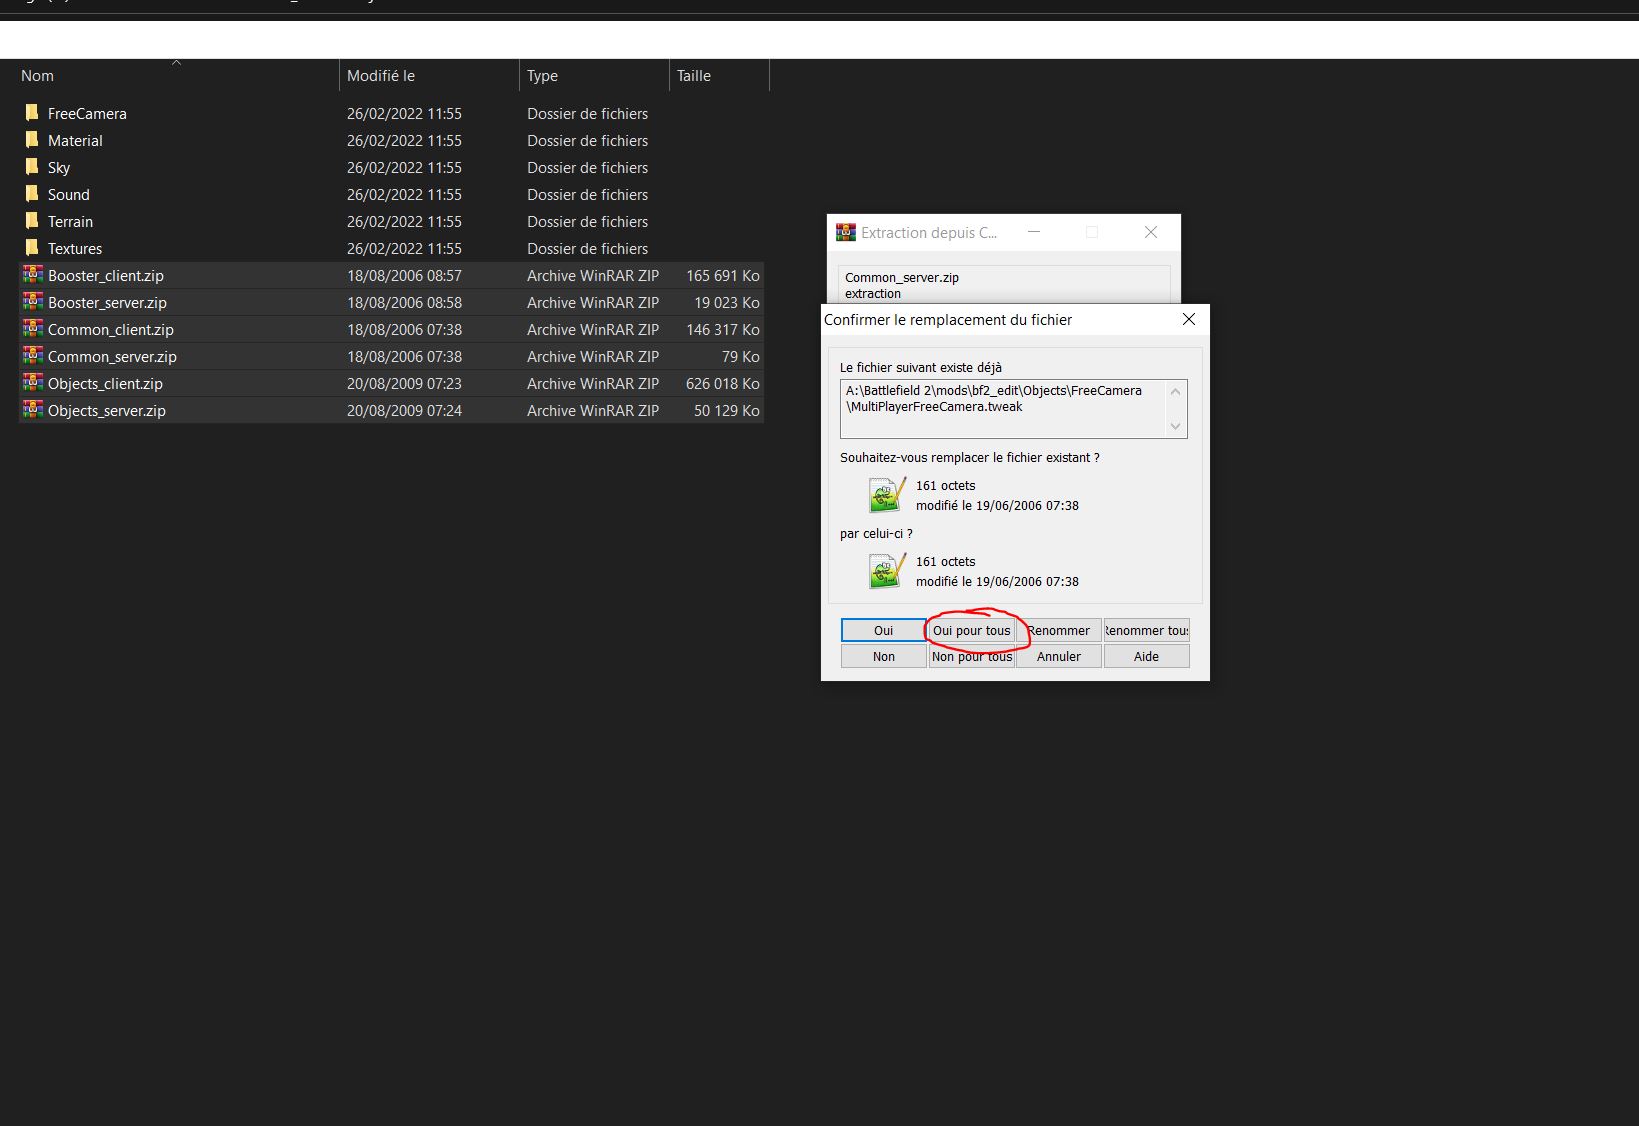
OK, it's done, delete the zip files here, they won't be useful to us anymore.
Well the resources are extracted, all that remains is to configure the maps, switch to the level folder
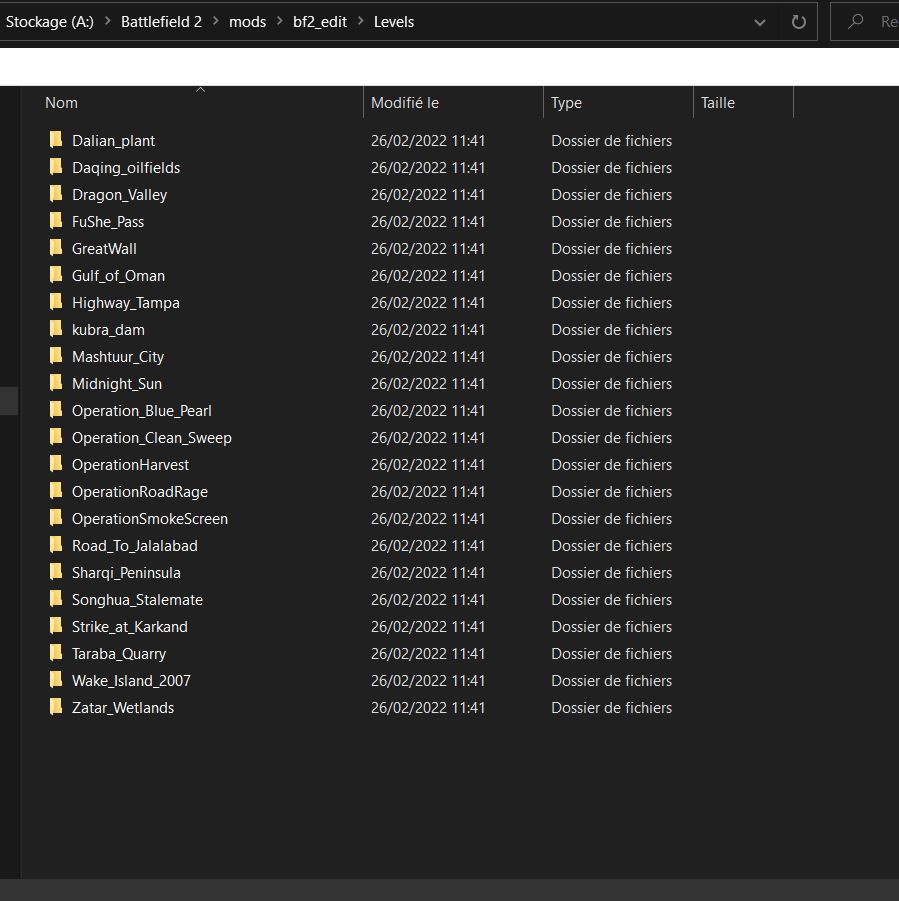
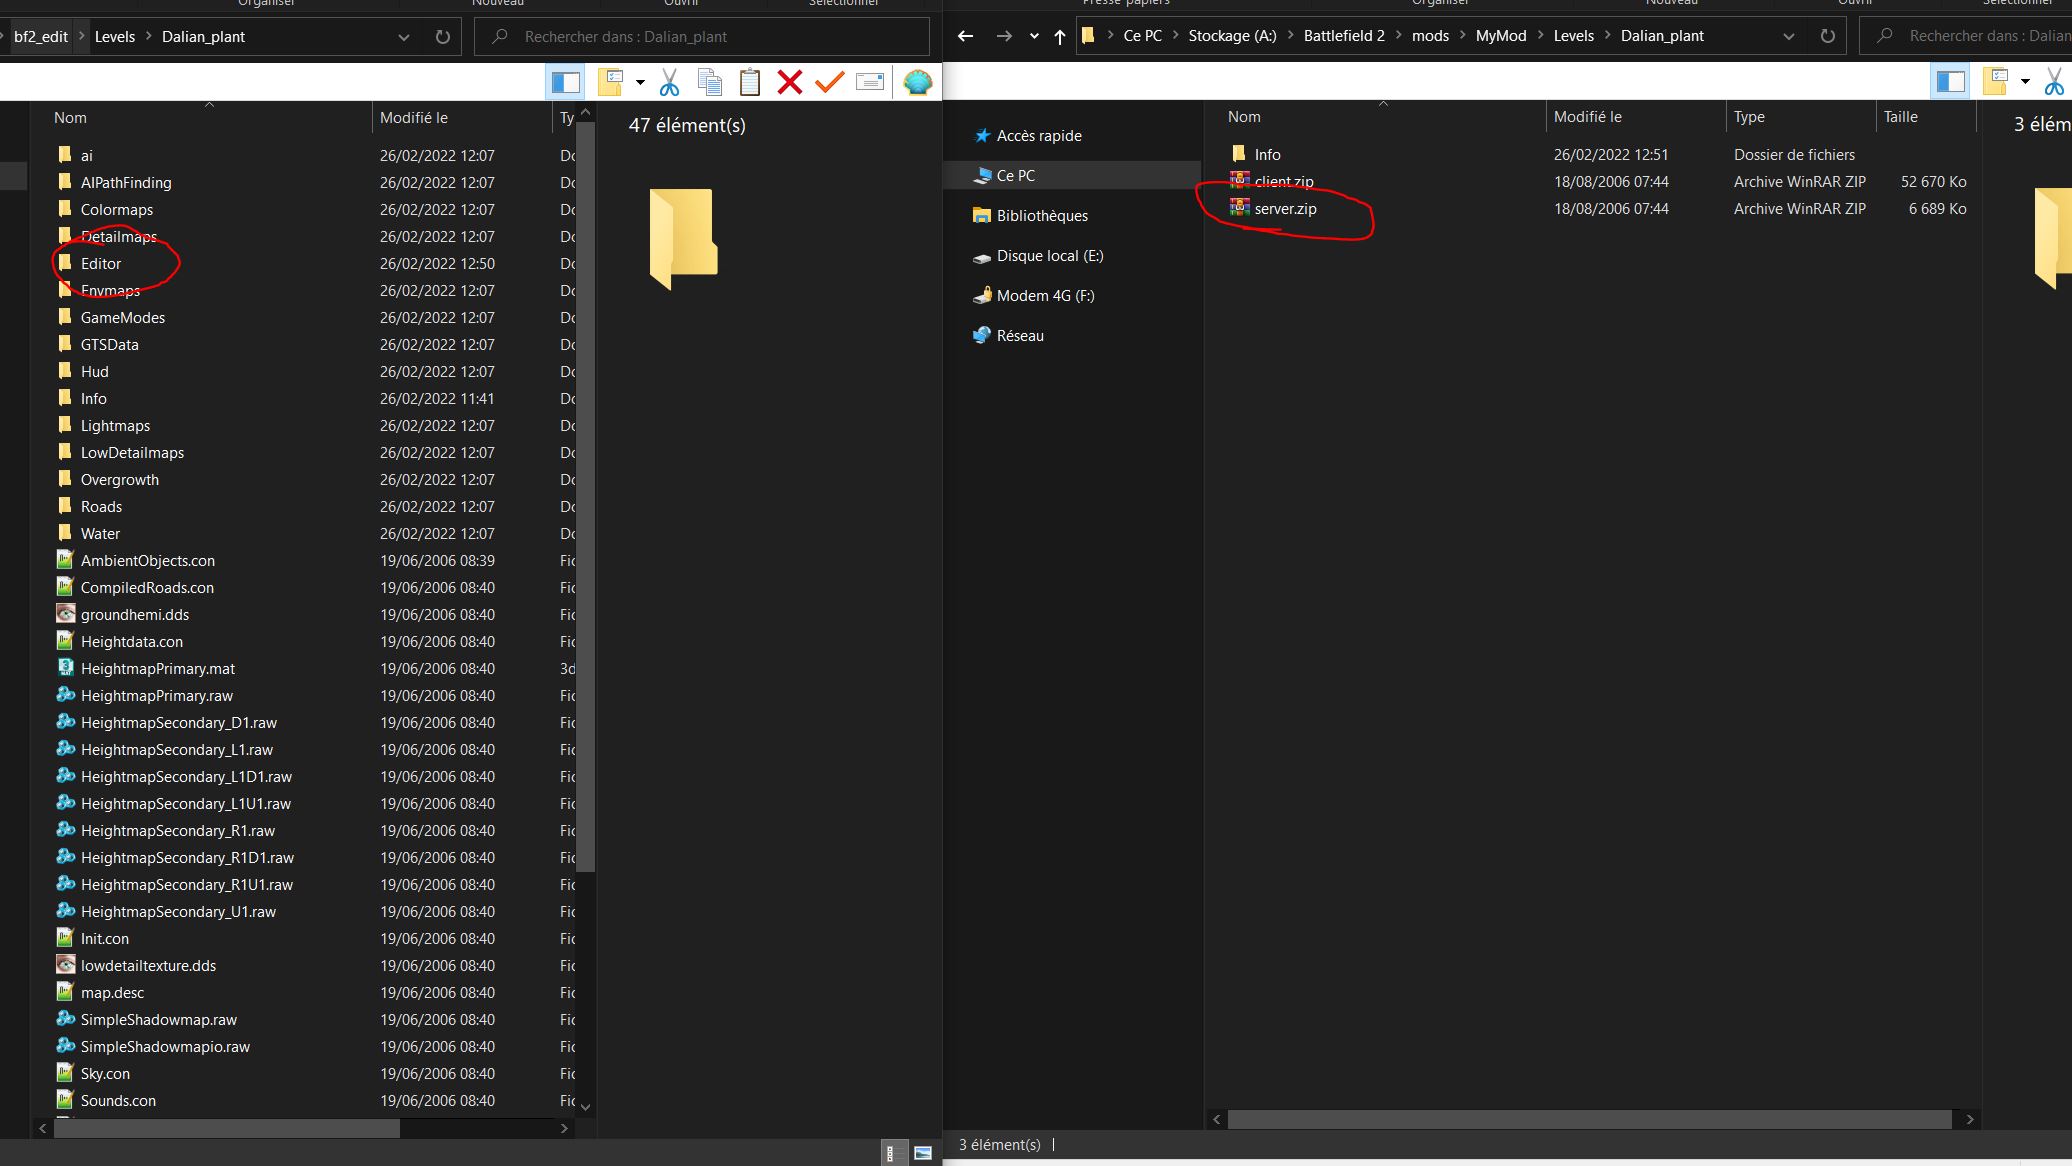
Well here read well, you open the map you want to edit, take Dalian_plant for example [same step for each map, take the one you want]
Delete the md5 archive, and extract the client.zip and server.zip, replace all if it ask.
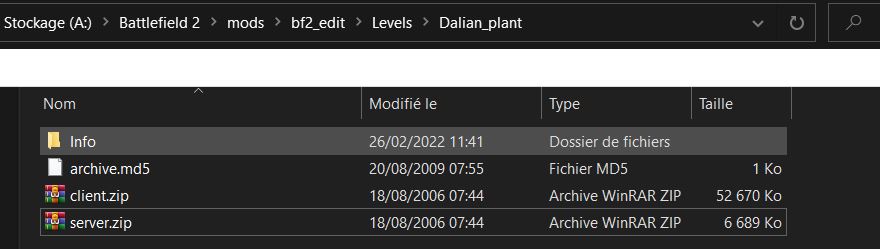
It will looks like that :
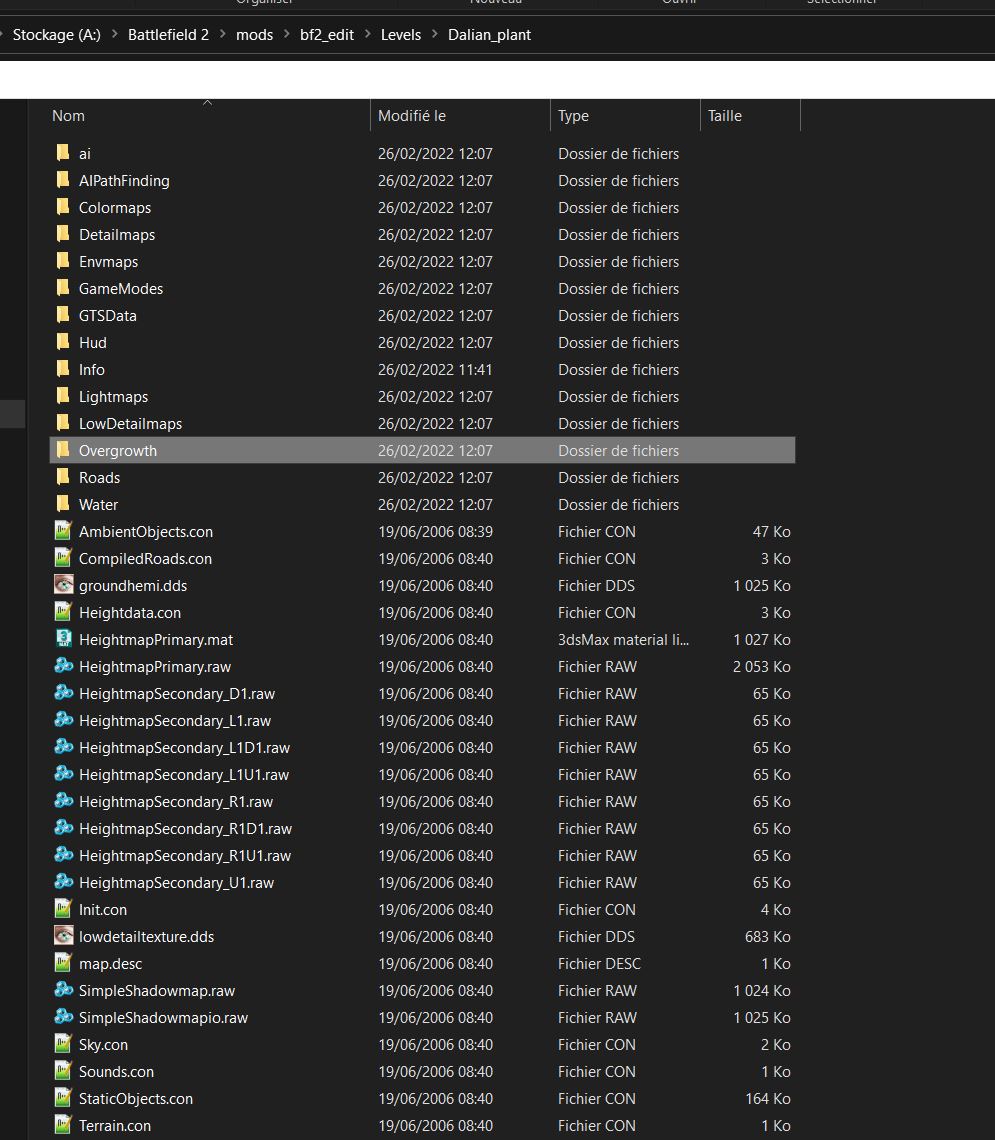
Well the map can be opened by the editor, however you will not have any spawnpoints, capture points, etc.. to see that, create an "Editor" folder here
Now we are going to put in the gameplay file you want, you know in game you have 2 game modes, conquest and co-op, it is these files that have the gameplay parameters like spawn, flags etc..
Now open the gameModes folder wich have 3 folder "gpm_coop" "gpm_cq" "sp1"
Gpm_coop = co-op with bots in the multiplayer menu of the game
Gpm_cq = conquest [only human players] in the multiplayer menu of the game
Sp1 = co-op with bots in the solo menu of the game
A word of advice, do not use the solo menu it is too limited, always use the gpm_coop file
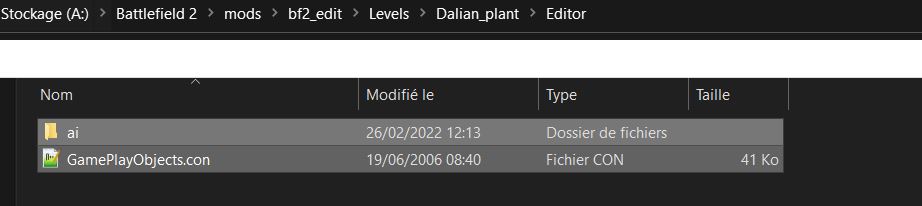
So open the gpm_coop folder, you will see "16" folder wich is related to the size (3 sizes, 16,32,64), open the folder, you will see "ai" folder wich content the ai strategie, and GamePlayObjects.con wich content the spawn, flags... copy that into the "Editor" folder created previously.
It's almost done, but don't forget the crucial step!! The editor can't read content with the "read-only" attribute
So go the the "mods" folder and do the steps on the screen below
It's gonna take a little time... and it's done, now launch the editor with sp2 mod and admin
Select you mod and click OK

Ignore the error messages in red, the publisher dates from version 1.3 of the game and thinks there are problems when not.
You will see that the loading is rather fast, it is normal, the editor did not load anything
Before doing anything, load the resources you have extracted, screen below
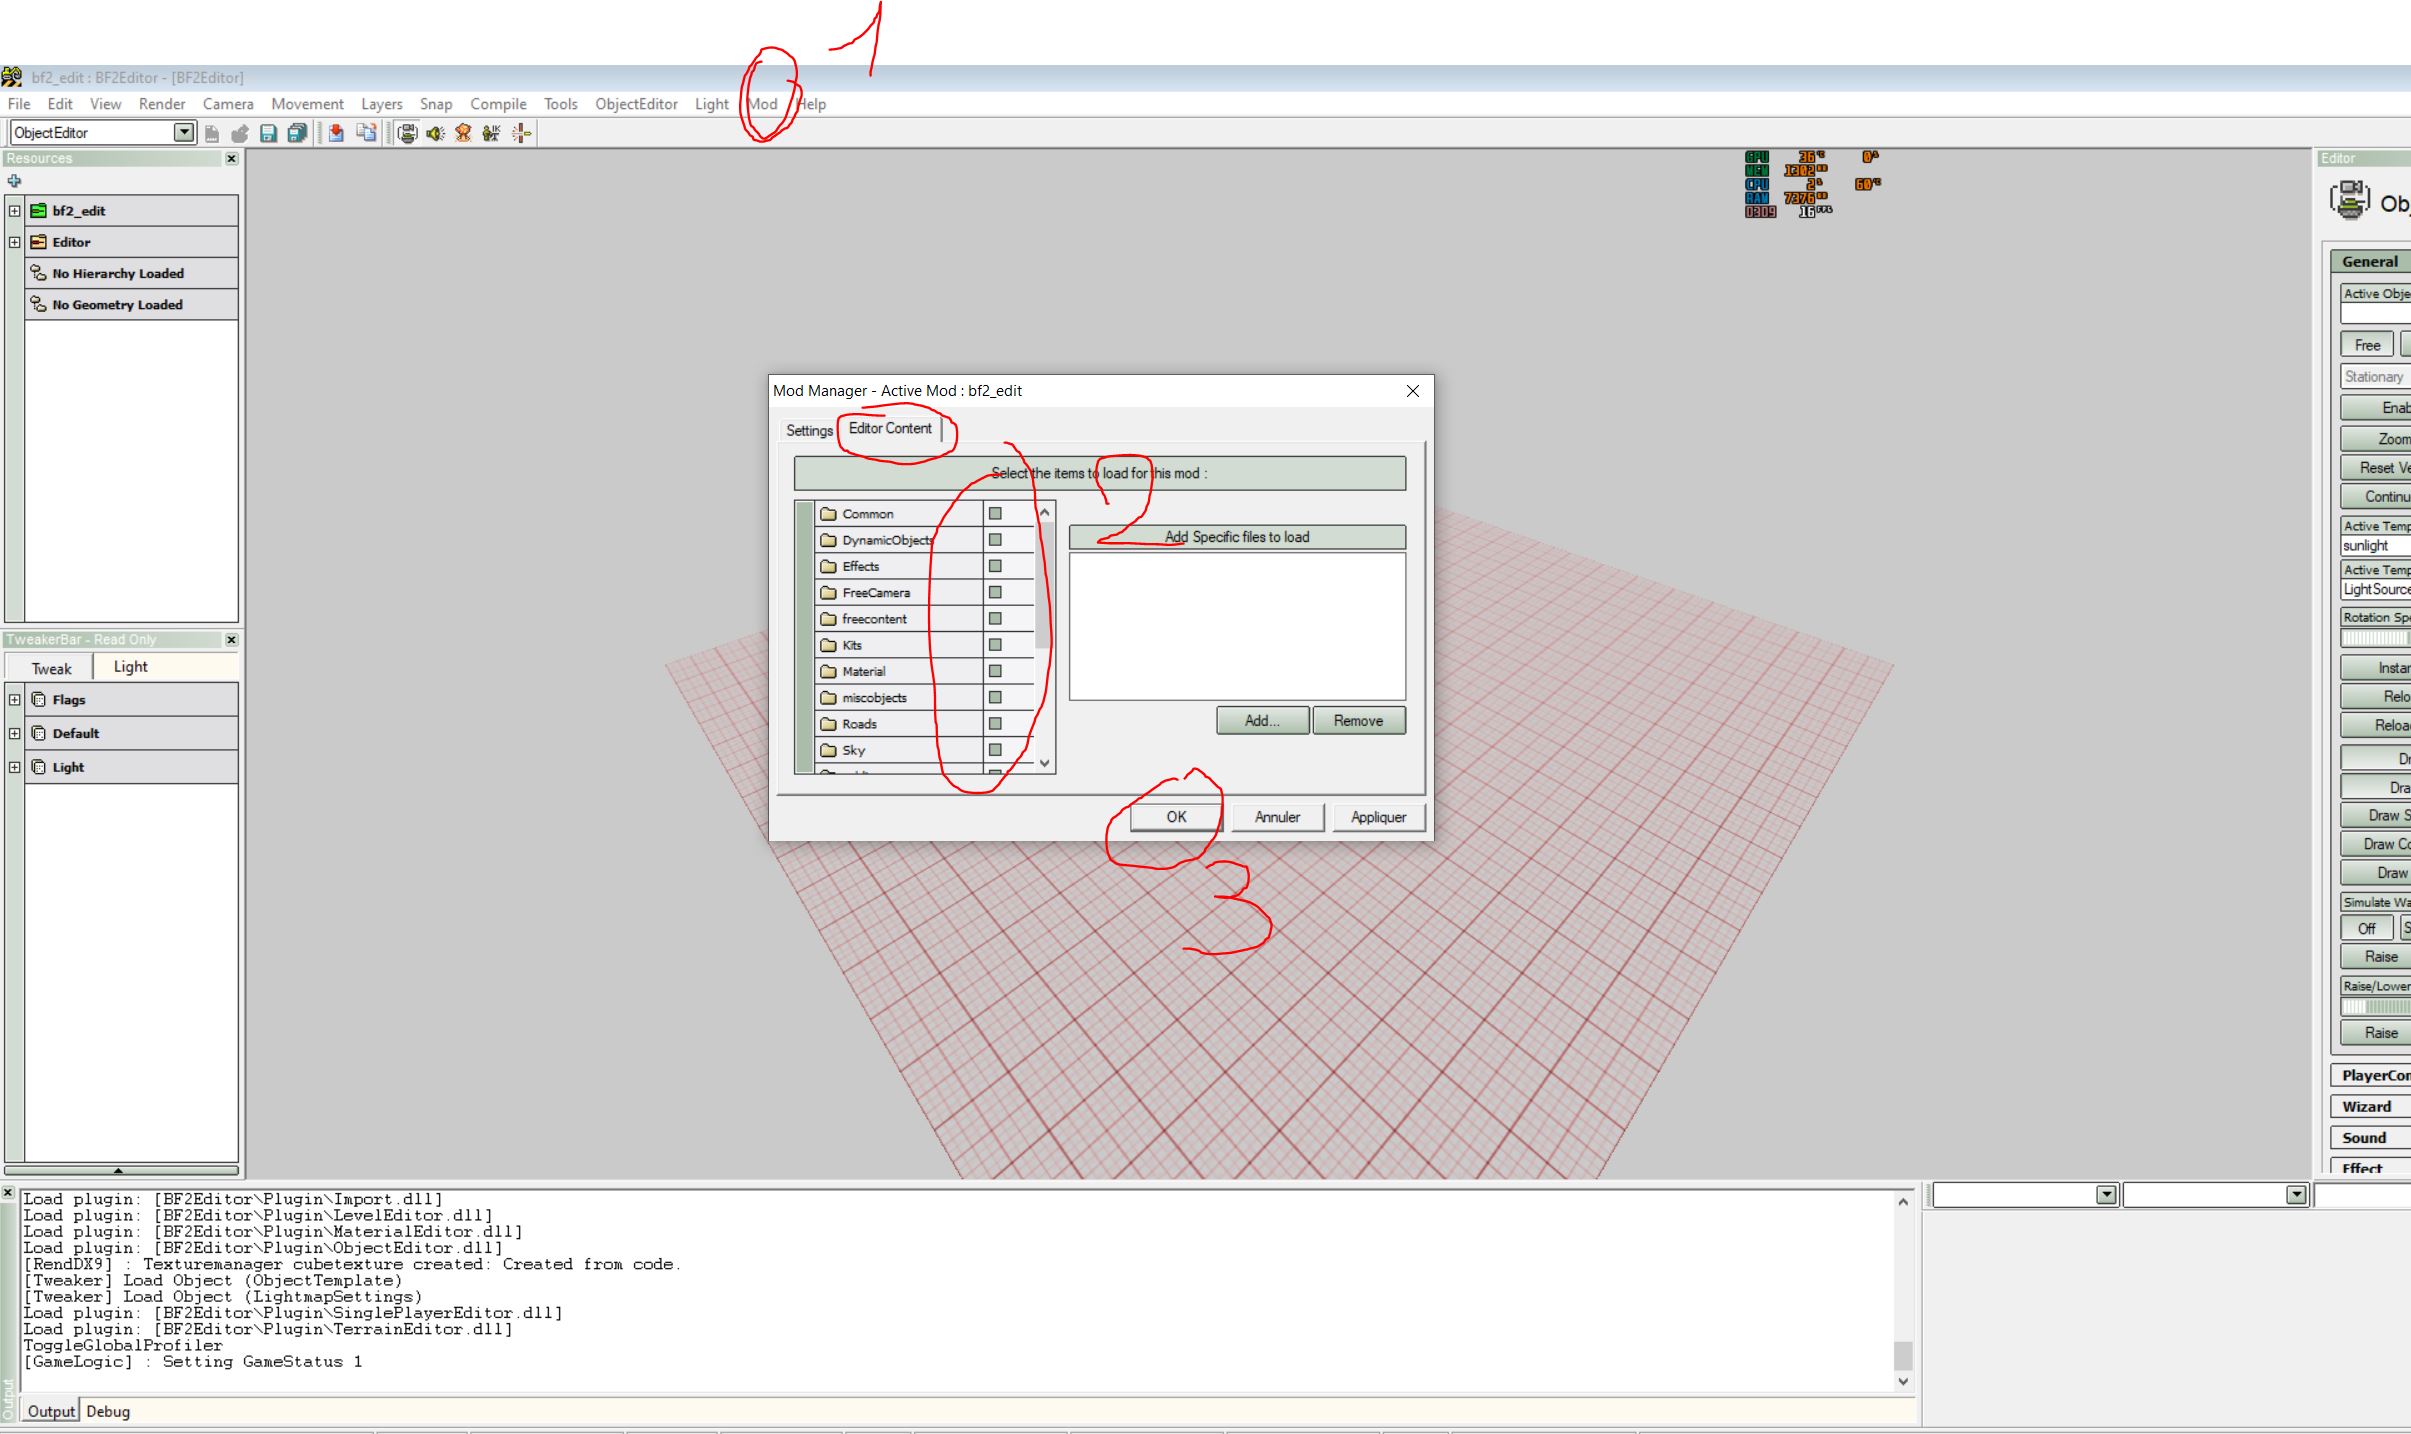
And then go make yourself a coffee.... Please note that this step only needs to be done once.
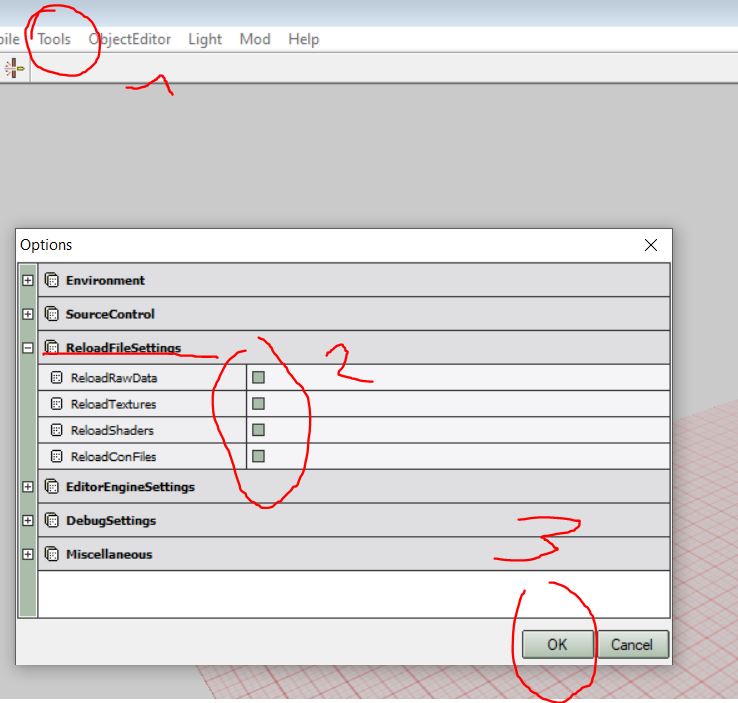
Then just a little thing to do to avoid problems and it will be good screen below [tool/option/] and checked that everything is checked in the "ReloadFileSettings", this step only needs to be done once.
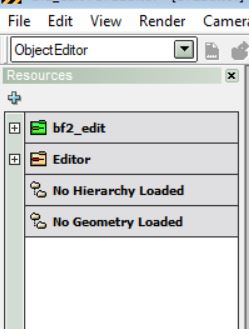
Well now that it's done, look at the top left, you will see the editing mode, by default it is the objects, switch to level editor if you want to modify the maps, terrain is to create maps or modify a terrain, animations etc etc..
Now the last rule and this is the most important! Bf2 editor is old and made for old versions of bf2, so when you save stuff with bf2 editor, it will delete stuff and generate crap on a regular basis !!!!!
That's why you have to use notepad++ in parallel
And that's also why I advise you to redo a copy of the mod you want to edit and thus avoid having to repack everything in the zips afterwards, make an unextracted copy of your mod, and then copy the files edited from bf2_edit in the mod you will use (don't touch the "bf2" mod don't forget"
Bf2 editor can still save maps, it does it well, but really avoid saving objects!
Okay now after the parenthesis, let's open a map :
Switch to level editor, File > load level, and select the level you have extracted before, in this tutorial it was Dalian
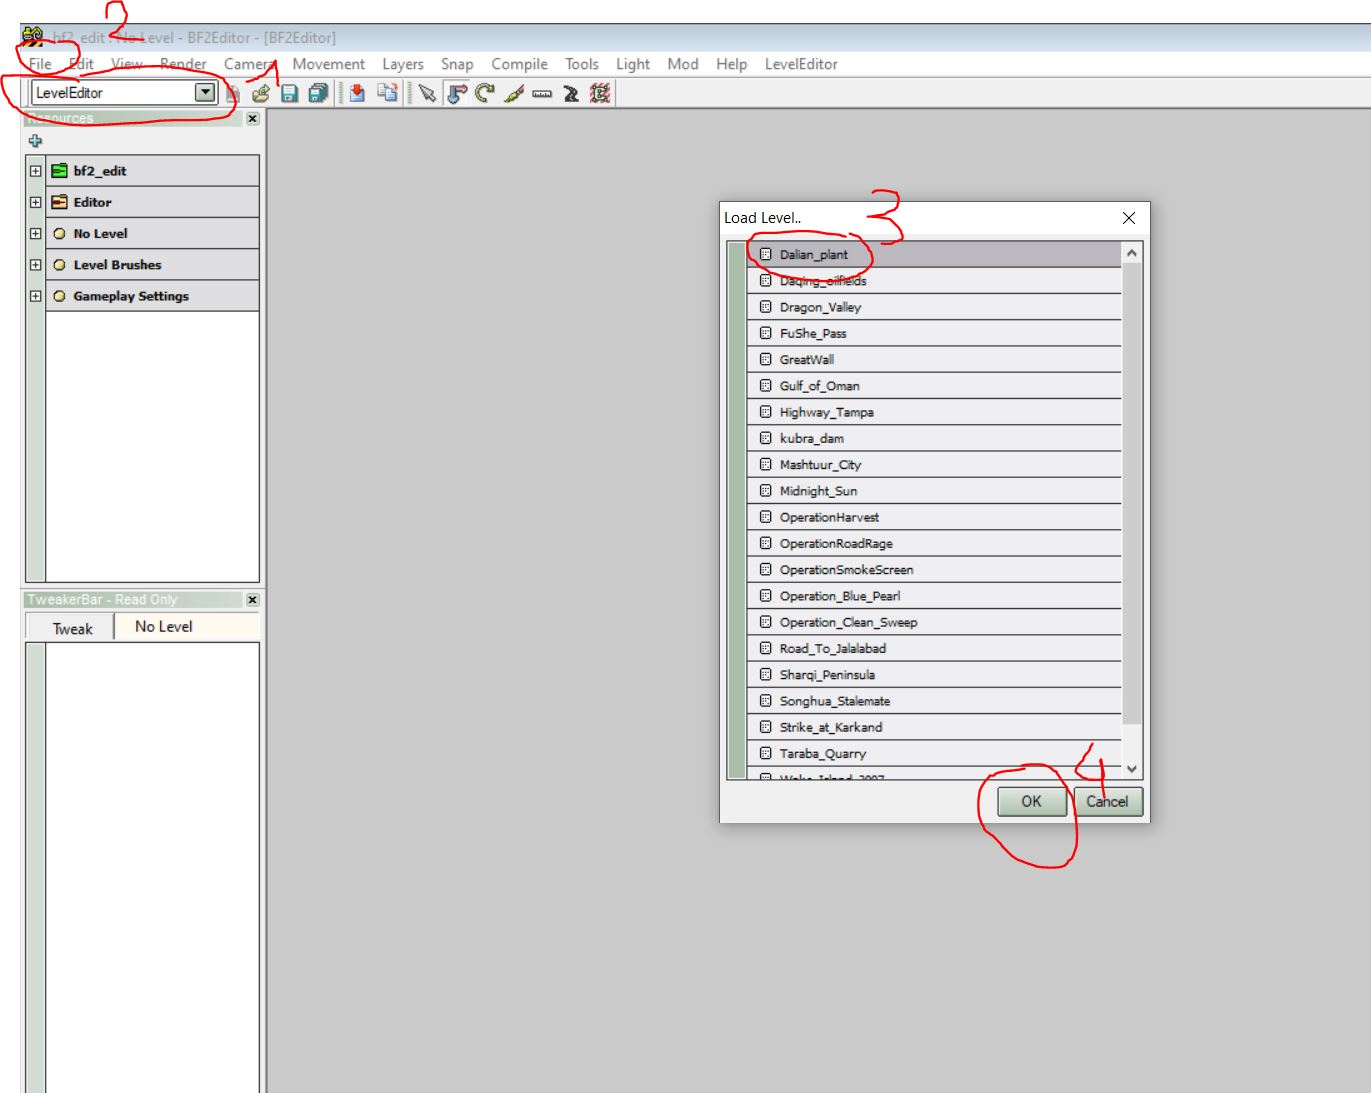
It will take some time, and you will get the map loaded
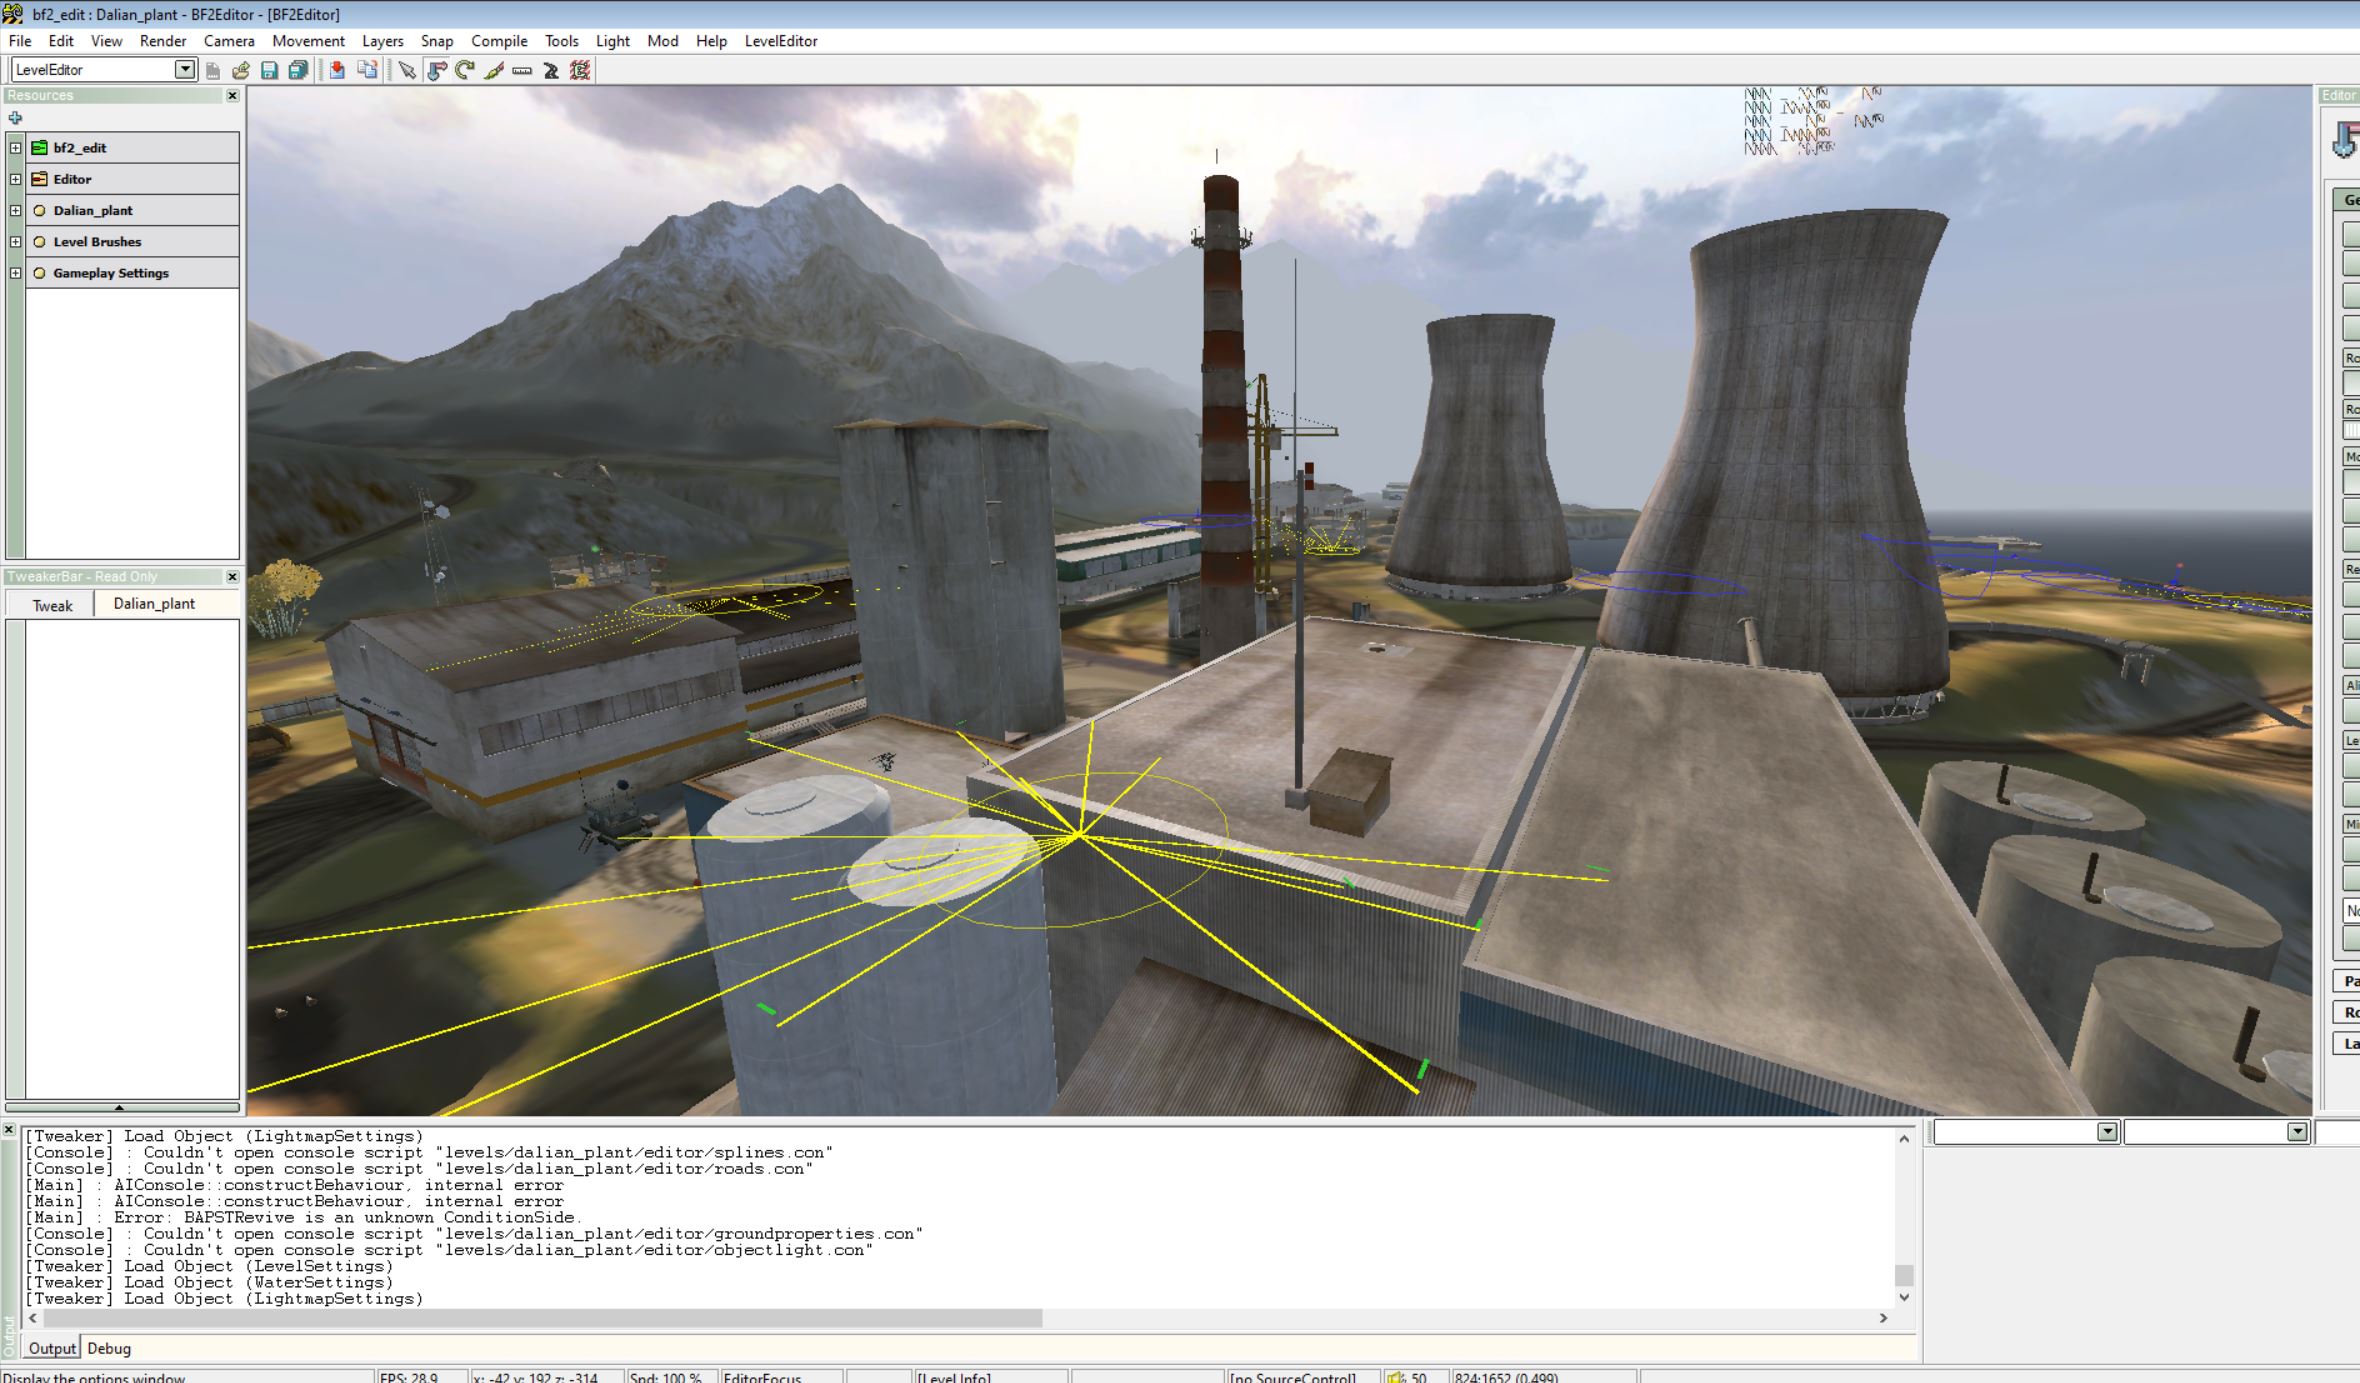
Familiarize yourself with the interface, go to the "Render" menu to show, hide things, right click to create spawns etc.
You can move with Z etc, move the camera while keeping the wheel mouse pressed, you can go to Tool/Shortcut manager to see the commands
Little exemple with the tank, click on it and you can edit lot of things, moove it, rotate it, edit the spawn time, replace by a jeep, everything ! 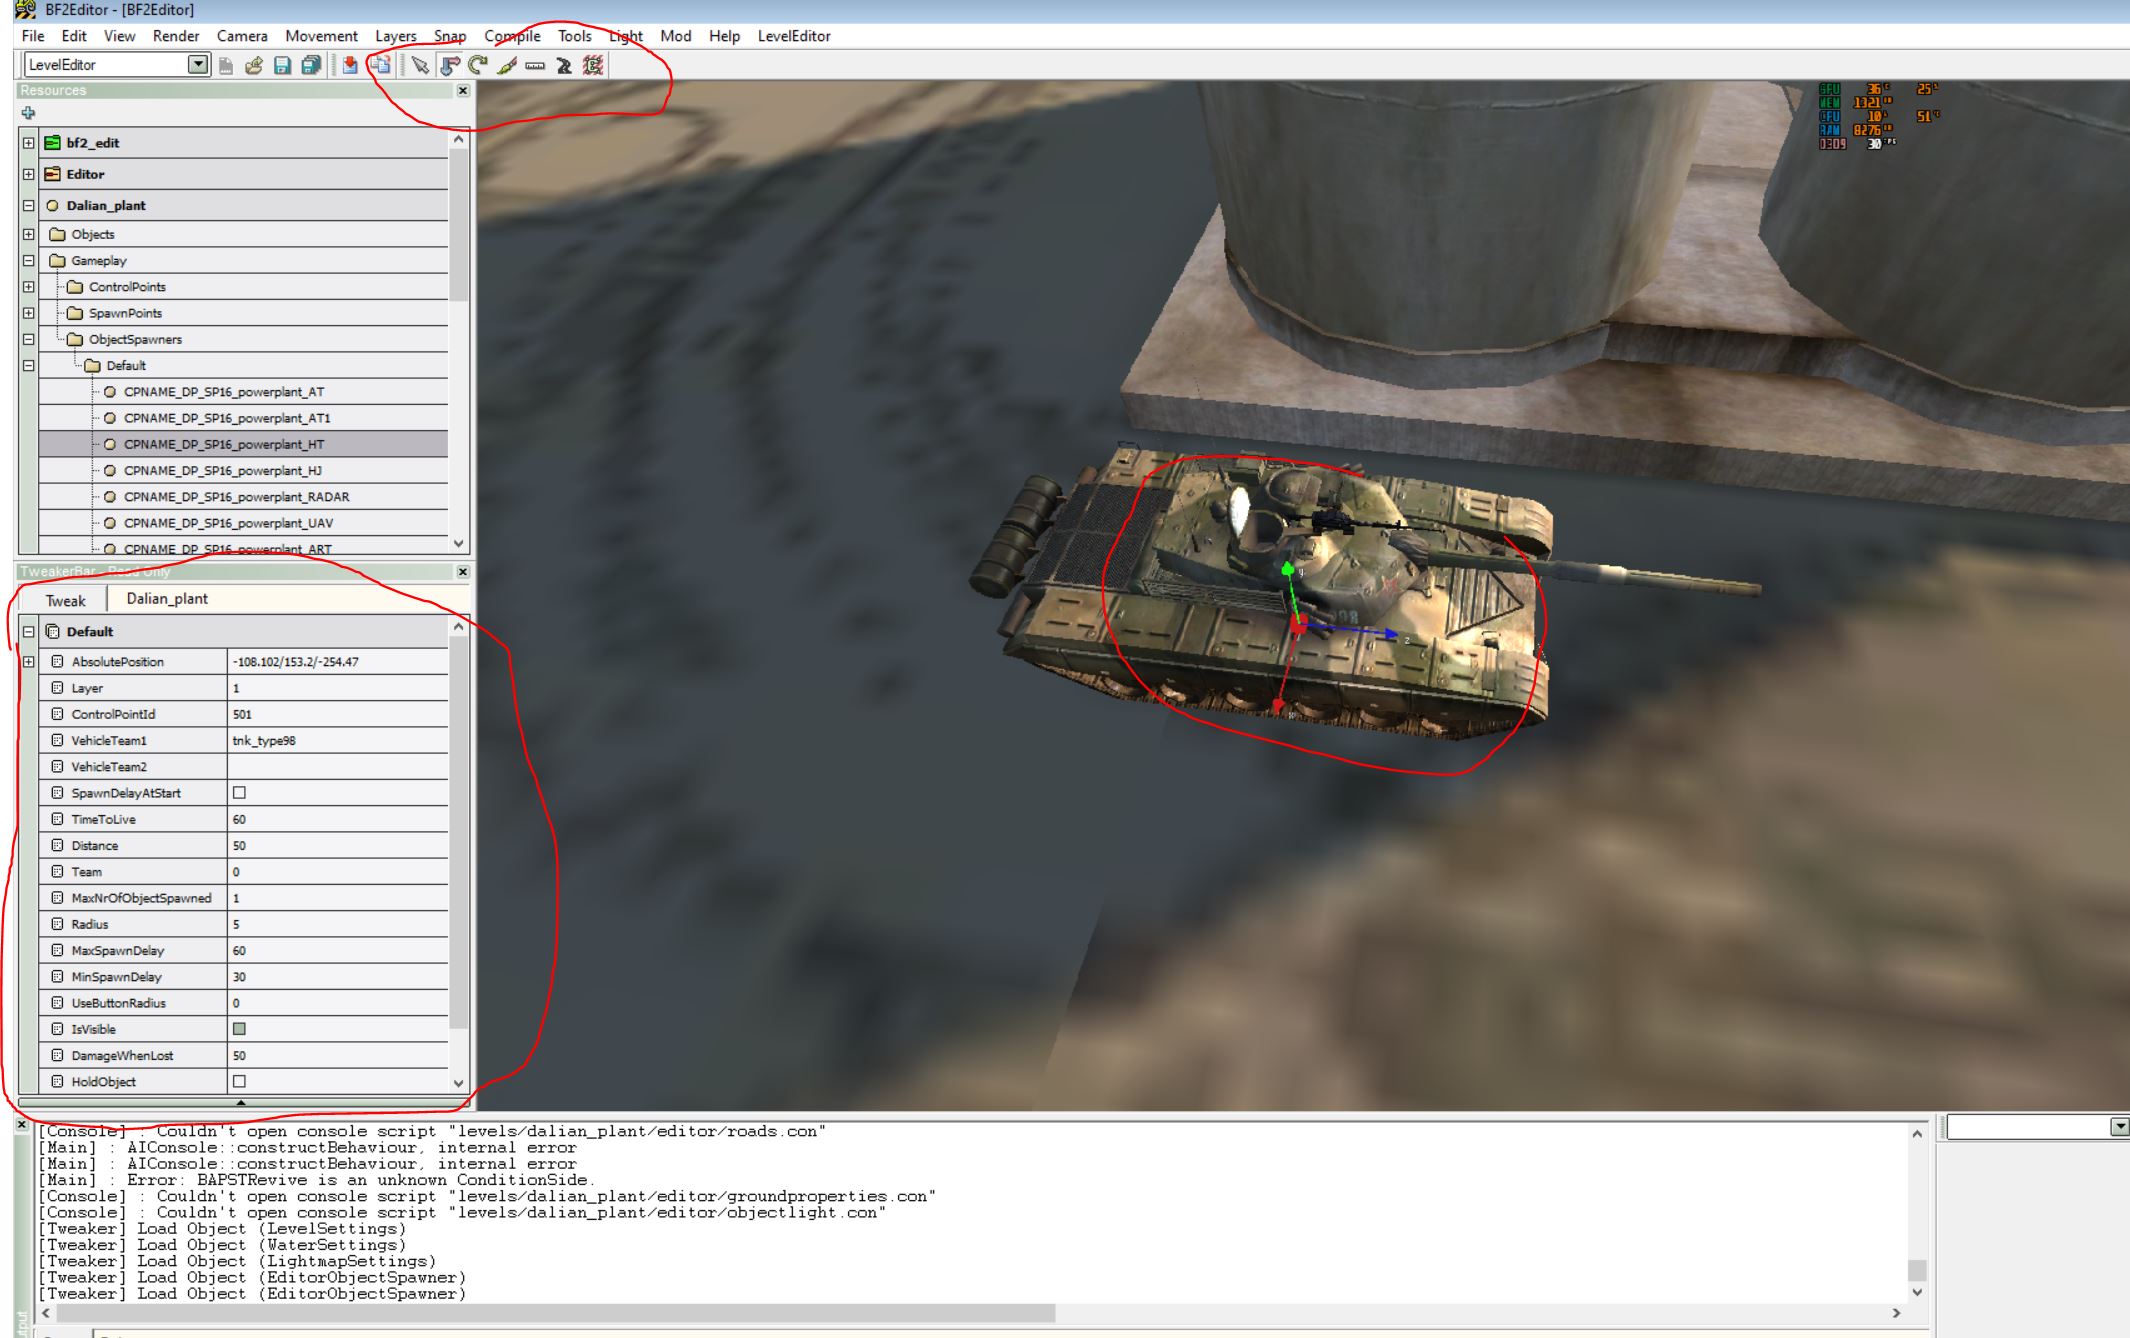
You can also click on camera> Snap to ground
It will spawn a soldier for you, Be careful, this can crash the editor if you use custom kits and soldiers, if this is the case, open the Mod.desc file in your mod and add your kit and the soldier that will be used by the editor.
I'm not going to explain here how everything works, the tutorial will last 25 years.....
Good you have modified what you wanted, perfect, go to file > Save
Modified gameplay will be saved and replace existing files in the "Editor" folder you created in your map
Well that's all great, but how do we add our modifications to our game? Let's go to "mods" folder
So remember what i said before, so i have create a new mod, wich is the one i will use to play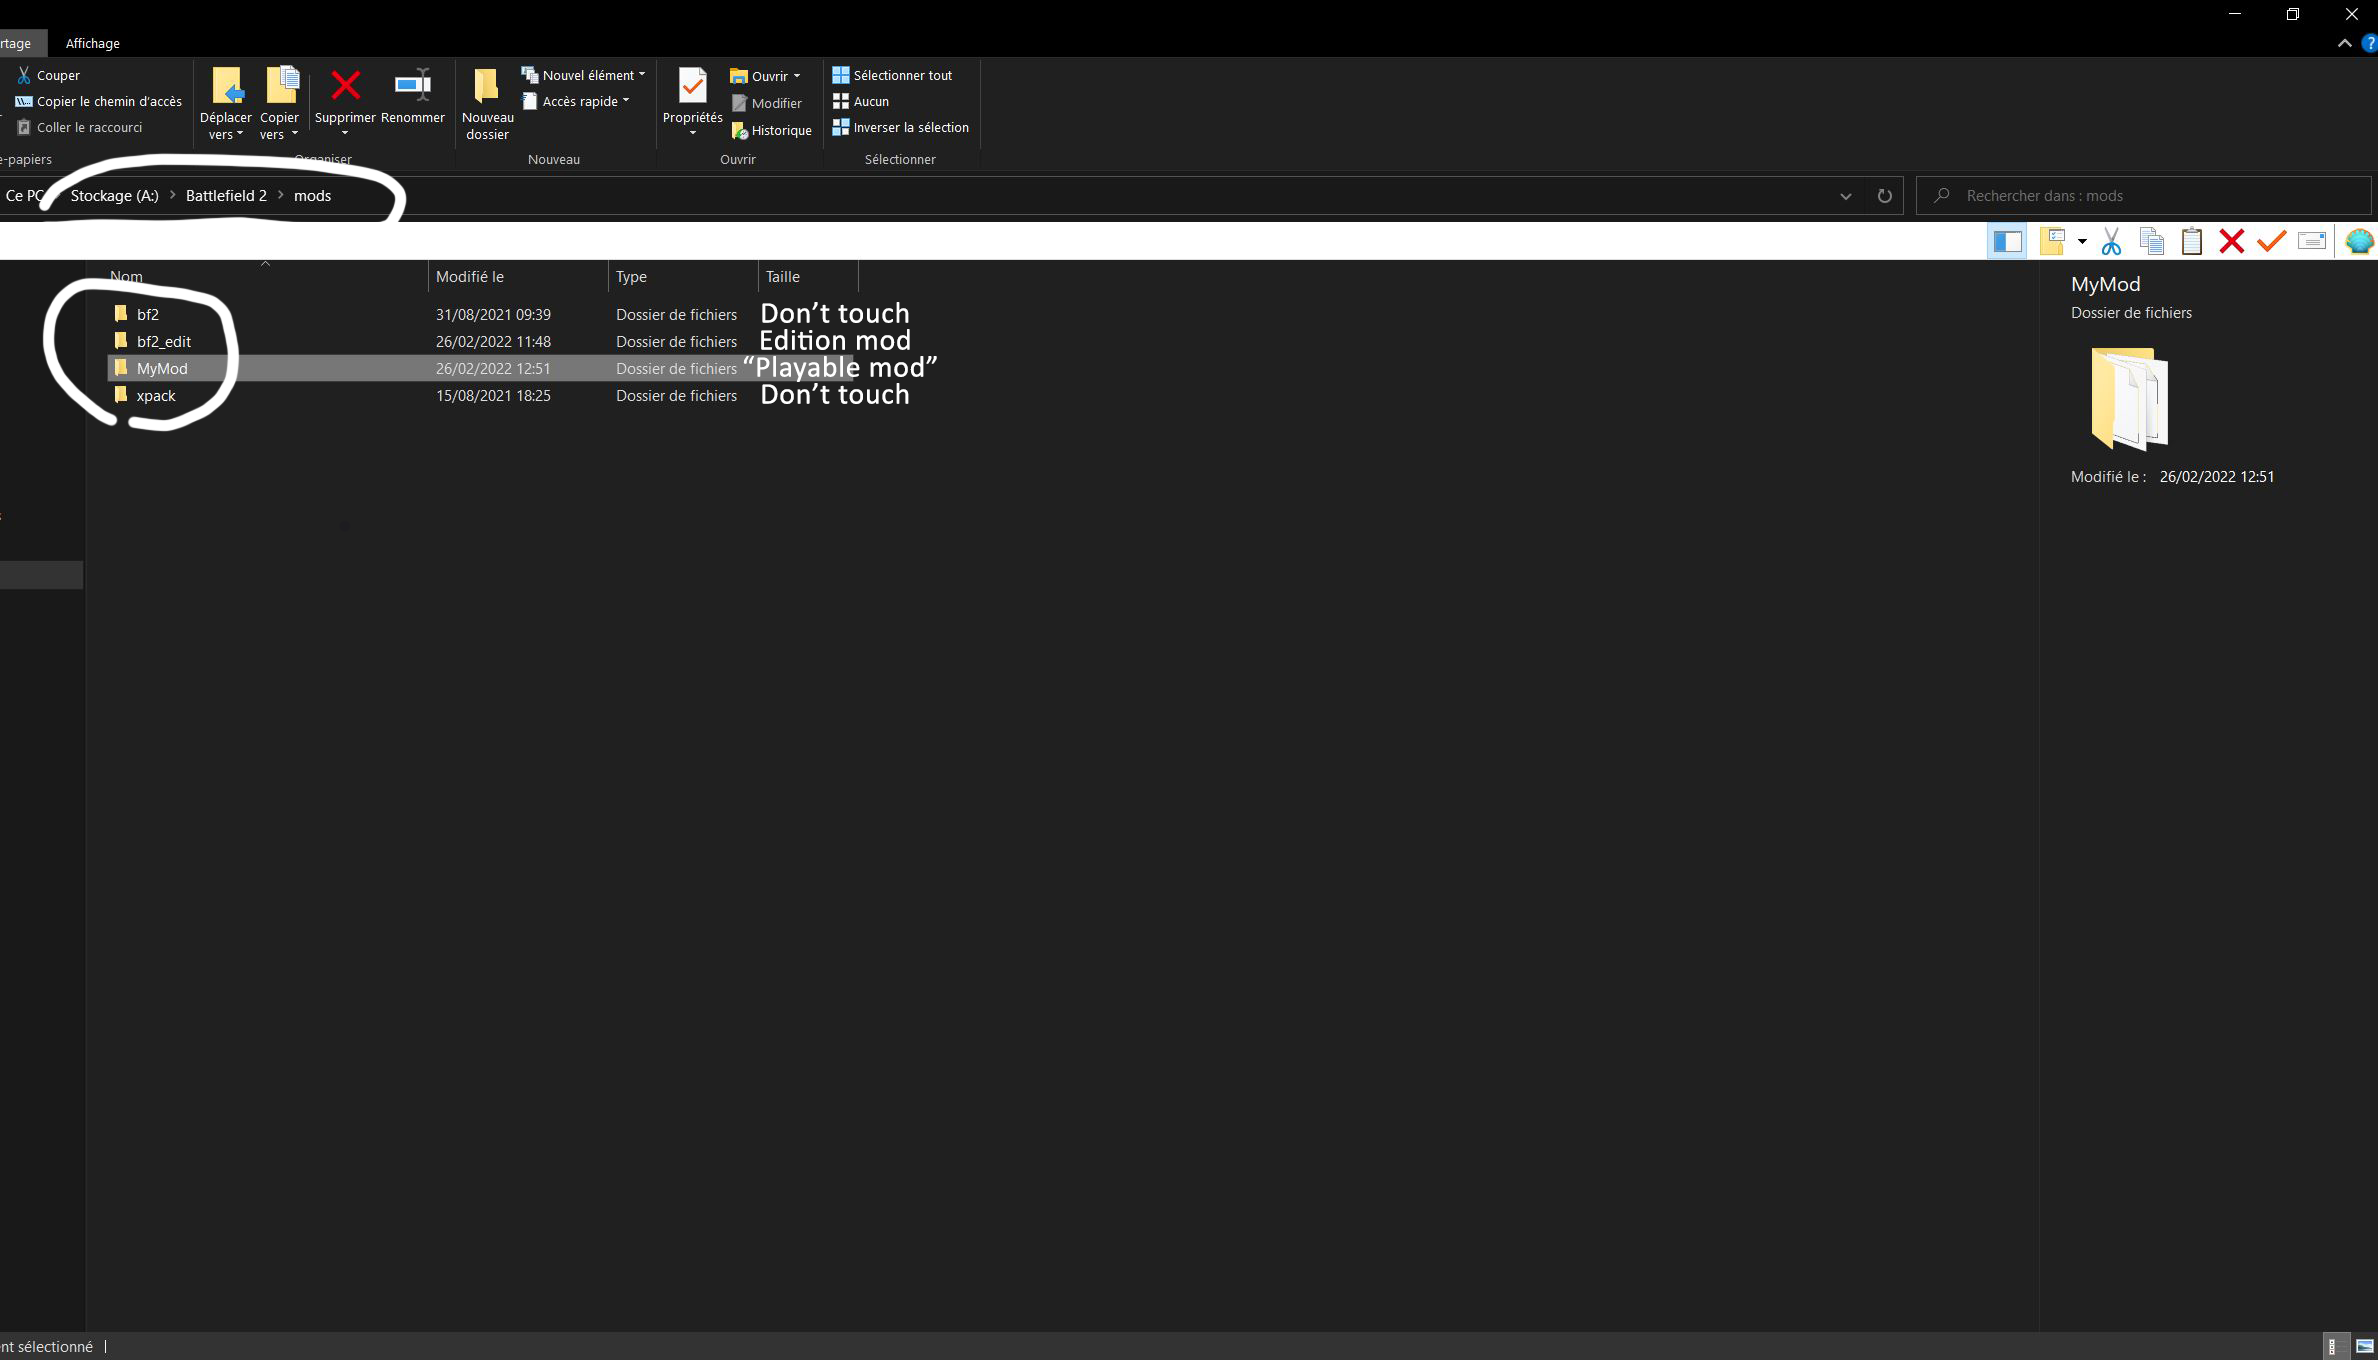
Never touch "bf2" and "xpack" folder, "Bf2_edit" will be our editable mod, and "MyMod" which will be used to play ( MyMod is just a copy of bf2 with the md5 archive removed, do the same)
Okay now we're going to put the Dalian files that we modified in our playable mod, the best thing is to open folders next to each other
And open the dalian map in each folder, Levels > Dalian_plant
Open the server.zip, go to the location of the original file (GameModes/gmp_coop/16/) and drag the files from the "Editor" folder, into the .zip
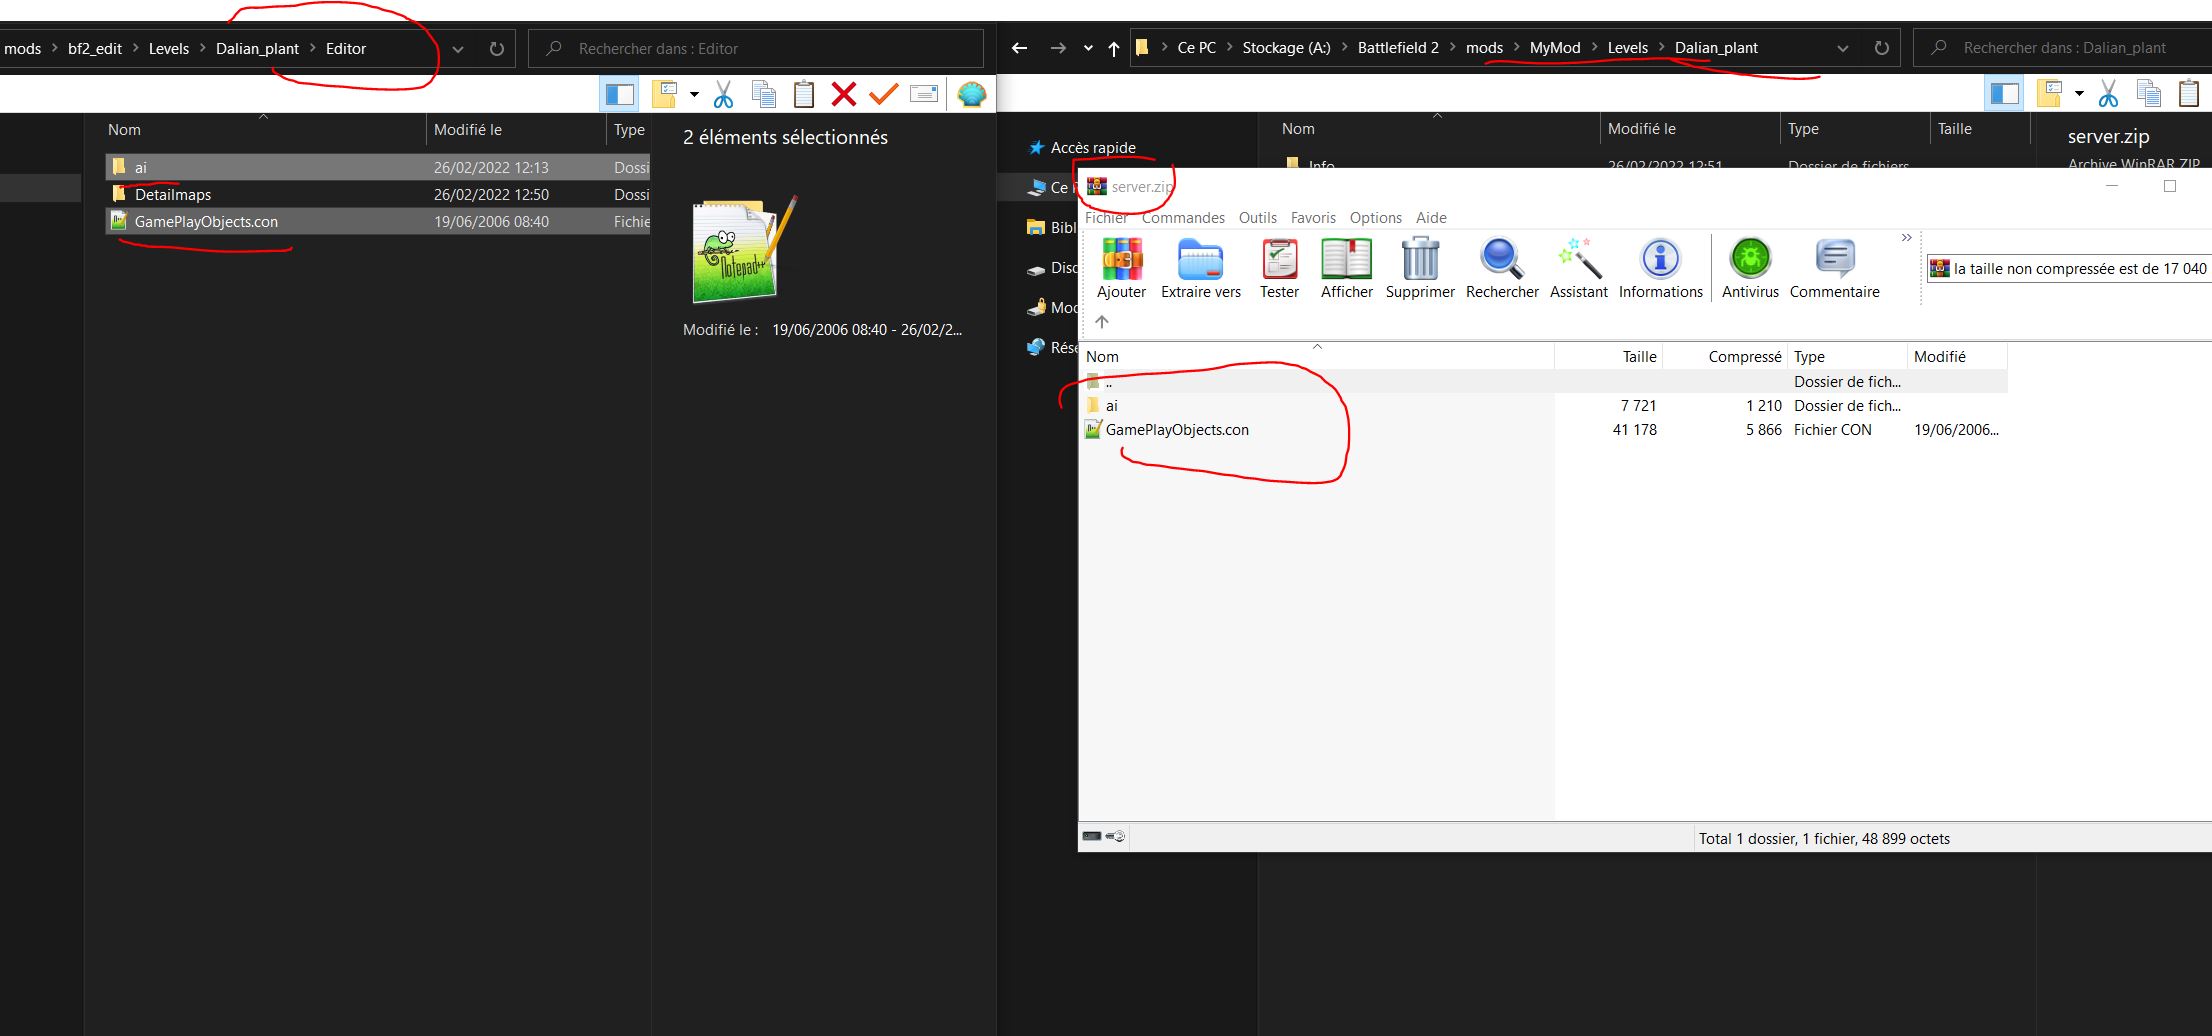
Ignore the Detailmaps folder, it is only useful for the editor.
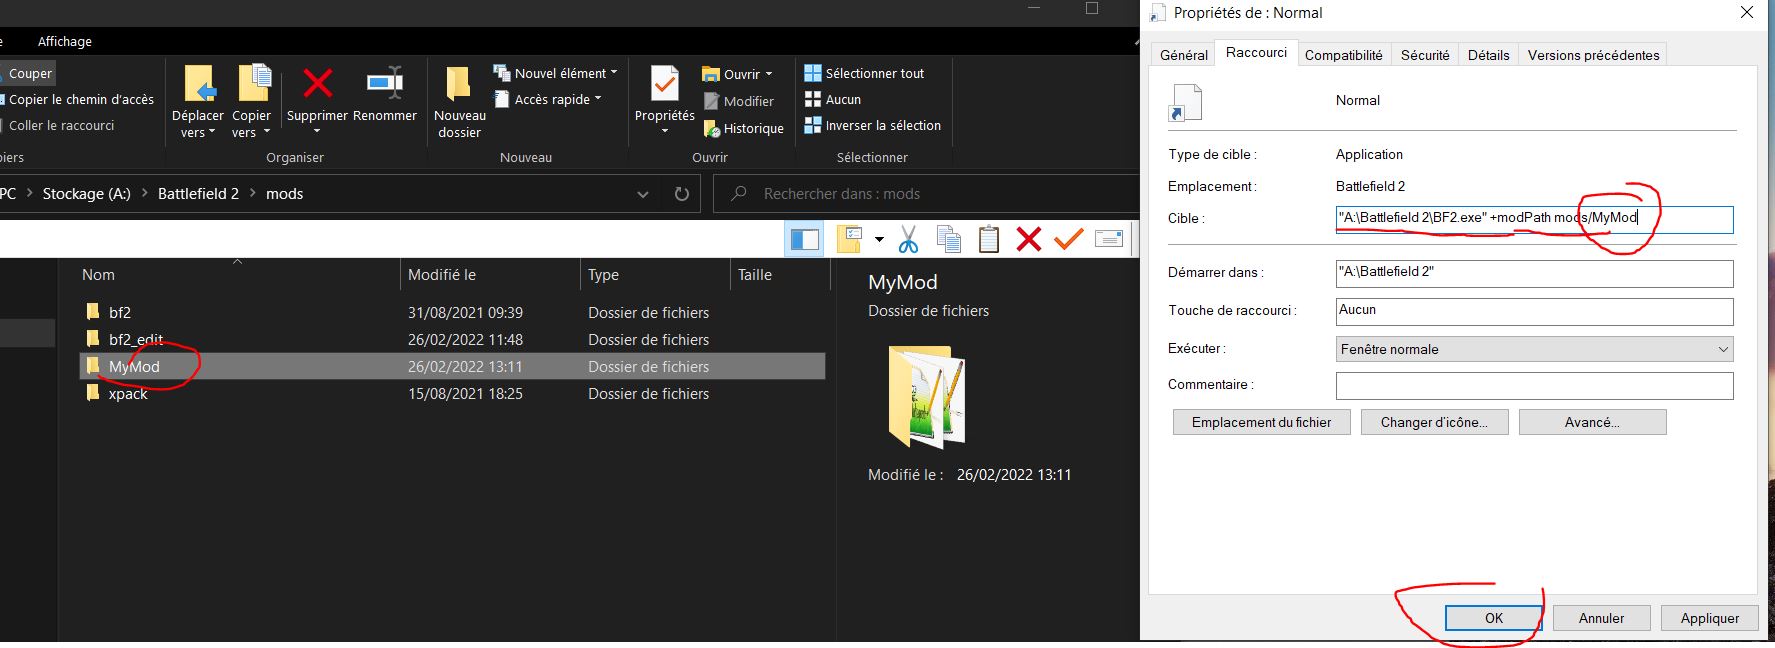
Now that it's done, launch your "playable" mod, right click on a bf2 shortcut and modify the target to start on your mod
There you go, don't forget that it is the gpm_coop that you have modified, and therefore the modifications will only be visible in the menu multiplayer/create local/co-op mod, not the singpleplayer menu unless you have copied the files in the sp1 folder of course :D
And here I think it's quite detailed, I took a really long time to write all this, don't hesitate to leave a comment to let me know if it was useful to you :)
For more information, join the discord modding server : Discord.gg
If you want to save that tutorial, use chrome, then print tool, and save to .pdf


Great tutorial!
Been wanting this tutorial for very long thanks!
¡Many thanks for this!.
Thanks ryan that really help it i forgot how to use bfeditor so long not touch
Great tutorial Ryan! Is there a downloadable version? Would be a good idea to keep a backup of this.
Thanks, you can download that with the "print" tool of chrome, and then save to .pdf
Thank you for this! IS it possible to mod the speed in which soldiers move and also the health of the player / soldiers or damage stats for the weapons?
you can edit those in the directory if you want. I do not know which files but it's in there.
Excellent Tutorial saved it the way you've said. Thank you.
Great tutorial, friend!
If someone want know more about making maps, you can find someting useful here.
Bfeditor.org
Realitymod.com
Create your maps happily!
it says you need dx9c, how do you fix that?
merci beaucoup pour cet excellent tutorial !
This comment is currently awaiting admin approval, join now to view.
Can I change the text in the map briefing, game mode and server message section (as the map is loading part) using this tool? ServerSettings.con only allows me to add one line of text.
Great work. I'm overwhelmed at first sight, but want to get into editing and creating levels. I assume that's what this editor can do. BF2 is so deep and so much to learn. I installed the F22 Raptor mod, but the com solders just fly it, but don't shoot anything. It's the first error message that appeared in red text when I set this editor up. Also, is this a mission editor?
Here's instructions I found on how to change the text, was wondering if it's the same program. I looked on the net for mission editor, but this editor was the only one that was found:
1. Go into the scenario editor.
2. Load a scenario that is already there.
3. Go to the "Mission" screen (highlighted in red).
4. Select the "Mission" section, below the red part.
5. Select "Text" to go to the text portion.
6. Click "Export" to export. You'll have to give it a name.
7. It will export to the "Game Files" folder.
8. Here, you can look at it. It's a regular old .txt file.
9. You can now edit that and replace any text you want to. Be sure to leave the "^" symbols in the text document. This is a delimiter that separates the sections of the briefing.
10. Once edited the way you want, simply put into the same Game Files folder and Import it. Save your scenario.
I wrote the message above this and accidently sent it before signing in.
Any help would be much appreciated.
....\bf2\Levels\GreatWall\Info\GreatWall.desc ->NOtepad++
Replace "LOADINGSCREEN_MAPDESCRIPTION_GreatWall" with "your own text"
Wow, you replied to two of my questions. That's amazing! I'm just trying to locate what you have written. Pretty sure I know where you mean. It's really handy you can do it for each separate map. Thank you! :-)
You are the man! Thank you so much!
This comment is currently awaiting admin approval, join now to view.
This comment is currently awaiting admin approval, join now to view.
Great tutorial. I am always posting links to this!
Great tutorial! been looking for something for years thank you.