Originally posted here: www.planetavp.com/modmaker/
Created by: William "modmaker" Bostjan
Mirrored here for archival purposes
Complex Trigger
- Player Triggerable
- AI triggerable
As complicated as you want to make it. XenoCommand is probably the most complex series of triggers in AvP2. In the process there are many interesting events implemented by Red Riot. If you get a chance , search out the downloadable .ed file and have a look at it. With a little due diligence, you will be able to understand complex triggers.
We have already had a look at a basic trigger. A single event.
in the trigger's properties, you'll come across a list of targets and messages. something like:
the simplest way to approach this is by just filling in the fields:
- target1: door_27
- message1: trigger
- target2: door_28
- message2: triggerclose
- target3: keyframer_truck
- message3: pause
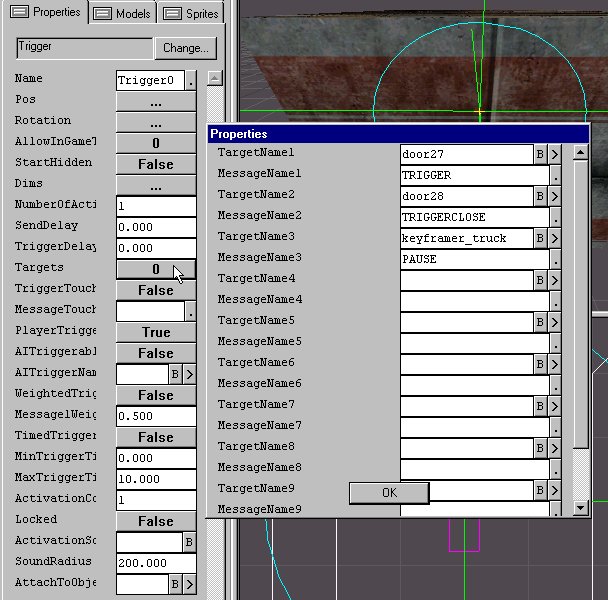
but you are only scratching the surface here. there is another way to enter commands, which is by nullifying the target field and entering a message string into the message field. the same example as above, using this method, would turn out like this:
target1: [NULL]
message1: msg door_27 trigger; msg door_28 triggerclose; msg keyframer_truck pause;
When you put [NULL] in the target field, the engine knows to ignore that field and just execute the string in the message field.(you can also write 'bogus' or sdf, or whatever, as long as you don't put the name of an actual object in the map. you must put something other than blank space here though
the syntax is "msg [target] [message]"
where target is the name of the object to receive the message, and message is what you are telling the object to do. keep in mind you can click the little button next to the message field to look at the whole message if it starts getting too long to fit in the 1-line text box. there is a limit to the length, though, so watch out. if you are sending a multipart message to a target, that message must be in parentheses.
for example: msg AI_predatorkiller (active 1)
succesive messages in the same text field must be seperated with a semicolon. for example,;
msg AI_killer (active 1); msg Plants_Group (animloop wind); msg Glass_Wall destroy; msg Door_9 lock;
with this approach you can do much more. here's one additional command:
delay X (message);
when this message is processed, the engine will wait X number of seconds before processing the message within the parentheses. for example,
delay 4.0 (msg AI_killer (ag attack; trg player );
when this message is processed the engine will wait 4 seconds, then tell AI_Bob to add 'attack' to his list of goals and target the player. there are more commands, including loops, random trigger, and identifiable delays and loops, but i'm not sure if they were included in the AvP2 TRIGGER NOTES docs.
Triggers can get fairly complex?
This is just skimming the surface. Triggers define interaction in a map. Good trigger design make a game enjoyable. Partially its anticipating what the player will do, and what experience they will have, but it is also, setting a balance. The third Trigger tutorial will build on these concepts and the information in the docs.
Keyframer
- complex movement of objects
- base and keys
- Setting the path
A Six floor elevator by Coty is one complex and interesting use of a Keyframer. MMost keyframers have an object like a truck or a dropship following a complex path of keys. But Coty's elevator, utilizes triggers to make a truly unique mapping accomplishment. inevitably make.
Keyframers make dolly pans and intricate action in cinematics and ingame poissible.
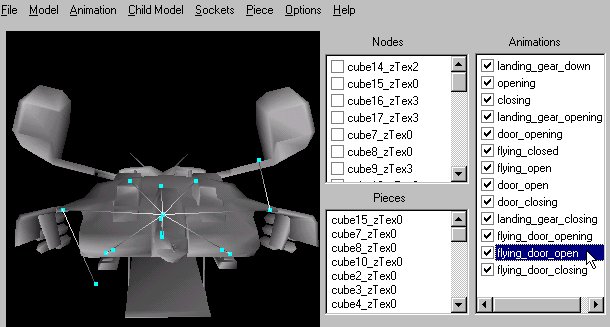
"I want a drop ship to fly through the sky and chase after a predator ship. I want it to shoot missiles, I want it to look amazing" Everybody want to make things look cool. The best way to do it in Dedit is with a Keyframe. You basically create a brush, bind it to a door object. You then attach the model in the door's attachment field, and use the Keyframer to move this door object and everything attached to it through the keyframer's path.
The two impoortants for a Keyframer to work is the KEYFRAMER Object, and the individual keys which are placed to set the path on the map. There are some basic rules that you can follow that will help you keep track of your work. Place the Keyframer at the start of your objects motion path.
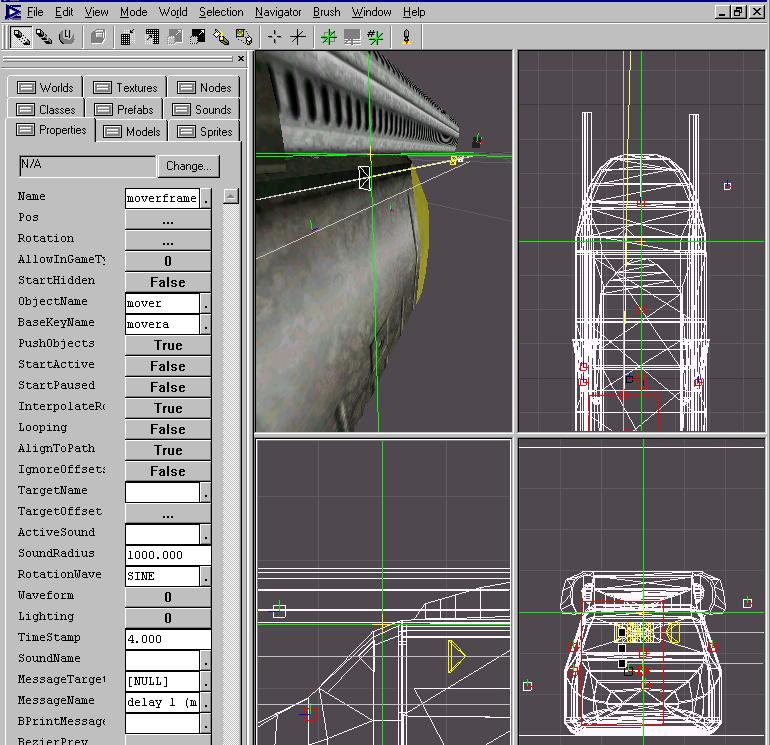
Lets look at some of these fields in the properties tab for the keyframer. The big ones are;
OBJECT NAME; this is the name of the door object we are using. It may be visible and textured, or it may be invisible with an .abc model in its attachment field
BASE KEY NAME; This is the name of your first key minus the numbering. In our case it is movera, and the first key will be named movera0. pretty straight forward, but this is where most the errors happen. Keyframers are finnicking about being exactly set up with consistent names and numbering.
Most of the other things are self explanatory. START ACTIVE LOOPING, all situation specific. If you have read the other tutorials then you are already familiar with these and I don't need to re explain them.
Now lets add some keys.
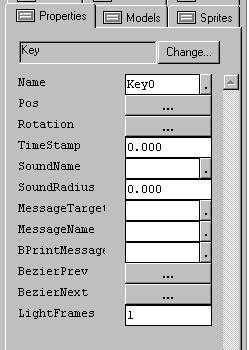
Lets add some keys the keys will define the path your keyframed object will follow. The key defaults to the name key0, change the name to your basekeyname, and if you copy/paste, you'll get a sequential list of keys that will only need a small adjustment in naming.In the Nodes window add a new container and name it moverstuff or what ever you named BaseKeyName set it as your active node, and then add your first key in the same place as your under your KeyFRAMER
Let recap cause this stuff can get messy.
Name your first key your BaseKeyName. Something short, and unique, in case you decide to have more than one keyframer you wont get confused. Place your second key where ever you like a short distance away. Note for you keyframer path to work numbering is important. If your numbers at the end of name are not double digit (apart from the 0) it will not work, therefore lets look at the syntax.
Quick note on the Keyframer syntax?
Keyframe Key syntax
Some simple rules, more to help the engine have a standard pattern of numeration to interpret for a working framer:
Base Key name: "movera"
Keys in order of 0 to 22
"movera0"
"movera01"
"movera02"
...
"movera21"
"movera22"
Always start with a "0" for the first key, and put a 0 in front of the number 1, so 01, 02, .... guarantees a numeric consistency when you are under 10. If you think you will hit a 100+ keys (though there is no reason why you would have that many, you could adapt the numbers) but don't do it.
NOW if you go into the node tree and rightclick on the keyframer, mine here is named moverframer, you get the option to set path. This gives you the visual representation of the path in the floor view.
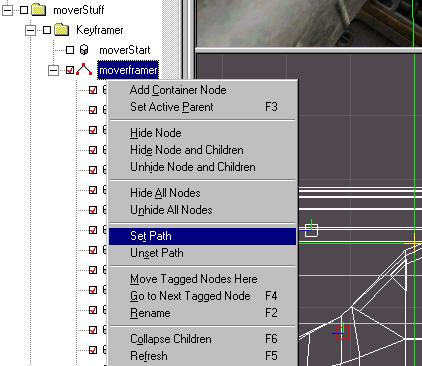
When you go to your node window and highlight your node with your keys in RMB and setpath this will give you a visual representation of your path highlighted in yellow. You now have the option to adjust the curve of the motion at any of these points.
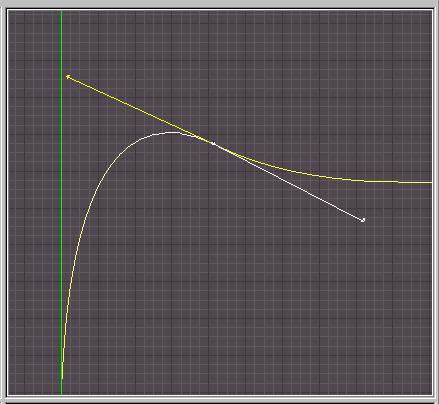
Each Key has a BezierPrev and a BezierNext field.
You can alter that path route by being in object editing mode (Ctrl+h) then holding down LMB+P this on alter the path between this node. You simple press P and move your LMB over the key and one of two arrows indicating prev brezier and next brezier will create a tangential arm with an arrow on it. Move it around as you want. If you can't get the arms, place a value in the brezier field to get you started. vectors of (1 1 1) will work.
KEYFRAMERS are influenced by time
Keyframers are about time and distance. You are moving an object, usually a door or transluscentWorld Model over a distance over a period of time. The keys set the distance. The time can be set two ways.
Each individual key has a TIMESTAMP option, the amount of seconds you place in there is the time it takes to get to this key from the previous key. You can punch in a value of 4.00 seconds. Using this method gives you more control on setting a Keyframe time.
The other option is to set the overall time of the entire keyframer in the Waveform sub menu. you can set total length time the keyframer takes to travel the total length of the path.
Two options, appropriate for different situations. Practice will figure out which is appropriate.
MESSAGING
The last big thing Keyframers can do is , send a message when the keyframed object gets to that particular key. So if for exmaple you have a plane flying thorugh the air with your keyframer , and now you set the brevier curve to send it hurtling into the ground, the key that is just at the point of impact could send a message when it gets there to trigger an explosion. You got to love this stuff. I think you get the idea. It is quite versatile.
Keyframers are used in the CINEMATIC TRIGGER as well, though instead of moving an object it moves the camera that is created. The same basic rules apply.