I'll be honest, I don't quite understand a lot of the things that go into making a terrain. The purpose of this tutorial or guide is to share what I do know. I hope you find this helpful or informative.
I use these programs when editing a terrain:
-Photoshop CS4
-Notepad++
-RLEsBMPs
You can use these to extract the original terrains to use as a template:
-QuickBMS
-Arch
The first thing I do before making a terrain is getting a template. When I set out to make a terrain, I do not start from scratch. Go to *\TalonSoft\Tzar\Packs and extract the entire contents of terrains.wdt. Extract it to wherever you want, these will be your templates.
Once you have everything extracted, we can start making a new terrain. For the sake of this tutorial lets only concentrate on one template. Make a new empty folder on your desktop or wherever. Go to your extracted templates and copy these files:
- SUMMER folder (copy the entire Summer folder, we need all its contents)
- SUMMER.IMAGES.INI
- SUMMER.TERRAIN.INI
We're using Summer as a template. Paste those to the empty folder you just created.
The first thing I do is edit the terrains that are used in Random Map generation. Tzar does not use all available terrains for Random Maps so I always start with the terrains that it does use.
Summer is already setup for Tzar to use 3 terrains. It uses:
- 11.BMP (Dirt)
- 22.BMP (Grass Type 1)
- 44.BMP (Rocks Type 1)
You'll notice a pattern here, all ground terrains are multiples of 11. So, 11, 22, 33, 44, 55, 66, and 77 can all be used for solid ground. I don't think 88 and 99 can be used because those are cliffs. Beyond that is untested.
Random Map generation only seems to use one cliff type:
- 28.BMP (cliff type 2)
- 29.BMP (cliff type 2)
Just a quick note about cliffs, there's a pattern here too. All cliffs will always be the eighth and ninth texture (i.e 18/19, 28/29, 38/39, etc).
Other BMPs Random Map generation uses:
- 00.BMP (00 is always used for water/liquid)
- 01.BMP (shoreline, merges 00.BMP with 11.BMP)
- 12.BMP (small pixels that serve to merge solid terrains with each other)
- TREES.BMP (tree sprites)
- TREES_S.BMP (tree shadows)
- LIGHT.BMP (random map generation doesn't use this, it's always on by default. This is the light map, modify it or leave it alone.)
So, all the bitmaps listed above will have to be modified to create a new Random Map terrain.
STEP 1
I always modify the solid terrains first and build around those. You can use them as colour palettes for your other bitmaps. For this step I'll be using free stocks from: Opengameart.org
- 11.BMP
- 22.BMP
- 44.BMP
Open 11.BMP in your image editing program.
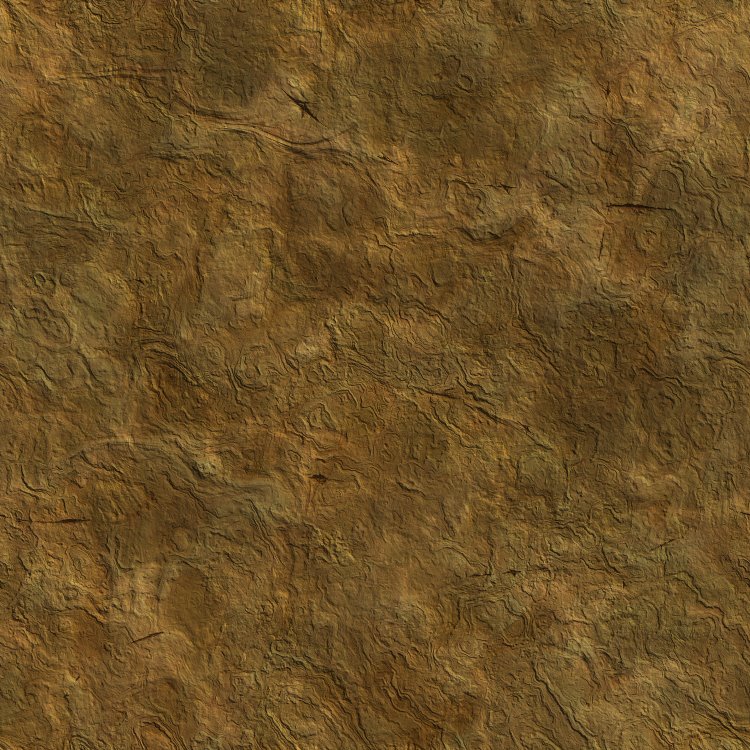
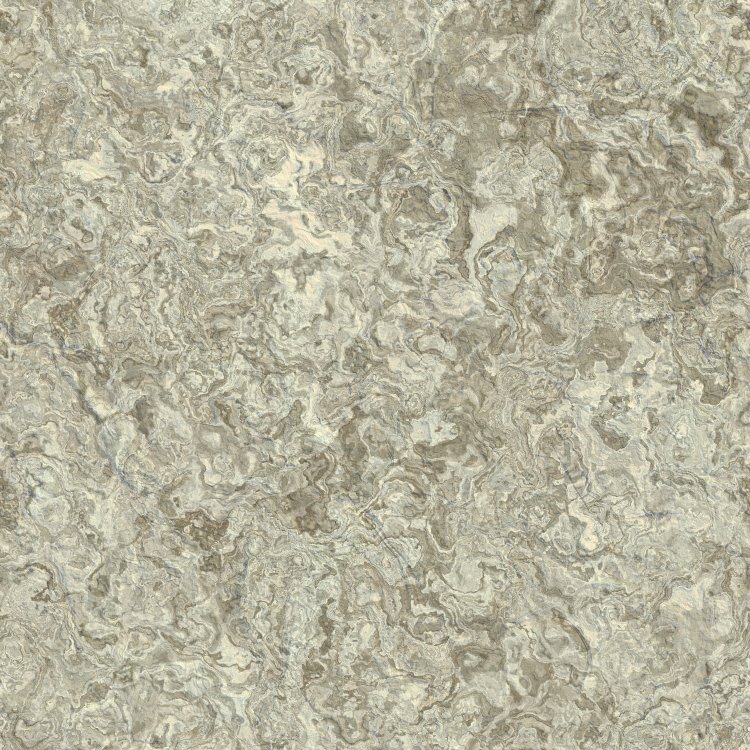
Open your new stock image. You can download it directly from this tutorial or here.
On your stock texture, press Ctrl+A to select the entire texture and then press Ctrl+C to copy it.
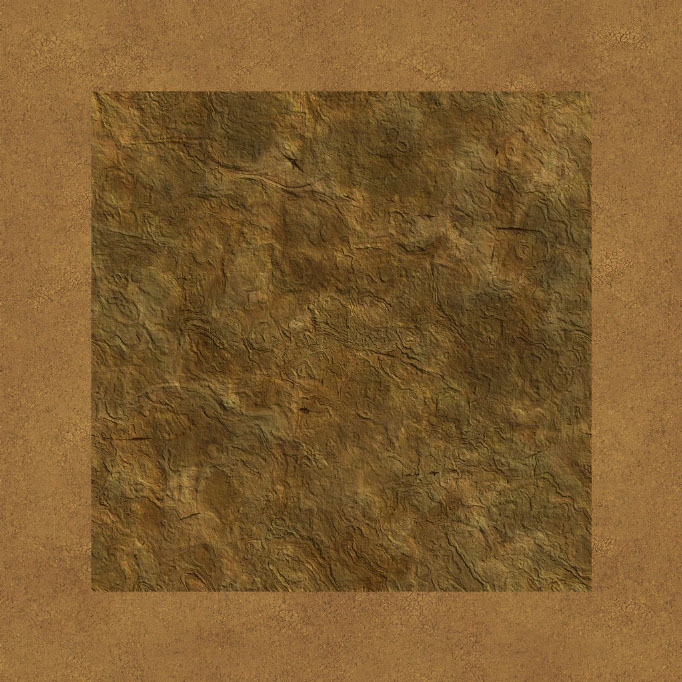
Go back to 11.BMP and press Ctrl+V to paste your stock texture over the vanilla texture. As you can see, it doesn't fit so we have to stretch it. Make sure you have Layer 1 selected or the layer your stock image is on and press Ctrl+T to free transform it. Grab the bounding box and stretch the stock texture to cover the whole image. Once you have it stretched out, press Enter to exit free transform. When you've exited free transform, press Ctrl+Shift+E to flatten the image and save it.
Follow the same steps for 22.BMP and 44.BMP.
Stocks:
STEP 1 (Alternate)
This alternate method explains how to have a texture that's a different size than the original bitmap.
Tzar interprets textures in powers of two (i.e. 2, 4, 8, 16, 32, etc). That's how Tzar translates image size in the INI files, those aren't pixel sizes. As far as I know, the smallest possible texture Tzar can handle is 64x64 pixels which Tzar interprets as 2. Also, Tzar should be able to handle 32x32 which Tzar might interpret as 1 but that is untested.
- 2 = 64x64
- 4 = 128x128
- 8 = 256x256
- 16 = 512x512
- 32 = 1024x1024
The largest texture Haemimont Games used for solid textures is 1024x1024. Textures could be larger but I haven't tested that.

Open your stock image. Keep in mind what I mentioned before about powers of two. This image is 750x750 which is not a power of two. We could resize it to 1024x1024 but that would defeat the purpose of this alternate method. So, we'll resize it to 512x512 which is half the size of the original texture.
In Photoshop, go to Image -> Image Size and change the Width and Height to 512 then click OK. If you're not using Photoshop, just make sure both the width and height are 512.
Now we must save it in the correct format. Go to File -> Save As. In the Format drop menu change JPEG to BMP and change the filename to 11.BMP. This part is important, you should get a little box that looks similar to this:
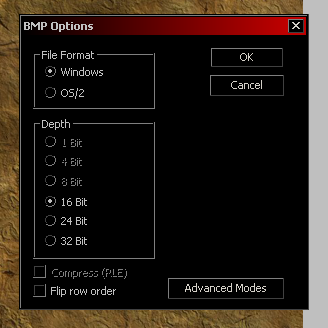
All Tzar bitmaps must be saved in 16-bit. Other bit depths will cause visual glitches or crashes.
The final thing we have to do is edit the terrain INI file. Open SUMMER.TERRAIN.INI and scroll down to [terrainsize] which is on line 65. This is where Tzar's interpretation of the bitmap pixel size takes place. Edit line 67 which is "11 = 32,32,0" and change it to "11 = 16,16,0". Reference the powers of two I listed earlier.
You need to do this for every new texture that is a different size than the original.
STEP 2
Next, what I usually do is edit the water. I couldn't find a good stock source for water frames so I made my own from Tzar's original.
Open 00.BMP.

Next, you simply take each new frame, starting with the first frame, and place them in order from top to bottom. In the screenshot, I've placed the first frame and numbered it for your reference.
The steps for different sized water frames is basically the same as the step 1 alternate method. Just make sure you change the values under [terrainsize] for 00, it should be line 66 in SUMMER.TERRAIN.INI.
STEP 3
The next thing I do after the water is finished is the shoreline. The shoreline is 01.BMP and its purpose is to merge 00.BMP with 11.BMP.
Open 01.BMP.

Open modified 11.BMP. You need this for a colour palette.

Open modified 00.BMP. You need this for a colour palette.
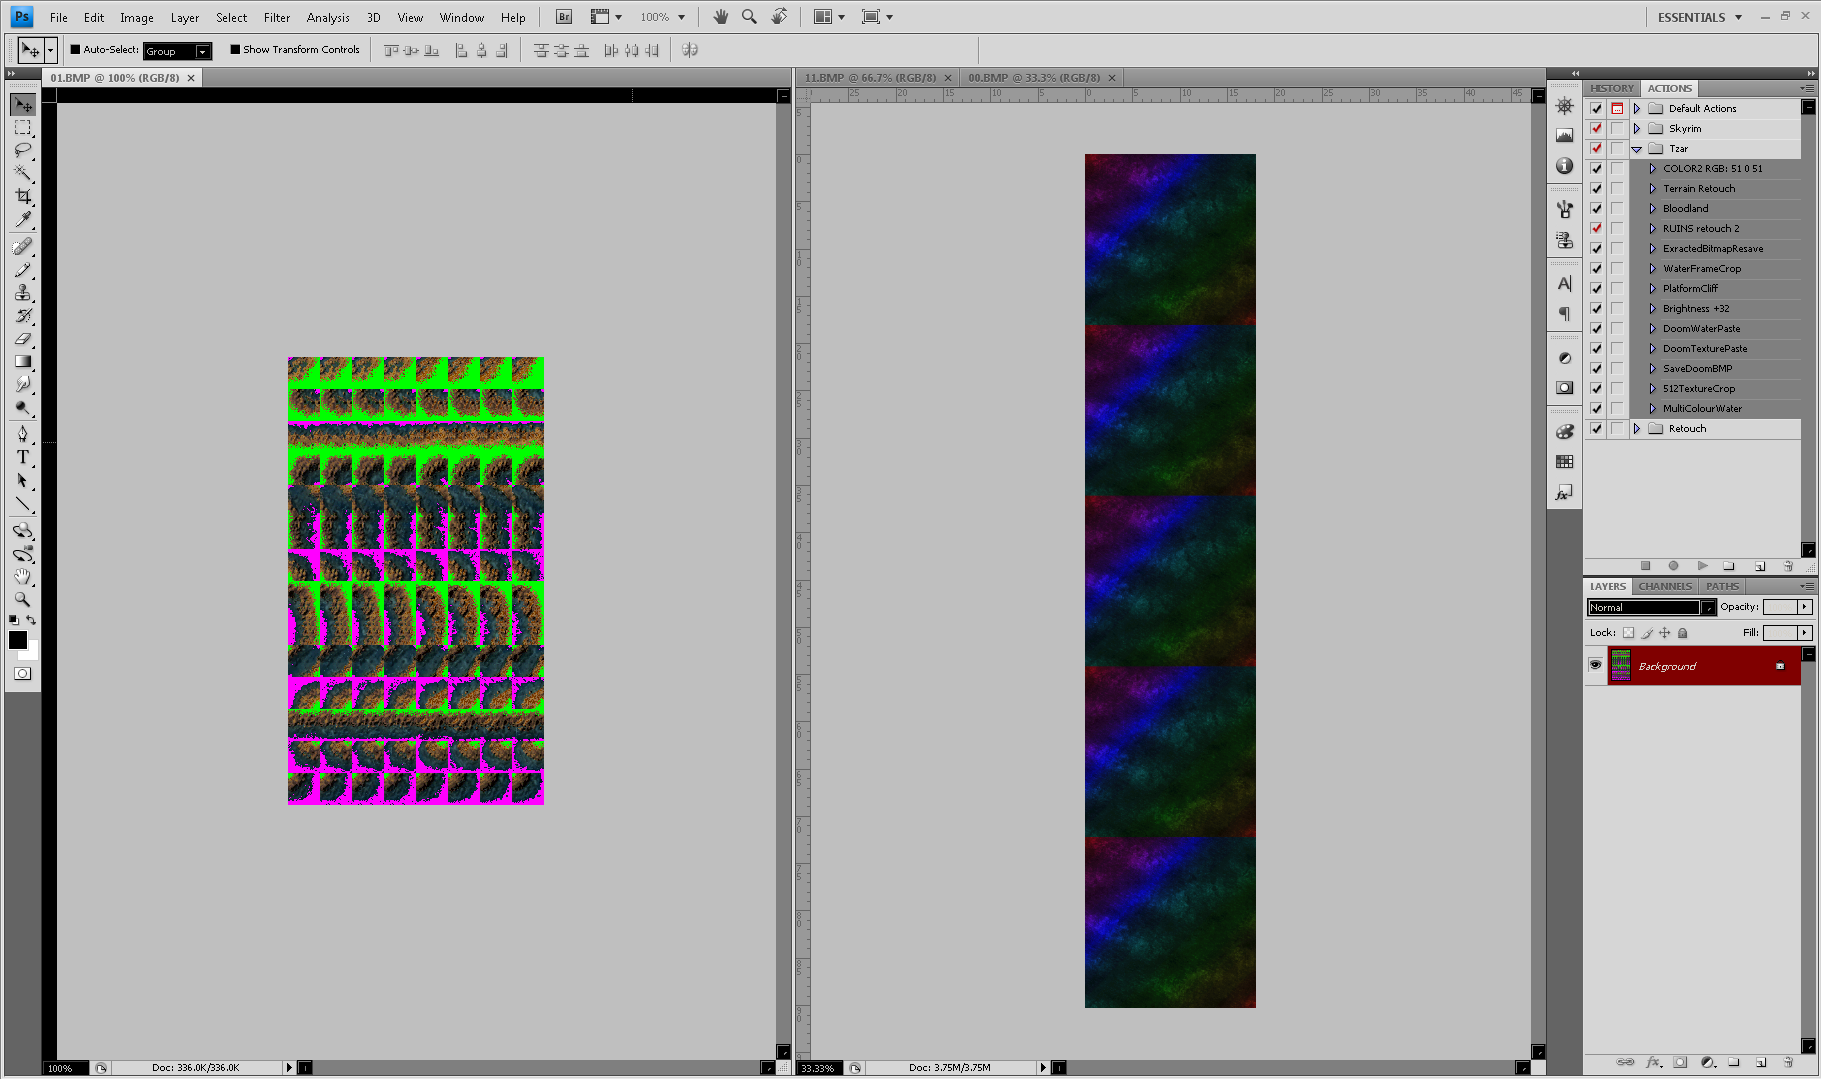
Grab the 01.BMP tab and drag it to either side of your workspace to move it to a new view. It should look similar to the screenshot. Make sure 01.BMP is always the focus of your work. Sometimes you might accidentally recolour 11.BMP or 00.BMP.
Note: The feature I'm about to use might be Photoshop specific, I'm sorry for any inconvenience.
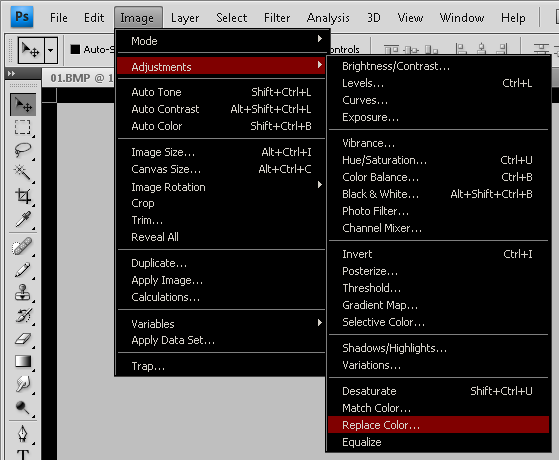
The feature I typically use to recolour 01.BMP is under Image -> Adjustments -> Replace Color. This part might require a hit-and-miss approach because replace color is not always accurate and there is no absolute setting for getting it right. What might seem like perfect settings for one texture might be bad for another. You have to test and retest until it matches.
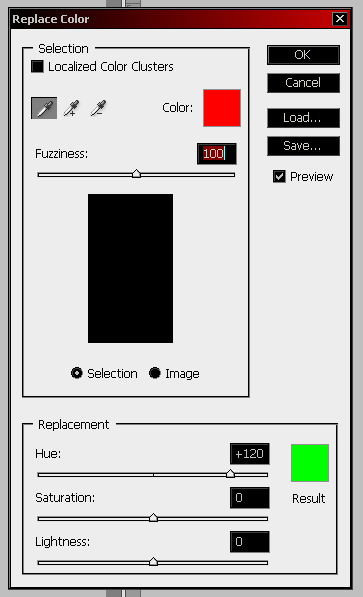
In the screenshot I deliberately made the color boxes red and green for easy identification. This is what replace color should look like. That red box, you click that to sample the colours you want changed. The green box, you click that to sample the colours that will replace the colour you sampled in the first box. The replace color tool automatically gives you an eyedropper tool when you move your mouse outside the replace color window. You use the eyedropper to sample colours.
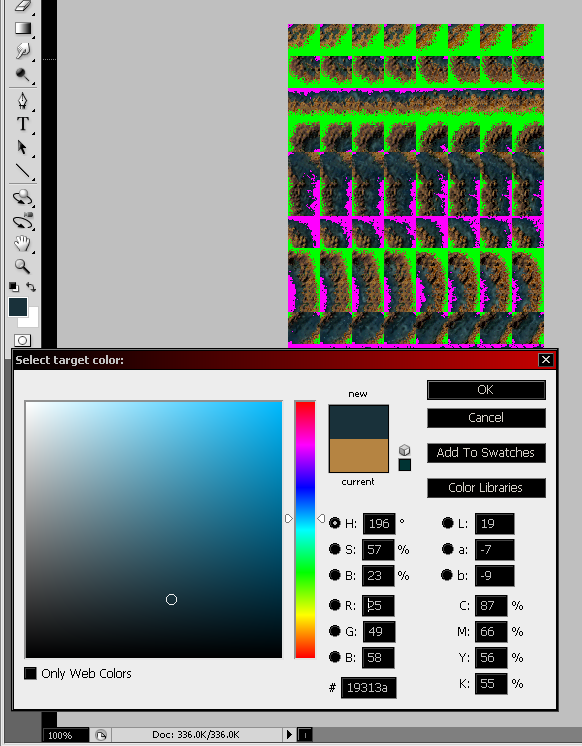
I always start with the blue part (water) of 01.BMP. I start with the water because it's a darker, lower contrast colour and that makes recolouring the land part easier because the land part is a brighter, higher contrast colour. If you start with the land part, sometimes the colour you're sampling might be dark and then it makes recolouring the water more difficult and you might have to start over.
Once you've sampled the water color from 01.BMP for the first box in Replace Color, click OK on the window pictured in the screenshot above.
Next, you have to click the second box to sample a replacement colour from 00.BMP. The colour you sample from 00.BMP will replace the colour you sampled in the first colour box.
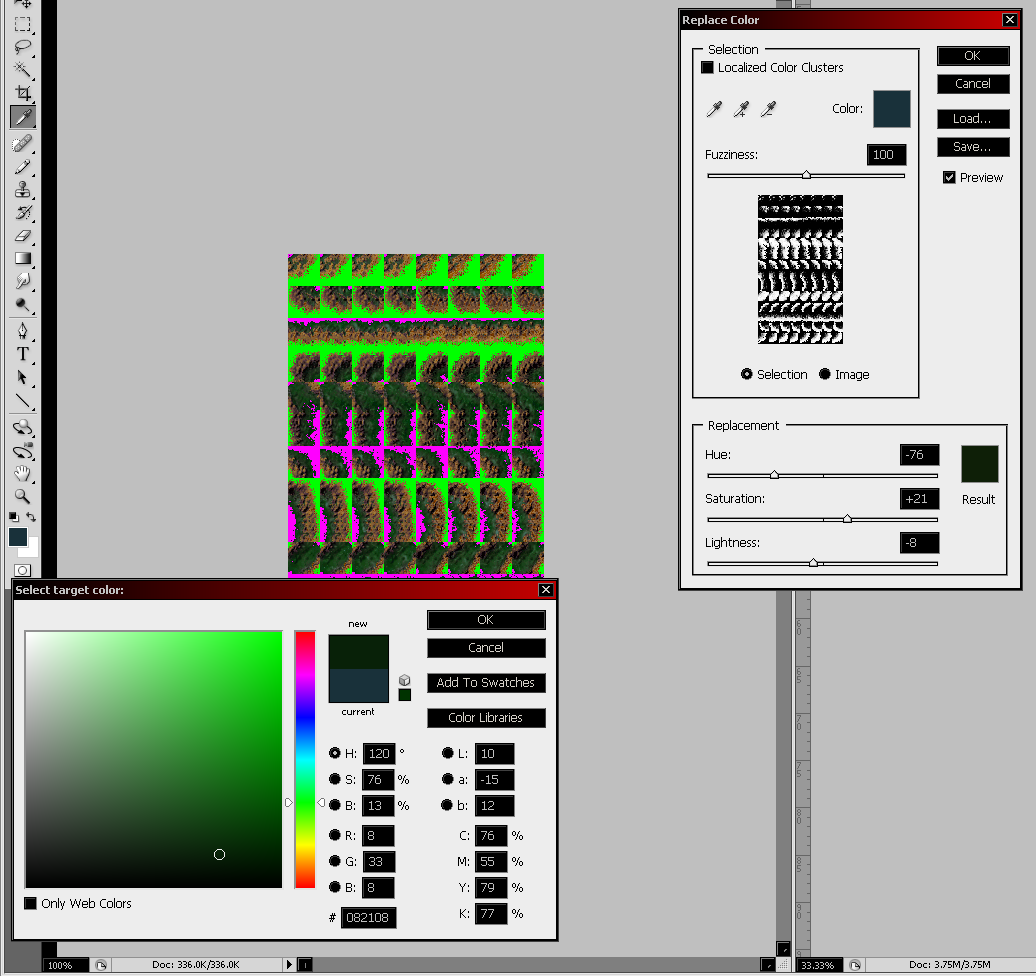
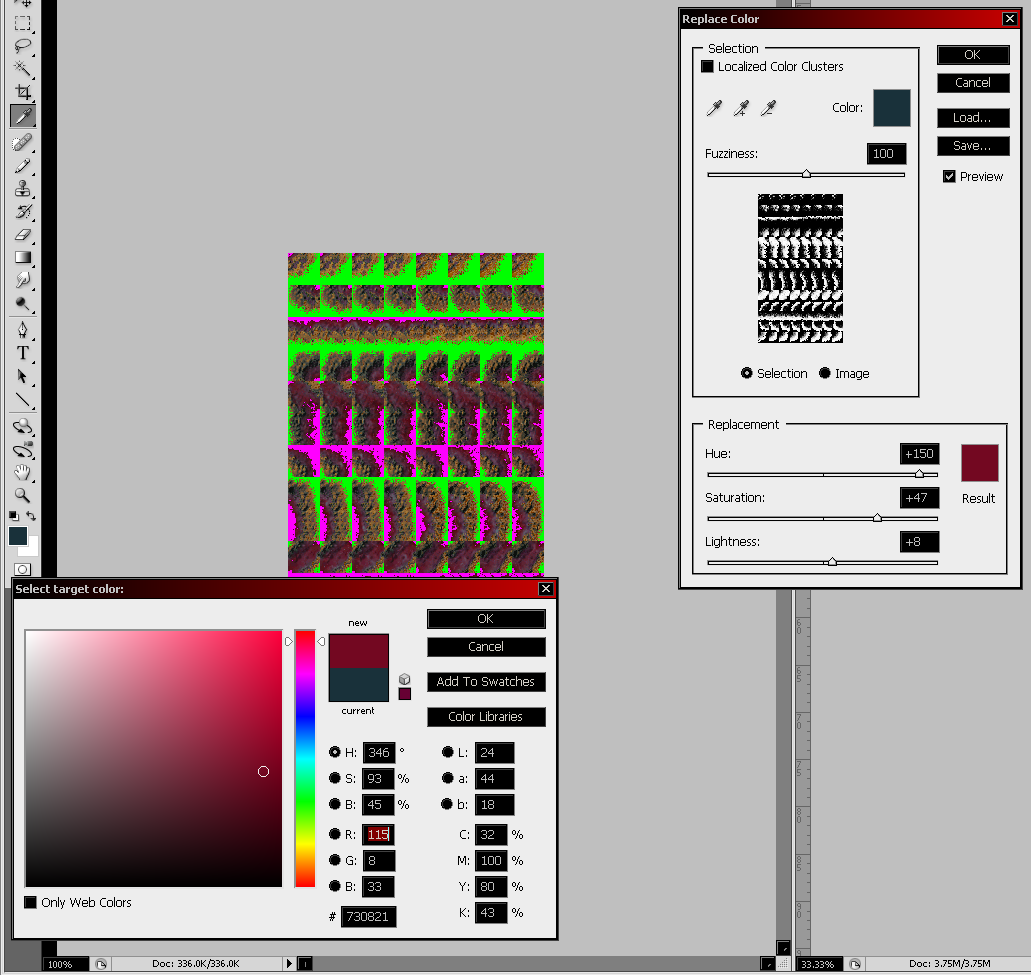
Since this water is multi-coloured it's a little hard to find the perfect colour. I made two example screenshots of how replace colour works. One screenshot, I've sampled the green part of 00.BMP and the other I sampled the red part of 00.BMP. For this tutorial, I'll stick with green. Once you're satisfied, click OK and then click OK again on the main replace color window.
Now, switch your second view from 00.BMP to 11.BMP for the land sample. For the land colour replacement, repeat the steps you just did for the water and it's finished. Just make sure you sample the land part of 01.BMP instead of the water.
STEP 4
Next, I usually modify 12.BMP; this is the small pixel border that merges different terrains with each other.
The procedure here is the same as step 3, you're using Replace Color to match 12.BMP with 11.BMP and 22.BMP. Typically, I don't use 44.BMP for a colour palette but you can if you want to.
If you look closely at 12.BMP you'll notice the pixels actually have a grass and dirt part. 11.BMP is your colour palette for the dirt pixels and 22.BMP is your colour palette for the grass pixels.
Open 12.BMP.

Open modified 11.BMP. You need this for a colour palette.
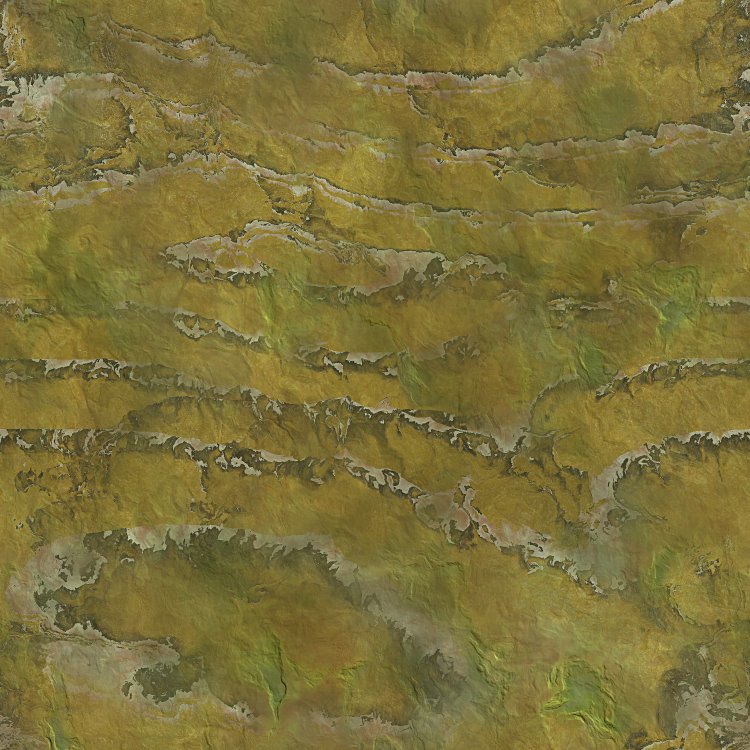
Open modified 22.BMP. You need this for a colour palette.
As before, move 12.BMP to a different view and replace the colours. Alternatively, you could just replace the green and brown pixels in 12.BMP with the same colour.
STEP 5
Once the terrain border is finished, you have to modify the cliffs; 28.BMP and 29.BMP.
You're using Replace Color here too so it's the same procedure.
Open 28.BMP.
Open 29.BMP.

Open 22.BMP, this will be your colour palette.
Typically, I replaced the grass parts of the cliffs with this and usually that's it. Occasionally, I might replace the rock part of the cliffs with colours from 44.BMP.
Once you're done replacing the colours on the cliffs then you move onto the trees.
STEP 6
I always save trees for last because it's sometimes a little difficult but it's worth changing them for a complete terrain. Trees offer you a chance to be creative. You can do whatever you want with them.
The easiest thing to do is to just use Replace Color again and replace the tree colours. However, since this is a tutorial, I will show you how I usually do new trees. For the trees I'll be using a free stock from: Opengameart.org

The stock tree is 256x256 which is too big so I resized it to 96x128, make sure you keep the transparent background. I resized it because 96x128 is the size of a single tree slot in TREES.BMP.
Open TREES.BMP in your image editor. This might look like a pain to edit but I have a way that makes it easy.

Create a new layer, set your foreground colour to 0-255-0 (green), and use your Bucket Tool (G) to recolour that layer. Bucket Tool Settings: Mode: Normal Opacity: 100% Tolerance: 0 Anti-Alias: No Contiguous: No All-Layers: No.
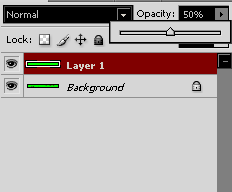
Set the Opacity of your new layer to around 50%.
Your trees should look like this now. The purpose of this is you're using the original trees as guidelines to place your new trees. So, when you place your new trees the only thing you have to do is align them with the original trees.
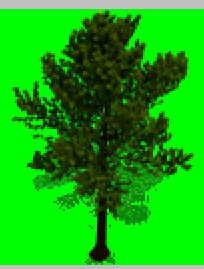
Next, you align the new trees with the originals like in this screenshot. You do this for each tree. Press Ctrl+Alt+Click+Drag on your newly placed tree to create a duplicate. Move the duplicate to the next tree. It doesn't have to be perfect, just bang them off fast until you're finished.
Once that's done, restore layer 1's opacity to 100%, press Shift+Ctrl+E to flatten the texture and save it.
STEP 6 (Continued)
Your trees might come out looking like this. I have a simple fix for this.
Open your modified TREES.BMP. Set your foreground colour to 255-0-255 (bright pink).
Use your Bucket Tool (G) to colour the green screen to pink. This lets you easily identify the offending green border around the trees.
Zoom in to a tree and use the Bucket Tool to colour in the green pixels with pink. Once you're satisfied, switch your foreground colour back to 0-255-0 (green) and use your Bucket Tool to return the pink to green. Because the leaves on the trees are green you might get some pixel loss on the trees themselves. This is only a demonstration of one way to fix this, the best thing to do in this specific case is to start over and clean up the original resized transparent PNG.
STEP 6 (Continued)
Tree shadows are tricky this is where the difficult part comes in. Tree shadows don't always align so it requires some trial and error.
Open TREES_S.BMP.
Since these stocks don't come with their own shadows I'm just going to use a shadow from the originals. I chose the shadow in the screenshot because it looks similar to our new tree. Then it's the same deal, duplicate it using Ctrl+Alt+Click+Drag and move it over the other shadows. As a personal preference, after I make that square selection, I use my Magic Wand tool (W) then I press Alt and Click on the green screen within the selection area. This deselects the green screen and gives you only the shadow.
STEP 7
The last thing you have to do is name your terrain. I always save naming for last because it's easier to name something when you're looking at it. For this tutorial, the terrain will simply be called "Tutorial."
Change the SUMMER folder name to Tutorial. It doesn't have to be all caps.
Change the INI filenames to match that of the folder. It should look like this:
- Tutorial.IMAGES.INI
- Tutorial.TERRAIN.INI
Next, you have to change the in-game name of the terrain because it's still Summer. And you also have to change the directory name listed in the INI file.
Open Tutorial.TERRAIN.INI and everything you need to change is at the top or under [terrain]. On line 10, change the name from Summer to Tutorial. On line 12, change the dir from summer to Tutorial. Optionally, under [terrainname] you can change the terrain names if you wish but this only affects the Tzar Editor. Save and close it.
Copy the Tutorial folder and both INI files and paste them in this directory: *\TalonSoft\Tzar\IMAGES\TERRAIN
Create those folders if you don't have them.
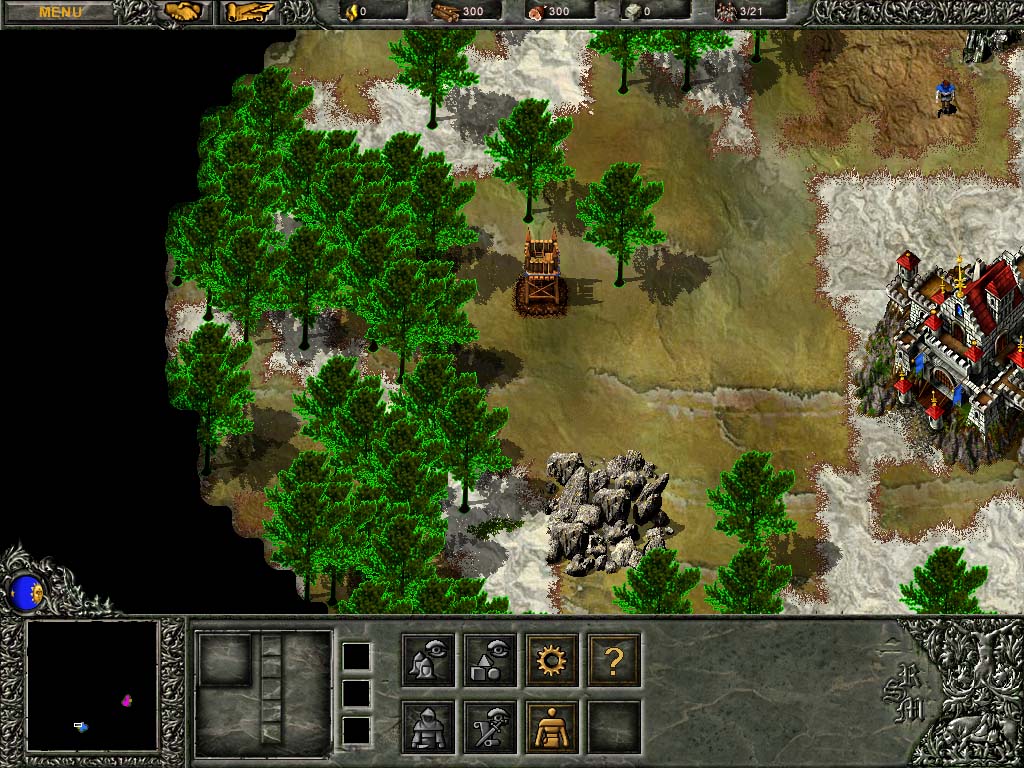
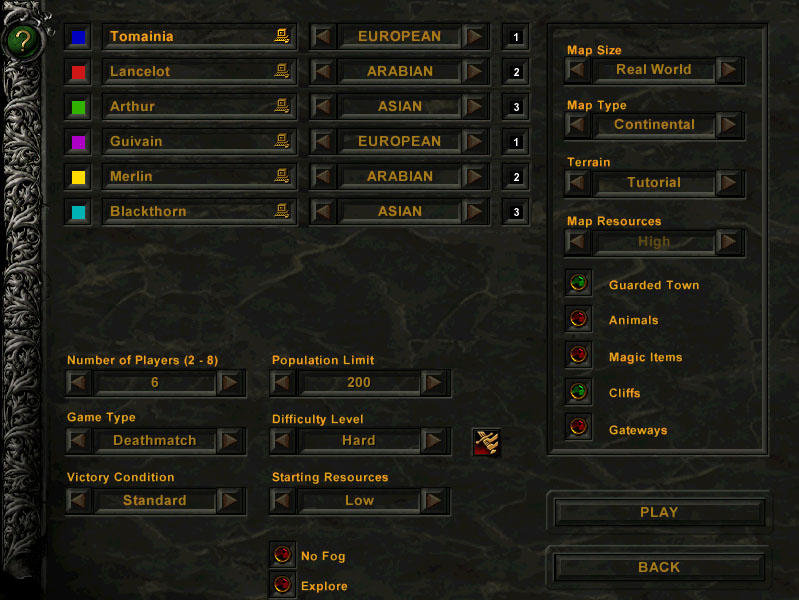
Start Tzar and Tutorial should appear in the terrain selection.
One final note about INI changes.
Open Tutorial.TERRAIN.INI and scroll down to [randomterrainset], it should be on line 121.
You should see something similar to this:
[randomterrainset]
01 = 180,0,1,1
21 = 110,255,21,3
42 = 110,170,21,4
This controls the terrain distribution and composition. The first two digits on each line is the terrain types, each digit is a terrain type (i.e. 01 = 0 is water and 1 is dirt). I've spent hours trying to figure out what the second set of numbers do and I'm not any closer to figuring it out. If anyone knows, please post in the comments and I'll update this section.
From my tests this is what the numbers do: total surface area?, size of terrain chunks, complexity of terrain chunks?, size of terrain separation?
It could be something a little more mundane like width and height but I'm not sure. These numbers are how I was able to make Random Map use more than 3 terrains for my custom terrains. Modify these numbers at your own risk, incorrect combinations can crash the game.
Credits and License:
Mitch Featherston - "100 Seamless Textures" / CC0 1.0 Universal (CC0 1.0)
PixelMannen - "Tree - Different seasons" / CC0 1.0 Universal (CC0 1.0)
Haemimont Games - Tzar Textures
Charlie_Frost - help with finding links in the first version
Thank you for reading this tutorial. The most important thing to take from this is the files you have to modify and the INI changes. I only showed you all the steps to demonstrate how I do it and what my process is. You might have an easier way of doing things and that's good; this is only a guide. If you have any suggestions or questions, please post them in the comments.
You can download the Tutorial terrain here: Tutorial Terrain
Happy modding!




Unfortunately the site holding the pack extraction tool and RLE-BMP converter has died and no other sources seem to be available on the internet. There is an extraction alternative in the quickBMS script uploaded here, but any ability to convert the RLEs seems to have been truly lost.
Can you reupload the texture converters here?
Sure thing, the links have been updated. And thanks for letting me know. :)
Much obliged.