MechCommander Gold - Darkest Hours
Expansion customer campaign merge
Overview & Operation 1
Introduction

Introduction by sarna.net, extended by RizZ
This expansion campaign is shorter than the original, and is available in MechCommander GOLD. The campaign follows the storyline but in a different planet, also in Clan Smoke Jaguar territory. It also has improved sprite artwork, more visible while in zoom.

Original Expansion Plot by sarna.net, extended by RizZ
Immediately after the liberation of Port Arthur, Zulu and Yankee Companies are sent to liberate the desolate planet Cermak in the Periphery, taken by renegade Smoke Jaguar Star Colonel Marcus Kotare (a character that was featured briefly in MechWarrior 2: Mercenaries), for an unknown reason. There has been reported activity of Clan Smoke Jaguar units in-planet, but it is unknown what their objective is.
The First Davion Guards began their attack on Cermak with Operation HYDRA, aimed at gathering intelligence on Kotare's goals. Zulu Company secured a landing zone near an abandoned Star League facility, Base Nomad, and defended the base from a Jaguar attack. Zulu then secured the Baitan Sector by destroying the Jaguar staging bases there, and overran the incomplete defenses at Base Ogre.
Following the success of Operation HYDRA, Colonel Reese launched Operation GORGON—sending out sorties to probe the Jaguar's defenses. Zulu Company destroyed targets of opportunity in the Azimuth Sector, recaptured a supply convoy from Star Captain Marcus Osis in Jade Sector, destroyed the mobile orbital guns defending Azimuth sector, and captured three Jaguar officers (Star Captain Rathburn, Star Captain Dulaney, and Star Captain Kulin) for interrogation.
The interrogations revealed that Marcus Kotare planned to dig up a cache of nuclear and biological weapons interred on Cermak, using his DropShip engines as drills. The Davion Guards launched Operation MINOTAUR with the goal of destroying the drills. Zulu Company captured the HPG transmitters at Base Kraken and sent a warning to the Operation Bulldog Command Center on Kathil, but received a response that the nearest reinforcements were a week away. Zulu defeated Kotare's reserves at their staging area, destroyed the industrial facilities used to convert the DropShip engines into drills, and then destroyed the drills themselves, killing Kotare in the process.
Following the success of Operation MINOTAUR, a ComStar disposal squad was dispatched to Cermak to dismantle the weapons graveyard and its contents.
Darkest Hours Plot
--- udenr ctscnoirun ---
Ultimate Expansion Campaign Merge Missions!
Operation 1
- Operation 1, Mission 1 - Expansion start!
- Operation 1, Mission 2
- Operation 1, Mission 3
- Operation 1, Mission 4
- Operation 1, Mission 5
- Operation 1, Mission 6
- Operation 1, Mission 7
- Operation 1, Mission 8
- Operation 1, Mission 9
- Operation 1, Mission 10
- Operation 1, Mission 11
Operation 2
- Operation 2, Mission 1
- Operation 2, Mission 2
- Operation 2, Mission 3
- Operation 2, Mission 4
- Operation 2, Mission 5
- Operation 2, Mission 6
- Operation 2, Mission 7
- Operation 2, Mission 8
- Operation 2, Mission 9
- Operation 2, Mission 10
- Operation 2, Mission 11
- Operation 2, Mission 12
- Operation 2, Mission 13
- Operation 2, Mission 14
Operation 3
- Operation 3, Mission 1
- Operation 3, Mission 2
- Operation 3, Mission 3
- Operation 3, Mission 4
- Operation 3, Mission 5
- Operation 3, Mission 6
- Operation 3, Mission 7
- Operation 3, Mission 8
- Operation 3, Mission 9
- Operation 3, Mission 10
- Operation 3, Mission 11
- Operation 3, Mission 12
- Operation 3, Mission 13
- Operation 3, Mission 14
- Operation 3, Mission 15
- Operation 3, Mission 16
41 Expansion campaign merge missions total!
Darkest Hours Expansion Campaign
Operation 1 - Mission 01-11
Operation 1 - Mission 1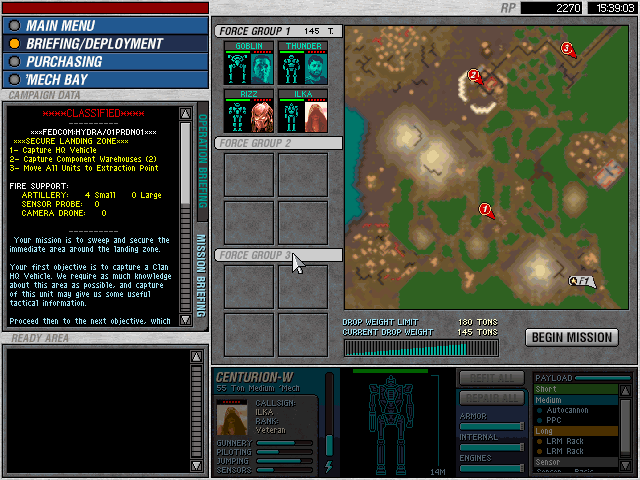
Original Expansion Mission 01/01 - Campaign start
Let's play: MCG Darkest Hours Expansion Merge
Mission Objectives:
+ Capture HQ Vehicle (20.000 RP)
+ Capture Component Warehouses (20.000 RP)
+ Move all units to Extraction Point (8.000 RP)
Maximum Tonnage: 180
Maximum Units: 4 (4)
Artillery: 4 Small
Logistic Phase: Do yourself a favor and fire Rooster; if you really need to use the Commando J, use Siren or buy a new MechWarrior altogether. Due to the low dropweight you'll want to use the two mediums and lights, ignoring the Jagermech. Although having the Commando in your team will add some firepower, it will be no more than a target. An easy target. However, it might be useful to bring a fourth pilot in battle for some experience. Exchange the Centurion's autocannon with an energy weapon, possibly an ER Large Laser or a second PPC. If you want, drop few LRM racks for Pulse Lasers.
This mission is very simple, and you'll might want to capture at the very least the Shadowcat J. Salvaging an other Uller is fine, but not mandatory.
Combat Phase: Move west and climb the hill; this will reveal the HQ vehicle parked, protected by two Uller Js and three J.Edgars. When attacked, the vehicles and one Uller will escort the Mobile HQ in the south-west area of the map while the second Uller engages you. Quickly dispatch the vehicles and concentrate on the Ullers: when they are gone, capture the Mobile HQ, and head back to the hill and head east toward a lonely Saracen patrolling the eastern forrest: destroy it and capture the Container with two Thunderbolts.
Now go in the map's south-west corner, destroy the two Strikers by rushing them to close quarters and capture all equipment there (4 Clan LRM Racks, 3 Heavy Flamers). Head north from your position, destroy the Saracen and continue moving north. Do not attack the base from your current position, it is wiser to reach the upper-leftmost corner and attack from the north. While you're there, destroy the three J.Edgars and capture 1 ECM and 3 Clan Pulse Lasers in the Containers nearby.
Move east a bit and begin to attack the two Bulldogs parked into the base; ignore the flatbed and the salvage rig and use your fastest 'Mech to capture the two Turret Control Towers to bring the Cannon Turrets on your side. Capture the Component Warehouses here and place all your 'Mechs on the other side of the turrets, and use your fastest 'Mech to scout the area near the extraction point: a Shadow Cat J and some Elementals will power up. Immediately retreat toward the base and let the Turrets take care of the Elementals while you concentrate fire on the Shadow Cat. Once all enemy units are gone, move to the extraction marker.
Operation 1 - Mission 2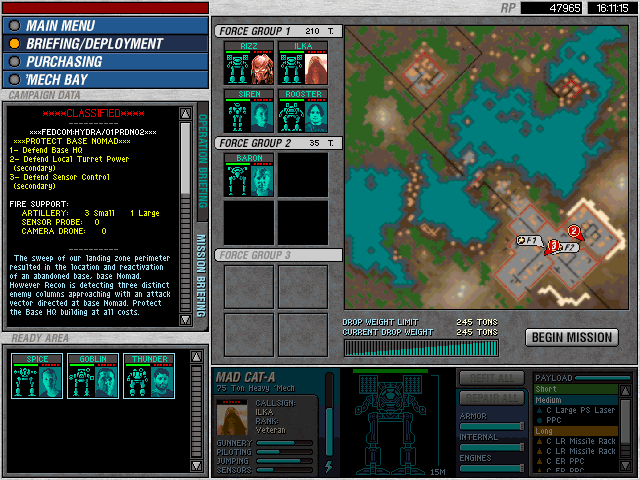
Original Expansion Mission 01/02
Mission Objectives:
+ Defend Base HQ (30.000 RP)
* Defend Local Turret Power (15.000 RP)
* Defend Sensor Control (15.000 RP)
Maximum Tonnage: 245
Maximum Units: 6 (4/2)
Artillery: 3 Small, 1 Large
Logistic Phase: Sell the Commando without repairing it. If you salvaged the Shadowcat, arm it with a PPC and fast-firing laser weapons. Equip the Jagermech with an heavy autocannon and the rest of your lance with a good mix of medium/long range weapons. Ignore any 'Mech lighter than 30 tons when deploying. You can freely load as many ammo-based weapons you want, there's a 'Mech Bay in the base you are going to defend. There will be four waves, and when a wave recognizes its assault has been stalled, it will pull back waiting for the other to arrive. With your fastest 'Mech, you'll scout the whole area, capture the three Component Warehouses and the turret controls which will delay each wave.
Combat Phase: Immediately send one 'Mech outside the base, on the west, one on the hill to the east (be sure to capture the Container with a Clan Heavy LBX Autocannon on the other side) and an other near the river in the middle of the map to capture the Turret Control Tower. The six autocannon turrets there will help you repel vehicles, though they will be only a slightly slow-down for 'Mechs. The small base on the other side of the river is protected by LRM turrets and holds 5 Clan LRM Racks in a Container; there's a third container with 2 ECMs, 1 Clan Advenced Sensor and 2 Active Probes north-west of the base, protected by two pop-up laser turrets. Most probably, you'll find time to capture the northern Turret Control Tower and the third Container after the second wave, but if you find yourself overwhelmed, forget about the northern base, or just concentrate on getting the two nearest supplies.There will be four waves. The first s composed by 2 Harrassers, 2 Manticores, 2 Saracens, 3 Uller As and one Uller W. The second wave is composed by 1 Uller W, 1 Uller A, 1 Cougar J and two Aerospace Spotters. The third wave is composed by a lone Cougar J. The fourth, and most powerful wave is composed by a Mad Cat J, 1 Cougar W and 1 Cougar A.The vehicles from the first wave will attack head-on, while the 'Mechs will attack the western side of the base. You should be able to pick the 'Mechs from long range while they are busy with the turrets there, and the vehicles will be blocked by the autocannon turrets near the river. If you don't destroy them all, they will flee toward the northern base waiting for the second wave.The second wave will follow a similar pattern: vehicles head-on and 'Mechs from the west. This time they won't retreat so easily and you'll probably get the chance to destroy them all. Repair your 'Mechs and try to capture the northern base and everything else.The third wave can be considered part of the fourth, as the Cougar J will scout the eastern area and will wait there until the Mad Cat J is near him to attack this side: note that this is very dangerous, as the Base HQ is near this side and both 'Mechs are jump-capable, and the Mad Cat outguns every 'Mech you have.
The remaining two 'Mechs will attack the west side, acting as a diversion. However, you should be able to drop a couple of artillery strikes on the Cougar J and force the other 'Mechs to attack. The Mad Cat will follow the same path as the vehicles in the previous waves, be sure to intercept it with all your 'Mechs and then go after the last two lights, whihc will engage any turret first before entering th base. When the last 'Mech is down, mission will end.
Operation 1 - Mission 3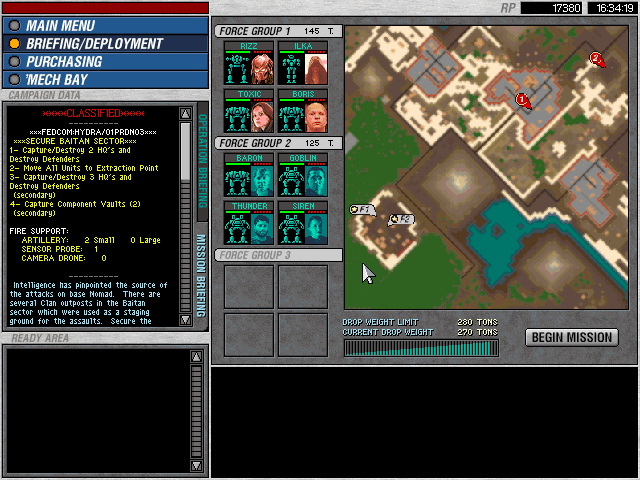
Original Expansion Mission 01/03
Mission Objectives:
+ Capture/destroy 2 HQs and destroy defenders (20.000 RP)
+ Move all units to the Extraction Point (10.000 RP)
* Capture/Destroy 3 HQs and destoy defenders (11.800 RP)
* Capture Component Vaults (22.000RP)
Maximum Tonnage: 280
Maximum Units: 8 (4/4)
Artillery: 2 Small
Probes: 1
Logistic Phase: Medium and heavies (the Mad Cat from the previous mission will work wonders), with a single light 'Mech for reconnaissance. A Cougar or an Uller J would be perfect, if you haven't just stick with the Raven. Equip one 'Mech with an heavy autocannon. There are three bases. The two lateral bases hold a 'Mech bat each. The one on the right is defended by LRM turrets and Hunchback IICs, and the LRM turrets are controller by four towers. The other two bases are a lot easier to take, though the entrance to the leftmost is mined and protected by Aerospace Spotters. The extraction point is patrolled by a customized Vulture...although the 'Mech itself is not that important, it uses Star League equipment which can be sold for large amount of RPs.
Combat Phase: Begin by heading north to climb the hill that will reveal the bases' defensive setup. You'll encounter a Manticore and a Bulldog: take out the Bulldog with long range weapons and rush the Manticore. Atop the hill there will be an LRM Carrier. The northernmost base is protected by two Aerospace Spotters and a LRM Carrier and its entrace is mined. The base in the center has a good number of cannon turrets flanking the road protecting its entrance and two Shadow Cats (one A and one J variant) are patrolling the area inside the base; there are three Bulldogs for support, which will move once the base is under attack. On this base's north side there are pop-up and normal cannon turrets, but it's the weakest side to attack.
The third base is well protected by LRM turrets and two Hunchback IICs; the northern side of this base, which has less LRM turrets, is protected by few pop-up laser turrets.Lastly, there are three Manticores patrolling the whole southern map perimeter. Begin heading toward the northern base: take out all vehicles daring to attack you and reach the unmmaned minelayer. Fire at the road with your laser weapons to make the mines detonate; this should alert the first Aerospace Spotter: take it out at long range and constantly move your 'Mechs; if you're lucky, the Aerospace strike will destroy more mines saving you some time. Expect the second Spotter and the LRM carrier to charge you as the first vehicle is destroyed. When all defenders are gone, enter the base, capture the HQ and the Container with two Clan Gauss Rifles inside. Now head toward the second base, passing though the base northernmost exit. Try to ignore the Vulture for now and carefully destroy the pop-up turrets: this will alert the base defenders; retreat a little when they start to move and pummel them at long range, concentrating fire on a single target at time. Then destroy the remaining turrets and enter the base. Capture the Warehouse containing 2 Thunderbolts, the HQ and repair your 'Mechs at the 'MechBay nearby. It's now time to take out the Vulture (be sure not to approach the extraction marker!). This 'Mech lacks the usual LRM Racks bu has two Star League Rail Guns and other medium and long-range lasers that makes it even more dangerous in a stand-up fight. Quickly rush it and let your close-range weapons bear of it.
Once the 'Mech is destroyed, fall back to the base, repair your 'Mechs and head toward the third base, moving through the small gaps between the ridges to reach the eastern side of the map. As before, take out a couple of pop-up laser turrets to alert the two Hunchback IICs (both W variant). Don't let them get near you and destroy them at long-range, then open a hole into the base perimeter and use your fastest 'Mech to capture all four Turret Control Towers, then move in all your 'Mechs, capture all buildings, repair your 'Mechs and head toward the extraction marker.
Operation 1 - Mission 4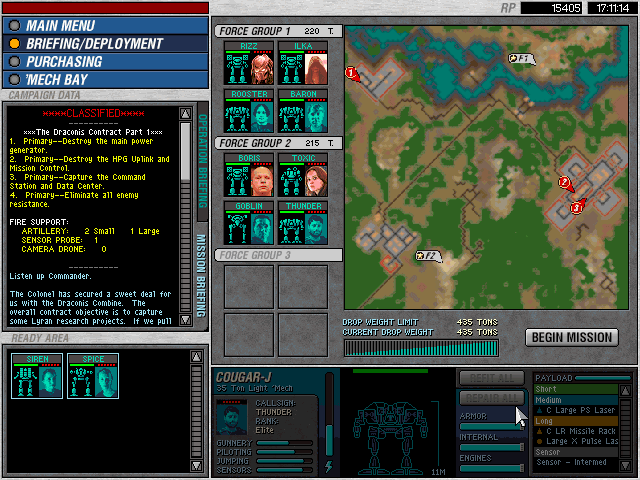
Bengal 01
Operation 1 - Mission 5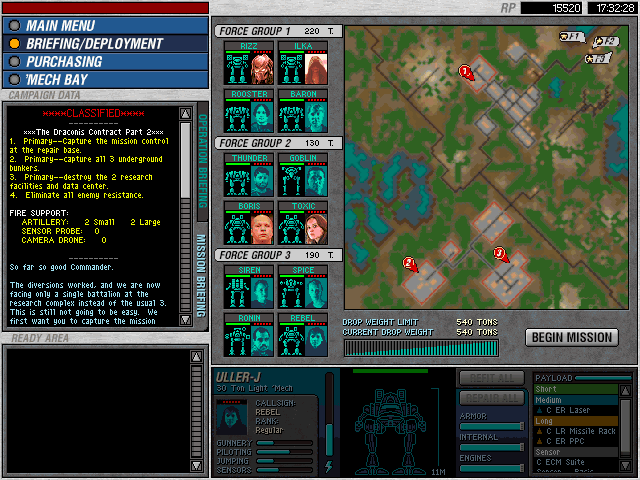
Bengal 02
Operation 1 - Mission 6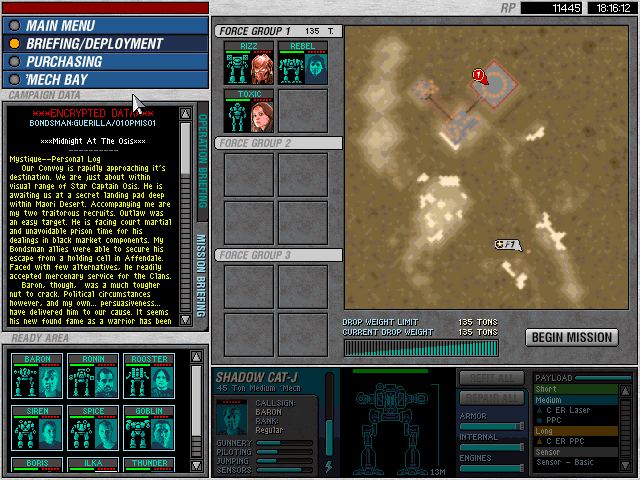
Turncoat 01
Operation 1 - Mission 7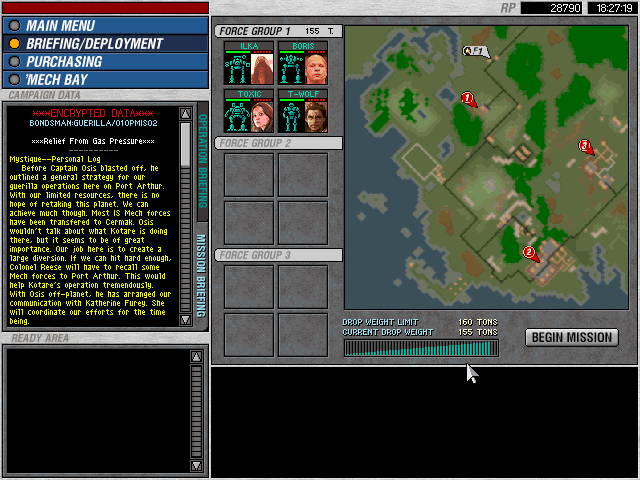
Turncoat 02
Operation 1 - Mission 8
Bengal 03
Operation 1 - Mission 9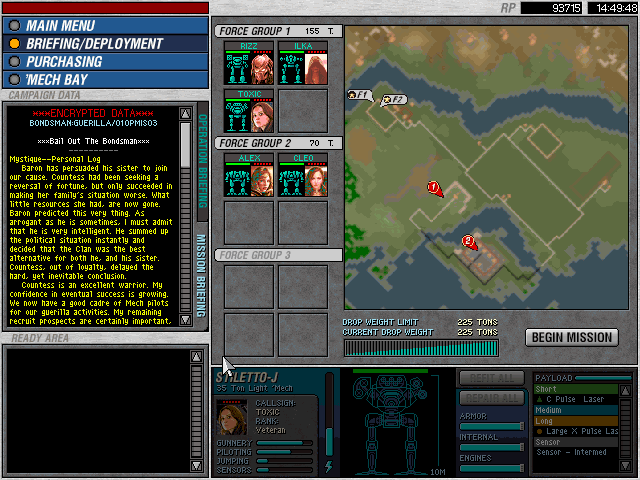
Turncoat 03
RizZen´s campaign notes: In this mission you expect to capture a building to get prisoners free. However, the mission objective only checks in when you destroy the Barn and Guard Houses (if still not working the turret control) - objective will check in. Just destroy the whole place at mission objective 1 area and objective will be triggered.
Hidden Underground bunkers: They are on the northside of the river, you need jump capable mechs to get them, be aware of that there is a hidden Mad-Cat (&Turrets), protecting the Bunkers.
Operation 1 - Mission 10
Turncoat 04
Operation 1 - Mission 11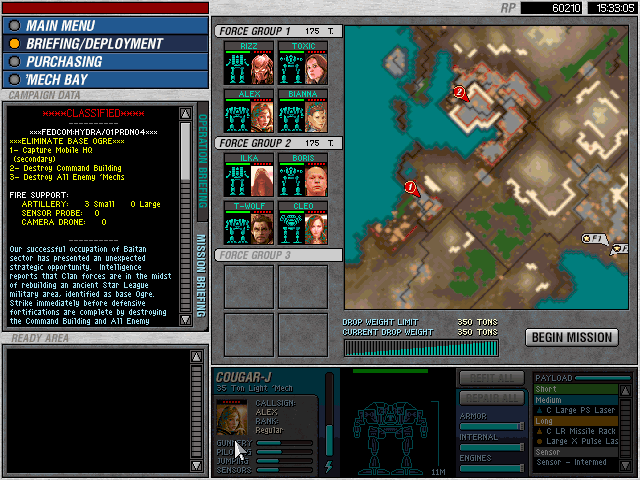
Original Expansion 04 - Op1 Final
Mission Objectives:
+ Destroy Command Building (35.000 RP)
+ Destroy all 'Mechs (25.000 RP)
* Capture Mobile HQ (15.000 RP)
Maximum Tonnage: 350
Maximum Units: 8 (4/4)
Artillery: 3 Small
Logistic Phase: buy Hitman and assign him to your best long-range 'Mech. Deploy medium and heavies, with a single light 'Mech for recon. This mission calls for complete annihilation of Smoke Jaguar 'Mechs, which are all concentrated in the northern base, well defended by LRM and artillery turrets. Plus, if you let the perimeter alarms ring off, they will all come toward you. The artillery turrets are incredibly powerful, accurate and with an extremely long range, but are slow in popping up, which should give a fast 'Mech the tim to capture their control tower before they can aim. If this cannot be done, just order long-range fire and destroy them. Unfortunately there are no power generators visible, and the whole base is sorrounded by turrets. There is a weak spot; it's tricky, but it's your only chance.
Combat Phase: Things are becoming serious and rushing things will only make you fail the mission. Begin to move toward the hill northwest of your position, destroying the two Shadow Cat Ws that will try to intercept you. Be sure to capture the containers near your starting position (worth one Clan ER Large Laser, 2 Clan Gauss Rifles, 1 Clan LB-X ACs and 1 Basic Sensor; note that you'll need a jump-capable 'Mech to capture everything, Clan ER Laser aside). Once you are on the top of the hill, move toward the Mobile HQ location; be sure to scout the hill south of its location to have a better view of the field. Destroy the Shadow Cat A patrolling the area and then take care of the two artillery turrets from long range (the turrets are the strange-looking circles near the walls...if you played MechCommander, you'll notice them for sure); now place your two fastest 'Mechs south of the Mobile HQ, then move in your heavies to engage the three Rommels. The Mobile HQ will move south-west trying to escape, but will be capture by your two 'Mechs, while the Rommels will meet their end at the hands of your other 'Mechs. Now step into the base, capture the Heavy Turret Control if there are still turrets alive and repair at the 'Mech Bay. From what you can see now, there's a Loki W and a Cougar J near the Command Building, protected by heavy walls and LRM turrets. A trio of 'Mechs (Hunchback IIC A, Cougar A and Uller W) are sitting on the base northern side and one Uller A, one Uller J and one Hunchback IIC are protecting the southern flank. Not enough, there are LRM and artillery turrets scattered all along the perimeter, with their Turret Control Towers very well protected and no generator to cut them off. Also, perimeter alarms will make all enemy 'Mechs converge on your position.
The best way to end the mission is to let all artillery barrages over the 'Mech group protecting the southern flank, then moving north along the paved bridged to circle the base and attack from the north, which has no perimeter alarms, fewer turrets and lighter 'Mech protection. However, before moving all your forces along the brdiges, place your heavies at the beginning of the first, then let your fastest 'Mech to scout the area. Two Hunchback IIC Js will power up and will come for you. Quickly retreat your 'Mech and let the other take care of the two Jaguar 'Mechs from long-range. DO NOT, I repeat, DO NOT, destroy the bridges; this won't stop the Hunchback IICs and will force you charging the base. When the two enemy 'Mechs are scrap, reach the northern side of the base and organise your forces. First, use a jump capable 'Mech to capture the container on the small island northwest of your position (where the Hunchback IICs came from) to retrieve a Long Tom cannon.
Now carefully scout the north sideto reveal a 'Mech Bay, a Heavy Turret Control, a Container (2 Clan ER Lasers), a Rommel and a Saracen. Take out the two vehicles and then charge (yes, charge) the Loki. Be sure to let you long-range 'Mechs take some fire and then move in your close-range fighter to make short work of both 'Mechs and than capture the Turret Control. Repair your 'Mechs and lure the remaining enemies toward your location; hopefully the massed LRM fire from the turrets will give you a great help in dealing with them. Once all enemy 'Mechs are gone, capture the two Component Warehouses east of the Command Building (1 Clan ER PPC and 5 Clan LRM racks), repair if you need and destroy the Command Building.
(c) by RizZen (2017) - overhauling (2020)
Darkest Hours Original Campaign Merge <-> Next Operation (ExpMrg)