
MechCommander Gold - Darkest Hours
Original campaign merge
Operation 2
"Pretty balanced for the most part. I enjoyed it a bit more than OP1, mostly in part to my pilots being much more proficient and coming into their own."
by stud84
Operation 2 - Mission 1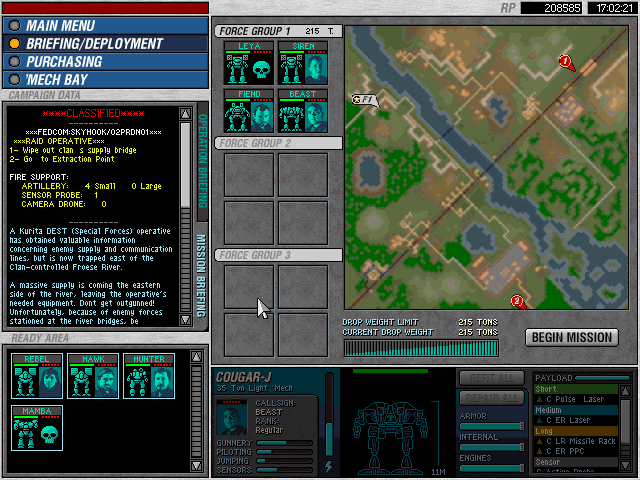
Original 02/01 - Op2 Start
Mission Objectives:
+ Escort the Hunchback IIC to the extraction marker (25000 RP)
Maximum Tonnage: 150 tons
Maximum Units: 4
Artillery: 4 small
Probes: 1
Logistic Phase: Repair your 'Mechs, and deploy the light and medium 'Mechs you have. Enemy opposition won't be so strong to require heavy 'Mechs. The map has a river running through it from north to south, with two bridges: the first (coming from the north) is unprotected, while the second has a wall section protecting it. Near the extraction point there is a small paved area.
Combat Phase: You begin on the left shore, while the HunchBack IIC A piloted by Falcon on the right one. It is imperative to get the Hunchback with your lance ASAP: as you move the captured Clan 'Mech formations of 2 vehicles (usually Harrassers or Condors) will try to stop it; the Hunchback IIC has a large-bore AC, but it won't have enough ammo to destroy them all. Begin to move your lance toward the south, and try to keep your 'Mechs on the left side of the map, to cross the hills and avoid enemies. After half a minute begin to move the HunchBack IIC toward the first bridge.
Now you 'Mechs (the ones you deployed) should have picked up vehicle contacts:
the first bridge is guarded by one Aerospace Spotter and 4 Harrassers. Use one or two of your artillery strikes to take care of them, especially of the Spotter. Now move the Hunchback IIC across the bridge, and be sure to destroy the second Spotter it will encounter. Once all your 'Mechs are on the same shore (the left one), destroy one bridge section and return on the hills, and proceed south, toward the extraction marker.
Once you reach the second bridge, use one artillery round to destroy the Strikers and the fuel tanks. Ignore the Rommel tanks, they will stay there.
Continue to head south, until you see the small paved area I mentioned in the logistics phase. This paved area contains three 'Mechs (two Hunchbacks W and one Hollander A) and two tankers. Try to ignite all fuel tanks in the area by using your artillery rounds on the four pressure tanks; if you are lucky, the round will arrive when one tanker is between the pressure tanks and the smaller fuel tanks (at the south of the base), destroying or badly damaging the 'Mechs in the area.
Now move in and finish all 'Mechs. If you didn't blow the smaller tanks, just wait until the first Hunchback and the Hollander are near them, and destroy one fuel tank with a direct hit. If the 'Mechs don't explode, be sure to engage the Hunchback first, from medium/long range, and keep your 'Mechs moving. If the Hunchback IIC still has rounds for its Heavy AC, send it to destroy the Hollander while the other 'Mechs fight with the enemy Hunchback. Now you have to fight the other Hunchback.
Once all 'Mechs have been destroyed, explore the paved area: you'll find (near the river) some warehouses with 2 Flamers, 2 Light Ultra ACs, 4 LRM Racks, 3 Clan Streak SRMs, 1 Clan ER Laser, 2 Sensors Standard. Once you have finihed capturing enemy supplies head to the extraction marker.
Operation 2 - Mission 2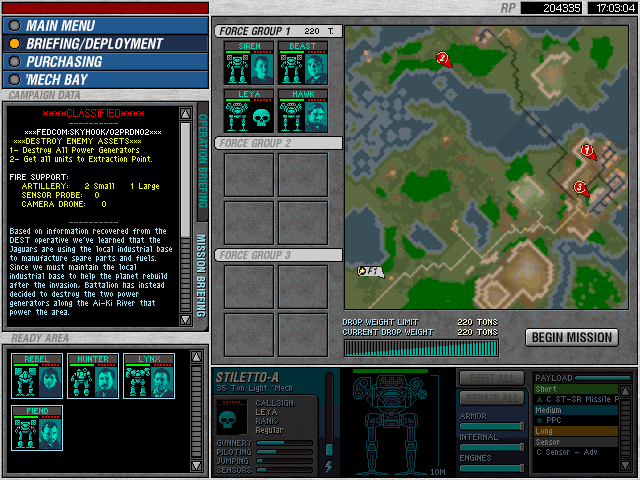
Original 02/02
Mission Objectives:
+ Destroy all power generators (10000 RP)
+ Retreat to extraction marker (5000 RP)
Maximum Tonnage: 200 tons
Maximum Units: 4
Artillery: 2 small, 1 big
Logistic Phase: Deploy medium and heavy 'Mechs only. You won't need fast 'Mechs for recon duties. The terrain of this mission features some hills and a single river which divides the map into two areas: the first, and the biggest, features your main objective and the majority of the enemy units; the second area has the extraction marker, and it's connected to the main part with a long bridge. The area is fitted with perimetal sensors.
Combat Phase: You'll start near a road. Follow it until you spot 2 vehicle contacts. These two vehicles are Bulldog heavy tanks, and you can take them out with concentrated long-range fire. Shortly after, or during the battle with the Bulldogs other four vehicles, 2 Strikers and 2 Harrassers, will reach your 'Mechs. Dispatch them too, and continue along the road until you reach a passage formed with two forest sections. Follow this passage until you reach four vehicles guarding a container; the vehicles are two SRM Carriers and two Strikers; the container has 2 Pulse Lasers inside.
Now proceed right, through a nearby passagge (formed by forest sections) to an other small supply base, this time guarded by a single Harrasser; destroy it and capture the three LRM Racks inside the container. Now return on your steps, and continue along the road until the terrain turns from grass to sand: from this point, bgin to move near the forest on the lowest edge of the map, until you see some ridges; among these ridges there is a natural ramp leading toward an hill. Climb on that hill: this will reveal a small vehicle supply base with five vehicles: 2 Bulldogs, two Strikers and one Harraser; all of these vehicles are inactive except one Striker. Use one small artillery strike to desstroy the active Striker and then destroy the barrack containing the vehicle pilots with long-range fire.
Now return on the road you was following, and be sure to move near the hill, or you will step over a minefield. Moving in this way should expose you to a single sensor only. By following that road, you'll enter the main enemy base from the west, the side with less enemies: you'll encounter 1 Bulldog and one Striker, backed by three AC turrets. You can easily pick them out with long-range fire.
Move past the destroyd turrets, and capture the Control Tower; this will bring the remaining three turrets located on the north side of the base. These turrets will also take care of the Bulldog and the Commando A. You may need to fire a salvo or two to the Commando.
Continue to proceed right: you'll find two vehicle repair bases and one HQ. Destroy the repair bases, and capture the HQ: this will reveal positions of two other small supply bases, one on the main continent, near the other two, guarded by a Centurion J and the second near the extraction marker, guarded by 2 Harrasers and one Bulldog. Use your large artillery strike on the Centurion (do not place the counter directly on the 'Mech, or you'll destroy the container) and the remaining small strike on the vehicles. The container guarde by the Centurion contains 1 Flamer, 2 Streak SRM Racks and one sensor-Intermediate. To reach the last supply base, you have to enter a road between two forest section, and it is mined. Use medium- and short range weapons to fire on the terrain. You can recognize by the small cans positioned at the beginning and at the end of the minefield.
You will reach this area at the end of the mission, however, so let's return to the previously captured HQ: continue to head right: your MechWarriors will spot a 'Mech contact guarding the power generators: this 'Mech is a Catapult W, but won't fire until you are very near, so you won't have to worry about its LRM launchers. Once you have destroyed it, capture the nearby warehouse (1 PPC, 1 Clan Gauss Rifle, 1 Flamer and 1 Clan Streak SRM Rack) and destroy the power generator.
Now head to the bridge, and take care of the two vehicles guarding it, a Rommel and a LRM Carrier.
Once you land on the island, you'll be assaulted by 2 SRM Carriers, one Bulldog and one Hunchback J. Try to move the battle near the upper-right edge of the map, where several fuel tanks awaits only one shot to destroy your enemies with ttheir shockwave.
Folow the paved road until you reach the Clanner's barracks, and destroy the five Elementals, then mve into the base and conquer 2 Pulse Lasers, 2 Flamers and 1 SRM Rack inside a warehouse.
Now head to the last supply base (the one guarded by the three vehicles, described above) and then to the extraction marker (you'll need to destroy the trees around it).
Operation 2 - Mission 3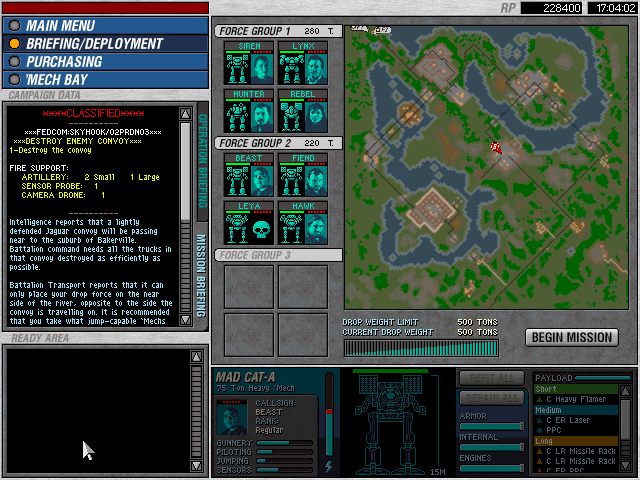
Original 02/03
Mission Objectives:
+ Destroy the convoy (30000 RP)
Maximum Tonnage: 300 tons
Maximum Units: 8 (4/4)
Artillery: 2 small
Probes: 1
Recon: 1
Logistic Phase: Deploy medium 'Mechs and Clan heavies if you have. You'll need both firepower and speed for this mission. The map has a river running through it from north to south. The river forms an arc few meters from its ideal beginning, and its ideal end divides itself into two smaller rivers with a small island between them. on the left shore there is a city in favour of the Clan government, and it is possible that people in it will try to stop you.
Combat Phase: You have to destroy a convoy composed of 6 truks plus one tanker, at the end of the convoy. It is escorted by two Hunchback IIC J, one Cougar J, an Aerospace Spotter at the head of the convoy and other vehicles, mostly Rommel tanks and Strikers.
Quickly move all yur 'Mechs away from the shore, or enemy's jump-capable Hunchback IICs will attack you. Though deploy jump-capable 'Mechs can be a good idea, keep in mind that they should have at least a medium/short jump distance, and probably you'll have very few 'Mechs able to reach to other shore jumping.
In this phase you can also fire your two artillery shots trying to it the convoy vehicle; targeting the 'mech is quite uneffective, as the Hunchback IICs' armor is too thick and the Cougar is too fast to track it. Place the recon camera at the possible end of the river, to reveal the final part of the convoy's route or on the city or on the island between the two rivers' branches.
Keep moving south until your 'Mechs pick up several vehicle signals: these contacts are at least eight Savannah Masters waiting for you. Do not order all of your 'Mechs to engage a single vehicle, and order a single 'Mech to engage one vehicle at once. Continue to move south, and when you encounter a sensor tower, destroy it ASAP: this will allow you to move with more stealthness. The tower is guarded by a group of vehicles: 1 Aerospace Spotter, 2 Strikers, 2 Bulldogs and 1 Harasser: engage the Aerospace Spotter first, then go after the Bulldogs then the Strikers and finally fight against the Harasser.
Continue to head south one more time: you should now reach the city: on the right there is a vehicle contact, but do not attack it: it's a minelayer, and you risk to step over a minefield if you try to attack it. Move on the west side of the city, and try to engage the fewest vehicles you can: you'll need all your armor for the end of the mission. At the beginning of the city there is a storage depot eith one Heavy AC and a Gauss Rifle inside it. The city is lightly garrisoned, with only a LRM carrier guarding the center.
Outside the city there is a contact with a sensor circle: it is not a 'Mech, it's a Swiftwind, and it's useless to attack it. on the south of the city you can see some fuel tanks: do not destroy them, they won't destroy any vehicle, but will destroy a warehouse.
Move past them, and capture the three warehouses with 2 Heavy Flamers, 3 Pulse Lasers and 1 Large Laser inside them.
Proceed along the paved road and destroy the Bulldog and the two Strikers guarding the access to the bridge leading to the other shore.
Cross the bridge, and be sure to have one of your medium 'Mechs leading the way: on the small island before the other shore one Bulldog and 2 Strikers will wait you. Once you have dealt with them, finish to cross the bridge and begin to head north when you see a small road. Proceed until you find two ridges coasting the road, and place your 'Mechs on them. Burn one section of trees on one ridge, and place your 'Mechs there.
Wait until the convoy arrives: immediately destroy the Aerosapce Spotter, then concentrate on the convoy vehicles, and ignore escorting vehicles and 'Mechs. To destroy the convoy and maybe damage/destroy its escort, target the tanker at the end of the convoy.
Patch 1.9 note: even if the train is destroyed, the mission won't end until all 'Mechs and vehicles are destroyed.
Operation 2 - Mission 4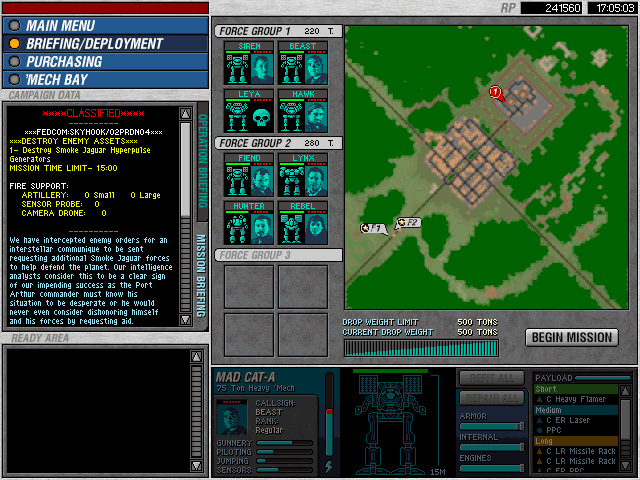
Original 02/04
Mission Objectives:
+ Destroy all Smoke Jaguar HPGs (25000 RP)
Maximum Tonnage: 400 tons
Maximum Units: 8 (4/4)
Artillery: 2 small
Probes: 1
Time limit: 15 minutes
Logistic Phase: For this mission, deploy at least one heavy and four medium 'Mechs; light 'Mechs aren't strictly needed, though they can help. Note that this mission must be completed within 15 minutes; you have to move across a dense city and penetrate in an heavily defended Clan base and destroy the two HPGs in it. The area is fitted with perimetal alarms, and the north and south areas of the city are mined. The whole area is sorrounded by forests. Be sure to deploy some LRM-equipped 'Mechs.
Combat Phase: You start in the west. Move along the road, and destroy the sensor on the left and continue until you see the first houses. Begin to circle the city in a clockwise order: enter from the west and destroy the alarm and the SRM Carrier you'll see. Capture the nearby warehouse (2 Heavy Flamers, one Beagle Probe) and move toward east. Near the center of the city there are several vehicles backed up by an Uller J. Pick out the LRM Carrier with long range fire (primary LRMs...you pilots aren't smart enough to move in to use other weapons...) and wait the Uller. It should attack you with Light AC shells, and won't pose big problems: the place where the Uller is is relatively open, and your pilots will be able to fire with direct-fire weapons such as Lasers and PPCs. It's safer to engage it from long range, to keep the nearby Rommel out from the battle for now. After the Uller, use the same tactic with the Rommel.
Now continue moving toward south: you'll find a warehouse (2 Streak SRMs, 2 Intermediate Sensors) guarded by an Elemental point (5 battle armors). Then move east, and destroy the alarm tower and the LRM/SRM Carriers protecting it. There is a Cougar nearby: though it has LRM Racks, don't worry, you 'Mechs will destroy it even in a LRM slugfest, but it's better to move into direct line of sight to criplle it faster.
It is time now to move out the city, and begin to plan the assault to the HPG station. This station is heavily defended by an other Uller J, an Hunchback IIC A, AC turrets all along the perimeter and a large vehicle continget.
Circle the outer walls and begin your attack from the north, by destroying the turrets on this side. You should also be capable of seeing behiond the medium wall sorrounding the base (at least for the side you are): there is an LRM Carrier and one of the five turret Control Towers of the base: pick them out from your position: this will power up the Uller J: pick it out with massed long-range fire too. After you destroyed the Uller the Hunchback IIC will power up: guess what kind of tactic you should use against it? Massed long-range attacks, of course. Do not let it come too close, or its Heavy AC will cause you problems. After the Hunchback, destroy the gate control tower: the vehicles inside the base will attack the gates, revealing themselves: place both artillery strikes on them, and destroy some wall sections to enter the base:
the best position is the norther angle of the base, which has no vehicles and a turret control tower very near: it is better to take out control towers than trying to capture them for this mission.
When you step in the base, all remaining vehicles will come after you: most of them are LRM Carriers and Strikers, though there are few SRM Carriers and Rommel tanks: destroy the SRM Carriers first and then close and destroy all remaining vehicles. Now capture the two warehouses in the base (worth 3 Pulse Lasers, one Standard Sensor, 1 ER Large Laser, 1 Light AC and 1 Advanced Sensor), destroy/capture the remaining turret and gate control towers (two gate towers for the two HPGs; turret towers are 5 in total) and destroy the two HPGs.
Operation 2 - Mission 5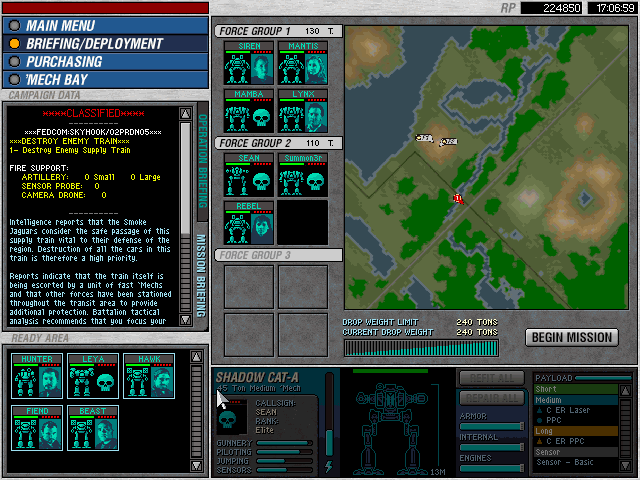
Original 02/05
Mission Objectives:
+ Destroy the train (45000 RP)
Maximum Tonnage: 240 tons
Maximum Units: 8 (4/4)
Logistic Phase: Nothing much to say. Deploy a good number of medium 'Mechs with fast weapon cycling (Pulse Lasers, ACs). The map has a railroad across it from east to west and two big hills, each on one side of the road, and both are high enough to reveal big portions of the map. There is also a very small river near the railroad, and there is a bridge south of your starting position. The train travels twoard west and it's composed of one locomotive and other 10 cars; none of these cars is explosive.
Combat Phase: You'll start over the hill north of the railroad. You can notice three Hunchbacks J near you. They shouldn't have noticed you due to their limited sensor range, and if you want you can attack them; these three 'Mechs will rendez-vous with the train and its escort (three Ullers A), so having one or two of them down will help when you reach the train.
Now move toward the bridge (you can deirectly see it): there are 5 Rommels (3 clearly visible and 2 hidden, but you will pick their contacts): quickly dispatch it and move across the bridge and move toward the other big hill. Climb the hill to its top: this will reveal an other great portion of the map. Once you have reached the top, move toward the railroad few meters.
Now wait for the train. Once the first Uller is within weapon range, fire a salvo of long-range weapons. If this doesn't destroy it, do not mind, and quickly destroy the train's locomotive: this will stop the other cars; ignore all 'Mechs escorting it, and keep your 'Mechs moving to avoid enemy fire and in the meanwhile target the remaining cars. Once the train is destroyed, the mission is finished.
Patch 1.9 note: even if the train is destroyed, the mission won't end until all 'Mechs (the Ullers and the Hunchback IICs) are destroyed.
Operation 2 - Mission 6
Original 02/06
Mission Objectives:
+ Capture Clan HQ (16000 RP)
TIME LIMIT: 6 minutes
+ Defend captured HQ (16000 RP)
Maximum Tonnage: 400 tons
Maximum Units: 8 (4/4)
Artillery: 2 small, 2 big
Logistic Phase: For this mission you should have at least two heavy 'Mechs with long-range weapons. Other 'Mechs should be within 45 tons; you'll need armor protection and firepower for this mission.
The HQ you have to capture is in the south-west, guarded by several AC turrets and other vehicles and 'Mechs. The hill where you start will allows you to directly see the Clan base and part of its garrison force. Other parts of the map will be useless to you, but there are two sensor towers you can use to detect incoming enemy forces.
Combat Phase: Move toward the base. Remember that you have a temporal limit of 6 minutes to capture the HQ. Approach the base from the east: this will alert two of the three Rommels and the single Uller W protecting it; do not destroy turrets on this side, you'll need them later.
After you destroy the three enemies, move toward the north side of the base:
there are tow access ramps: one in the north-east corner of the base, and the biggest, in the center of the norther side. Use the second ramp, destroy the two turrets and access the base. There should be the third and last Rommel garrisoning the base, so pick it out.
Now move to capture all structures inside the base: the HQ first, the sensor control tower (will bring online the two sensor towers in the north and east side of the map), the 2 turret control towers and the five warehouses containing 2 Large Pulse Lasers, 1 Heavy AC, 2 PPCs, 3 Clan ER Medium Laser, 1 Pulse Laser, 1 Light AC and 6 Clan Streak SRMs.
After you captured the HQ, enemy forces in the area will begin to move to destroy it: the first group of enemies is composed of three Strikers, coming from the north.
The second is a mixed 'Mech/vehicle group with two Commandos J and four Harassers. With the base AC turrets on your side and your medium/heavy 'Mechs this base will be very easy.
The next two attacks will be staged by couples of 'Mechs. The first two 'Mechs you'll see will be two Hunchbacks A from north-east. Try to use one small and one big artillery strike to reduce their armor, and wait them in the base. Let the turrets attack the 'Mechs first, and then fire with concentrated fire on a single 'Mechs at time.
The second couple of 'Mechs is composed of the Hollanders J, from the east. For these 'Mechs is better to move out the base and engage them at short range.
Last, but not least, three Centurions W will come from the east; return to the base, and let the turrets engage the 'Mechs first. You can also fire the remaining two artillery shots to make your job easier.
Operation 2 - Mission 7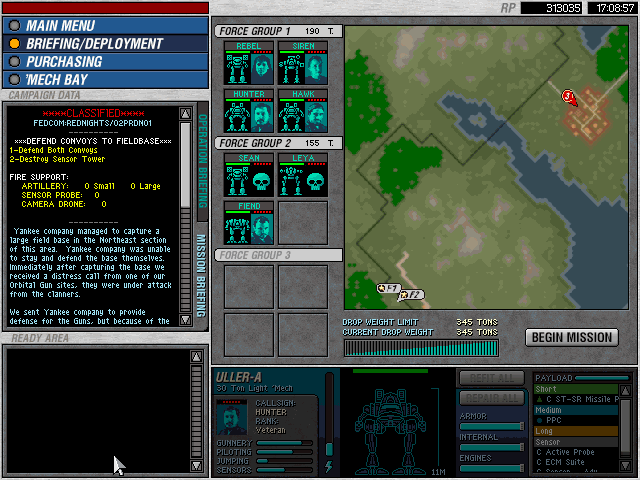
Xenocide 02/01
Operation 2 - Mission 8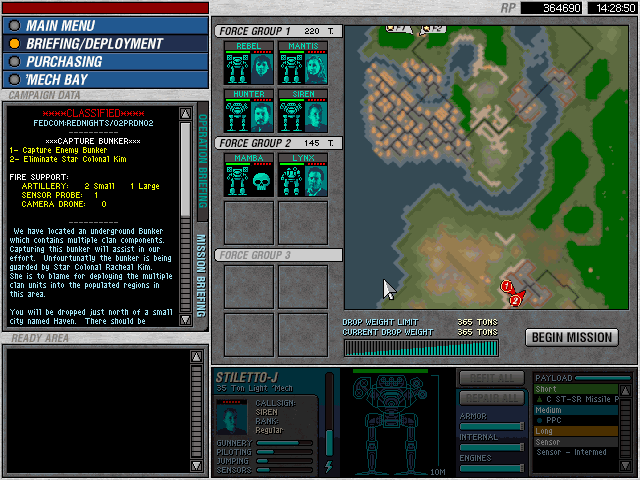
Xenocide 02/02
Operation 2 - Mission 9
X-Ray 02/01
Operation 2 - Mission 10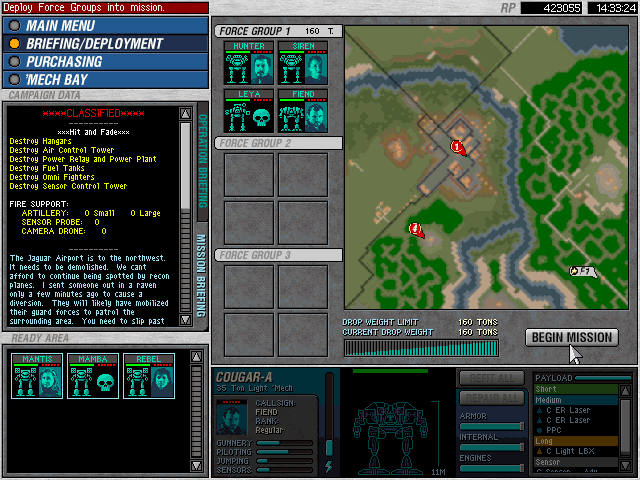
X-Ray 02/02
Operation 2 - Mission 11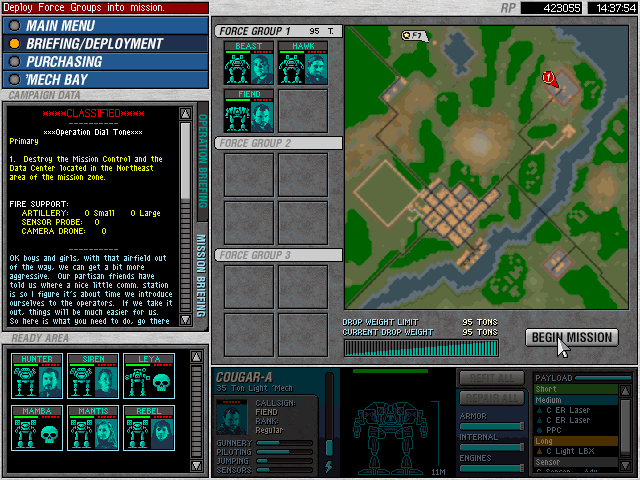
Xenocide 02/03
Operation 2 - Mission 12
Exodus 02/01
Operation 2 - Mission 13
Exodus 02/02
"This one is really tough, but still fair. You are allowed 720 tons to comprise your 'Mechs of, which is really nice, and you are going to need each one. There is such a huge amount of very strong tanks, from Pilums, Alicorns, and Von Luckners, and they will absolutely tear even your sturdiest of 'Mechs apart if you aren't careful. Bottlenecking is a must."
by stud84 on reddit
Operation 2 - Mission 14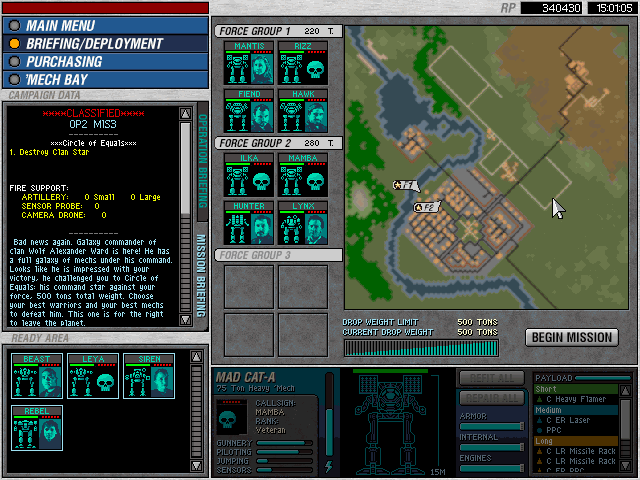
Exodus 02/03
"Probably my favourite mission in this Operation. Another 'your best versus their best' type. Prioritizing is a must. It's super quick, but also super fun."
Operation 2 - Mission 15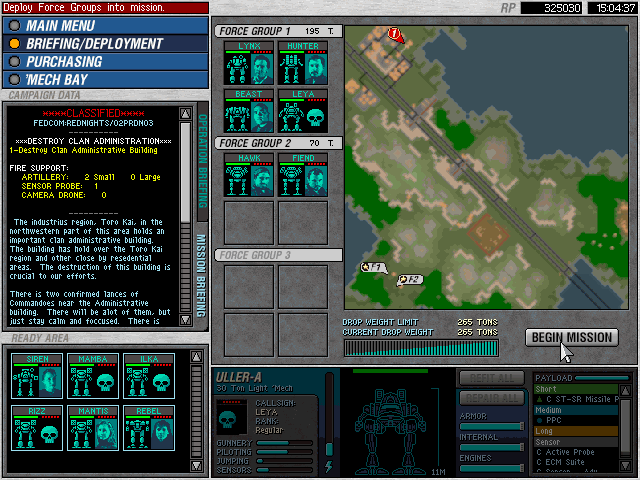
Xenocide 02/04
Operation 2 - Mission 16
X-Ray 02/03
Operation 2 - Mission 17
X-Ray 02/04
"A tricky one indeed. You need a jump-capable 'Mech to capture the left turrets, and the rightmost ones can be obtained by careful movement around the area you're expected to go through. Capturing the turrets is pretty much mandatory to win. The large volume of enemy 'Mechs present in this mission, combined with the low tonnage allowed, adds a lot of challenge. Scarab (not Outlaw, despite what the briefing tells you) is also located around many enemy turrets, but they are fairly easy to capture and avoid. I enjoyed this one a lot once I figured it out."
Operation 2 - Mission 18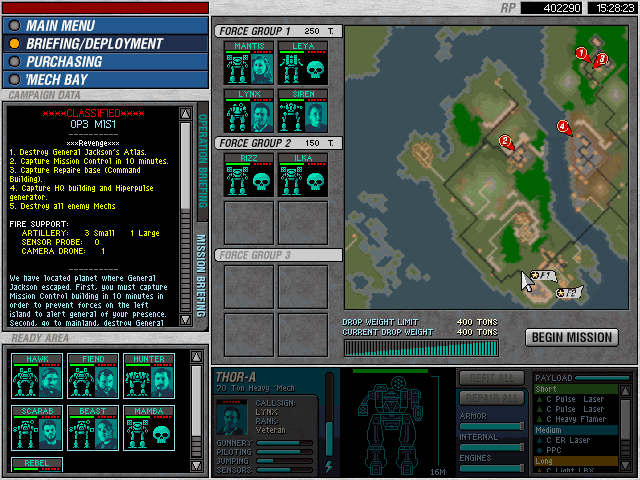
Exodus 02/04
"Every Operation so far has had that one 'Absolute Nightmare' type of mission, and this one definitely takes the cake. You start with an anxiety-inducing timer of only ten minutes to capture one building, which is fairly tight in of itself. What makes this worse is that the mission is actually tricking you. If you capture the building first, in order to disable the timer, you go through at least three stars of very strong 'Mechs, including multiple Hunchbacks, a Catapult, an Awesome, a Mauler, and many Firestarters that swarm you. Even with the utmost care in outfitting everyone and sending in your best pilots, each fight is ridiculously punishing. Not only do the enemies chase you, at least one star seems to rush you after a few minutes, regardless of where you are. Doing the timer objective first leaves your 'Mechs in horrible shape, so naturally, you'd think to capture the repair bay next. The joke is on you, however, since that repair bay is guarded by at least two stars of 'Mechs, one that is outside the entrance of the compound, and one that guards the bay, itself. I had to use my large artillery strike here, and I shudder to think what would happen if I didn't. The bay fights are pretty much unwinnable if you clear them after disabling the timer, guaranteeing a restart. Therefore, it is imperative that you clear the repair bay first, repair your team, and then (rather hurriedly, I might add) try to capture the building and disable the timer. This way is incredibly tight however, and I only had less than a minute left after doing so. The last star of 'Mechs, including the Atlas and a Mauler, are rather deadly as well, so plan for that, but they are made easier since they break pursuit after you flee enough distance away. I am not sure why the mission is so difficult, since every one before it has felt fair and balanced, but I am glad I survived. Siren, in my Masakari, ejected, and Rebel, in my Shadow Cat, was down to one pip of health. Still, a win is a win."
Operation 2 - Mission 19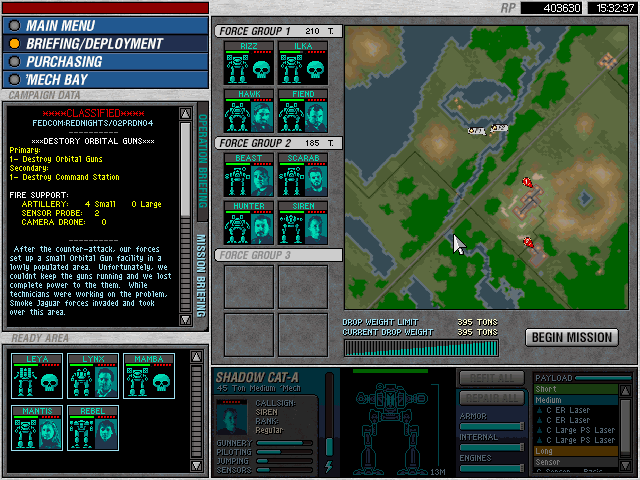
Xenocide 02/05 - Op2 Final
"Pretty easy, especially compared to the nightmare that was the previous. I enjoyed it."
"Concluding Comments - My team is pretty strong, but their (and my) skills are being tested. Excited to see what new adventures OP3 will throw at me. As always, feel free to ask me anything at all! Cheers!"
(c) by RizZen & stud84 (2017) - overhauled (2020)


Hi RizZen, thank you for the release and combining it all together.
Was hoping I might be able to get some advice. I am stuck on O2/M10 - I cannot seem to destroy all the power/fuel supplies. I even went and smashed the wind turbines on the hill to the east, but no luck.
There is a transformer station next to the starting point. Destroy the transformer station and the power supplies in the main base and mission objective will be triggered.
Hi RizZen,
I'm stuck on Operation 2 - Mission 13. I destroy all of the vehicles who are gathered north of the base, moved my 'mechs north to destroy the oil derricks, but then, nothing happens. The timer runs out, and I can't complete the 'Destroy all enemies' mission. Are there supposed to be more enemies coming in from outside the map?
EDIT: The issue is that Falcon gets auto added on this mission. If she is already in my roster, I get the error. Dismissing Falcon before the mission fixed the error.
I get a consistent error crash on completing Op2 M1, escort the hunchback 2:
ASSERT (00000000 - Warrior in an assigned mech is NULL )
Address : 0x006F6580
Location : No .PDB file found
File : No .PDB file found