Tutorial originally posted to Gameedit.com. Mirrored here for archival purposes.
Lesson 1 - Making Height Maps
Basics on height map making. Using paint tools to build up your terrain with jumps, bumps, berms and woops.
Height maps
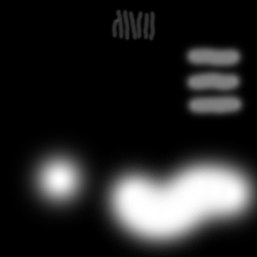
The most important and perhaps most time consuming part of building a track is creating the height map. A height map is a 2 dimensional image that is used by Armadillo to create your 3 dimensional environment. See the sample height map below (ex. a).
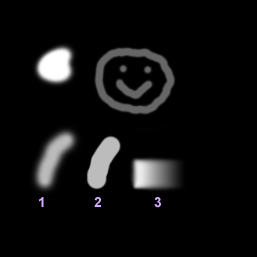
ex. a height map
The colors of the height map determine terrain elevation once the image is imported into Armadillo. The brighter the color, the higher the terrain elevation will be. A height map is a top-down view of the track terrain.
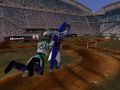
Compare these 2 images (ex. a and ex. b). You should be able to see how these 2 images relate to each other. Ex. a is the height map. The image in Ex. b was taken in Armadillo after the height map was imported. Check out the little smudge above the 3 in the image to the left. Notice how the color goes smoothly from black to white. This is how the ramp is formed in ex. b. The white area is the top of the jump and it gradually gets lower as the color is darkened, eventually to complete black. Most of ex. b is flat ground - these are the black areas in theheight map. The highest point is the white blob to the left of the smiley face.
Brushes
Now compare the areas in ex. a marked 1 and 2. These are simply 2 lines painted with the same color, but with 2 different brushes. The brushes are both about 20 pixels wide. Line 1 was done with a soft brush. See the inset in ex. b - this shows what the brush looks like for each of the 2 lines. Brush 1 has a dark (or hard) center that fades around the edges, creating the smooth mound effect of line 1. Brush 2 is a hard brush. It creates nearly vertical edges in Armadillo since there is no gradual lightening of color near the edge of the line.
ex. b
You can see how smooth hills or woop-de-doos can be made using a soft brush, and sharp edges and canyon walls could be made using a brush with harder edges. How bright the brush stroke is will determine the height of the hill.
ex. c
You can see how the size of the hills compare to the bike in ex. c. In the pic, I'm flying off the jump and over the 2 "lines". This jump was made using the gradient tool in Photoshop. Most good paint programs have a gradient tool of some sort, and they usually work in different ways. Photoshop and PaintShop Pro have completely different gradient tools. Satori Paint has a different method for achieving gradients. It's up to you to learn how to use your programs tools and brushes, as it is way beyond the scope of this series to teach their use.
You should now understand how the colors of your height map determine the 3D terrain of your track.
Making a Height Map
Ok let's get to it!
Open your paint program. I'll be using Adobe Photoshop 5.5 for my examples. It's up to you to use whichever program you feel most comfortable with. I'll try and make my instructions as universal as possible and not use terms that only Photoshop users would understand. As I mentioned before, you should know how to select brushes and customize the hardness and opacity of them. You should be familiar with the blur or smooth tools, and you should understand your gradient tool. You can get by without the gradient tool, but it comes in handy.
We will start by making a quick height map just to give you an idea of the way things work.
Begin a new image that is 257 x 257 pixels. Actually you can start the image larger and the n shrink it down to 257 x 257 when you save it. Your image must be this size, and be a 24 bit RGB image when it is saved. In PaintShop Pro I know that you can set the colors/bit-depth under the Colors menu. 24 bit = 16.7 million colors. Although we are using "greyscale" colors, this is NOT a greyscale image. Ex. a is an actual size height map.
Make the background of the image black (color 0,0,0). You can use the paint bucket or just use a big brush and paint it black. Black represents the lowest elevation possible, thus, everything we build on this height map will be at ground level or above.
Let's make some small hills/jumps for practice. First we need to figure out which tool is best for the job. We want a nice smooth shape like line #1 in ex. a. We will need a soft brush, or perhaps an airbrush. Photoshop provides an assortment of pre-made brushes (ex d.). Many paint utilities have a brush pallette such as this. Other programs force you to create your own custom brushes. Therefore I will list the attributes of the brush I'll be using for the following example.

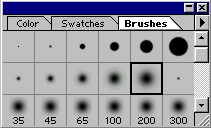
ex. d

ex. e
ex. f
The diameter of the brush is 21 pixels. The hardness is 0%. The higher the hardness factor, the bigger the solid black center of the brush will be. The top row of brushes in ex. d have 100% hardness - the brush is solid black. The spacing tells the brush how often to apply color to the drawing surface as you draw a line. This number should be set so that a brush stroke appears smooth. The default setting is usually OK, however you may need to lower this number (in Satori PhotoXL for one). The opacity is set to 50% - any stroke applied will appear as if only 50% of pressure were used on the brush. 100% opacity is full pressure and 0% will be completely transparent.
In ex. e I've made 3 strokes using the above brush. I used full white (255,255,255) for the color, but since the opacity is set to only 50% the color appears grey. I did this to keep the jumps at a reasonable height. White, being the full possible height of our track, and black the lowest, our jumps will be 1/2 the total allowable height...still pretty big! The actual distance between the high and low points is adjustable in Armadillo.
These jumps look pretty wide considering that the height map is the total allowable area for our entire track, but that's cool for now. We're just experimenting.
Go ahead and draw these jumps. They are simply single lines using the aforementioned brush. Put them anywhere you want. Use only a single brush stroke for each line.
For the top set of small strokes (ex. f) I used the same brush, but modified it to be only 5 pixels in diameter, and the opacity 20%. They are darker and smaller as you would expect. They might make good woop-de-doos...then again they may be too big. It's hard to tell until you import the image in Armadillo and take a test ride (which we will be doing!).
The big white blobs near the bottom in ex. f are once again the same brush, this time 65 pixels in diameter and 100% opacity, making the solid portion of the stroke full white. These will be the highest points on our terrain.
Go ahead and experiment a little. Remember this is just a practice run. After we import this into Armadillo and check it out in 3D, we will scrap it and begin to build a Nationals track from scratch!
When you get your height map the way you want, you must save it as a 24 bit Targa file (.TGA). You can save it anywhere you like - I make a separate folder for each track and place it in the /MXM2/trackeditor/projects/ folder. I'm gonna leave my height map just the way it is in ex. f. Since it's just practice I won't bother smoothing it out either.
Now it's time to import our height map into the track editor. I am only going to go through the steps necessary to do a quick "ride-through" on our terrain in Armadillo. I will explain all the details of the editor in the next few lessons, but for now I just want you to get a feel for how your painting translates into a 3D terrain. It takes some practice to know how things are going to look as you're painting the height map.
Follow these steps carefully...
Start Armadillo. When the main screen appears you will see a menu on the right (ex. g). Select Nationals for your track type, then click the Create button.
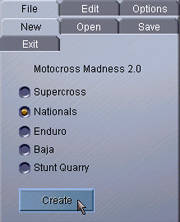
Ex. g
After a few moments another menu will appear. Note that you are now in the Edit menu (ex. h). Click Import Targa Height Map, then on the next screen, click import. Browse around until you locate your .TGA, then open it. Your height map will appear in the main window, just as it did in your paint program.
If you are confused with the folder browsing system in Armadillo, the ".." will take you back one directory when double clicked.
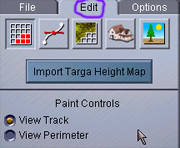
Ex. h
Now it's time to convert our targa into a 3D terrain. In ex. h there are 5 icons just above the Import Targa Height Map button. The one on the left is already selected - click any one of the other 4 icons. Armadillo will begin converting your height map into 3D terrain and a progress meter will appear at the bottom of the screen. In a moment you will see your terrain, probably from a top-down perspective.
Ex. i
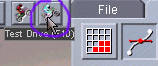
Hit F-10 or click the little motorcycle rider near the top of the screen - there are 2 - the one on the left is a computer controlled rider, the button on the right is a rider we can control (ex. i). Select the one on the right.
ex. j
You can now ride around your terrain! You may have to set your controller in the Options tab (see ex. h). This should give you an idea of how your brush strokes relate to the "finished product".
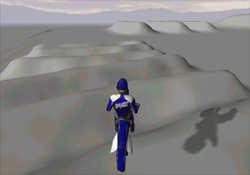
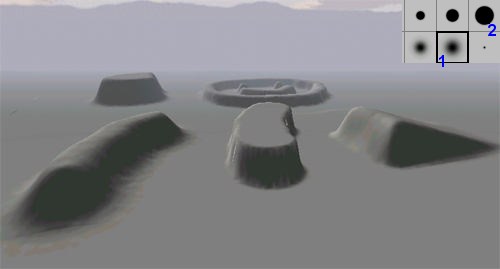
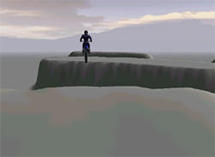
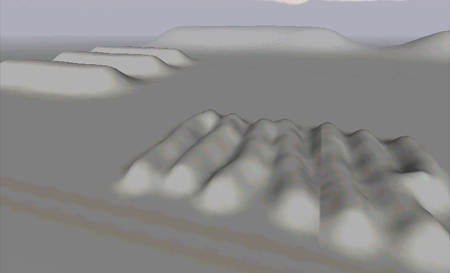
ex. k
The 2 images above show my terrain. The woop-de-doos are pretty big, though the 3 bigger mounds make a decent triple-jump. The white "blobs" from ex. f created some pretty good size hills in the background.
When you're finished riding around, close Armadillo. Saving the project is up to you - we will begin a new one in the next tutorial. If you do save it, save it in its own folder, as several files will be created. It is easier to keep track of different projects this way.
Conclusion
This should give you a good start with building terrains. We will get into more detail in the lessons that follow. Until then, practice and experiment with different brushes and techniques and check the results in the editor. Make sure you understand the gradient tool as it will be useful in later lessons.
In the next lesson we will begin building a Nationals track. I will guide you along and show you various techniques, but the majority of the final track will be a unique design by you!
Let me know what you thought of this first tutorial. It didn't cover much detail but I want to be sure I am explaining this stuff clearly. There will be more lessons and I will consider any comments or suggestions as to their content, and the way they are presented.
Expect the next lesson shortly. Until then...class dismissed!!!
- schplurg