How to do versioninfo in Microsoft Visual Studio 2010 and above & How to do code signing using self signed certificate
This will be a two part tutorial. In the first part, I will show you how to populate the [Details] tab for your dll or exe file you would like to compile. In the second part, I will show you how to digitally stamp you dll or exe file with Digital Signature.
Let us start. As always I will list the tools you will need, and will give some additional documentation, you might find useful.
Tools:
- Windows Software Development Kit - Windows 10 ( or something else that has signtool and pvk2pfx)
- Microsoft Visual Studio (2010 - 20XX)
- NotePad++
- Free Random Password Generator
Resources:
How to do versioninfo in Microsoft Visual Studio 2010 and above
Note: I will refer to Misfosoft Visual Studio as MSVS from now on.
So basically what this will do is to populate the [Details] tab in "Properties" of your compiled dll or executable. If you don't have the correct values set during compiling of the dll/exe file, the
[Details] tab like look like this - basically empty.
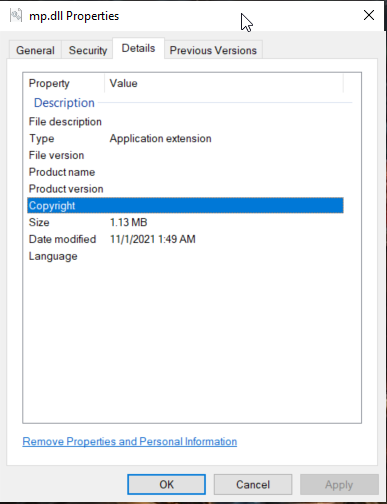
Figure 01: [Properties] > [Details] before edit
To correct that we need to add .rc file to the project and we need to populate it correctly.
1. Open your "solution" in Microsoft Visual Studio. I will use 2010, any version after this one should work exactly the same.
Seclect the "project" you would like to add versioninfo to, ideally, I would liek to have that information added to both client and server dlls. Still I will show you how to do it for the server, you can figure out the rest, I guess.
2. Go to [View] > [Resource View] (or press Ctrl + Shift + E while you are in the MSVS. )
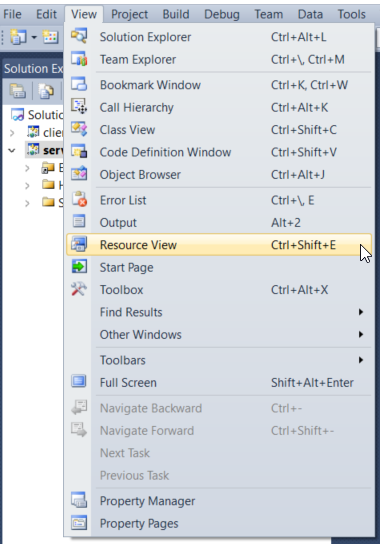
Figure 02: Resource View in MSVS 2010
3. The resource View will open, somewhere... there... :D It should look like this (empty):
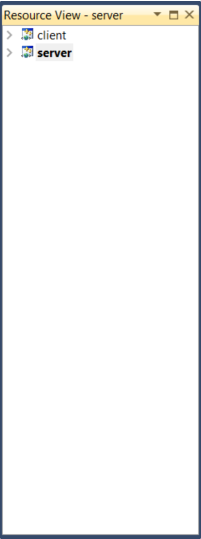
Figure 03: Resource - server
4. Right click on your "server" and select [Add] > [Resource], then from the Add Resource window select [Version] > [New]

Figure 04: Add Resource - server
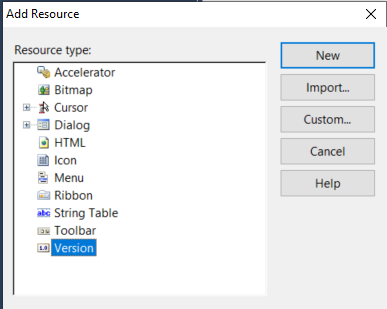
Figure 05: Add Resource - Version
5. Now if you click on the down arrow next to "server" you will see "server.rc" and if you click on the down arrow for "server.rc" you will see "version" and under it "VS_VERSION_INFO"
Let's Double click on it and see what we have there:
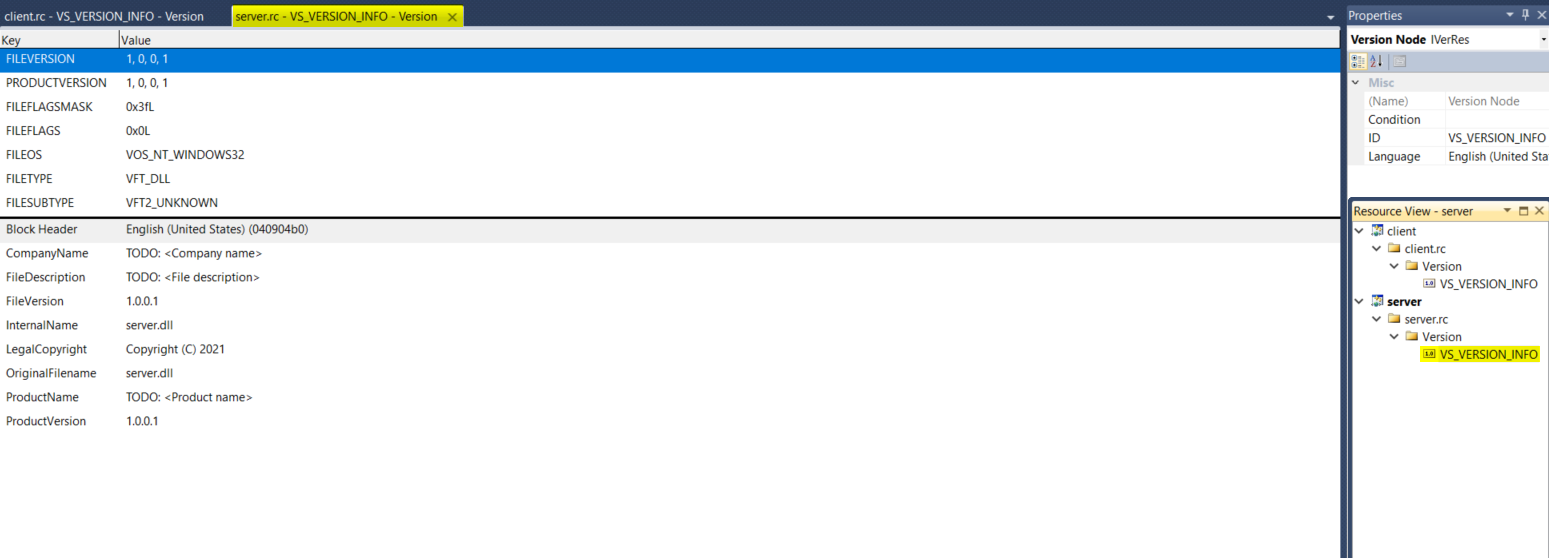
Figure 06: server.rc - VS_VERSION_INFO
Note: Dont forget to Rightclick on server.rc and save the file (even empty), since we're going to modify it outside of the Visual Studio.
I really like what I see, but if you check the document I shared with you (look at the top if this page) you will see that we have just 9 values, and according to the document we can setup 12 values... It's not that MSVS does not support them... It basically does not support to add them from the tool (I haven't found a way to do that).
So here's where the Notepad++ will be used...
Navigate to your projetc directory and search for files with extention .rc (you should find only 1, or 2 depending if you did the steps for server and client or only for server). If you have more than 2... well look for files called with the same name as your "solutions". In my case they will be called "server.rc" located under "dlls" fodler and "client.rc" located under cl_dll directory.
6. Let us open the server.rc file with Notepad++. Scroll down untill you get to "// Version". Here you should see something like this:
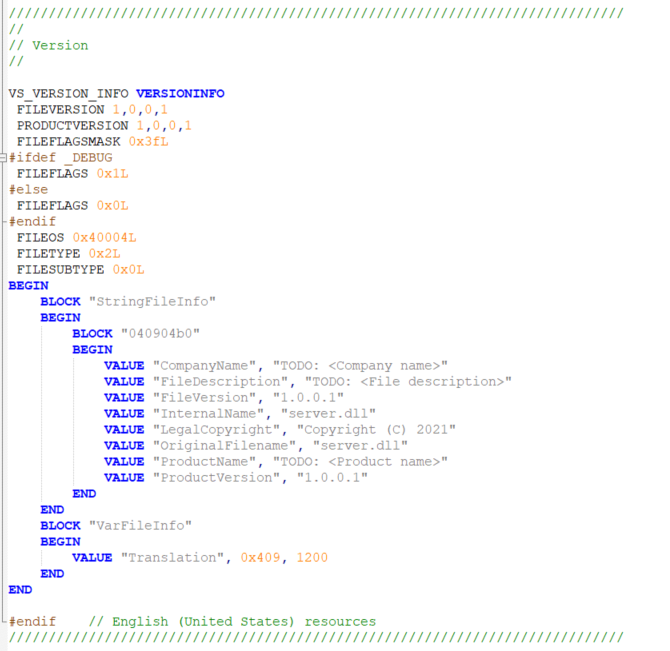
Figure 07: default (empty) VERSIOINFO
We are going to play here. Bellow I will give you example from what I have put in my server dll, you can adjust it:
    BLOCK "StringFileInfo"
    BEGIN
        BLOCK "040904b0"
        BEGIN
            VALUE "Comments", "Beta"
            VALUE "CompanyName", "Zarko 'Napoleon' Dinev"
            VALUE "FileDescription", "FlatLine Arena Server"
            VALUE "FileVersion", "1.0.0.1"
            VALUE "InternalName", "mp.dll"
            VALUE "LegalCopyright", "Copyright © 2008-2021 by Flatline Arena"
            VALUE "LegalTrademarks", "FlatLine Arena © 2008-2021"
            VALUE "OriginalFilename", "mp.dll"
            VALUE "PrivateBuild", "10.31.2021"
            VALUE "ProductName", "FlatLine Arena Server"
            VALUE "ProductVersion", "1.0.0.1"
            VALUE "SpecialBuild", "1.0.5.1"
        END
    END
    BLOCK "VarFileInfo"
Here's example with picture and a little more explanations of what is what:
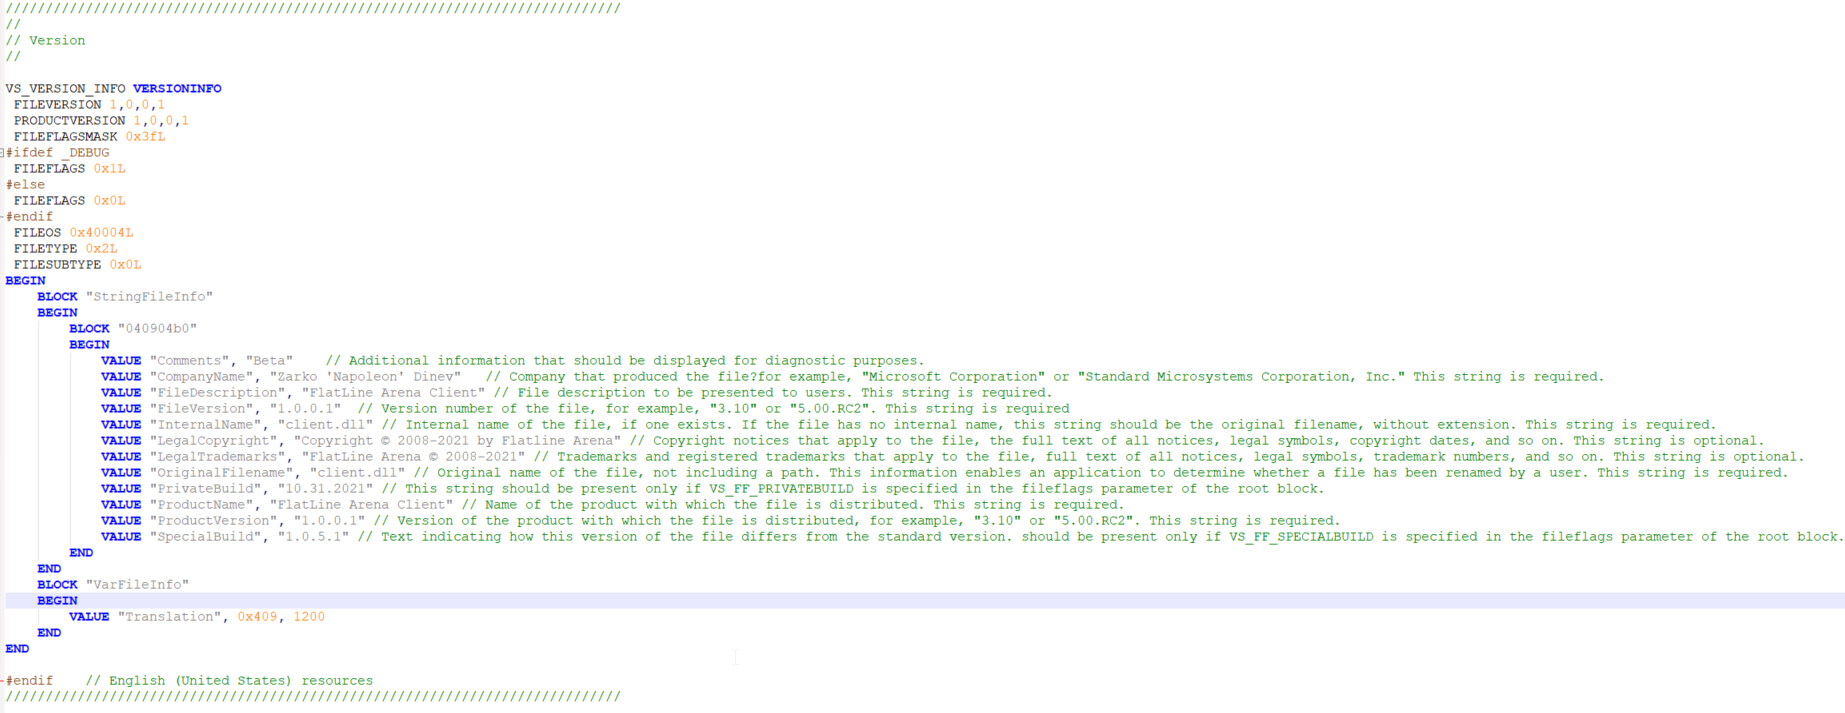
Figure 08: Full VERSIOINFO with comments (Open image in New Tab, since it's quite big)
7. Now, save the file and go back to Micosoft Visual Studio 2010.
The compiler will inform you that the file "server.rc" was modified outside of the tool, and will ask you to reload it. Reload it.
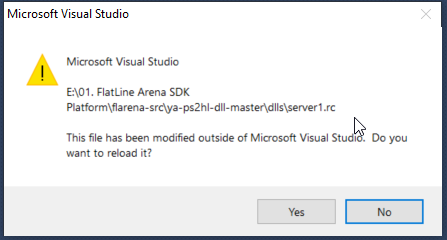
Figure 09: Visual Studio File has been modified outside of Microsoft Visual Studio
If you load the server.rc file (I remaned it to mp.rc) you will see the updated file in the tool.

Figure 10: Correct VS_VERSION_INFO for mp.dll / server.dll
8. Go and compile your projects. Then go and select the compiled dll files and Right mouse click [Properties] and go to [Details] tab. It's different now is it not?
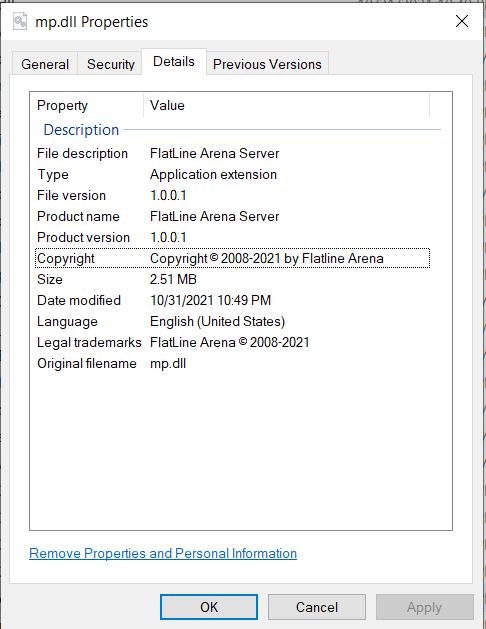
Figure 11: [Properties] for mp.dll / server.dll
Well, this was how to populate the [Details] / Versioninfo for your dlls or executables.
Let's get a quick break, and we will continue with the signing part of this tutorial.
How to do code signing using self signed certificate
In those days of Digital Insecurity, it's important to know that the software you just downloaded is provided by the one that claims it is provided from. In this tutorial I will show you how to digitally sign / stamp your dlls or executables, using nothing else than the standard Windows 10 SDK, PowerShell and Command Prompt.
Starting with Microsoft Visual Studio 2015, this stamping is possible within the compiler itself, still I never made it to work properly for me. So here's the way I do it post compiling the programs / dlls. (Additionally, for the installator files you can not do it even from Visual Stidio...)
Let us start
1. Now download and install the windows development kit for visual studio from below link ( if you already have signtool and pvk2pfx then skip this step)
My suggestion would be to download and install the packgae before you start with the procedure.
2. Then, Open PowerShell in the following directory: "C:\Program Files (x86)\Windows Kits\10\bin\x64". You can do that using one of the following two methods:
- Open the directory, Hold [Shift] and Right Mouse Click and select "Open PowerShell window here". - Open PowerShell and cd to the directory.
- Create a self -signed Authority (CA) by running following command in PowerShell :
makecert -r -pe -n "CN=FlatLine Arena" -ss CA -sr CurrentUser -a sha256 -cy authority -sky signature -sv FlatLine.pvk FlatLine.cer
3.1 You will be asked to create private key password "225E7B3CF7F1C86A764B53A599064" - for example
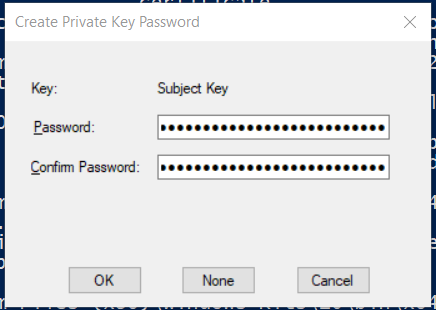
Figure 12: Create Private Key Password
3.2 You will be required to enter the private key password "225E7B3CF7F1C86A764B53A599064"
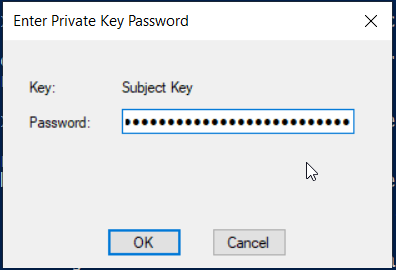
Figure 13: Enter Private Key Password
3.3 You will see a message that the operation was successfull. If you go to "C:\Program Files (x86)\Windows Kits\10\bin\x64" you can see the files "FlatLine.cer" and "FlatLine.pvk" created.
4. This creates a self-signed (-r) certificate, with an exportable private key (-pe). It’s named “FlatLine Arena”, and should be put in the CA store for the current user.
We’re using the SHA-256 algorithm. The key is meant for signing (-sky). The private key should be stored in the FlatLine.pvk file, and the certificate in the FlatLine.cer file.
5. Now Import the CA certificate by running following command in PowerShell:
certutil -user -addstore Root FlatLine.cer
5.1. You will receive Security Warning, click on "Yes"
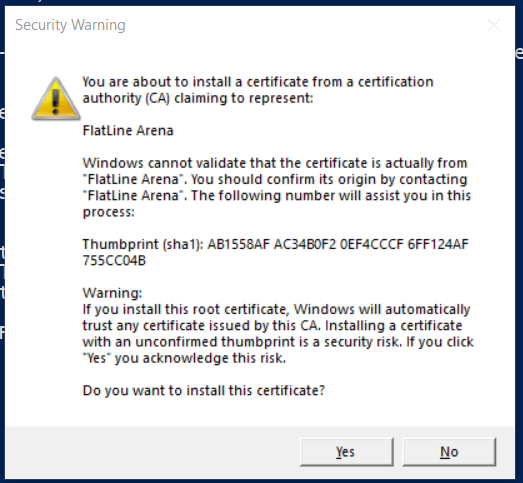
Figure 14: Security Warning
5.2. In PowerShell you will see the following output:
	Root "Trusted Root Certification Authorities"
	Signature matches Public Key
	Certificate "FlatLine Arena" added to store.
	CertUtil: -addstore command completed successfully.
6. Now create a code- signing certificate by running following command:
makecert -pe -n “CN=FlatLine Arena” -a sha256 -cy end -sky signature -ic FlatLine.cer -iv FlatLine.pvk -sv FlatLineArena.pvk FlatLineArena.cer
6.1. You will be asked to create Private Key Password (this one is different from step 1!) - "782ECFG31A9E1D196B25F2DP126D7"
I'm not going to include picture for this one as it will look exactly the same as the one on Figure 12
6.2. You will be asked to enter the Private Key Password (the one you jus put in the previous step).
6.3. You will be asked to enter Private Key Password, this is the password you put during Step 1!
You should have received confirmation that the operation was successful. In the directory you will mow see a files called "FlatLineArena.cer" and "FlatLineArena.pvk", we're going to use those for signing. :)
7.Now open CMD with admin rights and navigate to
C:\Program Files (x86)\Windows Kits\10\bin\x64
( this path may be diffrent on your system)
Tip: You can switch from PowerShell, to Command Propmpt by typing cmd. If you're in Command Prompt, you can type PowerShell to switch to PowerShell.
8. Now run the following command to convert .pvk file to .pfx file :
pvk2pfx -pvk FlatLineArena.pvk -spc FlatLineArena.cer -pfx FlatLineArena.pfx
(specify the path for the certificate files if everything is not in same directory)
You will be asked for the password, remmeber that's the password from step 6 - "782ECFG31A9E1D196B25F2DP126D7"
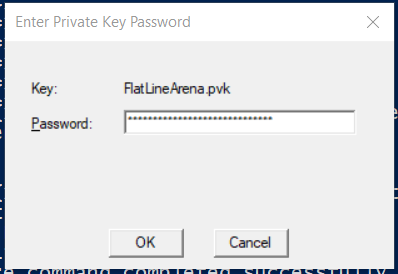
Figure 15: Enter Private Key Password
9. Now sign the code using certificate which was created in step 8 by running following command:
signtool sign /v /f FlatLineArena.pfx mp.dll
(without time stamp) if you want to sign with time stamp run :
signtool sign /v /f FlatLineArena.pfx /t http://timestamp.digicert.com mp.dll
I will be using this for timestamp server url "http://timestamp.digicert.com", you might have to use something else, especially having in mind that those servers tend to go offline...
Here's example on stamping executable file with the same certificate:
signtool sign /v /f FlatLineArena.pfx /t http://timestamp.digicert.com test.exe
Note: This procedure assumes your .dll or .exe file is located in: "C:\Program Files (x86)\Windows Kits\10\bin\x64". I'm using "FlatLineArena.pfx" for certificate and I'm signing "mp.dll" /"test.exe" files. (That's my server file for the modification, and the second one is a random SFX archive)
You should receive output like this:
	The following certificate was selected:
		Issued to: FlatLine Arena
		Issued by: FlatLine Arena
		Expires:   Sun Jan 01 01:59:59 2040
		SHA1 hash: 61C6C7C2C39EDB6EAC7356649887EB8AA6D01059

	Done Adding Additional Store
	Successfully signed: mp.dll

	Number of files successfully Signed: 1
	Number of warnings: 0
	Number of errors: 0
Congratulations you signed your dll.
Note: All of the comands are case sensitive, and if you mess up somewhere, you might get an error... The most common one is:
SignTool Error: No certificates were found that met all the given criteria.
This means that you did something wrong with your certificate... And you have to start from step 1.
10. If you go to your dll, right mouse click "Properties" you will see and extra tab called "Digital Signatures", you can click on [Details] and then in the new pop-up [View Certificate]
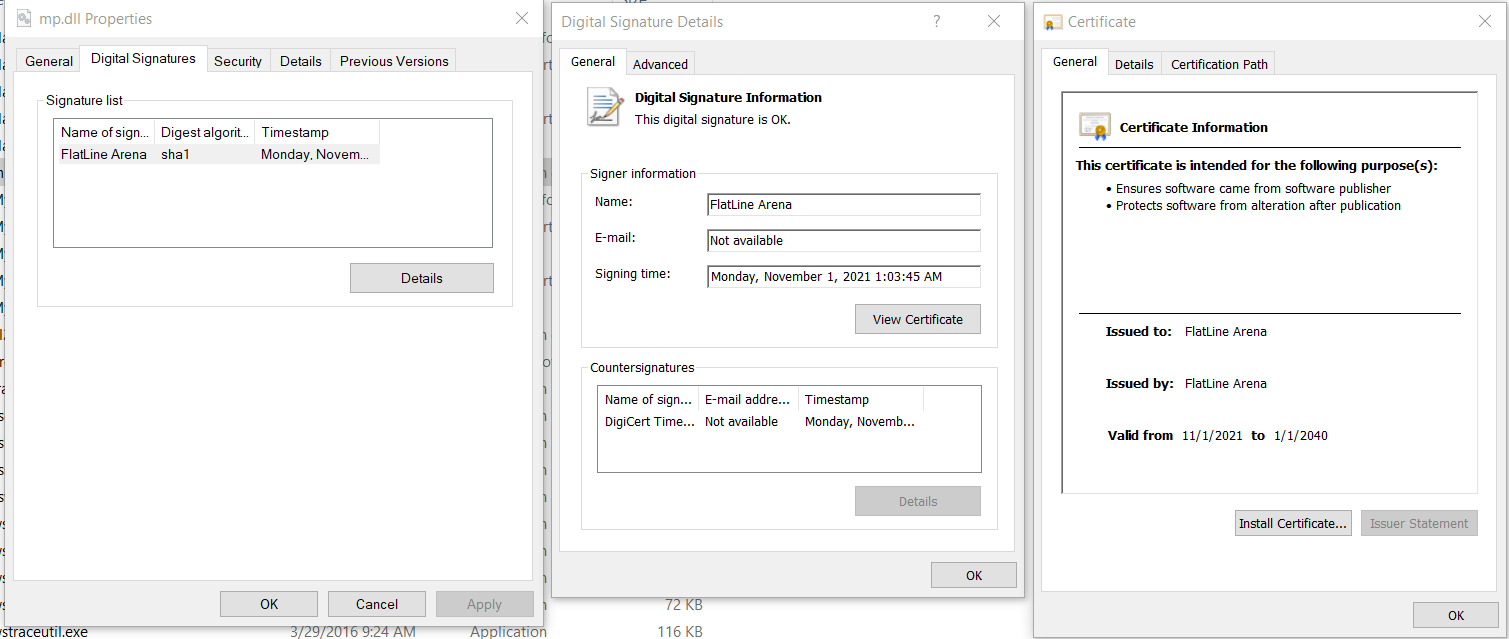
Figure 16: Dll Properties and Doigital Signatures
If this is not the case... well go figure it out. :), probbaly you did something wrong.
10. So, the question is what happens with the certificate if the file (.exe or .dll) got modified, for example by malicious applications, or let's say a bit was switched off, or lost during the download?
I'm going to simulate that, by editing the executable file with HEX Editor.
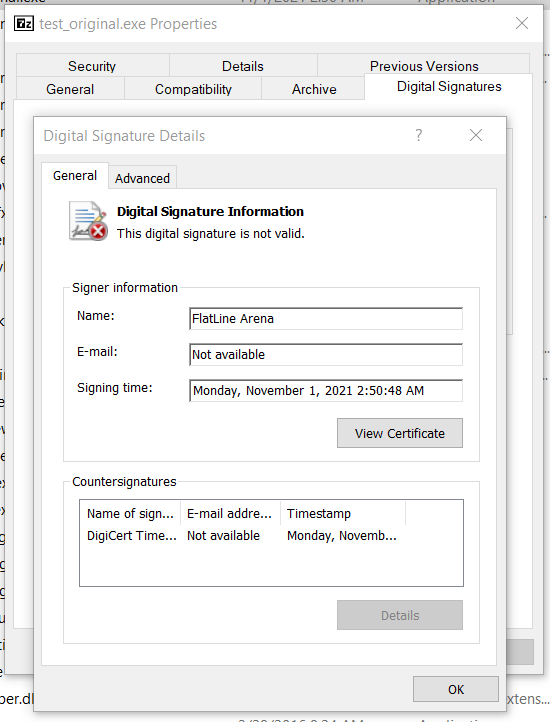
Figure 17: This digital signature is not valid.
As you can see, now that I have modified the file, the signature is no longer valid.
Oh, well, I guess this is the end of the tutorial. Well, before we call it finish, I will give you some tips:
Tip: My suggestion would be to backup the certificates and the passwords you created, since you might need them at some point...
*You can certify your installation files too. :) *
Tip: And the last tip for the day, but I think it is the most important one (and self-explanatory...) - Do NOT use the passwords I used here, they are just examples, and obviously, since this tutorial will go Public... if you use my passwords, the chances are someone will crack your certificate... and that's not good...
If you're lazy about generating passwords... you can use online password generators. For example here's a good one, I have used in the past when I was testing one of my tools for brute-forcing passwords (Hey, everyone has a dark side...):
Have fun kids!
Napoleon was here at some undisclosed time in 2021…