Tutorial written by *rrr*bbb*
Mirrored here for archival purposes. Note this is an unofficial tutorial the official Remedy tutorials are located here.
Faking Shadows
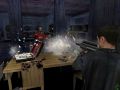
As you may know, dynamic shadows aren't possible in Max Payne. In this tutorial I am going to show you, how to create a faked shadow caused by an ceiling fan. Of course the shadow isn't realistic but it creates some atmosphere to your level.
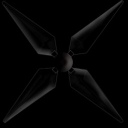
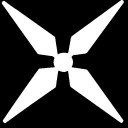
For the tutorial you will need some textures. You can make your own or you can use these:


How it works
Well, we are going to create a fan placed under a lightsource. We then need a black texture with an dark gray alpha layer that has the same outlines as our fan and is a bit transparent. We create a polygon on the floor which is our shadow. The shadow will get the same animations as our fan and in the end it will look like that the fan throws a shadow on the floor.
Creating the fan
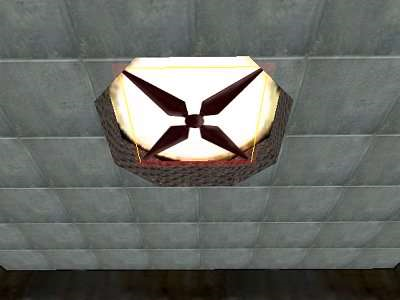
Start by creating a room with a lightsource on the ceiling. Under the lightsource we build our fan. Of course you can create a 3D fan, but for the tutorial a single polygon with a texture works fine.
Use the first 2 textures (texture + alpha layer). Put the texture in a category of your choice. Then create a single polygon named "fan" under the lightsource by pressing "shift + right MB". Scale the texture to fit the polygon.
In the next step we have to make the fan dynamic and create the animations for the rotation.
Animating the fan
First make the fan dynamic by going into "F5-Mode", clicking on the fan and pressing "d".
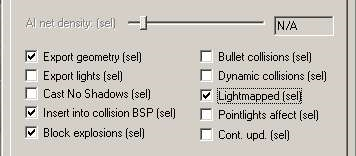
Still in "F5-Mode" klick on the fan and press "Return". Now go under the "Statistics"-Tab and tick off the following checkboxes:
Now align the grid in the middle, then select the fan and press "p". This will set the pivot to the center of our fan.
Then turn off the world axis rotation and turn on the pivot rotation by pressing "w" and "p" in F5-Mode. You now have to create 3 keyframes, the first with 0° rotation, the second with 120° and the third with 240°. After that create 3 animations named rotate_0, rotate_120, rotate_240. This three animations are between the following keyframes:
- 0 : between 0 and 120
- 120 : between 120 and 240
- 240 : between 240 and 0
The animation length can be set whatever you want, but it should be the same for every animation. After scripting the animations together we will get a 360° rotating fan, but we'll do that later.
Creating and animating the shadow
Take the third and fourth texture (texture + alpha layer). Put the shadow texture into the "graffiti" - category. This will prevent the clipping effect, if 2 different textures are the same level.
Now create a single polygon named "shadow" direct or a minimum grid size above the floor. Make it about 2 sizes bigger than the fan. Scale the shadow texture on it and be sure that the fan and the shadow are in the same starting position and have the same center.
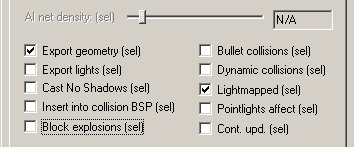
Again we have to make the object (the shadow this time) dynamic. Do so and again go to the "Statistics"-Tab of the shadow-polygon.
Now we place the grid in the middle of the shadow and press "p" to set the pivot point. Check if pivot-rotation is still activated and create again 3 keyframes with rotations of 0°, 120°, 240°. After that you create the same animations as we did it before with the fan. The names and lengths should be the same.
Scripting it all together
We will control the animations of the fan and the shadow by using different FSM-states and one custom string. The animations of the shadow will be triggered at the fan, to synchronize them with the fan.
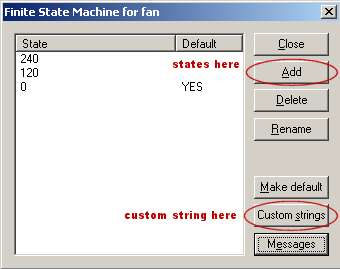
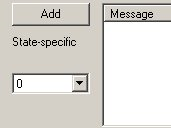
Go into "F5-Mode", click on the fan and press "4". This will open the FSM for our fan. In this window, we add 3 states "0, 120, 240", 0 should be default. We also add a new custom string "rotate".
If you have done this, click on messages. There is now a tab called "FSM_Send(rotate)". Click on it.
![]()
The 2nd row looks now like the following picture:
Here you can define what should be done if the custom string "rotate" is received. In the drop down list, you define what happens in which state.
For example if the object is in state 0 but there's nothing defined for this state and the custom string is received per ( FSM_Send(custom string);) nothing will happen. If you are in state 240, were some messages are defined, and the custom string is received, the messages will be processed.
So we now trigger our animations. Be sure the state "0" is selected. Enter the following 3 messages:
this->DO_Animate(rotate_0);
parent::shadow->DO_Animate(rotate_0);
this->FSM_Switch(120);
This starts the first animation of the fan and the shadow and switches to the 2nd state. At state "120" enter these messages:
this->DO_Animate(rotate_120);
parent::shadow->DO_Animate(rotate_120);
this->FSM_Switch(240);
In state "240" enter the following:
this->DO_Animate(rotate_240);
parent::shadow->DO_Animate(rotate_240);
this->FSM_Switch(0);
Finally we have defined all messages to trigger the animations, now we only have to send the custom strings.
Still in the messages window, we have to switch to the Animation tabs (Animation(rotate_0), Animation(rotate_120), Animation(rotate_240)). In everyone of the tabs enter the following messages in the 3rd row ( Reaching 2nd keyframe ):
this->FSM_Send(rotate);This will send the custom string "rotate" every time an animation is finished and let the next animation start.
To start the fan at the beginning, finally add this message at the "startup-tab" of the fan:
this->FSM_Send(rotate);