Hey everyone! We've got about 1.5 weeks to go in our Kickstarter campaign, and we're nearly 90% funded. If you're interested in dark tactical RPGs, we would appreciate you checking it out!
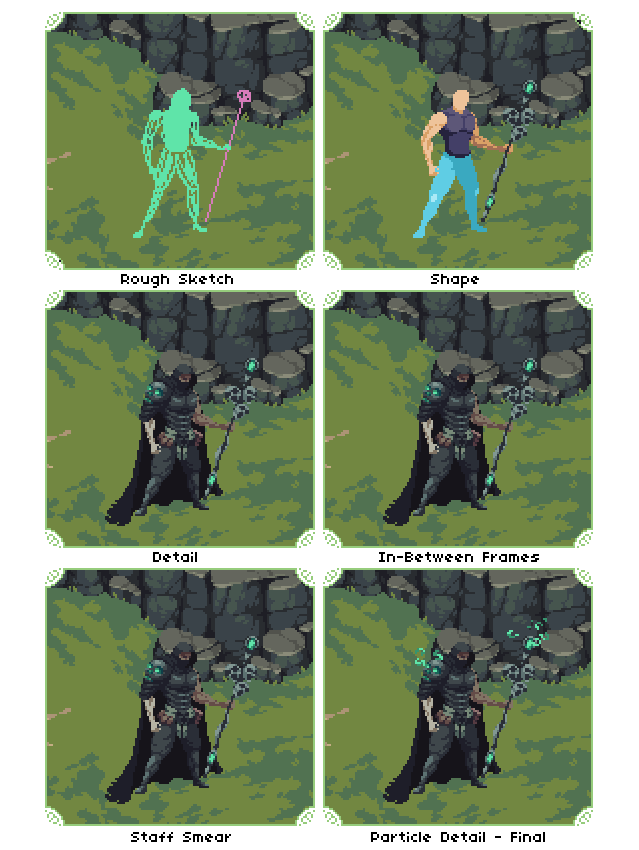
Today I would like to share my workflow for animating every character in the game. It's not super in-depth, but I hope it will still be helpful to some of you who are interested in pixel art or animation.
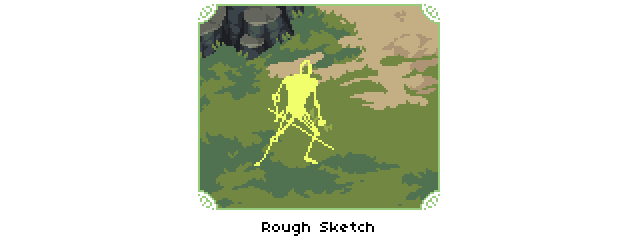
Rough Sketch: The first part of my workflow is to just do a really rough sketch of the animation that I have in mind. I begin first by doing 3 key-frames for the starting position, anticipation and follow-through. Once I have the key-frames sketched out I then duplicate the layers, make small changes to each and I end up with a very rough version containing some in-between frames. If I'm happy with how everything looks I then move on to refining the shape of the key-frames.
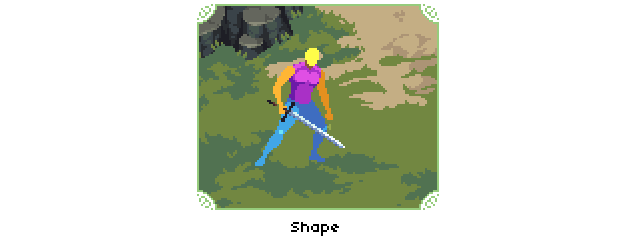
Key-frame Shape: This is probably the most important step. If your silhouette doesn't read well the whole animation is going to suffer. I like to take my time here and really make sure I get the shape of each body part correct. If I'm struggling with something, I find it helpful to stand in front of a mirror and recreate the pose that I'm going for. For this animation, I actually ended up recording a video of myself that I referenced on occasion.
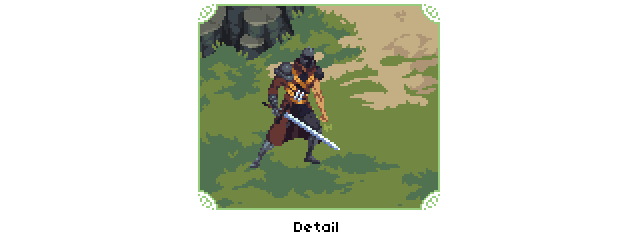
Detail: Once the shape is refined, the detail step is a lot easier to handle, though it still takes the longest amount of time! I begin by first separating out each body part onto its own layer, and doing the same for each piece of gear that I add. The gear is done in the same fashion as the Shape step, I start with a color that stands out for each piece and make sure the silhouette reads well before I actually begin to detail onto it. Using references here is again helpful for making sure the detail on the muscles is more or less correct.
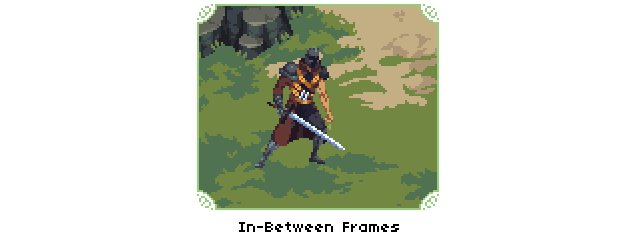
In-Between Frames: Adding in-between frames really smooths out the animation and adds a lot of life to it. It's something that I was always afraid of doing because it seemed like it would take a lot of time, but in actuality it only took about 2 hours for the above example(the entire process took 12h). For this step, I do my best to recreate the in-betweens that I roughed out in the sketch step. You don't need to have a ton of frames here to trick your mind into seeing a fluid motion. The mantra to follow is "ease in, ease out" which basically means you want to add frames that are easing in, and then easing out of your 3 keyframes. Some of the in-betweens might end up looking a little silly on their own, but as long as it looks good in motion it doesn't really matter!
I also put together another workflow image of a Necromancer boss I animated a couple months ago. Fortunately I still had some of the older files laying around and was able to present it this way! :)
I also have two full timelapses for those who would like to see the process in more detail:
Thanks for reading! I hope some of you found it helpful and I would of course be happy to answer any questions you may have about pixel art or The Iron Oath. Be sure to check us out on Kickstarter!


Very cool to see how the process turns it from sketch to final!
Thank you :)
Nice of you to share this update with the community =)
Glad to :)
Don't like so much turn based games, but this look great!
Thanks!