Tutorial by clivewil:
Okay, here's a super-basic tutorial on skinning camouflage onto the SuperCobra in BF2... you will need a paint program, and either the nVidia photoshop plugins for .dds (on nVidia's site) or what i am using, DXTBMP from MW graphics, and grab my ugly grid from here I am using photoshop 6; and assume you know how to drive your own paint program.
(late edited note: this grid is a 2048x1024 size. i recommend you crop it to suit the aspect ratio you are working with so the squares remain square. for the AH-1Z, this would be 2048x512 - i did not do or mention this in this tutorial, but hey it was written in 2005, it is now 2009 and i have learnt a few new things myself since then - cw)
*IMPORTANT!! My BF2 install is located at I:\BF2, substitute your own path where applicable...
when zipping/unzipping, ALWAYS KEEP FOLDER HIERARCHY INTACT
MAKE A BACKUP OF ANYTHING YOU MODIFY, even photoshop layers - remember people, it's all fun and games until someone loses a .con file*
1.) go to I:\BF2\mods\bf2 and extract Objects_client.zip - warning! almost 1gb unzipped
2.) in I:\BF2\mods\bf2\Objects_client, COPY the folder Objects_client\Vehicles\Air\ahe_ah1z into I:\BF2\mods\bf2 and rename it to ahe_ah1z_camo - this will contain our modded heli.
3.) backup and replace ahe_ah1z_camo\vehicles\air\ahe_ah1z\textures\ahe_ah1z_c.dds with my grid (renamed to ahe_ah1z_c.dds)
4.) zip up the ahe_ah1z_camo folder as ahe_ah1z_camo.zip (ensure it is in BF2\mods\bf2)
5).in the BF2\mods\bf2\ClientArchives.con file, add the line: fileManager.mountArchive ahe_ah1z_camo.zip Objects *it must be the first line in the file* and save it
6.) save/close anything open, and start any level with a SuperCobra - (lone multiplayer so bots don't steal it)
7.) look at the mardi-gras/psycho cobra. take as many screenshots as you think you'll need, pay attention to detailed areas - see Pic #5. if you must vomit, avoid splashing your pc.
8.) quit BF2.
9.) open the ORIGINAL ahe_ah1z_c.dds that you previously backed up like a good chap, and get it into your paint program and save it (i save it as a photoshop .psd and work from that) see pic #1. copy this layer twice. 1 is a backup, 2 is original and 3 will be coloured.
10.) you may find it helpful to add the grid to the .psd as a layer on, say, 50% transparent and make it visible/invisible as needed. scale it to exactly match the texture size you're working with - see pic #2
11.) fill an empty layer with camo colour 1, best to use the lighter colour, tan in this case. set this layer to Color (top-left of layers palette) then on another empty layer, paint in camo colour 2, brown. set this layerto Color, Multiply, Overlay or whatever looks closest. adjust hue/transparency etc. until it resembles what you're after colour-wise. now we have the same as pic #3, without all the red doody.
12.) merge the camo layers with the uppermost copy of the original.
12.) going by the screenshots and grid layer, identify and mask out the areas that are NOT camo and delete these from the coloured camo layer, should look like pic #4
13.) flatten the image and import the original's alpha channel, before you either a.) export as .dds or b.) save as .tga > open in DXTBMP > save as .dds, depending on whether you're using plugin or DTXBMP
14.) rename the result to ahe_ah1z_c.dds and replace the existing ahe_ah1z_camo\vehicles\air\ahe_ah1z\textures\ahe_ah1z_c.dds file.
15.) delete the ahe_ah1z_camo.zip and re-zip the ahe_ah1z_camo folder to make a new zip (for some reason, winzip won't update read-only files, so i just delete & re-zip, as a matter of habit)
16.) close everything open and launch BF2.
17.) it should look like pic #7
18.) take the little fella out for a fly, destroying any filthy MEC you may see. then it's back to base, just in time for tea and cones.
19.) go nuts. pic #8
that's it. i'm sure someone will let me know if i missed something...
p.s. this was done in a hurry, so no flak, ok? cheers
edit: BTW, the reason for the loud colours in the grid pic is that often you can't make out the letters/numbers - but if you can see yellow next to black, then it must be top right corner, or pale blue and mid grey is in the centre etc.
sorry admins for the size of the post, i kept it as small as i could
any dramas, send me a PM
Attached image(s) 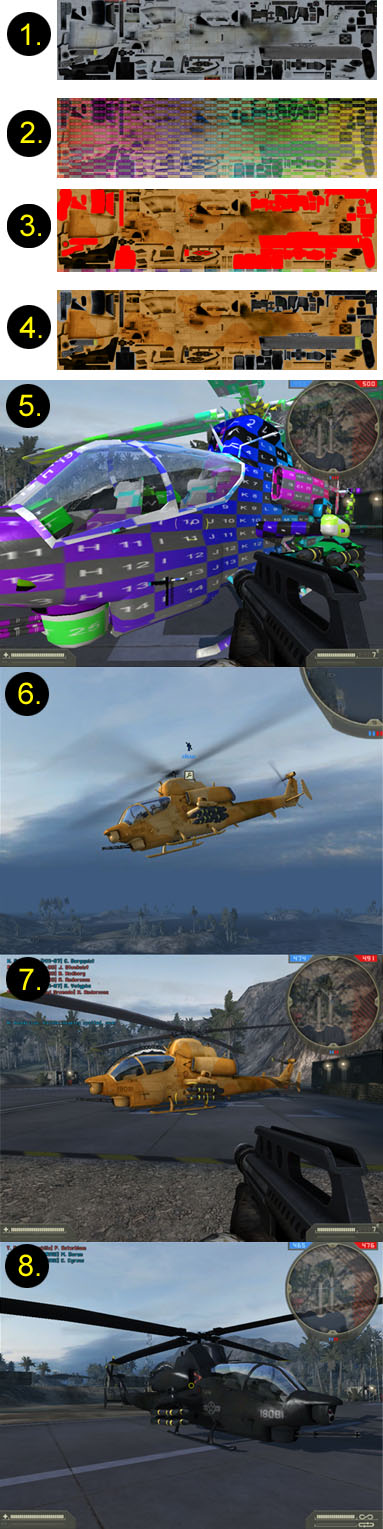


Good tutorial! Only problem is.... I don't know how to fly a plane :/
Your play bf2?
Bruh