Welcome to our twenty-fourth blog post!
In the last blog post, we went over our latest boss fight, the Souls of the Lesser Dragons. This fight has proven to be a significantly more difficult challenge than prior- totaling multiple hours of attempts, this boss has greatly heightened our sense of understanding when it comes to the mechanics of this game.
You may have noticed in the previous blog’s video- we didn’t actually slay the boss. Yes, the boss proved too much a challenge, even for us. However, we know the fight is plausible. You can slay these bosses with the tools given to you. And the video above proves it.
The intricacies of this fight are quite spectacular, and harp back to one of our core design principles: the difficulty of a fight such as this should stay consistent throughout the fight.
In this project, our goal is to have more bosses similar to this. That is, instead of fighting just one lone beast (which can be a good boss design, but not our core boss design), we want the player to essentially be clashing their army against the enemy’s. One critical element to that is, that, as the opponent’s army begins to fade away… does the challenge snowball in the Player’s favor? Or must the Player continue to fight and fight and fight all the way through? Our desire is the latter- you must be prepared for a challenge, a challenge that lasts until the last foe falls. Preferably, increasing with difficulty.
In this particular fight, we’ve truly proven to at least ourselves that this is the case. Each stage of the fight is equally as intricate and dynamic as the last, an equivalent challenge all around.
So let’s go into each phase, and what makes them so special.
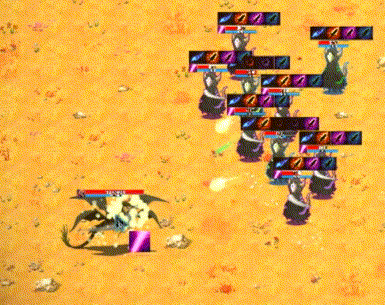
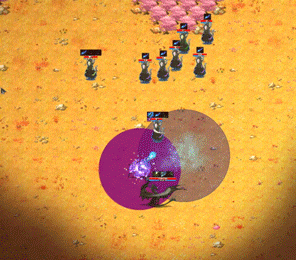
The Soul of the Lesser Dragon of Lightning is simple, but the timing is fairly precise. What you’re after is to Fear away the other two dragons at the same time so that you can quickly burst down the SotL Lightning Dragon. Timing is key- you cannot deal with more than just the SotL Lightning Dragon at a given moment, and you only have a short window, but with Mystic Energy, you’ll have enough time to kill it before the Fear status ailments end, and the SotL Flame and Frost are back upon you.
The SotL Lightning Dragon’s health regeneration means you’ll need to not delay too long, else it will return to full HP. So you can’t have your focus averted- you’ll need all your warriors locked onto the SotL Lightning Dragon, not on dodging the spells of the other two assailants.
Initially, the most devastating dragon is the SotL Lightning Dragon. This is primarily due to the fact that it invokes repeating damage, given how fast its spell can be cast, and the fact that it essentially can’t be dodged. It will quickly cut the health of our warriors, so that is why we must defeat it first.
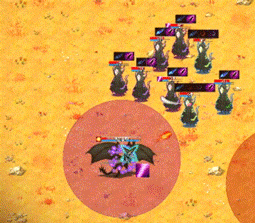
There are two spells crucial to this next part of the fight. The Soul of the Lesser Dragon of Flame has some timings that are fairly critical to hit, else it just becomes a boss that kills off all your warriors without you even able to do a thing.
The first revolves around our core spell, Fear. Fearing the SotL Frost Dragon is inherently the best move- we don’t want to deal with its frost freezing us in place; the stun of the SotL Flame Dragon is bad enough already. With a quick Fear, the SotL Frost Dragon is out of the fight, and we can focus on step 2.
In this next part, we need to ensure our Apprentice of Nature is primed. While keeping the SotL Flame Dragon from moving around too much, we need the Apprentice of Nature to invoke its primary status ailment: Spell Deprivation. This fully prevents the target from casting any spells for a short moment. Which is key for the fight: the SotL Flame Dragon has some devastating spells, but it is worthless while unable to attack. Controlling the SotL Flame Dragon from moving around too much is very important- we need to minimize our movement so that when the Apprentice of Nature’s spell is cast, it actually hits the target and invokes the ailment.
Now, with all steps in place, we can begin our engagement. In this, we repeatedly cast our Mystic Energy upon the Dragon. When the Fear and Spell Deprivation wear off, we retreat, and when they are ready again, we re-cast, and repeat. Timing is critical here. Given that the SotL Flame Dragon has no health regeneration, and the fact that its only way of regenerating health is if we accidentally hit the SotL Frost Dragon, we must carefully take our time here and pick the best shots. In this stage, bursting the Dragon down like we did the SotL Lightning Dragon will have negative effects- this being that our mana is very, very important right now. We do not want to be missing our shots, so timing our spellcasts so that they hit the Dragon while its not moving is of critical importance. Else, we’ll run out of mana mid-fight with the SotL Frost Dragon and end up dying as a result.
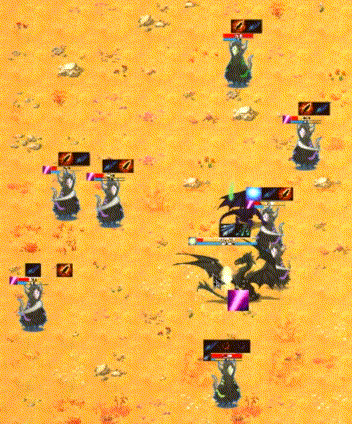
With the other two Dragons defeated, we have but one task remaining. But this will be no easy task. While you may think that, since the other Dragons are dead, that the fight is ours for the taking. But that is not the case- the SotL Frost Dragon will not go down without a fight.
The primary concern with the SotL Frost Dragon is in regards to its health regeneration- its base regen is already excellent, but its healing spell is truly terrifying. We’ll need to be quick, to be able to strike it before it can cast it again. We only have less than a minute to pull this off.
With this fight, we can re-use strategies of prior. That is mainly revolving around spreading out our warriors so that the damage spread is minimized, and keeping our spellcasts up. The SotL Frost Dragon likes to move around, way more than the SotL Flame Dragon due to the fact that the Frost’s spells are closer range (and thus it must move to get within range to cast its spell). So surrounding is the best strategy- our spells are not quick enough to catch up to the speed of the Frost. But if we surround it, it will not move nearly as much (since it will already be in range).
We quite enjoyed this boss fight, and the numerous amount of attempts required just to defeat it. Its a fairly hard boss, but it taught us quite a bit about the game’s mechanics, and we hope to develop more, similar, harder bosses in the future! Hopefully bringing out even more of the “army versus army” feel that we currently have going on this one.
---
Thank you for viewing our post! Support and interest for the project has been rapidly growing ever since we began posting here, and we're incredibly grateful for all the wonderful feedback so far! We hope this project interests you as much as we love developing for it, and please look forward to more updates coming in the very near future!
If you’re brand new, consider checking out our trailer and overall description of the game here.