The Sins: Remastered shaders use a standard PBR metalness & roughness workflow. Textures for normal and ambient occlusion maps are also supported. They also retain the teamcolor, emissive and bloom maps from the original Sins of a Solar Empire ship shader.
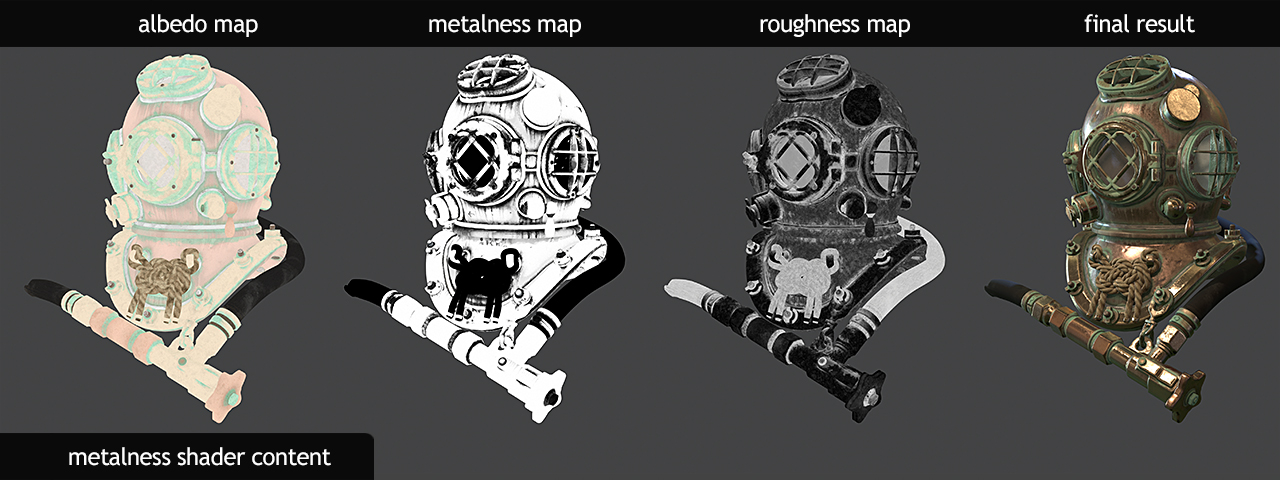
Metalness & Roughness workflow
Texture Mechanics
Those who have worked with the original Sins shaders will already be familiar with the basic concepts of textures but may not be with some of the new ones supported in the Sins: Remastered shader. What follows is a brief explanation of how they work.
Basecolor
The basecolor texture is also commonly referred to as the albedo texture. It represents the color of the surface of an asset at the corresponding point in the UV map. It differs from a traditional diffuse map in that it should not include elements of normal or ambient occlusion influence. In other words, where an old diffuse map was something of a picture of an object, the basecolor is more just the flat coloring under all the details of that diffuse map.
If you are converting an existing non-PBR asset to the new PBR format, the existing diffuse map can work but ideally any baked in shadows from ambient occlusion should be lessened or removed.
For the Sins: Remastered ship shader, an adjustment of +25% saturation and +25% lightness should be applied to the final texture for game use. This offset is required on the input due to internal processing in the shader. If you are using an authoring app (such as Substance Painter, Bitmap2Material, Substance Player, Quixel Suite, etc), this should be done after you are finished processing and exporting the basecolor texture.
Metalness
The metalness texture defines the nature of the surface material as being either metallic (conductive) or di-electric (non-conductive). It is represented as a grayscale where 0 (black) is completely di-electric and 1 (white) is maximum metallic. The behavior of a metallic surface is that it tends to take on the hues of the ambient light affecting it (IE, the skybox in Sins) but retains its defined colors under direct light (IE, the star in Sins). By contrast, a non-metallic surface will retain more of its natural color under ambient light but may appear more dull and flat.
Traditionally, metalness is often represented in a somewhat binary manner, with values at one extreme or the other. While most pure metals do fall near the 1.0 range, alloys can range from 0.7 – 1.0. The full range is available for use and it can be helpful when working on a macro level (IE, 1 pixel equals several feet or meters on a ship) to use an intermediate value to represent an aggregate for a surface with mixed properties (partially dirty or dusty, for example).
Roughness
The roughness map defines the finish on a surface and how it interacts with light. It determines if the material is smooth and mirror-like or very coarse. It is represented as a grayscale where 0 (black) is perfectly smooth and 1 (white) is maximum roughness. A low roughness surface will have sharper, more focused reflections whereas a high roughness surface will scatter light and have a wider, hazier reflection.
Roughness can have a dramatic effect on the look of an object in dark environments like space in Sins when using a darker skybox. A mirror-like orb object in a dark room with a single point light will appear mostly black with just one sharp bright point of the reflected light. A rough orb would have that reflection spread out over most of the surface visible to the light though and appear much lighter. Neither is incorrect when setting up your ship textures but keep in mind that objects using both low roughness and high metalness may be harder to see in low light conditions.
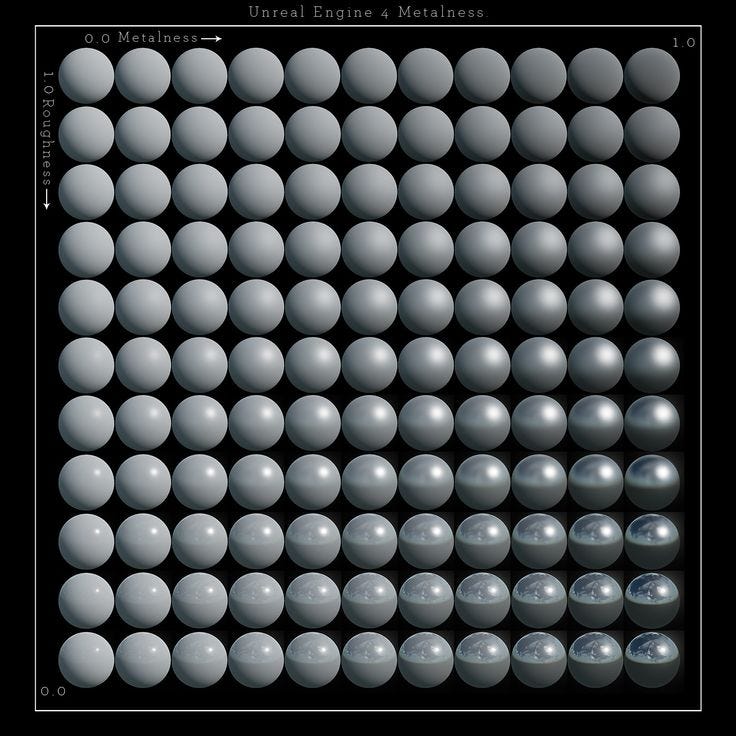
Metalness & Roughness cumulative interaction
The above image illustrates the effects of metalness & roughness interacting over a range of values and the end results within the given ambient environment. Note that color remains consistent but reflections come into focus as roughness decreases in the vertical columns while the hue changes and becomes increasingly influence by the ambient environment as metalness increases in the horizontal rows.
Ambient Occlusion
The ambient occlusion texture (AO for short) is akin to a shadow map of your object. It defines areas of the texture where light is partially or entirely blocked due to the shape of the object. It is represented as a grayscale where 0 (black) is completely dark and 1 (white) is fully unobscured and lit. It can be useful for helping to draw out visual depth on an object. An object level AO map is usually generated by raytracing in some sort of 3D app but micro AO (texture level) can also be generated from a normal map.
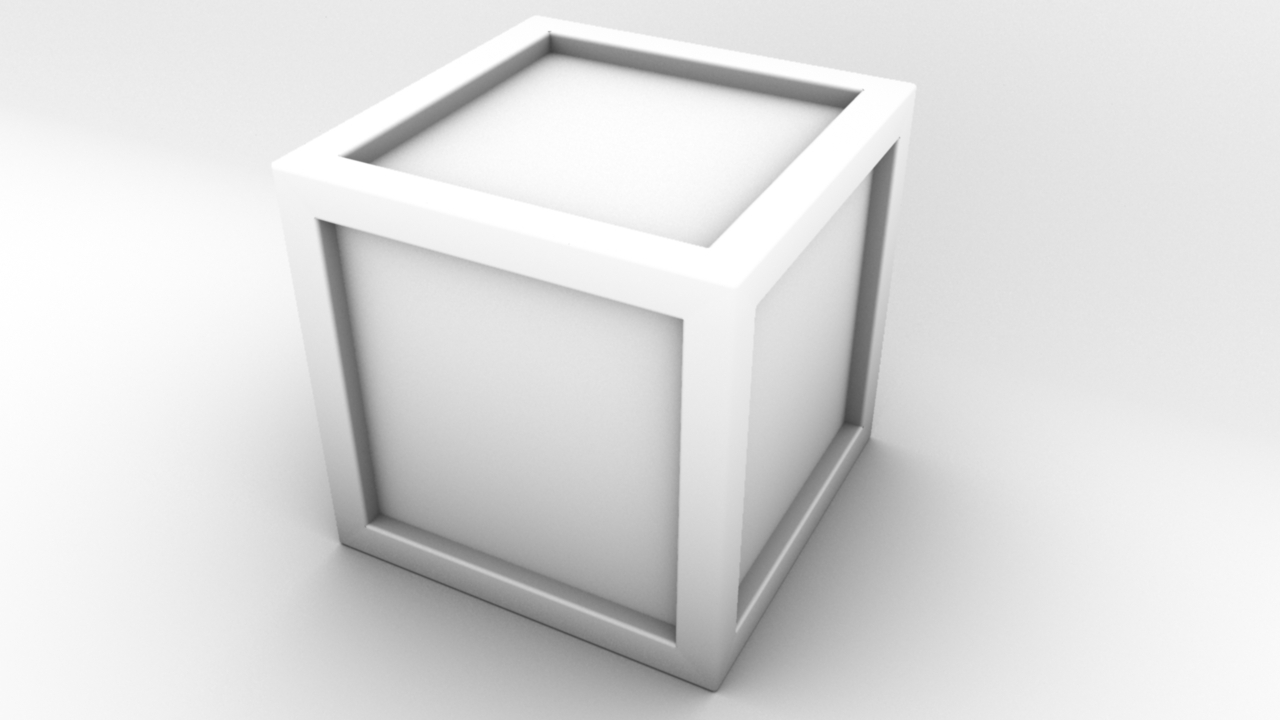
An example of ambient occlusion on a simple crate
In the above image you can see how the object is shaded along the edges of the inset areas, where light is partially blocked by outer surface. If you do not have an ambient occlusion map for your ship, you should fill the texture channel with white.
Subsurface Scattering (v0.91b+)
Subsurface scattering, also known as subsurface light transport, is a mechanism of light transport in which light penetrates the surface of a translucent object, is scattered by interacting with the material, and exits the surface at a different point. It is useful in textures for marble, skin and other organic materials. It is represented as a grayscale where 0 (black) is none and 1 (white) is maximum.
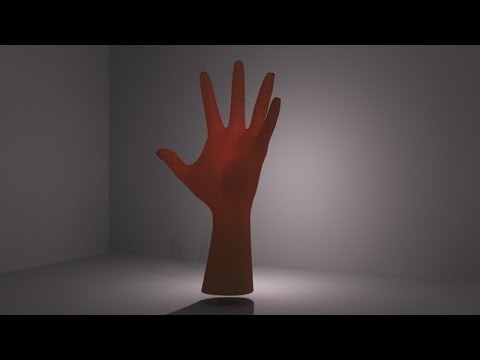
Subsurface scattering applied to a hand
In the example image above, the effect of subsurface scattering is notable in a couple ways. First is the obvious effect of light "glowing" through the hand when it is between the light source and the viewer. The second is more subtle but the look of skin when under direct light on the left is altered and more realistic as well.
Tip: If you are using Substance Painter, a good way to generate a subsurface scatter map
is export your thickness map, apply an inverted metalness map as a mask or multiply
and then adjust as needed.
Subsurface Scattering is available in v0.91b and later.
Bloom, Emissive & Team Color
The effects textures from the original Sins shader remain intact and unchanged, although their channel assignments may have change. The emissive texture remains a grayscale texture and still draws it’s from the corresponding basecolor texture.
Texture Configuration
Textures for the Sins: Remastered ship shader should be assembled as follows:
Color Texture (-cl, DXT5 format)
- RBG – Basecolor (with +25% saturation & lightness applied. See above).
- A – Teamcolor.
Normal Texture (-nm, DXT5 format)
- R – Subsurface Scattering (v0.91b and later).
- G – Normal Y information (the default G channel in a standard normal map).
- B – Ambient occlusion (fill with white if none).
- A – Normal X information (the default R channel in a standard normal map).
Data Texture (-da, DXT5 format)
- R – Metalness.
- G – Emissive.
- B – Bloom.
- A – Roughness.
Mesh Preparation
There have been no fundamental changes to the existing Sins mesh format. Existing meshes can be used without any modification provided they correctly reference the relevant PBR textures.
Object smoothing is now controlled by object normal. Tangents are no longer required. When preparing your asset in XSI, you are no longer required to set up or prepare any tangents in any way. If you are importing your assets from creation in another 3D app, so long as you export your model with relevant smoothing, sharp edge, etc information then it should be ready to go once passed through XSI.
Hard points are still required and their preparation in XSI is unchanged.