Vanilla+ is a huge update to Far Cry 2 that stays loyal to the original experience.
This tutorial has been archived by the uploader because it is out of date and no longer supported. We recommend you browse the file list for the latest tutorial.
Location
Games : Far Cry 2 : Mods : Far Cry 2: Vanilla+ (Tom's Mod) : FilesFilename
Weapon_Holstering_-_Toolkit_Guide.zipCategory
TutorialUploader
boggalogAdded
Size
427.77kb (438,036 bytes)Downloads
102 (1 today)MD5 Hash
aa60ea72b9d989a583d2805115f93166Embed Button
Embed Widget
Description
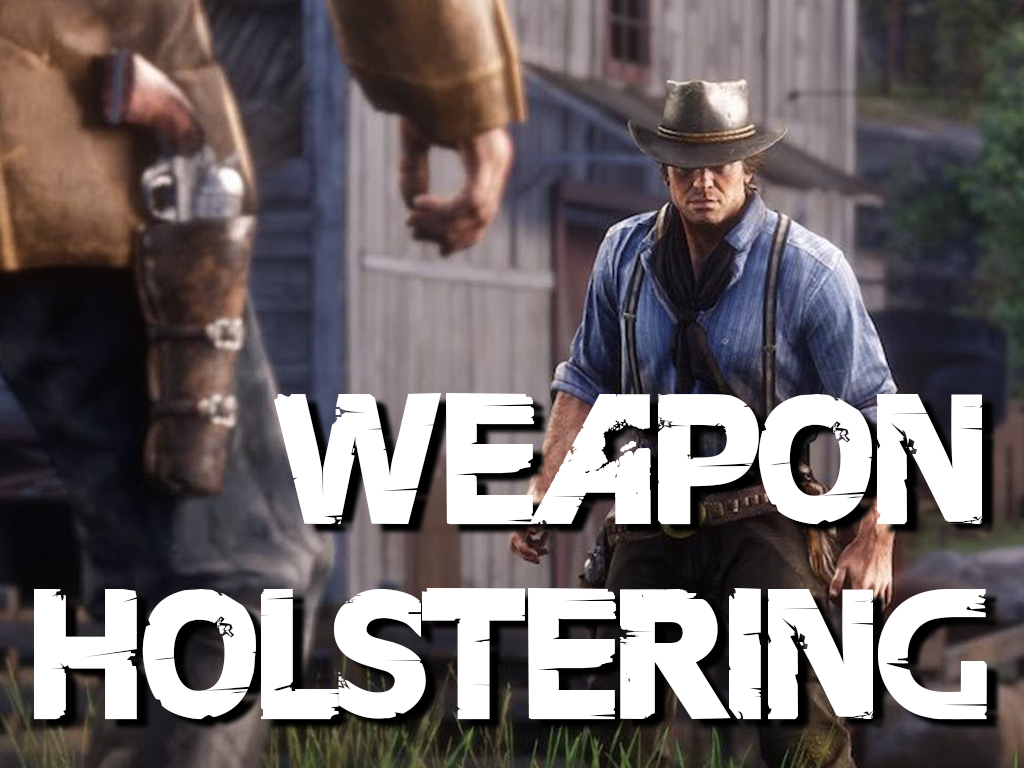
A guide to show how to install weapon holstering to your Far Cry 2 mod. The files are also available for download.

Weapon Holstering in Far Cry 2
This guide will explain how to add weapon holstering to your Far Cry 2 mod. As usual all the files changed are available in the download. Otherwise get ready, this is going to be a long one. I have a google docs version of this guide available here.
It is strongly recommended to use Notepad++ to edit .xml files. It is available here: Notepad-plus-plus.org
Unpacking Files
The only commonly available mod unpacking/packing tools that will not cause crashes are found here: Moddb.com
This is a different set of tools than is listed elsewhere but the old method using bootstrap doesn't work for modern mods.
Download the mod tools and then follow these steps:
Unpacking worlds.fat/worlds.dat
1. Find your “worlds.fat” and “worlds.dat” from your vanilla install within \Far Cry 2\Data_Win32\worlds\.
2. Copy both files into your mod tools folder. Drag "worlds.fat" onto "Gibbed.Dunia.Unpack.exe". This will unpack the files and create a folder called "worlds_unpack" which contains all of the files.
Step 1: Holstering Controls
1. Go to “inputactionmapcommon.xml” in \patch_unpack\config\. Find the section under the title “<ActionMap name="common_move">”. We are going to add the following lines to the keyboard and gamepad sections, these can be customised but I recommend not changing the gamepad setting:
<!--Keyboard-->
<Binding input="kb:x" action="press" signal="HolsterWeapons"/>

<!--Gamepad-->
<Binding input="pad:y" action="hold" signal="HolsterWeapons"/>
It doesn’t matter where in this section you put these lines but mine looks like this:
<ActionMap name="common_move">
    <Import actionmap="common_move_remap" optional=""/>

    <!--Keyboard-->
	<CompoundInput name="move" device="kb">
		<Input input="w" axis="0"/>
		<Input input="s" axis="0" invert="1"/>
		<Input input="d" axis="1"/>
		<Input input="a" axis="1" invert="1"/>
	</CompoundInput>


	<Binding input="kb:move" action="press" signal="move"/>
	<Binding input="kb:move" action="release" signal="move"/>

        <Binding input="kb:lshift" action="press" signal="lock_sprint"/>
        <Binding input="kb:lshift" action="hold" signal="lock_sprint"/>
	<Binding input="kb:lshift" action="release" signal="unlock_sprint"/>
	<Binding input="kb:x" action="press" signal="HolsterWeapons"/>

    <!--Gamepad-->
	<PadFilter name="left_thumb" device="pad">
		<Binding input="left_thumb_leftright" axis="1" sensitivity="1" curve="Player.MovementCurves.Movement_leftright"/>
		<Binding input="left_thumb_updown" axis="0" sensitivity="1" curve="Player.MovementCurves.Movement_updown"/>
	</PadFilter>
	<Binding input="pad:left_thumb" action="update" signal="move"/>
	<Binding input="pad:left_thumb_push" action="press" signal="sprint"/>
	<Binding input="pad:left_thumb_push" action="hold" signal="sprint"/>
	<Binding input="pad:left_thumb_push" action="release" signal="walk"/>
	<Binding input="pad:y" action="hold" signal="HolsterWeapons"/>


</ActionMap>
Step 2: Main_avatar.gosm.xml
1. Go to “main_avatar.gosm.xml” in \patch_unpack\scripts\engine\objects\pawn\statemachine\. If you don’t have this file you can find it by unpacking your worlds.dat and world.fat files and then within \worlds_unpack\scripts\engine\objects\pawn\statemachine\. Make sure you copy it into your patch folder before making edits.
2. First let’s setup a link to the controls we made in step 1. Find the section with the title “<State FullName="::Main Avatar/Common/Idle" Type="CGOStateAnim">”. At the bottom of this section add the following lines:
<Sink Name="HolsterWeapons" Start="0" End="100">
	<Connection Target="::Pawn Weapons/Weapon Mechanics/States/HolsterWeapons" Signal="HolsterWeapons" />
</Sink>
Your completed section should look like this:
<State FullName="::Main Avatar/Common/Idle" Type="CGOStateAnim">
	<Parameter Name="groups">
		<Parameter Name="0" Value="Idle" />
		<Parameter Name="1" Value="can_ironsight" />
	</Parameter>
	<Parameter Name="duration" Value="0" />
	<Parameter Name="signalpriorities" />
	<Parameter Name="forceAnim" Value="0" />
	<Parameter Name="syncAnimDuration" Value="0" />
	<Parameter Name="animStateID" Value="Pawn_Generic_Movement" />
	<Parameter Name="layerStateID" Value="Pawn_Generic_Aim" />
	<Parameter Name="gestureStateID" Value="0" />
	<Parameter Name="followTerrain" Value="0" />
	<Parameter Name="MoveLayer" Value="-1" />
        <Sink Name="Slide" Start="0" End="100">
		<Connection Target="::Main Avatar/Common/Slide/StartSliding" Signal="start_sliding" />
        </Sink>
        <Sink Name="random idle" Start="0" End="100">
		<Connection Target="::Main Avatar/Common/IdleCycleBreaker" Signal="cyclebreaker" />
        </Sink>
	<Sink Name="HolsterWeapons" Start="0" End="100">
		<Connection Target="::Pawn Weapons/Weapon Mechanics/States/HolsterWeapons" Signal="HolsterWeapons" />
        </Sink>
</State>
3. Now let’s create the weapon holstered state that we will be activating. Find the section with the title “<State FullName="::Main Avatar/Common/IdleCycleBreaker" Type="CGOStateAnim">”. Copy and paste this section so you have two identical sections one above the other. Make sure to maintain the same formatting.
4. We’re going to make edits to one of these, it doesn’t matter which but I did the top one. First change the title to “<State FullName="::Main Avatar/Common/WeaponsHolsteredState" Type="CGOStateAnim">”.
5. Now we are going to add conditions that will stop your weapons being holstered. First find the following line at the bottom of this section:
<Sink Name="abort breaker" Start="0" End="100">
	<Connection Target="::Main Avatar/Common/Idle" Signal="abort" />
</Sink>
We are going to edit this so that pressing the ‘use’ button will stop holstering:
<Sink Name="abort breaker" Start="0" End="100">
	<Connection Target="::Main Avatar/Common/Idle" Signal="use" />
</Sink>
6. That’s the only essential line to change here but I recommend adding two more conditions so that trying to shoot or heal will also cancel holstering. These are created by copying the line from the previous step and editing the Signal=”...” section. The conditions for shooting and healing should look like this:
<Sink Name="abort breaker" Start="0" End="100">
	<Connection Target="::Main Avatar/Common/Idle" Signal="startshooting" />
</Sink>
<Sink Name="abort breaker" Start="0" End="100">
	<Connection Target="::Main Avatar/Common/Idle" Signal="heal" />
</Sink>
My complete section for these changes looks like this:
<State FullName="::Main Avatar/Common/WeaponsHolsteredState" Type="CGOStateAnim">
	<Parameter Name="groups">
		<Parameter Name="0" Value="IdleCycleBreaker" />
		<Parameter Name="1" Value="can_ironsight" />
	</Parameter>
	<Parameter Name="duration" Value="0" />
	<Parameter Name="signalpriorities" />
	<Parameter Name="forceAnim" Value="0" />
	<Parameter Name="syncAnimDuration" Value="0" />
	<Parameter Name="animStateID" Value="Pawn_Generic_Movement" />
	<Parameter Name="layerStateID" Value="Pawn_Generic_Wait" />
	<Parameter Name="gestureStateID" Value="0" />
	<Parameter Name="followTerrain" Value="0" />
	<Parameter Name="MoveLayer" Value="-1" />
	<Connection Target="::Main Avatar/Common/Idle" />
	<Sink Name="Slide" Start="0" End="100">
		<Connection Target="::Main Avatar/Common/Slide/StartSliding" Signal="start_sliding" />
	</Sink>
	<Sink Name="abort breaker" Start="0" End="100">
		<Connection Target="::Main Avatar/Common/Idle" Signal="use" />
	</Sink>
	<Sink Name="abort breaker" Start="0" End="100">
		<Connection Target="::Main Avatar/Common/Idle" Signal="startshooting" />
	</Sink>
	<Sink Name="abort breaker" Start="0" End="100">
		<Connection Target="::Main Avatar/Common/Idle" Signal="heal" />
	</Sink>
</State>
Step 3: Weapons.gosm.xml
1. Go to “weapons.gosm.xml” in \patch_unpack\scripts\engine\objects\pawn\statemachine\. If you don’t have this file you can find it by unpacking your worlds.dat and world.fat files and then within \worlds_unpack\scripts\engine\objects\pawn\statemachine\. Make sure you copy it into your patch folder before making edits.
2. First we are going to setup the initial animation system for holstering to work. Find the section with the title “<State FullName="::Pawn Weapons/Weapon Mechanics/States/Holstering" Type="CGOStateAnim">”. Copy and paste this section so you have two identical sections one above the other. Make sure to maintain the same formatting.
3. We’re going to make edits to one of these, it doesn’t matter which but I did the top one. This is to create a separate holstering system that will activate our previously created holstered state. First change the title to “<State FullName="::Pawn Weapons/Weapon Mechanics/States/HolsterWeapons" Type="CGOStateAnim">”.
4. Now find the following line:
<Connection Target="::Pawn Weapons/External States/Main Avatar/Common/xIdle" />We are going to edit this to point to our holstering state:
<Connection Target="::Main Avatar/Common/WeaponsHolsteredState" /> Your completed section should look like this:
<State FullName="::Pawn Weapons/Weapon Mechanics/States/HolsterWeapons" Type="CGOStateAnim">
         <Parameter Name="groups" />
         <Parameter Name="duration" Value="0" />
         <Parameter Name="signalpriorities" />
         <Parameter Name="forceAnim" Value="0" />
         <Parameter Name="syncAnimDuration" Value="0" />
         <Parameter Name="animStateID" Value="0" />
         <Parameter Name="layerStateID" Value="Pawn_Generic_Holster" />
         <Parameter Name="gestureStateID" Value="-2" />
         <Parameter Name="followTerrain" Value="0" />
         <Parameter Name="MoveLayer" Value="-1" />
         <Connection Target="::Main Avatar/Common/WeaponsHolsteredState" />
         <Event Name="Holster" Type="CGOStateEventInventory" Start="100" End="100">
	           <Parameter Name="alwaysTrigger" Value="1" />
	           <Parameter Name="triggerOnce" Value="1" />
	           <Parameter Name="triggeredOnEnd" Value="1" />
	           <Parameter Name="triggeredOnBegin" Value="0" />
	           <Parameter Name="requestType" Value="4" />
	           <Parameter Name="simpleEventID" Value="" />
         </Event>
</State>
5. Now we need to add our holstered state to the game’s preexisting system that decides what actions can be performed within all of the game’s states. This involves adding the following line throughout “weapons.gosm.xml”:
<StateRef Path="::Main Avatar/Common/WeaponsHolsteredState" />We are going to add it to the sections with the following titles:
<Group FullName="::Pawn Weapons/Weapon Mechanics/Allow Gadget Use" Type="BaseGroup">

<Group FullName="::Pawn Weapons/Weapon Mechanics/CanSprintGroup" Type="BaseGroup">

<Group FullName="::Pawn Weapons/Weapon Mechanics/States/AllowWeaponSwitch" Type="BaseGroup">

<Group FullName="::Pawn Weapons/Weapon Mechanics/States/AllowThrowGrenade" Type="BaseGroup">

<Group FullName="::Pawn Weapons/Weapon Mechanics/States/MapCompass/AllowMapCompass" Type="BaseGroup">
Add our line to the lists directly underneath these titles. It’s the same for each and here is an example of what it should look like:
<Group FullName="::Pawn Weapons/Weapon Mechanics/Allow Gadget Use" Type="BaseGroup">
	<StateRef Path="::Pawn Weapons/External States/Main Avatar/Common/xIdle" />
	<StateRef Path="::Pawn Weapons/External States/Main Avatar/Common/xIdleCycleBreaker" />
	<StateRef Path="::Main Avatar/Common/WeaponsHolsteredState" />
Step 4: Editing weapon animations
The steps we have already completed are all that is technically required for holstering to work. We are left with a bug though where once holstered 12 of the weapons will still show the players arms as we are still holding the weapon. I have a fix that will almost completely solve this. There is still a small bug where the player's hands sometimes freeze at the bottom of the screen for a split second before disappearing. This is unfortunate but is way better than the arms remaining completely.
This is going to get complicated so to be honest I really recommend just using the files in the download for this bit.
A hex editor is required. I use 101 Editor but for a free option I recommend HxD which is available here: Mh-nexus.de.
1. We are going to need the weapon animation files for this. These are found for non-DLC weapons by unpacking “worlds.dat” and “worlds.fat” and then within \worlds_unpack\graphics\characters\_common\animations\weapons\. For DLC weapons unpack “entitylibrary.dat” and “entitylibray.fat” within \Far Cry 2\Data_Win32\downloadcontent\dlc1\ and then go into \entitylibrary_unpack\graphics\characters\_common\animations\weapons\dlc\.
2. First go and get the MGL140 holstering animation file “1stge_uppb_holster_+000fw_prmgl_i1”. Open this in your hex editor.
3. Scroll down to near the bottom of this file and replace the section I have highlighted in the image below with zeros:

Make sure you enter your zeros on the hex side. Your file should look like this:

4. Save this file. You are now going to use this file to replace the holstering animations for the following weapons. This will leave the animations looking identical but minimise visual bugs from the holstering. Trust me, I spent a long time experimenting with replacing using different animations and replacing/deleting different parts of the hex.
These are the bugged weapons: MP5, G3KA4, AK47, Ithaca, SPAS12, MGL140, M249 Saw, Dart Rifle, Mortar, Sawed off shotgun, Silenced Shotgun, Crossbow.
You need to create folders within your patch for each weapon with the correct parent folder (Secondary, Primary, Special, DLC). Copy the file structure and folder names exactly and copy them into \patch_unpack\graphics\characters\_common\animations\weapons\.
Paste our edited MGL140 animation file and copy it into each weapon folder. Then replace it’s name with the filename for each respective weapon’s original holster animation.
5. Ok so you can stop here if you want but right now each weapon has the same sound when it is holstered. To fix this you need to open up each weapon’s original holstering animation using your hex editor and copy the sound file it specifies near the bottom of the file. This needs to be pasted over the same section in every weapon’s edited MGL140 file. I have highlighted the specific string that needs to be changed in the image below:

And that’s it! Now you can enjoy weapon holstering with minimal bugs.
Packing Files
1. Drag your "patch_unpack" folder over "Gibbed.Dunia.Pack.exe" and this will create "patch_unpack.dat" and "patch_unpack.fat". Copy these and go to your Data_Win32 folder (Steam\steamapps\common\Far Cry 2\Data_Win32). Delete your original "patch.dat" and "patch.fat", paste your copied files in and rename them to the same.
Preview
Post a comment
17.1KDownload
FULLFar Cry 2: Vanilla+ (Final)
6.7K805.29mbFULLFar Cry 2: Realism+ (Final)
4.4K805.28mbFULLFar Cry 2: Chill+ Vanilla Combat (Final)
1.5K805.3mbFULLFar Cry 2: Chill+ Realistic Combat (Final)
326805.28mbFULLFar Cry 2 - Insanity+ Vanilla Combat (Final)
1.2K799.09mbFULLFar Cry 2 - Insanity+ Realistic Combat (Final)
171799.09mbFULLFar Cry 2: Vanilla+ Realism+ Chill+ Insanity+ (Enhanced Texture Addon)
7331007.58mb
Explore 5 more downloads or add content.
Icon
Game
Far Cry 2Developer
Far Cry 2 - Vanilla Plus (Tom's Mod)Contact
Send MessageRelease date
Mod watch
Follow
RTX Remix
RTX Remix is a modding platform by NVIDIA, which allows modders to create stunning HD remasters of classic games (see all supported), with ray tracing and DLSS.
This mod is NOT using RTX Remix. Learn more about ModDB's collaboration with the Remix community to organize all compatible games, and Far Cry 2's support for RTX. Hide this dialog.
Related Mods
Related Games
Far Cry 2
First Person Shooter
Related Groups
Far Cry 2 - Vanilla Plus (Tom's Mod)
Developer
Tags
So good. I Especially love the attention to detail with the sound swapping.
Well done, and thanks!
Nice! You figured this one out!
It works for me but whenever I go in game and holster then stop holstering
my weapon animation default back to their safe zone state and won't stay in they are readied position in for too long.
I take this back I immediately understood what's wrong as soon as I said safe Zone Style and then I remembered that I installed the safe Zone styled not knowing what it did. I am the guest above this comment.