Tutorial originally posted on Jediknight.net. Mirrored here for archival purposes. Note despite the title "pt 1" there was never a part 2
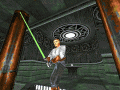
In Dark Forces, the component that made a level very original and unique were the Wax files, this may be the same with Jedi Knight, but with Cog's, Pup's and AI, you can do alot more. For part 1 of this article, we will make a Mandalor with a rail detonator. You will need Conman (available from DarkJedi.com) for this.
WEAPONS
********************
Weapon                        3DO                 Template
1. Bryar Pistol                Bryg.3do         +ebolt
2. Rifle                        strg.3do         +elaser
3. Thermal Det.        detg_1.3do +actor_grenade
4. Bow Caster                bowg.3do         +ebow, +ebowplusm
5. Repeater                rptg.3do         +eball
6. Rail Det                rldg.3do         +eraildet, +smack
7. Sequencer Charge        seqg_1.3do         NOT USED AS WEAPON
8. Concussion Rifle        cong.3do         +econcbullet, +bosskswipe
9. Light Saber                sabg.3do         +gamaxe
Jedi Knight Weapon Information
First, using Conman, extract the files "kyH4.3do" and "rldg.3do" from Res2.gob and place it into your JED or Force Builder/Project/Level name director. Open "kyH4.3do" with a text editor and copy the information from "rldg.3do" into it replacing the information for the mesh "K_rhand" (Refer to the article on 3do editing in the October Issue of Darkness Falls). Save the file as "Mandalor.3do". Now, you have a 3do of a Mandalor with a Rail Det.
Next, extract "ky.pup" from Res2.gob in the misc/pup folder and place it into your JED or FB director with the new 3do file. There is no need to extract a SND file, there is already one for a Mandalor "KyBobaFett.Snd". For future models, you will need to make an SND file of your own. Other files that can control the way an enemy acts are in the "actor_xx.cog" and "xxxx.ai" files. Unless your experienced with Cog editing and desire a more unique character, I don't recommend editing these.
The .Pup file controls how the model moves, fires, jumps etc. Edit ky.pup, the layout is pretty simple.
# Puppet control file for player character
# submode    keyframe        flags  lopri hipri

Mode=0       # Default mode
stand           kystand0.key         0x00     0    0
walk            kywalkF.key            0x01         2    2     # submode 1 = walk
run              kyrun0.key             0x01         2    2     # submode 2 = run
walkback    kybackp0.key         0x01          2    2     # submode 3 = walk backwards
strafeleft     kystrafl.key            0x01        2    2     # submode 4 = strafe left
straferight   kystrafr.key           0x01         2    2     # submode 5 = strafe right
death          kyftdeth.key          0x14         5    5     # submode 6 = small death
death2        kyexdth0.key        0x14          5    5     # submode 7 = big death
fire              kypnchl0.key        0x28         1    3     # submode 8 = fire (left punch)
fire2            kypnchr0.key       0x28          1    3     # submode 18 = alt. fire (punch)
hit               kyhit0.key             0x28        1    4     # mixin 9 = hit
rising          kyjump.key           0x00         3    3     # submode 10 = jumping
drop           kydrop.key            0x00         2    2     # submode 11 = dropping
fall              kyfall.key              0x00        2    2     # submode 12 = falling
land            kyland.key            0x38         3    3     # landing
activate       kyusew0.key        0x28         1    3     # submode 13 = activateFirst, we will need to change the fire and activate submode. Change "Kypnch10.key" to "kyfire.key". Save this as "Mandalor.pup"
Finally, we get to the last file to edit. In your JED/JEDDATA or Force Builder/Templates there should be a file called "Master.tpl" or "Jk1.tpl", Open this file in a text editor. At the bottom, you will need to create a new line like this:
Mandalor _humanactor thingflags=0x20000400 model3d=Mandalor.3do puppet=mandalor.pup soundclass=kybobafett.snd cog=actor_s3.cog maxvel=0.250000 weapon=+eraildet weap health=70.00 maxhealth=70.00 maxthrust=0.90 maxrotthrust=90.00 typeflags=0x20001 fireoffset=(0.014000/0.053200/0.013000) aiclass=straildefault.aiLike the pup file, the Template File is easy to understand. The word "Mandalor" at the beginning is the name that will come up in the resource picker of JED or ForceBuilder. On this line, you can classify the health, weapons, AI, pup, SND, and everything else.
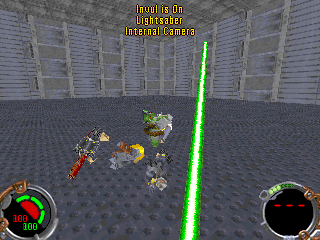
When you make your own characters, be sure to use a PUP file that works with the model or else this might happen:
Save this file and load up your JK editor.
Place a object in a sector, scroll through the resource picker to the end and click on "Mandalor". Gob the project and run it in JK. When you play your level, there will a Mandalor with a Rail Detonator.
Part 2 of this article is coming soon and will wrap up this area of Jedi Knight editing.