
Tutorial originally posted to JediKnight.net. Mirrored here for archival purposes
Dark Forces: Jedi Knight II MOD
Texture Re-Creation Tutorial
These are some techniques I've devised for creating (what I consider) professional looking textures for the Dark Forces MOD for Jedi Outcast.
As these are methods that I've had to discover on my own - and I actually don't consider myself an expert on Photoshop - there might be more efficient ways of doing some of these things. Let me also apologize if some of this seems patronizing, I'm just trying to be thorough with my instruction. By the same token, I'm working under an assumption that my audience has a certain level of knowledge and experience with Photoshop, and it's possible that I'm overestimating. As such, any ideas and feedback is appreciated.
Also, this tutorial is very Photoshop specific. So, if you don't have Photoshop, you'll need to be able to figure out how to apply these procedures to whatever graphics program you're using on your own - because I'm sure I don't know.
I'll be conveying my ideas primarily through example, simply because that's how I've found I tend to learn things most efficiently and effectively.
First, as a general rule, my basic philosophy when re-creating Dark Forces textures for Jedi Outcast cpmes down to the two questions:
What was the intention of the texture artist that made the Dark Forces original?
How did the texture artists for Jedi Outcast accomplish this kind of effect? (and always look for examples in the Jedi Outcast textures)
Starting Out/Flat Surfaces
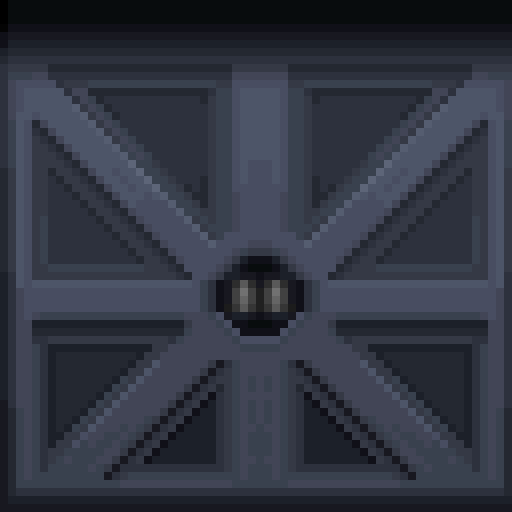
Step 1, I enlarge the original texture (IDDOOR1 in this example) from Dark Forces to the resolution of the new texture for the Jedi Outcast MOD. Generally, this would be 4x the original size, but I've noticed that, in Jedi Outcast, textures for doors of a similar size are usually 512 by 512, so this texture ends up being 8x its original size of 64 by 64. I believe we've discovered that switches need to be enlarged this much as well.
At any rate, it's not a bad idea to see if you can find a Jedi Outcast texture that fills a similar amount of space as the one you are attempting to create.
Step 2, I copy and paste the enlarged original texture into the new Photoshop .PDF texture file. This is so I can make sure I get the shapes and colors correct for the re-created texture.
Step 3, I copy and paste a base texture from Jedi Outcast into the new texture file. In this case I used "basic.jpg" from the "textures\doomgiver" directory in "assets0.pk3" - if you look at a texture like "512_512d.jpg" or "door1.jpg" in the same directory, you can see that the texture artists on Jedi Outcast have used this base texture as a starting point just as I am doing here. Look through the textures in "assets.pk3" to find different base textures that are appropriate for various surfaces.
(I've not included a visual aid of this texture because I'm trying to be careful about distributing copyrighted material - you might want to go find it yourself in your own "assets0.pk3" and take a look at it, though)
Step 4, I use the eyedropper tool to grab the color of the surface I'm going to re-create. I then create a new layer and fill it solid with that color.

Then I change that layer form "Normal" to "Color" and merge it down onto the Jedi Outcast base texture (I generally make a copy of the layer that the base texture is on just so I don't have to repeat Step 3 when I start on the next surface).

If you don't know, what the "Color" setting does is change the underlying layer to the same color ratio (the RGB values in this example are 77, 85, 105) as the layer set to "Color", while retaining the various light/darkness values of each individual pixel.
Step 5, since the light/darkness values are a bit darker than the original surface color, I need to adjust that with the "Brightness/Contrast" dialogue box found in "Adjust" under the "Image" menu (Image->Adjust->Brightness/Contrast to use the common representation of menus and sub-menus). The color range on this surface texture is about 34, 42, 62 to 68, 76, 96 - an average of about 51, 59, 79. That's 26 less than the original surface, so I adjust the brightness "+26".

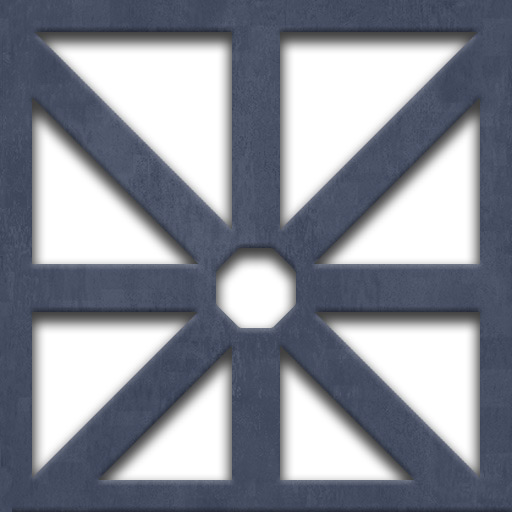
Step 6, at this point, I can start forming the shapes that comprise the texture. I do this by using the various selection tools to create a mask in the shape of the surface I'm creating. Then I copy and paste that shape into its own layer.
This, of course, will be unique for each shape in each texture. My advice for making the selection shape is to make it as geometrically sound as possible. For instance, with this texture, in order to get the diagonal parts of the shape, I made a horizontal rectangle and used Selection->Transform Selection to rotate it 45 degrees each way. And remember you can combine different selections by saving them as and loading them from channels.
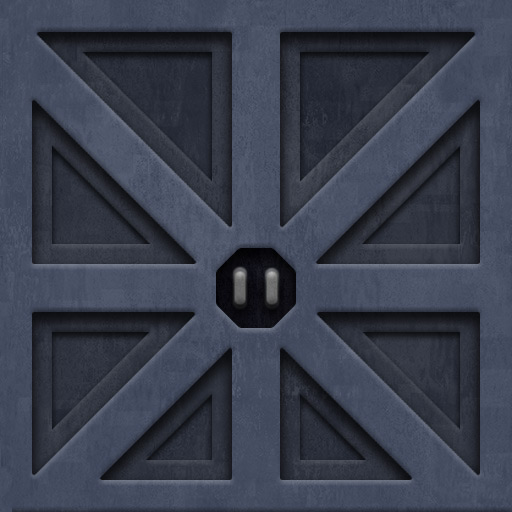
Step 7, now that this surface is in its own layer, I can apply layer effects (Layers->Layer Style or double-click on the tab for the layer in the layers pallette) on it. For this particualr surface, I gave it a drop shadow and a slight smooth inner bevel. Again, this is something that will be different for each texture. So, use the effects that are appropriate and, as with everything, try to approximate the size and intensity of those shadows and other lighting effects that are in the original Dark Forces texture. Play around with all of the layer effects and see what they do.
For a relatively simple texture like IDDOOR1, I can just repeat these steps until I've created all of the different parts of the texture until it becomes:

nice tutorial