Tutorial written by Heed
Mirrored for archival purposes
ActorFx Tutorial
by Heed
Updated Sept 3, 2001
ActorFx is one of the tools that comes with Maxed, unfortunately, it is the least user friendly of all of the tools. As Remedy state, the tool is very old and awkward to use. It has taken me the better part of a week to finally get the program to load animations with skins properly. I don't pretend to know everything about the tool or skinning, but I will pass along what I have learned and this should at least allow you to load the animations and proceed to edit the skins and their properties. This tutorial will assume that we want to edit the max Payne skin, but the principles should apply to any other skin. Also, I will assume that you have already unpacked your x_data.ras file. Users familiar with the directory structures of the x_data.ras can simply follow the illustrations for step #1. NOTE: THE DEFAULT_SKELTON DIRECTORY CONTAINS MORE FILES THAN IN THE UNPACKED X_DATA.RAS EQUIVALENT.
Step #1:
The first thing we want to do is set up our directory structure and place the appropriate files in the proper places. We will be sticking to the general directory structure of the unpacked X_data.ras file: that is, data\database etc. Create an empty directory that will be a "work" directory-- name it whatever you want (i.e. actor), now create the subdirectory "data" and in that directory create another subdirectory "database". Under "database" create another directory called "default_skeleton". You should now have this path structure: actor\data\database\default_skeleton. Under "default_skeleton" create two directories: "anim" and "max_payne". Finally, under the "max_payne" directory create the directory "textures".

Your Directory Structure
We are now ready to place the files in their appropriate locations. Begin by copying all of the files in the database folder of your unpacked x_data.ras file into your database folder under your work directory (i.e. actor).
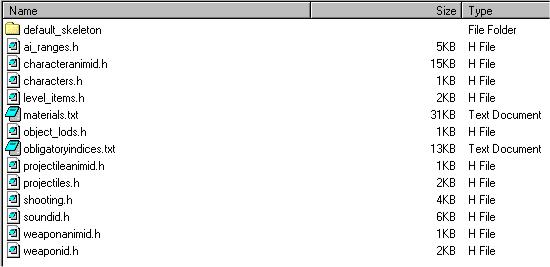
Your Database Folder
Now, go to your unpacked x_data.ras directory and locate the directory "skeletons" and copy the default_skelton.txt to your "default_skeleton" directory. Go to your unpacked x_data.ras and locate the "default_skeleton" directory under the "skeleton" directory and copy the two files (maxpayne-collision.kfs and maxpayne-collision.kf2) to your "default_skeleton" directory. Now, go to your unpacked x_data.ras and locate the "skins" directory and copy the max_payne.txt file to your "default_skeleton" directory.
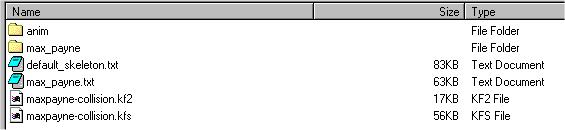
Your default_skeleton Directory
Locate the "anim" folder in your unpacked x_data.ras folder and copy the entire contents into your "anim" folder under the "default_skeleton" directory.
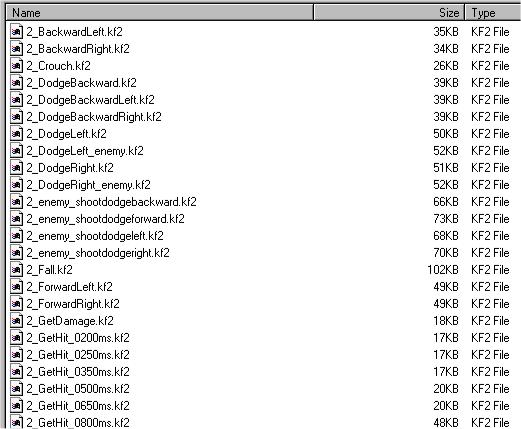
Your anim directory
Locate the "max_payn"e folder under the" skins" directory in your unpacked x_data.ras folder and copy the two files (Payne_Max_L0.kfs and PAYNE_MAX_L0.skd) into your "max_payne" directory.

Your max_payne directory
Finally, (yes, finally!), locate the "textures" directory under "max_payne" in your unpacked x-data.ras folder and copy the contents into your "textures" folder under" max_payne".
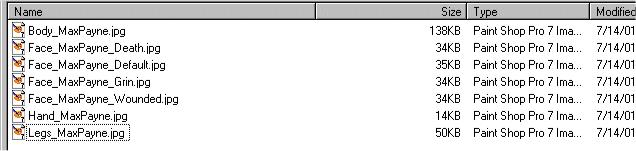
Your textures Directory
NOTE: this directory structure works, but there very well may be other structures that do as well. This is simply the way I managed to get the program to function, and the text editing we will do in step 2 assumes this structure.
Step #2:
Now that we have our directories and files in place, we must edit two files in order for them to be accepted by ActorFx. The two files we will be working with are the default_skeleton.txt and the max_payne.txt. First, open the default_skeleton.txt in a text editor. You will notice numerous entries, but I want you to locate the one that begins [Skeleton] (just after the #define and #include). Follow this entry almost to the bottom of the page until you see the comment line:
// ---------------------------------------------------
Below this comment line we will be adding a new entry:
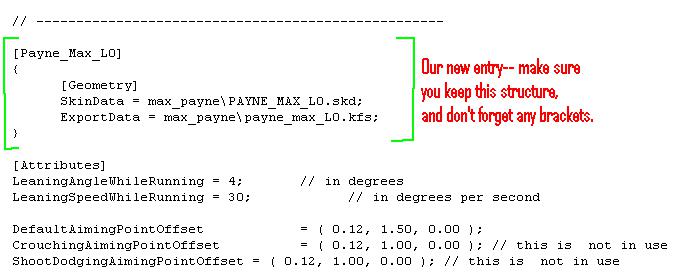
When you're done adding this entry save the file. NOTE: L0 is capital L and zero.
Now, open up the max_payne.txt file-- we will be making two changes to this one.
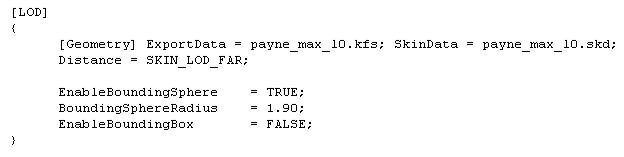
Locate this section in max_payne.txt
We need to add the directory that the payne_max_l0.kfs and payne_max_l0.skd files reside in. For us, it is the max_payne directory.
Scroll down to the next entry entitled "[Modifiers]".
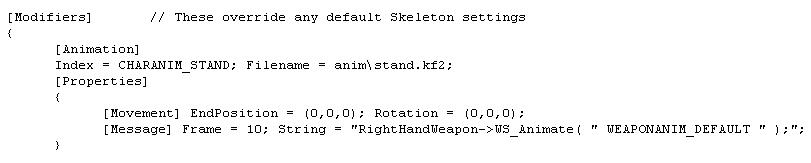
We need to make one addition here:
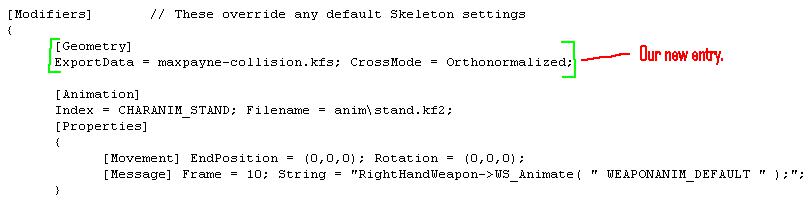
Now save the file, we're now ready to run ActorFx.
Step #3:
Start ActorFx and from the drop down menu at the top choose "File" --> "Import Bones and Skin" and navigate to your "default_skeleton" directory and choose default_skeleton.txt. An option box will appear for D3D-- I choose onboard, and I assume this means it will utilize the feature of your particular videocard. Click OK, and a new box will appear. You should see the following:
If you do not see the above, use the drop down boxes to choose the appropriate items.
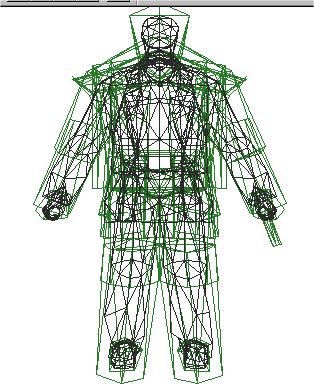
Click OK and you should now see a wireframe human object that consists of "bones" and a "skin".
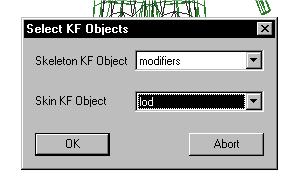
W'ere almost done. But first, we need to import the particular weighting of the skin that's appropriate for the model we're working with (Max Payne, in this case). Go to the "Edit" button at the top menu and choose "Weighting from a Template". It should open to your "default_skeleton" directory (if not, navigate there). Now, choose max_payne.txt and click "open. You will now see a dialog box as we saw earlier. We need to choose "modifiers" for the skeleton option and "lod" for the skin option.
You'll now see another dialog box that I'm not too sure about. Simply click OK without modifying the values (unless you know what you're doing) and your weighting should load after that. We now have our completed Max Payne skeleton with skin and a full compliment of animations ready to edit. At this point I would suggest saving the file: "file"--> "save as". Enter a name for it and it will be saved as an ActorFx file (.AFX). You can now simply open that file from the "file" menu (file-->open) instead of importing the skeleton and weighting-- the .AFX file contains all of the items that we've had to enter separately.
Well that's got you started with ActorFx. Play around with the vertices and see how altering them affects the placement and behaviour of the skin. I'll add to this tutorial later to give some idea of what to do now that you've got the proper items loaded into the program. This was only intended to help you get past the frustration that I felt in simply trying to figure out how to load the animations and skins into the program-- Remedy weren't kidding that this program is ancient and unweildy! Note: I fully accept that there may be easier or different ways to get the program running-- this is just the first way I got the damn thing to work ;)
What ActorFx Does and Doesn't Do
Okay, I suppose this should have gone at the beginning of the tutorial, but I didn't realize that there would be a fair bit confusion surrounding the program's purpose. In a nutshell, ActorFx is the only tool
where you will be able to see the skin (mesh and texture--.kfs), the skeleton (bones) and the animations (.kf2) all working together. The main purpose of this is to see how your skin interacts with the skeleton during movement (animations). The skin has many vertices which must be assigned to the bones of the skeleton so that when the skeleton moves the skin moves along with it. You can see what effect this has if you follow the tutorial above but DON'T do the last step of "weighting from a template". This will load the skin with a default set of vertex assignments which are not specific to the max payne model. If you toggle (pgup, pgdn) through the animations in preview mode (P) you will notice that max deforms as he's running. His pants seem stuck to his jacket, so when he jogs his pants "balloon" out to follow the flapping movement of his jacket-- his butt expands (lol). This is because the vertices of his pants are incorrectly assigned to his jacket-- so, they move with his jacket; rather than moving with his pelvis and legs. Essentially, the purpose of ActorFx is to allow you to correct problems like this with any custom skins (meshes) you create. So, if you created a mesh that included a hat you would want to assign the hat vertices to the head and neck bones so the hat moved in accordance with the model's head. This is what ActorFx is for-- you do not "create" anything with it-- you edit your creations with it. Once you have things working properly you export the kf vertex data to a file. This file has a .skd extension and is used by the game engine to apply the vertex data you set in ActorFx to your model in the game so it works like it did it ActorFx. That's it. It's a pretty small function compared to the other editors, but it is an essential function if your're creating your own custom skins that include original meshes. If you're not creating original skins, then you need not ever worry about ActorFx. One "side function" of ActorFx is that, since it can actually load the .kf2 animation files, it can be used to count the number of frames each animation has, so it can be useful if you're creating new animations-- you can find out the number of frames the original animation's by Remedy have.
I'll be adding a few "hints and tips" shortly and any other info. I can think of.
Heed.