Follow this tutorial and you'll be mapping like the pro's in no time. It takes less than 60 minutes to make a map for Far Cry 2, check this video out if you don't believe me:
There are plenty more videos just like this one.
Phase 1: Navigation
Navigating within the editor is a snap and should be easy to understand if you have played any FPS style game. You move around using W, A, S and D and use your mouse to look around. Pressing SHIFT while moving will increase the movement speed of the camera. You won't be able to fly through the land or water so if you plan on adding anything below sea level, you will have to do it all before placing the water in the map. Unlike most editors you have the ability to jump in game without even saving your map, it's quite handy to use if you want to get a players perspective on your deigns to do so simply press CTRL + G and you will instantly load into the game where your view point is within the map, no matter how high up you are. You cannot die while in this mode but you can shoot, swim, burn and drive around your map.
Phase 2: The Menu Buttons

The first set is the normal run of the mill New (CTRL + N), Open (CTRL + O), Save (CTRL + S), Undo (CTRL + Z) and Redo (CTRL + SHIFT + Z). Simple stuff you should all know about.

The second set is the Terrain Editor.
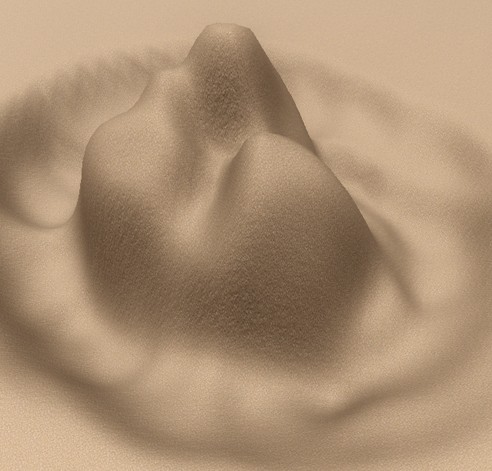
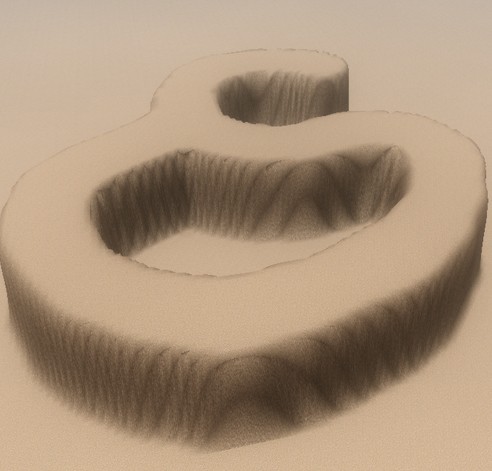
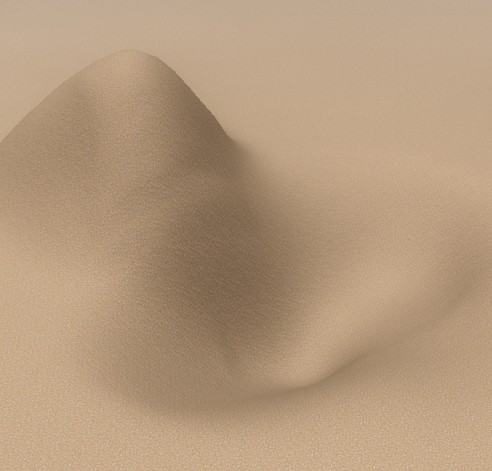
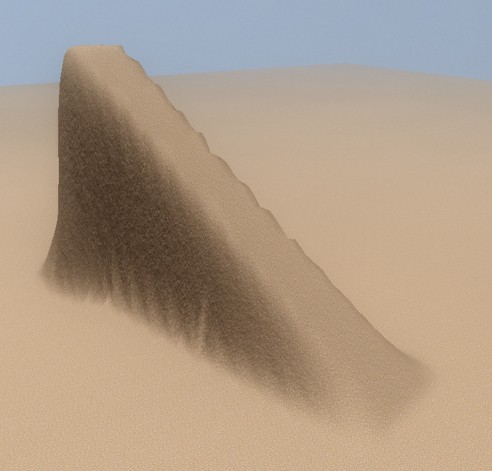
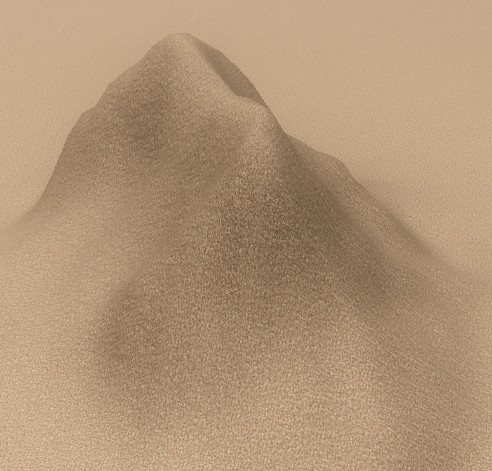
Terrain Bump (Hotkey F1):
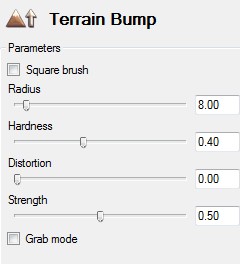
Terrain Bump is useful for creating uneven, flowing landscapes like mountains and riverbeds. Note: Pressing CTRL in this mode will switch between adding and removing land.
Parameters:
Square brush: Selects a square or circle brush (circle is default).
Radius: Controls the size.
Hardness: Controls the falloff.
Distortion: Controls how random the edit will be.
Strength: Controls how strong the edit will be.
Grab mode: Allows you to control the height using the Y mouse axis.
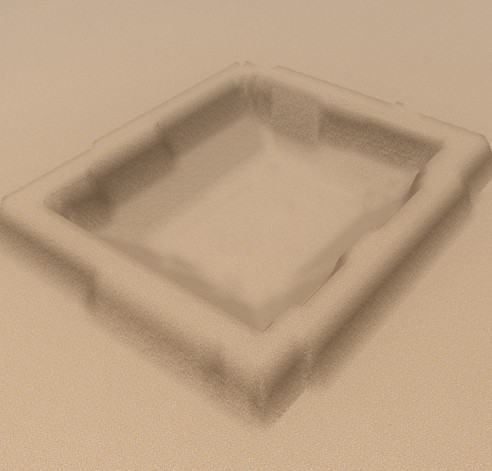
Terrain Raise/Lower (Hotkey F2):
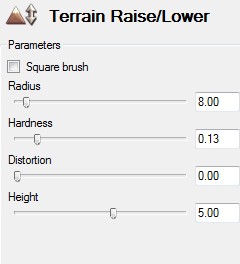
Terrain Raise/Lower is useful for creating even ground at a set height. For example, if you wish to create a cliff that will have a flat top or a wall, clicking on any piece of land using this tool will add or remove additional height. Note: Pressing CTRL in this mode will switch between adding and removing land.
Parameters:
Square brush: Selects a square or circle brush (circle is default).
Radius: Controls the size.
Hardness: Controls the falloff.
Distortion: Controls how random the edit will be.
Height: Controls how high the edit will be.
Terrain Flatten (Hotkey F3):
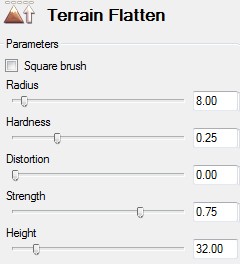
Terrain Flatten creates piece of land that will always be set to the same height. This tool will not add additional land on top of a piece that is set to the same height. This should be used only to set the land to a chosen height-therefore it's especially useful for creating islands and map boundaries.
Parameters:
Square brush: Selects a square or circle brush (circle is default)
Radius: Controls the size.
Hardness: Controls the falloff.
Distortion: Controls how random the edit will be.
Strength: Controls how strong the edit will be.
Height: Controls how high the edit will be.
Terrain Smooth (Hotkey F4):

Terrain Smooth is a very useful tool that smooths the selected piece of land to a median between two heights. Very useful tool for making land easier to navigate in game. This is great for making riverbeds so players can get in and out of water.
Parameters:
Square brush: Selects a square or circle brush (circle is default).
Radius: Controls the size.
Hardness: Controls the falloff.
Distortion: Controls how random the edit will be.
Strength: Controls how strong the edit will be.
Terrain Ramp (Hotkey F5):
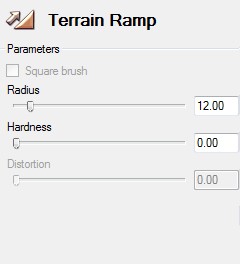
Terrain Ramp allows you to easily create ramps to a higher point of land. Simply click a point on the map you wish to designate as one end of the ramp and then select the point for the second end of the ramp at a different height to the first. This is useful for creating roads up a mountain or over a wall that a vehicle can easily navigate.
Parameters:
Radius: Controls the size.
Hardness: Controls the falloff.
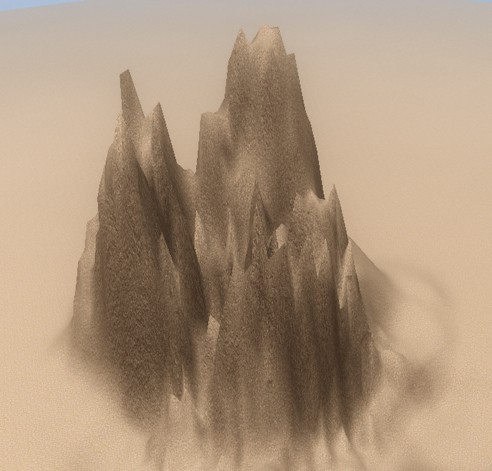
Terrain Noise (Hotkey F6):
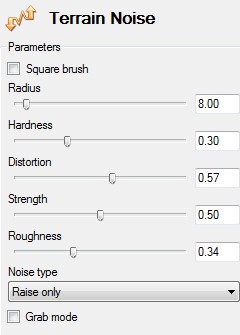
Creates noise on a selected piece of land, allowing you to create land that has more personality. Useful for adding the final touches to your mountains. Note: Pressing CTRL in this mode will switch between adding and taking away land, only works with Raise and Lower Only noise types.
Parameters:
Square brush: Selects a square or circle brush (circle is default).
Radius: Controls the size.
Hardness: Controls the falloff.
Distortion: Controls how random the edit will be.
Strength: Controls how strong the edit will be.
Roughness: Controls how smooth or rough the noise edit will be.
Noise type: Allows you to select how the edit will work, Raise Only and Lower Only edit in their respective direction while Raise and Lower will randomly pick a direction to edit in, sometimes it does both at once.
Grab mode: Allows you to control the height using the Y mouse axis.
Terrain Erosion (Hotkey F7):
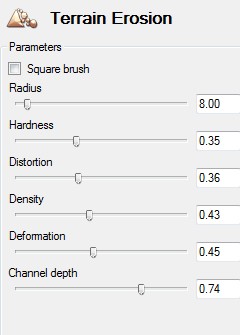
Terrain Erosion is used to give your selected area of land a more natural, weathered look. Useful for tweaking land shapes that are in-accessible to the player. This tool will only subtract land.
Parameters:
Square brush: Selects a square or circle brush (circle is default).
Radius: Controls the size.
Hardness: Controls the falloff.
Distortion: Controls how random the edit will be.
Density: Controls the speed of edit.
Deformation: Controls how much land will be effected by the edit.
Channel depth: Controls the strength of the edit.
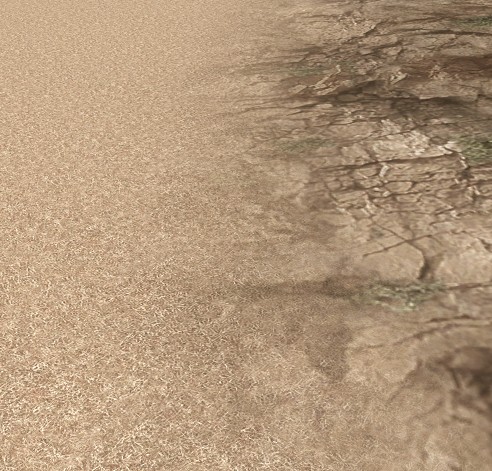
Texture Painter (Hotkey F8):
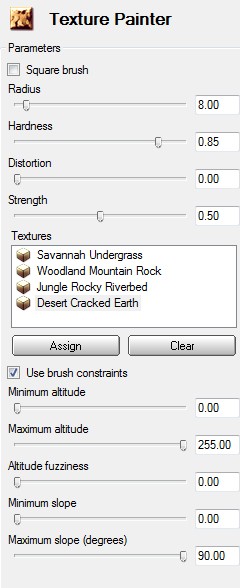
Texture Painter is used to give your land a custom texture. You can have a maximum of 4 textures within a single map. Textures can be selected from 4 different types: Savannah, Desert, Jungle, and Woodlands. Each brush has their own distinguished look and each have their own selection of appropriate textures for just about any natural situation; mountain ranges, traveled ground, and river beds. Using the painter is just as easy as the terrain editor in that you select a region of land you wish to texture and then you click. The textures will always blend into each other. If you re-assign a texture which is already in your map, it will change to the newly selected texture automatically. Note: Pressing the CTRL button will fade out all textures bar the first texture in the list.
Parameters:
Square brush: Selects a square or circle brush (circle is default).
Radius: Controls the size.
Hardness: Controls the falloff.
Distortion: Controls how random the edit will be.
Strength: Controls how strong the edit will be.
Textures: This box will allow you to select 4 different textures to be used within your map, there are 4 texture categories to choose from.
Use brush constraints: Allows for advanced texturing constraint options.
Minimum altitude: Sets the minimum height this texture can be painted (0.00 default).
Maximum altitude: Sets the maximum height this texture can be painted (255.00 default).
Altitude fuzziness: From what I can tell it sets the sharpness of textures at higher altitudes.
Minimum slope: Sets the minimum for how flat the land must be to apply the texture.
Maximum slope: Sets the angle that the texture will not appear (max is 90.00 which is straight up).
The third set is the Objects Bar
Objects (Hotkey F9):
This tool and all the options within are used to add and edit props. Note: Drivable vehicles will not be able to spawn under water. It's perfectly fine with static props and buildings. Pressing down CTRL while you have a prop selected you can select the orientation before you place it within the map.
Parameters (the following Hotkeys will only work while you have Objects mode enabled):
Select (Hotkey 1): Allows you to drag a 2D selection box over any number of objects (box only has to touch the object in question). Note: Pressing CTRL or SHIFT will allow you to selected multiple objects at once, the last object you select will be the center point if you choose to rotate the selection in any way. Pressing CTRL and clicking a selected object will remove it from the selection.
- Group selection: Creates a 3D box around the objects in question creating a group allowing you to rotate the selection from the center of all the objects in the selection.
- Neighborhood selection: By using this option you can select one large object and all smaller objects close by will automatically be selected as well. Good for moving many objects, for example, a house and all the props located within.
- Delete selection: Deletes current selection (Hotkey DEL).
- Freeze selection: Freezes current selection omitting them from further editing.
- Unfreeze selection: Unfreezes current selection, only applicable if objects are frozen.
Move (Hotkey 2): Allows you to move the objects current location in X, Y and Z axis. Note: Pressing CTRL or SHIFT will allow you to selected multiple objects at once, the last object you select will be the center point if you choose to rotate the selection in any way, unless you re-select an object already within the current selection. Pressing SHIFT and moving the selected object will create copy at the new location.
- Group selection: Creates a 3D box around the objects in question creating a group. This allows you to rotate the selection from the center of all the objects in the selection.
- Neighborhood selection: By using this option you can select one large object and all a smaller objects close by will automatically be selected as well. Good for moving many objects IE a house and all the props located within.
- Axis type: This will select the axis that you can move the selected props on, using local will align the axis to your selected object, world will have the axis never changing from the directions set by default within the map.
- Position: Allows you to define the location of a selection using X,Y and Z coordinates
- Use snap grid: Depending on what option you are currently using for AXIS TYPE your objects will move aligned to an invisible grid.
- Use gizmo: Allows you to turn off the editing gizmo (the 3 arrows that appear on selected objects).
- Grab anchor points: -
- Drop selection: Drops the current selection until a physical interaction is found, meaning as soon as it hits something.
Rotate (Hotkey 3): Allows you to rotate the object in its current location on the X, Y and Z axis. Note: Pressing CTRL or SHIFT will allow you to selected multiple objects at once, the last object you select will be the center point if you choose to rotate the selection in any way, unless you re-select an object already within the current selection. Pressing SHIFT and rotating the selected object will create copy at the new location.
- Group selection: Creates a 3D box around the objects in question creating a group allowing you to rotate the selection from the center of all the objects in the selection.
- Neighborhood selection: By using this option you will can select 1 large object and all smaller objects close by will automatically be selected as well. Good for moving many objects IE a house and all the props located within.
- Axis type: This will select the axis that you can move the selected props on, using local will align the axis to your selected object, world will have the axis never changing from the directions set by default within the map.
- Rotation: Allows you to rotate the selection using X,Y and Z coordinates.
- Use snap angles: Selecting this check box will allow you to pick the angles in which objects will snap too, so rotating an object with 5 selected will snap to every 5 degrees of rotation.
- Reset tilt: Will reset the current selection on the X and Y axis of rotation back to 0.00 which makes it upright, the height (Z axis) of the object will not be affected.
- Delete selection: Deletes current selection (Hotkey DEL).
Snap (Hotkey 4): Lets you correctly join two objects together, a good example of this would be when you want to join two bridges together. To use this tool simply select a part of an object, click and drag your mouse to an object you wish the first to join too.
- Use snap angles: Enables use of the snap angle option and angle direction.
- Snap angle: Select from 5, 10, 20, 45 and 90 degrees that you can snap objects too.
- Angle direction: Selection from clock wise (CW) and counter clock wise (CCW)
- Preserve orientation: Selecting this will negate the use of SNAP ANGLES and ANGLE DIRECTION. If your object is at a custom orientation of either X or Y axis (Z will be moved to match the second object) then it will keep those angles when you attach the object.
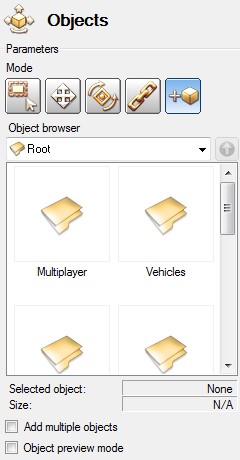
Add (Hotkey 5): Allows you to add objects into your map like vehicles, buildings, bridges, gas cans, graffiti (posters, etc), MP spawns, capture points, diamond points, ammo points, etc. Shadows will be automatically corrected when you place any prop in your map. Note: Drivable vehicles will not be able to spawn under water. It's perfectly fine with static props and buildings. Pressing down CTRL while you have a prop selected you can select the orientation before you place it within the map
- Object browser: Allows you access to the prop library that is within Far Cry 2.
- Selected object: Gives the name of the current object in question.
- Size: Gives the size of the current prop using X, Y and Z in meters.
- Add multiple objects: Allows you to add more than 1 of the same prop at once, without having to re-select it.
- Object preview mode: Gives you a 3D rotation of the prop in question.
Collection System (Hotkey F10):

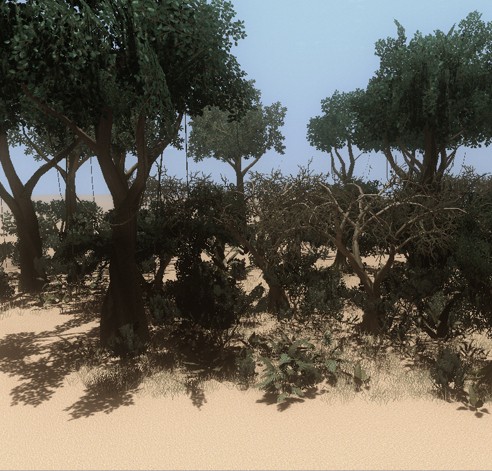
Collection System is used to add foliage to your map including includes grass, trees, forest, shrubs, and small rocks. Like the texture painter you can only have 8 per map. You will be able to select from a few types of foliage desert, Savannah, Jungle, and Others (fake distant foliage). These are random as to what it will look like, e.g. you won't be able to place each tree individually. The collections won't overlap or be able to transition into one-another. Note: Pressing CTRL will remove the current foliage collection from the area you have selected.
Parameters:
Square brush: Selects a square or circle brush (circle is default).
Radius: Controls the size.
Hardness: Controls the falloff.
Distortion: Controls how random the edit will be.
Collections: From here you will be able to select the foliage collections that will be present in your map.
Assign: Assigns the current collection to the current selected collection slot.
Clear: Deletes the current collection from the collection slot and if there is any instance within your map that will also be deleted.
Roads (Hotkey F11):
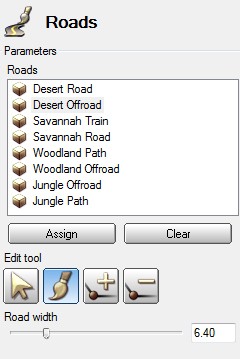
Allows you to add roads to your map, like the Texture Painter and Collection Systems you only have a limited number of selections that you can make from the Library. These include Desert, Savannah, Woodland and Jungle style roads. Creating the roads is easy, simply select the draw tool, click and then drag. After you have laid your foundations you can then add additional lengths or move the points to make the road smoother. Adding any intersecting roads needs to be a brand new selection set so use them wisely.
Parameters:
Roads: This box will allow you to select 8 different roads to be used within your map, there are 4 road categories to choose from.
Assign: Assigns the current road to the current selected road slot.
Clear: Deletes the road selection from the road slot and if there is any instance within your map that will also be deleted.
Edit tool: These tools give you options to customize how the roads will be drawn (the following Hotkeys will only work while you have Roads mode enabled).
- Select (Hotkey 1): Allows you to move key points along the road, changing how the road twists and turns.
- Draw (Hotkey 2): The tool used to draw the road out, simply click and drag.
- Add (Hotkey 3): Adds additional key points along a road already drawn out.
- Remove (Hotkey 4): Removes selected key points along a road already drawn out.
Road width: This option allows you to increase the width of the road.
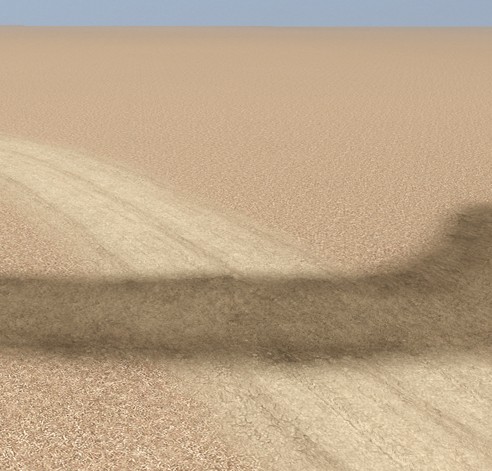
Playable Zone (Hotkey F12):
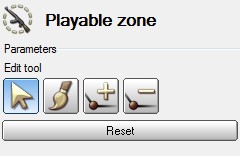
Allows you to set the area in which players can spawn, move and die in. If they leave the designated area they have 10 seconds to get back into the battle zone. Its best to give players a visual cue to the edge of the areas they can and cannot be in.
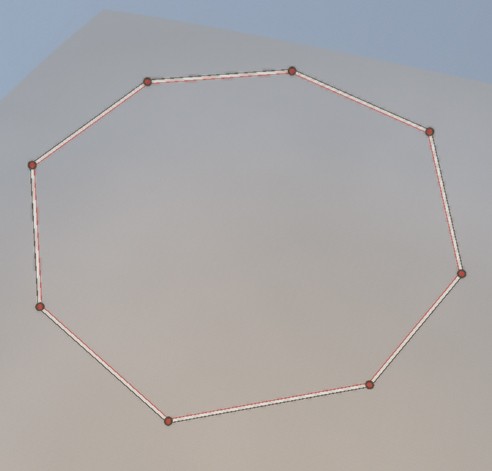
Parameters:
Edit tool: These tools give you options to customize the boundary (the following Hotkeys will only work while you have Playable Zone mode enabled).
- Select (Hotkey 1): Allows you to move key points along the boundary
- Draw (Hotkey 2): The tool used to draw extra points along the boundary, simply click an existing key point and drag out what you need.
- Add (Hotkey 3): Adds additional key points along the boundary.
- Remove (Hotkey 4): Removes selected key points along the boundary.
Reset: Resets the boundary back to the original state.
The fourth and final set is the Miscellaneous Bar.
Environment:
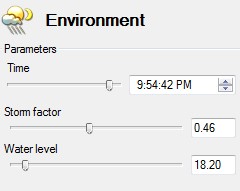
Controls the time of the map (changes the sky to be day or night) weather (if it's raining or not) and the water level. Water can only be at one height for all over the map.
Parameters:
Time: Select from a time of day, either PM or AM. Time is 12hr.
Storm factor: Sets how stormy the map will be. 1.0 being heavy storms, 0.0 being a sunny day.
Water level: Sets how high the water will be within the map.
Map Validation:
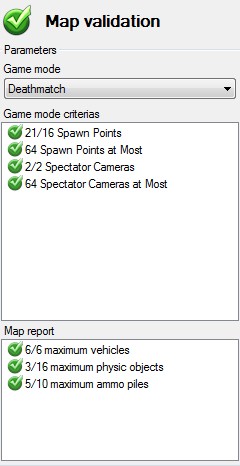
Map validation is something all maps need to comply to or else they will not be accepted by the master server and even be put into any server rotation. It's best before going into making your map you have some idea what type of game mode you wish to do. For example Uprising needs 3 capture point in the map, be that 3 bunkers or something else that's up to you, but it should be clear to everyone playing where the points are. I'll detail what exactly your map needs for each game mode.

Parameters:
Deathmatch: A simple tried and true game type, free for all.
Game Mode Criteria's:
- More than 16 ordinary spawn points less than 64: The prop you need for the spawn points can be found under the Multiplayer folder in the Objects Tool, it's called Spawn Point
- At least 2 spectator cameras less than 64: The prop you need for the cameras can be found under the Multiplayer folder in the Objects Tool, it's called Spectator Camera. They must not collide with any objects.
Team Deathmatch: A variation of Deathmatch, that involves teams.
Game Mode Criteria's:
- More than 8 UFLL spawn points less the 64: The prop you need for the spawn points can be found under the Multiplayer folder in the Objects Tool, it's called UFLL Spawn Point.
- Need to nominate the UFLL base: Simply put the base marker in the area you wish to designate the UFLL base.
- More than 8 APR spawn points less the 64: The prop you need for the spawn points can be found under the Multiplayer folder in the Objects Tool, it's called APR Spawn Point.
- Need to nominate the APR base: Simply put the base marker in the area you wish to designate the APR base.
- At least 2 spectator cameras less than 64: The prop you need for the cameras can be found under the Multiplayer folder in the Objects Tool, it's called Spectator Camera. They must not collide with any objects.
Capture the Diamond: Far Cry 2 variation on capture the flag.
Game Mods Criteria's:
- More than 8 UFLL spawn points less the 64: The prop you need for the spawn points can be found under the Multiplayer folder in the Objects Tool, it's called UFLL Spawn Point.
- Need to nominate the UFLL base: Simply put the base marker in the area you wish to designate the UFLL base.
- More than 8 APR spawn points less the 64: The prop you need for the spawn points can be found under the Multiplayer folder in the Objects Tool, it's called APR Spawn Point.
- Need to nominate the APR base: Simply put the base marker in the area you wish to designate the APR base.
- At least 2 spectator cameras less than 64: The prop you need for the cameras can be found under the Multiplayer folder in the Objects Tool, it's called Spectator Camera. They must not collide with any objects.
- Needs 1 UFLL diamond station: The prop you need for the station can be found under the Multiplayer folder in the Objects Tool, it's called UFLL Diamond Station. They must not collide with any objects.
- Needs 1 APR diamond station: The prop you need for the station can be found under the Multiplayer folder in the Objects Tool, it's called APR Diamond Station. They must not collide with any objects.
Uprising: A control point game mode needing one player to capture all points.
Game Mods Criteria's:
- More than 8 UFLL spawn points less the 64: The prop you need for the spawn points can be found under the Multiplayer folder in the Objects Tool, it's called UFLL Spawn Point.
- Need to nominate the UFLL base: Simply put the base marker in the area you wish to designate the UFLL base.
- More than 8 APR spawn points less the 64: The prop you need for the spawn points can be found under the Multiplayer folder in the Objects Tool, it's called APR Spawn Point.
- Need to nominate the APR base: Simply put the base marker in the area you wish to designate the APR base.
- At least 2 spectator cameras less than 64: The prop you need for the cameras can be found under the Multiplayer folder in the Objects Tool, it's called Spectator Camera. They must not collide with any objects.
- Needs 3 control points: Points A, B and C need to be within your map, these need to be quite a decent distance away from each other or it will not save correctly. These props can be found under the Multiplayer folder in the Objects Tool, it's called Control Point A, B and C.
Map Report: This box will tell you about additional map limitations you will need to comply with in order to release your map officially.
- Spectator Camera: Tells you if your spectator cameras at intersecting with anything.
- Control Points: Tell you if any of your control points are too close together.
- Clear Control Points: Control points need to be out in the open and not intersecting with any other objects.
- Vehicles: Needs less than 6 in your map.
- Explosive Objects: Needs less than 16 explosive objects called physic objects in the editor.
- Ammo Piles: Needs less than 10 ammo piles in your map.
Map Properties:
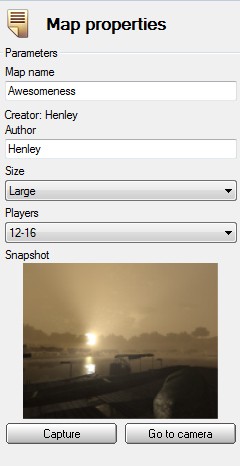
This is one of the final steps before you author your map, Simple stuff shouldn't be anything here you'll have problems with.

Parameters:
Map name: The official name of your map.
Creator: The creator name will be your username in game.
Author: Can be anything you wish, even put your full name in here.
Size: Small, Medium and Large this is to give players an idea how large your map is.
Players: 2-4, 4-8, 8-12 and 12-16. Again gives players an idea on how many players your map will support.
Snapshot: Allows you to take a picture within your map that will be shown in the map browser, this will help players pick and choose maps so make the image count! Don't worry it won't take a picture of the MP icons that show up while editing your map.
- Capture: Where your looking in your map is what will be captured in a 4:3 frame.
- Go to camera: Once you move away from the spot you took the picture this will move your view back to this location.
Make Beautiful:

Basically optimize your map, this includes shadows and the light (depending on the time of day). It's easy to use, just click and wait for the map to finish the process.

Ouch that was a long one. well I reached to learn it when it was released. Isn't that hard but a good tip is to use the terrain Flatten tool before you set buildings or else there would be like sand inside the building.
This comment is currently awaiting admin approval, join now to view.
very useful, thanks
Very helpful and detailed. Thanks much!
If you need a tutorial for the Farcry 2 map editor, perhaps you should learn how to use a computer first. :P I'm being biased but seriously, why do people need a tutorial to learn this editor? I guess this is childs play, so I guess this tutorial is for children. Thats the whole reason they created the map editor right? For small children?
Well, the editor itself is pretty self-explanatory, but I know many people in the PC gaming scene that want to get into mapping but have no prior experience, so even THEY can make a fair amount of mistakes in the editor, or just simply not make good looking maps because they're not sure. Although they could figure it out fairly easily by tinkering around with it, guides such as these help to make sure you're using the editor in the best way possible, get into map making much quicker without having to tinker around with it, and also helps bypass common mistakes.
I'll definitely be sending this guide to a few of my friends.
If you give someone a fish, you'll feed them for a day. If you teach them how to fish, you'll feed them for a life time.
Let them learn. Feeding someone the knowledge isn't going to teach them anything but how to use that one tool your telling them how to use. Let them learn to think for themselves. Thats the problem with people today, they want everything to be fed to them. They don't want to have to figure anything out themself. How depressing.
the editor is simple yes but useless no i mean the maps made by some people in the community are nothing short of breathtaking i think that this is a good thing to help people get in to game making its not like you can learn the hammer editor in an hour with no prior experience but with this you can plus if you have been slaving away with the hammer editor for like a year then its nice to have some beautiful pre-made houses instead of making them all your self so that you can sit back relax and have the engine practicely make the map for you
This comment is currently awaiting admin approval, join now to view.
Yeah it is a easy editor BUT the chances that il use it alot or verry low
you cant make sp maps :/ thats why >.>
Nice work, a well done tut...
lol nullsoldier I do find things out myself but so many people keep asking me what to do -.-
how u rotate without pressing the button?
You can press control and select the objects orientation before you place it. It's handy so you wont be switching between two tools all the time.
Is there anywhere to download the map editor on it own? or do you need to buy the game?
it comes with farcry two, i do believe.
and of course you need the game, how are you supposed to test it otherwise!
yes you need to purchase the game
how do i download the level designer
A great tutorial...
For those that dont know theres a petition for getting the far cry 2 SDK
from Ubisoft at this link: Gopetition.com
Nice that helped a lot. I always host a server but I can not run a custom map in a ranked match. I know it can be done because others are doing it. It can't be that tuff but I can't figure it out. Any help would be great. Thank you for your time.
how do you validate the map i want to make a tdm i have 9 apr spans 9 ufll spans 1 of each base maker 2 sc but it wont let me publish it
This comment is currently awaiting admin approval, join now to view.
thank you so much!!!!
first i has no idea how i can rotade stuff and now i can :)
thank ypu
Yo how do u publish the map?
where do i get the map editor
men your good!
Very nice :)
How i can add animal in map?
how to host with an unpublish map??????
i want to use the map i have created when i host.
i can't publish it because i need an online account(which required yu a serial key)
ok i read through all of it and couldn't find anything pertaining to how to disable respawning items (cars etc.) does anyone know if this is at all possible?
This comment is currently awaiting admin approval, join now to view.
This comment is currently awaiting admin approval, join now to view.
how to put weapons
You can't (without modification).