another one, like a child with a new toy image - BF2 HD Remastered Maps 2.0 - Vanilla Sky mod for Battlefield 2
Battlefield Remastered 3.0 has finally has gone gold after a 2 years development. Expect to play it soon! Old change logs: ____________________________ Lot's of improvements has been made since the first Beta release 1.2 Realistic BF2 HD Remastered battles, up to 64-Bots coop mode for training or epic online game modes. Enhanced HD 2017 maps, much more realistic look, better textures and lighting, lots of graphics tweaks for better visuals, new larger navmesh and strategic areas. - 14 classic BF2 maps fully remastered. (2.0)
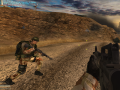
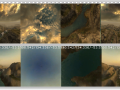
another one, like a child with a new toy
(view original)

Post a comment
That's a super good one I must say!
Sgt_Prof
not hard to make it man:
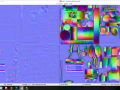
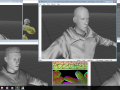
1)On editor generate an Envmap in a good place(usually in the middle of the map and around 10m height above the water or terrain, or just use the existing one, but set scroll 0/0 for water and clouds, water animation to 1000.
2)Set your game resolution at max 8X FSAA,16x Aniso but at 1280x1024
3) restart the game and leave it open, alt-tab, open your level folder and init.con file, also open your generated EnvironmentMapInfo.emi file
4) At init.con find gameLogic.setBeforeSpawnCamera X,Y,Z 0/0/0, fist is camera position and second field is camera angles. At camera position add your envmapinfo first 3 coordinates forget about the last one which is face position. like -98,79,133,1
add only the -98,79,133 at gameLogic.setBeforeSpawnCamera -98,79,133 0/0/0.
5) Save the init.con file, drag and drop on your zipped level server folder.
6) Alt-tab and start your level, that will be the first face of the cube, ` renderer.drawhud 0 to disable HUD elements and print screen, ESC, disconnect, Alt-Tab.
7)At your opened init.con file, change second field to 90/0/0, save it drag n drop to server, alt-tab, start the level again and print screen. Note that you don't need to close the game or disable hud again while doing this.
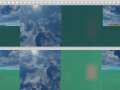
8)Follow up till you got the 6 faces of the cubes, the six coordinates are: 0/0/0, 90/0/0, -90/0/0, 180/0/0, 0/90/0, 0/-90/0
stupid but took me a while to find out a way to do that.
9) Now you have your original/generated envmap.dds and the six faces of the new one. Open the original envmap and the six faces at photoshop or Gimp. Upscale the original to 3072 x 512, you will only use it as a cheat to assemble your new one over it. Resize your generated faces at 1280x1024 to 512x512 using sharp method.
10) Start to mount the faces as they were in the old one, use guidelines always snapping to the edge where current face ends and the next one wil start till you have all the six faces mounted over the old one.
11) save it with nvidia dds plugin, don't forget to choose Cube map in the options and set mip map to 10, more than that will bring bug for this size. (3072x512) Use DXT1 No Alpha, final result is a 1MB file that looks thousand times better and bring photorealistic reflections.
That's a great explanation. Shall be added to BF singleplayer forums/tutorials!
Yep I'll probably move my content and thread there at some point, Reality forums seems a bit hostile with foreign content