Original Tutorial created by Octopus Rex on Relicnews.
Setting up Your First Mod (Warning - Pictures)
postcontent wrote: Rating: Ultra Noob Friendly
THIS IS FOR DARK CRUSADE 1.2
It's about time I got round to this.
This tutorial is for setting a distinct mod that is separate from Relic DC. There's some types of modding that may not need you to set them up this way, eg re-skins or map making. This is for Attribute Editing and general new mods.
Your version of Dark Crusade must be patched to version 1.2 for the tools to work.
Download the 1.2 ModTools or newer.
Install them.
Get .net Framework. - Microsoft.com
Install it.
Note: the .net Framework bit is needed for the ModTools archive viewer, I've simply added it in here so that you're not surprised later when that Tool doesn't work.
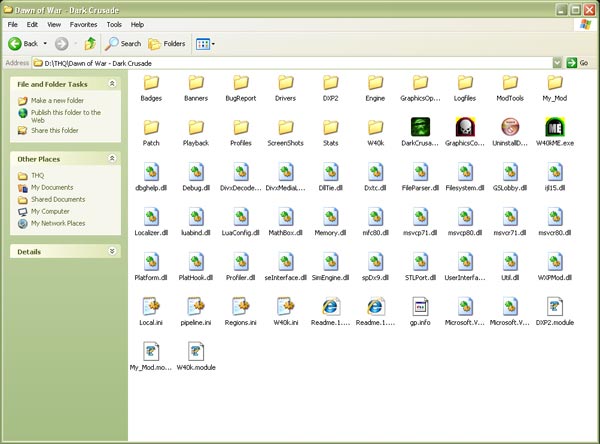
Your folder "THQ/Dawn of War - Dark Crusade" should now look similar to this.
I will call this folder the DOW folder from now on. The new and relevant things in this folder are:
My_Mod folder
My_Mod.module file
pipeline.ini
w40kME.exe
ModTools folder
The Module File and Mod Folder
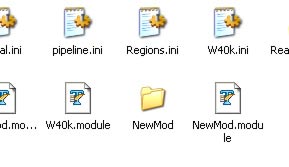
Copy the My_Mod folder (unmodified at this point please!) and paste it in the same location. Rename this copy to the name of your mod. This name must have no spaces and must be exactly the same for every part of the process the involves this mod. It must be different from every other mod you've previously done or donwloaded. This folder is usually called the Mod folder but can also sometime be referred to as the ModData folder or similar althuogh this is not the best term for it.
Copy My_Mod.module and paste the copy into the same folder. Rename this copy to the name of your mod. open the new module file with a simple text editor and change all the instances of My_Mod to the name of your new mod.
This is what the default should look like when you open your module file.
Code:[global] UIName = My_Mod Description = My Super Duper Mod for Dawn of War DllName = WXPMod Playable = 1 ModFolder = My_Mod ModVersion = 1.0 TextureFE = Art/UI/Textures/Title_winter_assault.tga TextureIcon = DataFolder.1 = Data ArchiveFile.1 = RequiredMod.1 = DXP2 RequiredMod.2 = W40K
Change it to this:
Code:[global] UIName = NewMod Description = My New Mod DllName = WXPMod Playable = 1 ModFolder = NewMod ModVersion = 1.0 TextureFE = Art/UI/Textures/Title_winter_assault.tga TextureIcon = DataFolder.1 = Data ArchiveFile.1 = RequiredMod.1 = DXP2 RequiredMod.2 = W40K
Note that UINAme is allowed to be different (although I haven't renamed it in this case). The UI Name is the name that appears in the Game Manager and so could be "Octo's Balance Mod" or anything like that.
Pipeline.ini
Open up the pipeline.ini file with a simple text editor. Scroll down and you will see this at the bottom:
Code:[project:my_mod] Description = Your Super Duper Mod Name! DataSource = ModTools\DataSrc\My_Mod DataIntermediate = ModTools\DataInt\My_Mod DataGeneric = ModTools\DataGeneric\My_Mod DataBurn = My_Mod DataFinal = My_Mod\Data DataExtra = LocaleFolder = My_Mod\Locale\English Parent = DXP2 DataSourceShared = ModTools\DataSrc\My_Mod DataPreview = AttrLoc =
Before editing this you will need to come out of it, right-click on it and get Properties up, then uncheck the read-only box, otherwise you won't be able to save it when yo've edited it.
Copy this chunk of text and then paste it on the bottom. On this second copy change all instances of My_Mod to your mod name. The bottom will now look like this:
Code:[project:my_mod] Description = Your Super Duper Mod Name! DataSource = ModTools\DataSrc\My_Mod DataIntermediate = ModTools\DataInt\My_Mod DataGeneric = ModTools\DataGeneric\My_Mod DataBurn = My_Mod DataFinal = My_Mod\Data DataExtra = LocaleFolder = My_Mod\Locale\English Parent = DXP2 DataSourceShared = ModTools\DataSrc\My_Mod DataPreview = AttrLoc = [project:NewMod] Description = Your New Mod DataSource = ModTools\DataSrc\NewMod DataIntermediate = ModTools\DataInt\NewMod DataGeneric = ModTools\DataGeneric\NewMod DataBurn = NewMod DataFinal = NewMod\Data DataExtra = LocaleFolder = NewMod\Locale\English Parent = DXP2 DataSourceShared = ModTools\DataSrc\NewMod DataPreview = AttrLoc =
Now save this.
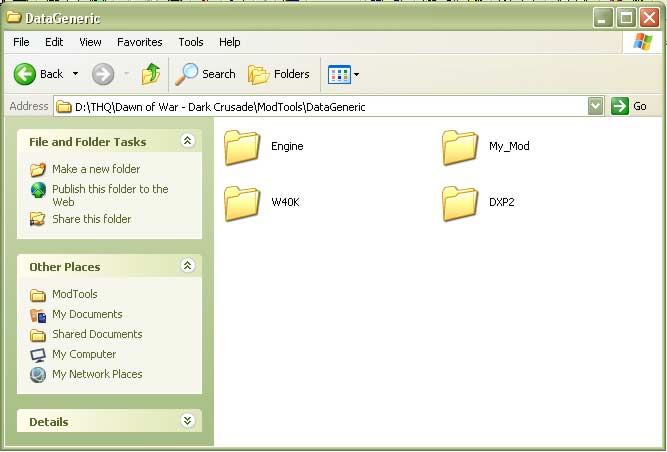
Now open up the ModTools folder that's in the DOW folder. Then open up the DataGeneric folder. It should look like this:Click this bar to view the original image of 667x452px.
Copy the My_Mod folder (again, unmodified at this point) and paste in the same location. Rename this folder to the name of your mod as before.
Your mod is now set up.
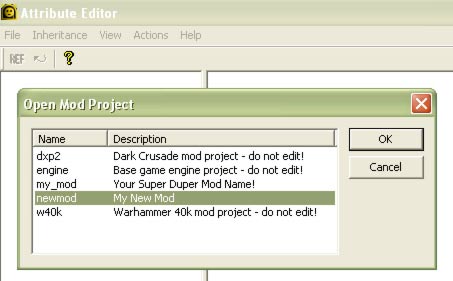
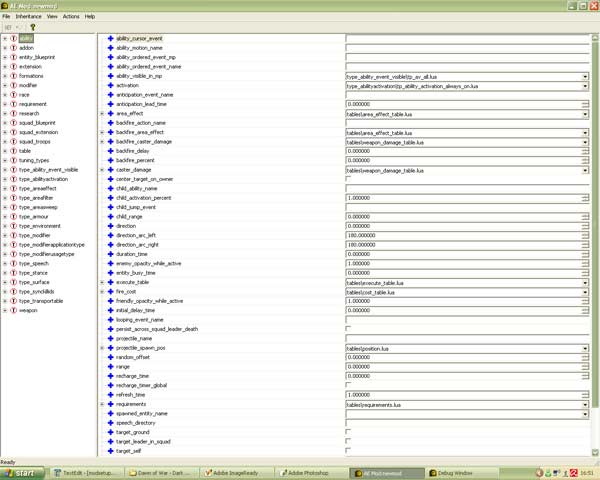
Go to the start menu and open the Attribute Editor (AE). Two windows will open: one is a debug window that you can ignore for now, the other is the main window. Go to File then Open Mod Project.
Select your mod, click OK and another small window will appear. This is for choosing alternate data sets; you don't need this right now, just select none then press OK and go get a coffee. WARNING: Depending on your computer the AE will take in the region of 15 minutes to load. Your PC will grind to a halt and the AE will say Not Responding, but it is really working away. The reason for this is that the AE has to open several thousand text files at the same time. If you want it to open fast then get some RAM. I had 1Gb of RAM and it would take up to 15 minutes to load. Now I have 3Gb of RAM and it takes less than a minute to open.
Edit: you may find that the AE seems to close once it's loaded and you can't open it (it disappears off the taskbar at the bottom). Don't worry, open up the task manager (CTRL + ALT + DEL) and you can switch to it in there. It is still running, it's just hiding!
Eventually it will finish opening and you should get a screen like this.
Now you can edit attributes.
Try something simple: here I have expanded the trees until I have reached the scout squad. See picture.
I have changed unit_min from 2 to 3. This means that the Scout will spawn with three units (and will also cost more as squad cost is definte by unit cost multiplied number of units). It's important to know how to test things in a simple way. This test is visually very obvious and will not take long to test as Scouts are the first unit available. If you alter Terminators then you will have to get to T3 to test them which can be very time consuming. Now open the File menu and "Save Binary". This will take quite a while as before. It will prompt you with a box asking about PerForce - just click OK on this.
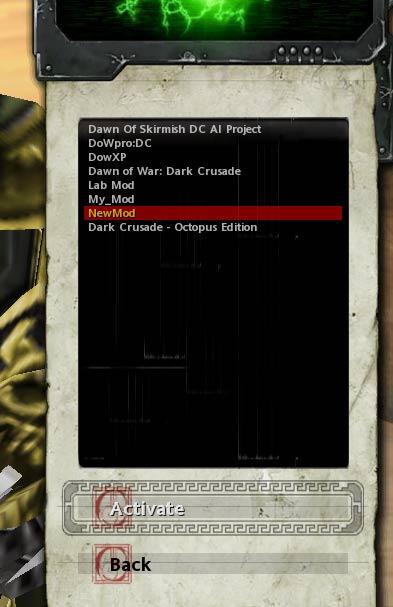
Now open up Relic DC, go into the Game Manager which is on the Main Opening Screen Menu. Select your mod and press Activate, this will restart the game.
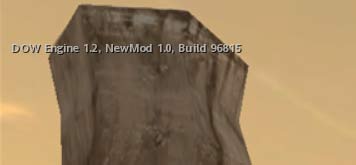
Note that the top left corner will have your mod name in it.
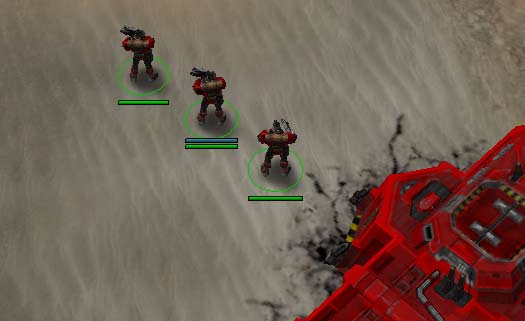
And here we have a Scout Squad spawning with three members.
Note for FinalDeath - I've compressed the images and put a thumbnail in there for the biggest one so none of them are very big. Do I need anymore thumbs or is it okay as it is? Only imgaeshack is poo and it kills the flow of the tutorial.


This comment is currently awaiting admin approval, join now to view.