Original tutorial created by Octopus Rex on Relicnews.
Hex Editing: Duplicating Models + Terminator Sergeants
postcontent wrote: Rating: Rookie to Competent modders
Duplicating a model to use as a variation in the game.
Okay, so I don't have 3DS max, but I want to create some variations on existing models using different skins. How can I do this as I can only have one skin applying to each model?
Also, this method applies when using a model from another race without changing them at all eg using Grey Knights with Imperial Guard. If you just use the model as it is (in the old races folder) and remove it from the build options on the old race you will most likely get team-colour bleed, where the wrong team colours appear. It is also not enough to simply copy the model and textures into the new races folder, you need to duplicate the modele properly including the file paths in the same way as I will describe here.
Here we will learn how create Terminator Sergeants by cloning the Terminators and using an edited skin for them.
Tools you will need:
Relic ModTools - specifically the Attribute Editor and the ModPackager
A hex editor - I use this one: it's simple and free Chmaas.handshake.de
***It is assumed that you know how to setup a mod and how to operate and setup the Attribute Editor****
To edit the skin you will also need:
Graphics editing package such as Photoshop or The Gimp
IBBoard's texture tool - Skins.hiveworldterra.co.uk
***It is assumed that you can edit textures already***
Extract the files
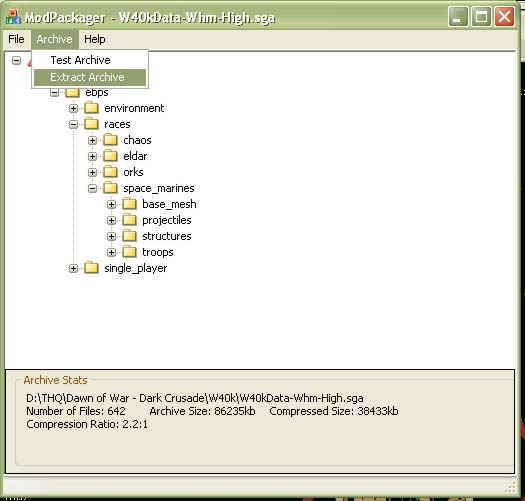
First you need to extract - dark crusade\w40k\W40kdata-whm-high.sga and dark crusade\w40k\W40kdata-sharedtextures-full.sga using the ModPackager that comes with the Relic ModTools. I find it best to extract them to a separate folder, but that's personal preference. Open the packager, then locate the correct .sga archives and extract the whole thing to a folder of your choice.
Fig 1 - the Mod Packager in action.
From these extractions you then need to find/get hold of:
terminator.whm, terminator.whe (found in art\ebps\races\space_marines\troops in wmh-high)
terminator_unit.rsh, terminator_unit_default.wtp (found in art\ebps\races\space_marines\texture_share in shared textures)
Found 'em? Ok, leave them alone for a second. (There's a shed load of .rtx files in there too for the termies, but leave them for now.)
Recreate the Structure
Now setup an exact copy of the folder structure in your mod's NewMod\Data folder, though some of the work is done for you already.
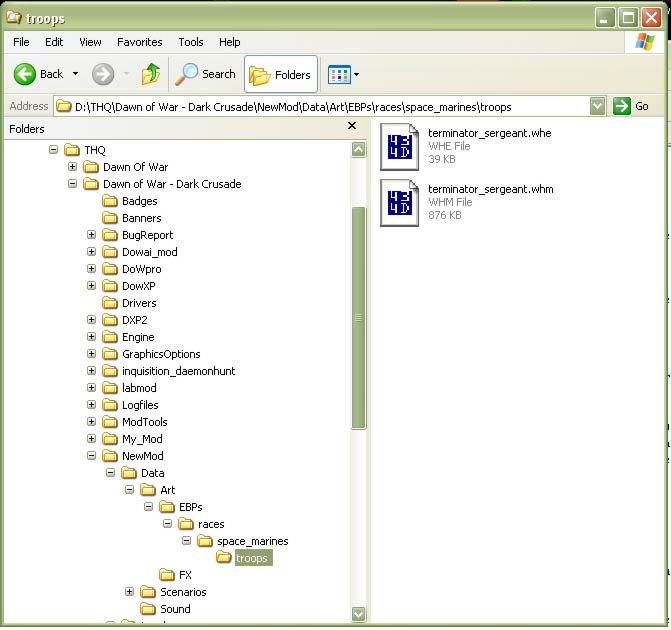
Okay, copy into your mod folder tree and rename the termy model (the pair of files .whe and .whm) to an appropriate name eg terminator_sergeant.whe and terminator_sergeant.whm. It is important that both the names are the same, except for the file extension.Click this bar to view the original image of 671x630px.
Fig 2 - note the structure of the folder tree.
Now you need to recreate the folder tree in the same way for the texture files, although you will find that most of it is exactly the same as the last one, so really you will only need to add a "texture_share" folder alongside the troops folder.
Fig 3 - more folders
Rename the Textures
Now copy and rename the texture files too but make sure the names are OF THE SAME LENGTH IN CHARACTERS AS THEY PREVIOUSLY WERE!! That's very important. Also, they must have the same name, except for the word "_default" on the end of the .wtp.
Fig 4 - name your textures files carefully
So, I have chosen to change terminator_unit for term_sergt_unit, but terminator_serg or termie_sgt_unit would do too. Notice how all of them are 15 characters long - whatever length they started at they must stay at (except for the "_default" already mentioned).
Hex Editing
Now, you need the edit the binary code so that the model now looks for the new textures when it wants skins, as so far you've only renamed it, which will not affect it at all.
The .whm file points to the .rsh file which points to .wtp file. The .rsh isn't really used, it is almost always overridden by the .wtp or .rtx, but there are instances (eg Toth the Inquistor) where the .rsh is used. All that needs to happen is for the .wtp to have that "_default" stuck on the end and it will override the .rsh when present.
Okay, go back to your whm and open it with the Hex Editor.
Now you need to find all the instances that point to the old .rsh file and change them to point to the new one.
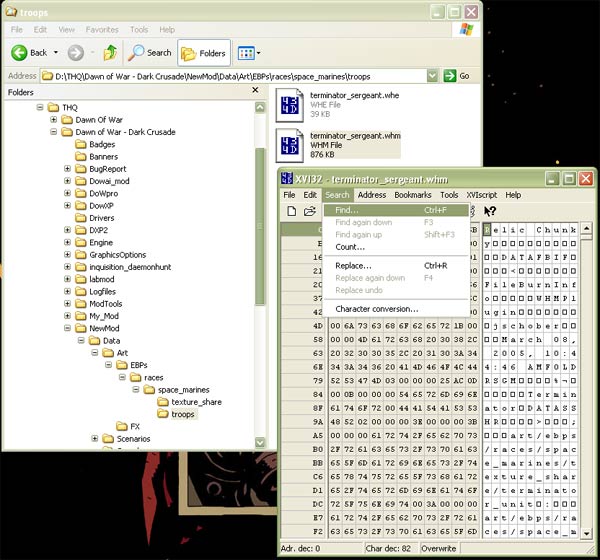
Fig 5 - hex-editing the whm
Using the find function convert the word terminator_unit to hex and then find and edit all the times that appears to your new .rsh name (term_sergt_unit in this case). Don't use the delete key as removing letters will change length, simply overwrite each time and start again if you mess it up (quit without saving). There was eight instances of "terminator_unit" and I changed them all. It may be a different amount for different models, I'm not sure, so just keep going!!! Save the hex edited file when you are done.
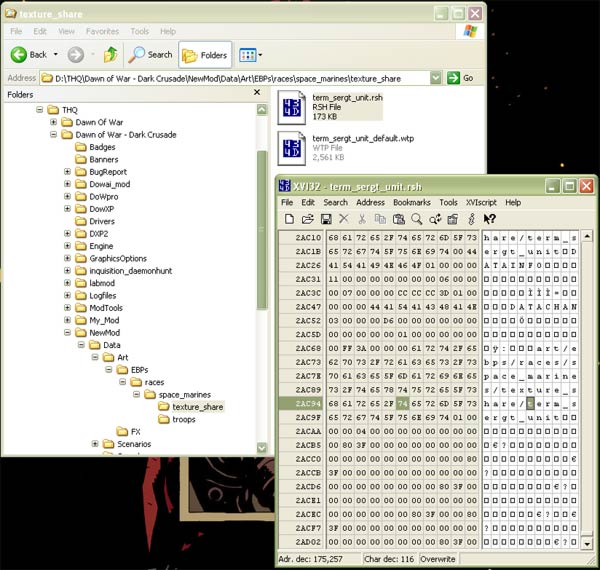
Now we need to do the same thing with the .rsh. There was four instances of "terminator_unit" in the .rsh. Save the hex edited file.
Fig 6 - hex-editing the rsh
Right, now you're done hex editing.
The Rest
Now you need to add him into the AE. I'll assume that you can use the AE already as this tutorial is not for that. Remember: to add a new lua right click (on the lua you want to copy), add new subtype, right click on the new one, edit metadata, change nothing, OK, the Save (not binary) THEN you can edit it. (phew!)
Fig 7 -thumbnail of AE entry for EBPS
I've copied the normal terminator, got rid of his upgrades weapons and given him more HP. Make sure you edit the entity_blueprint_ext to link it to the new model (use the new model name, without whe or whm). I haven't given the sergeant rally ability, I think I'll give him something more interesting some other time. I've also assigned a custom terminator sergeant icon for him (not covered in this tutorial). Don't for get to do the UCS tooltips as well.
Remember to edit the SBPS too, add the leader_ext and stick the serg in there.
Lastly, you need to actually edit your texture to what you want (if you want it to be different) using the aforementioned tools. I assume you can do this, there's plenty of tutorials if you can't. Then you're done!
Fig 8 -Woo-hoo! A simple termy serg (ok, so no fancy models but it's fun and useful for your owns mods! - stop complaining)
Also - because I'm a nice guy, if you don't know how to edit textures or use graphics stuff yet here's a download with an edited texture and a terminator sergeant icon pair. You have to put these in the right place and rename etc. yourself though, this is a tutorial after all!Mods.octopusrex.co.uk
Note: RTX files - these are needed if you plan to use them in the campaign or if you turn team-colours off. I don't bother with these mostly, as it's just too much hassle for something I'm never going to use, but it's up to you and depends on the mods function.


Yea, I knew the piece of info I had forgotten/missed was in this very tutorial!
I remember this fondly.
In my latest mod project I forgot to edit the .rsh
BUT, now, thanks to you, I have team colourable new units!!! Yar!!
tytyty