Episodes From Liberty City HD Real Weapon Icons Mod
Made with EFLC Game Patch Version v1.1.2.0
Do It Yourself Version.
This mod will not prevent you from playing Multi-Player Mode!
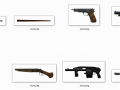
This mod will allow you to change your default weapon icons to a high quality actual picture of all weapons.
Step #1: Download the latest version of "SparkIV EFLC" from here: Code.google.com
Extract it to a folder somewhere.
Step #2: Go into your EFLC\pc\models\cdimages\ folder & save a copy of "weapons.img" for a backup.
Save the copy somewhere you will remember just incase you need to revert to the original file.
Step #3: Go into your EFLC\TBoGT\pc\models\cdimages\ folder & save a copy of "weapons_e2.img" for a backup.
Save the copy somewhere you will remember just incase you need to revert to the original file.
Step #4: Go into your EFLC\TLAD\pc\models\cdimages\ folder & save a copy of "weapons_e1.img" for a backup.
Save the copy somewhere you will remember just incase you need to revert to the original file.
Step #5: Run SparkIV (EFLC), & Click the "Browse" button to load your GTA EFLC content. Now find "weapons.img"
in the dropdown menu on the left side. Its located at pc>models>cdimages. Click on cdimages to
select it & weapons.img should be in the list. Click to select weapons.img & click the button "Edit".
now scroll to the bottom & you will see files that have the same name as the folders containing the
icon files in this pack. Simply select the file named after the folder in "Main" that holds the icon & click
"Edit". (I usually start at the bottom with "w_uzi.wtd" & work my way to the top "rpg.wtd"), Click
"Import Texture" & overwrite the icon file with the new one I made. Click "Save and Close" in
the top right. Now click Save in the SparkIv EFLC - weapons.img window. Congrats you added your
first of the many icons to come. Repeat untill done & click "Rebuild" button & close.
Step #6: Now got to TBoGT>pc>models>cdimages in SparkIV & find the "weapons_e2.img" & do the same thing as above
but this time take the icons from the "TBoGT" folder in this pack.
Step #7: Now got to TLAD>pc>models>cdimages in SparkIV & find the "weapons_e1.img" & do the same thing as above
but this time take the icons from the "TLAD" folder in this pack.
Thats it, hope you found this usefull.
Made by: Lamron333
Questions, Comments &/or Requests please e-mail me at: lamron333@shaw.ca or Lamron333@live.com
Or add me in X-fire, Name: lamron333