By Yoshiyuki Watanabe
June 12, 2008 saw the simultaneous worldwide release of Metal Gear Solid 4: Guns of the Patriots (MGS4) for the PlayStation 3. Gamers all over the world were waiting eagerly for this ultimate stealth mission game.
No doubt they had already been captivated by its powerful gameplay.
MGS4 was a huge project that took Hideo Kojima, the virtuoso director, about three and a half years to complete. The Metal Gear series has been around for 21 years, with many people regarding it as a masterpiece in terms of its scenarios, gameplay and realism. Making a particular impact is its world-class graphics that go beyond the boundaries of a conventional game. These graphics give the action such realism and immediacy that players feel like they have been transported to a real battlefield.
The Metal Gear Solid series was created by Kojima Productions, a development unit at Konami Digital Entertainment. Kojima Productions has also given us popular series such as 'Zone of the Enders and Boktai: The Sun is in Your Hand'. The team has three directors: Hideo Kojima, Yoji Shinkawa and Shuyo Murata. There is a program manager, design manager, script manager and sound manager, as well as many other artists and programmers.
In the development of MGS4, about 100 staff were involved in the 3D content production. Extra personnel were added during busy periods, and by the final phase of development over 180 people were working on the project. By the end there were as many as 40 programmers working on MGS4, including the work required for online compatibility. MGS4 truly was a mega-project.
The main tool used in this game with its world-class video graphics was SOFTIMAGE|XSI. We interviewed the Kojima Productions team after they had finished development and as the release date for MGS4 was approaching. In this interview, we were lucky to be able to speak with staff from all the major development units, including characters, background, machines, 2D, event demos, motions and programing.
From a Single Storyboard...
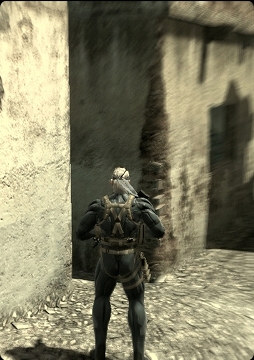
The MGS4 video was first previewed to the public in a trailer shown at the 2005 Tokyo Game Show. The main character, Snake, was shown looking around a wall in a ruined building. From this single storyboard, the whole project started. After four months, the team finished a spectacular trailer that was over 10 minutes long and made a huge impression around the world.
This high quality video that made such a strong impact fully utilized the real-time processing power of the PS3. To transfer this to the actual game without losing quality, it took a lot of effort from the team to import the data and create a proper balance. In the initial stages of the project, they were still getting used to the performance of the PS3, and there were no precedents to any of the work they were doing. The data size required for the content was much bigger than anything that had come before.
Art Direction in Metal Gear Solid
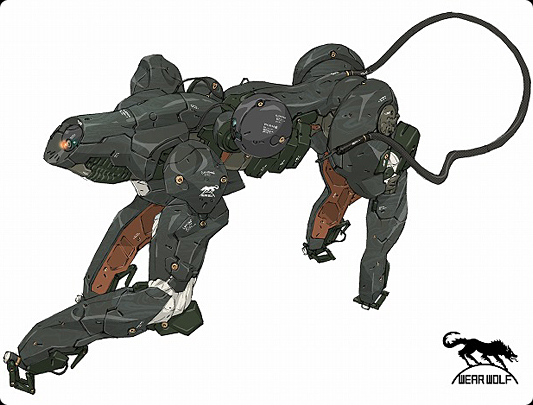
Like the previous titles in the series, Yoji Shinkawa was in charge of art direction for all the character and machine designs in MGS4. In this game, the most important consideration was whether the design would pull the player into the game. It didn't matter whether it was expressed through an exaggerated effect or through a conventional illustration.
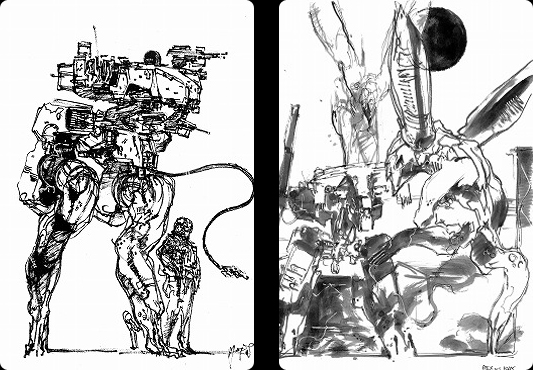
Mr. Shinkawa starts his design process by using a brush to make a drawing. The resulting design is a black and white image drawn in Mr. Shinkawa's distinctive brush style. Then, one of a number of different methods is selected to embody the black and white image. The original picture may be touched up, it may be transferred to a 3D figure, or if the design is complicated, it may be modeled out of clay.
In this way, the team developed a more concrete design from the original image, which they then used as a reference when modeling with XSI. For machines modeled from clay and some of the characters, they used 3D data obtained from image-based modeling. The team then imported the data into XSI for editing.
It is also possible to use 3D scanning to create 3D data. But because the scanned data requires a lot of modeling correction work, the team decided not to use this method. They said that using the calibration method results in less correction work and that it was relatively easy to import accurate image data into XSI. The calibration workflow is described in more detail using images later of this article.
Yoji Shinkawa's design workflow
In the design process, Mr. Shinkawa also selected all the color designs. He said that even when he was drawing the original pictures in black ink, he could see in his head the types of colors that he would use for the characters. He made his final selection after all the characters were ready, choosing colors that would achieve a good overall balance. He reproduced textures such as material colors, metallic expressions and complex patterns using the real-time shader. The textures that Mr. Shinkawa wanted were created one after another by programers using the real-time shader. Sometimes he would show a prototype that he created in advance with a mental ray shader to share his ideas on texture with the programers.
Many characters from previous titles in the series reappear in MGS4, which makes the fans very happy. But there were some characters that were being depicted in 3D for the first time, such as Naomi, who appeared in MGS1. The team worked hard to create attractive 3D characters that would not disappoint the hardcore fans of the series.
Mr. Shinkawa said, "When we first started to develop the Metal Gear Solid series, we just wanted to make a war game that we ourselves would really want to play. The fact that the series grew into one that is played by so many people is thanks to our loyal users. We are confident that MGS4 will live up to the expectations of these fans. But we are never satisfied with the way things are. We always want to work harder to push our creative abilities to the limit and create even better games in the future."
Character Production Workflow
Most of the characters that are animated on the console, including the main character, Snake, have been restricted to a data size (including the face model) of about 5,000 to 10,000 polygons. Further, characters are used that have the same polygon resolution in both the game action and the event demos. This means that the game screens and video clips are seamlessly connected, making it easier for players to become emotionally involved.
As mentioned above, with the exception of crowds, characters are used that have the same polygon resolution in both the game action and the event demos. Separate from the resolution model used on the console, high-rez data are also simultaneously modeled for generating the normal map. Details such as creases on clothes are then expressed with the normal map that was generated from the high-res model.
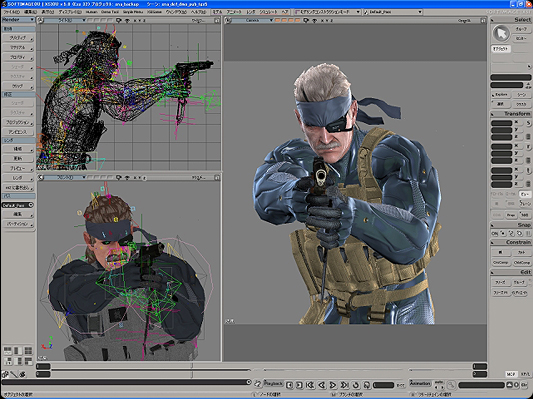
In terms of bones used for constructing the bodies of characters, about 21 joint bones were used that contained animation data and were activated through these data. But many auxiliary bones were also used to supplement movements such as the twisting of knees, elbows, legs and arms. These were not activated by animation data. Rather, they were linked to the values of the basic joints that were activated by animation.
The team used these specifications not only on XSI, but also on the console. They could perform the same control on the console simply by outputting an auxiliary bone definition file from XSI.
Because the auxiliary bones themselves do not contain motion data, the data size can be kept to a low level. Further, if auxiliary bones need to be added or deleted, the operation can be performed simply by changing the model data without having to reconvert the motion data.
Gator: An Essential Function
To ensure top quality in game development, repeated specification changes cannot be avoided. In response to this issue, the team frequently used the Gator function in their character production workflow. Often, they wanted to extract just one attribute from a specific model, or they wanted to reuse an attribute from a past model. For example, due to unavoidable circumstances, sometimes complex UV information must be rejected after creation. Gator is perfect when you want to reuse such painstakingly-created UV information. Although the topology and number of polygons will be different, the data can be reused on models with a similar shape.
To give another example, creating UV information for high-res models involves a lot of work. Using Gator reduces this work by a significant amount. You can even transfer UV information from a low polygon model with a completely different polygon count to a high-res model. The UV information is interpolated before being transferred. In MGS4, the main character, Snake, has about 10 different clothes patterns, including camouflage and costumes. Instead of performing envelope settings for these clothes on a case-by-case basis, the team could instantaneously transfer the character's existing envelope information just by clicking a button in Gator.
As an aside, the team mentioned that just one month before they were due to finish the project, they started work on Assassin's Solid, a collaboration between Ubisoft's Assassin's Creed and MGS4. Obviously, it was going to be difficult in terms of scheduling to complete such a novel idea in the final stages of the MGS4 project. But coincidentally, both Altair and Snake, the main characters in the two games, have bodies that are very similar in terms of limb length and body size. Because of this, they could use Gator to assign Snake's rig structure to Altair's model.
Their effective use of Gator enabled them to place Altair in the runtime battle scenes in MGS4 even though they had such limited time. This collaboration broke down barriers between game companies and made a big impression on the public. It also brought great publicity benefits.
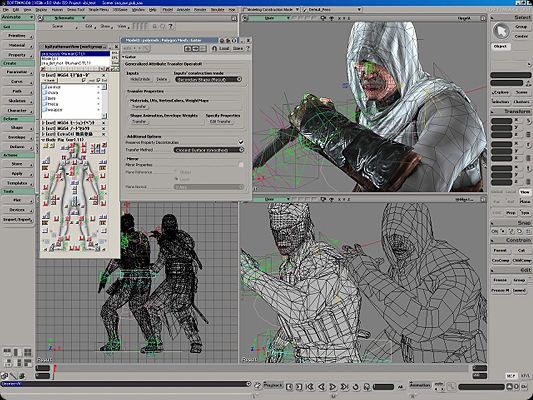
Operation Video of Efficient Rig Setup Using Gator
This video shows that with XSI's Gator, it was easy to reuse Snake's existing envelope for Altair. The Altair character is the model data received as-is from Ubisoft: modeling correction was not performed. This is a vivid operation video that shows how the setup was performed in an efficient and rational way.
Youtube.com
Amazing Facial Animation
Because lip synch work is performed in the localization stage, and to lessen work loads, audio analysis animation is used in the Metal Gear Solid series. For example, in MGS4, lip synching in the English and Japanese versions was performed using different types of audio analysis software. Emotions and facial expressions other than lip synching were added through manual animation. In most cases, facial expressions and phoneme elements do not interfere with each other, so both can be worked on in parallel. It was this that allowed the simultaneous worldwide release of the title.
When performing audio analysis, the facial expression components (such as anger or laughter) and the phoneme components in each language must be divided into separate parameters. These must then be reproduced as rig behavior. Although it is possible to create parameters for bone rotation and movement, the team said that this would make the rig too complicated and make it too difficult to predict bone changes as an whole. In other words, there would have been two problems had they tried to perform facial animation using bone control only: it would have been difficult for the designer to perform intuitive operations, and difficult to create facial expression and phoneme parameters for bone behavior.
On the other hand, while shape animation has the disadvantage of producing linear interpolation animation, it is very easy to create parameters for phonemes and facial expressions.
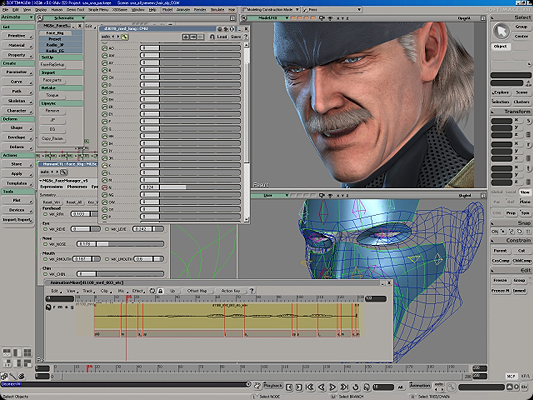
Flow for Facial Rig Construction
1. Low polygon model activated with shape animation
2. Bones fixed on top
3. Enveloped polygon meshes for these bones
4. Tangent color
5. OpenGL display (wrinkles also expressed with a normal map)
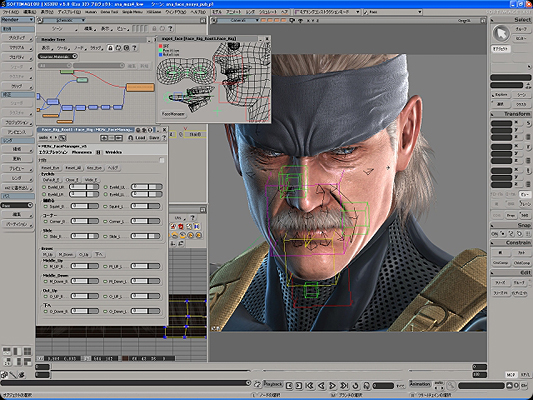
Expressions, phonemes, eyes (and eyebrows) and shader wrinkle animation can be selected using the tabs.
The team created rich and varied facial expressions by using a large number of different parameter combinations.
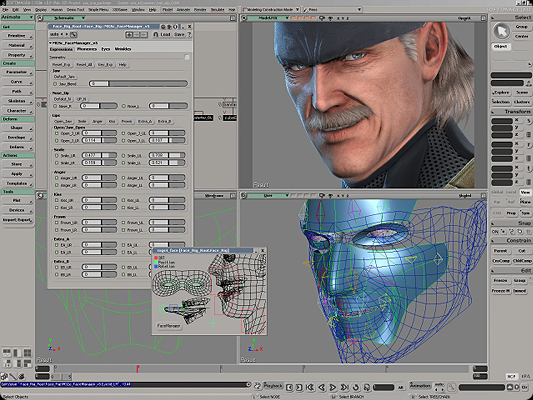
Surprisingly, the team even developed a tool for the automatic creation of setups for facial rigs that were capable of this kind of advanced control. In their system, they prepared face model data and executed the tool to automatically identify the optimum bone positions. The tool also created controls that included preset parameters for expressions such as laughing or angry faces. To perform automatic facial rigging, it was first necessary to make sure that the topology information for facial data was uniform. Setup was fully automated just by observing this rule. Then, all that was required to construct an environment in which facial animation could be performed was fine-tuning of the control by the designer.
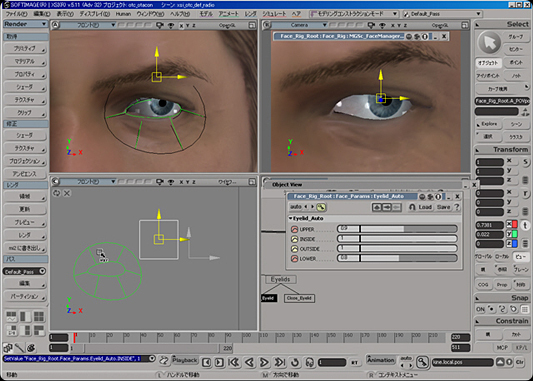
They also used a tool to automatically generate the rig for controlling eyeball movement and the muscles around the eyes. Because the area around the eyes is also controlled using both shapes and bones, when the eyeball locator is moved, the muscles move smoothly just like they do for the mouth. Further, even if the shape is edited to redefine the eye edges, it does not spoil the blinking or brow furrow expressions at all. It took these setup techniques and efficiency quality improvements to create the memorable game characters that appeal so much to players.
High-Quality Normal Maps Generated with Ultimapper
Textures such as defuse maps, normal maps and incidence color maps were used for the face models. With incidence, shading is determined not by light and normal lines, but by cameras and normal lines. By making the outline part brighter, they could depict a softer texture.
Surprisingly, the entire texture size for characters was kept to a resolution of 512×512, to restrict the amount of VRAM that is used. This is a relatively low resolution for a next-generation console. In the initial stages, since they were designing for the next-generation PS3, they used larger data. But after a while they reassessed whether they actually needed the volume of information that they were using. The result was that they decided to use their wide-ranging expertise and techniques to produce high quality at a lower resolution. As one example, for limb and body material, they used two symmetric materials for the left and right that could be reversed in a U direction. Although the portrayal suffers to a very small degree by dividing the material into two, the resulting memory that is freed up is a major advantage.

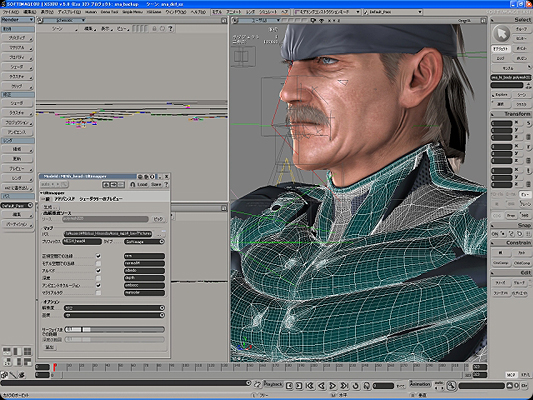
The 512 size was not exceptional for normal maps either. The team imported into XSI a face model to which details of about 500,000 polygons had been added with ZBrush. From this, they generated a normal map with Ultimapper. Hideki Sasaki said that to obtain the maximum effect at a low resolution, it was essential to raise the quality of high-res models. He said that if work is performed carefully using XSI's modeling function and subdivision surface, it should be possible to achieve sufficient quality even at low resolution. To ensure that the normal map data generated with Ultimapper did not lose information through compression when output as game data, they were extremely careful when outputting the data from their own normal map editing software.
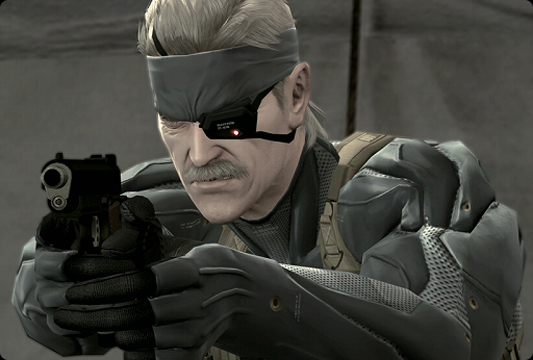
So how did they express the wrinkles on Snake's face? They used a technique that blended two normal maps; one with wrinkles and one without. The team also used this animation with blended normal map values in other facial animation work. It is surprising how many techniques the team used to delete data so that the processing load would not destroy the balance of the game. Snake has visibly aged in this game as compared with previous titles: the work described above shows how much effort was put into creating this new look.
XSI's Cluster Constraint Function: Turning Ideas into Reality
When we asked Mr. Sasaki which functions benefited the project, he gave an unexpected response. "There were many, but I found cluster constraint extremely useful for animation." Even in the facial rig setup, he used cluster constraint to fix each point cluster of the shape target to the bones. Also, he said that his team used cluster constraint in the following situations. To minimize processing in MGS4, they used a specification where the tangent color on the console only changes when bones are rotated. If they were fixed just to coordinates, the animation behavior would be correct but the tangent color would not change. In other words, the shading would not change from the default condition. In response to this issue, the team used cluster constraint to fix normal maps and tangents. By doing this, they could input an accurate rotation value to the bone and reproduce correct shading.
Further, shaking items attached to the characters' clothes were mostly expressed in both the game action and the event demos with simulations on the console. However, there were also some event demo scenes with extreme action where simulation control was difficult. In these cases, they used animation that was simulated with XSI's Syflex. The flow for the main operations in this process was as follows.
1. Run a simulation with Syflex to depict the shaking of the clothes.
2. Convert the cached simulation results as a shape target.
3. Use cluster constraint control to fix the bone to the point group of the object that was controlled with the shape.
4. Perform bone envelope control for the actual model to be used on the console. (The concept is the same as for the facial rig.)
The advantage of this control is that if there were slight deformations or defects in the simulation results, they could add an editing stage using "Secondary Shape Mode" to step 2. They could edit the shape form with apex movements, or make images smoother with smoothing or push operations. Naturally, the results of these intuitive corrections were then reflected in the envelope control console data.
Mr. Sasaki explained, "Cluster constraint can be set for all kinds of components, such as apexes, polygons and edges. The fact that the fixing function is available as standard even for normal maps and tangents is typical of the rich features of XSI. If it wasn't for the excellent functionality of cluster constraint, we could not have achieved our facial rig setup ideas or our technique for transferring cross-simulation to bones."
XSI Animation
Just the event demo videos in MGS4 are nine hours long. Players can enjoy the longest-ever real-time movie clips used in a game, which are more than three times longer than a Hollywood blockbuster. Even so, some scenes were cut out to maintain the tempo, so the pacing of the video is quite fast.
The team used motion capture for the movement of the characters in the event demos. But for the other motions in the game action, the motion team manually added movements. They focused on how they thought a man of Snake's age should move. Manual animation is also indispensable because of the flexible specification changes that it allows. The total number of motions is 1,700 just for Snake and 4,800 for enemies (such as regular PMC or militia soldiers). And when including the boss characters and facial animation, the total number of motions in the game is about 10,800.
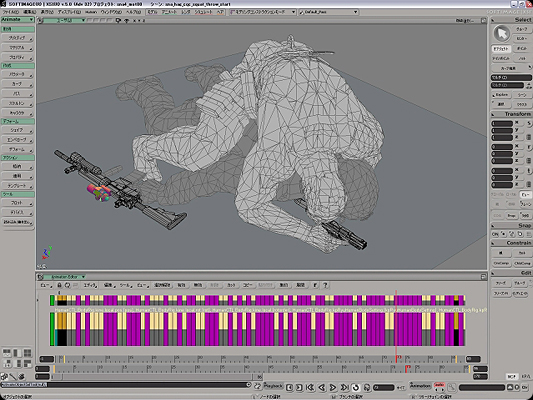
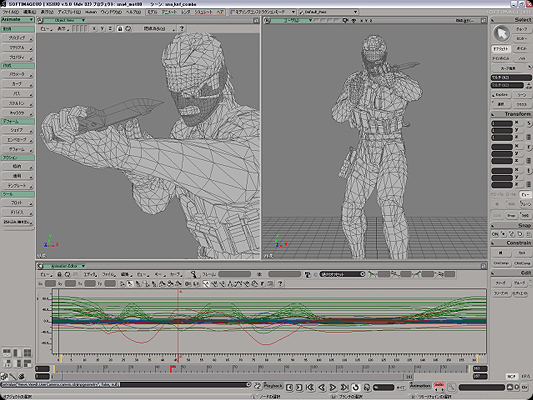
The motion manager, Masahiro Yoshinaga, had the following to say about the superior qualities of the XSI animation environment. "I started out in cell animation, so I like to think about the image frame by frame when adding animation. The animation FCurve is easy to manipulate in XSI, and you can finely control partial motions exactly as you want without destroying the original movement. Also, the high-speed animation playback environment made it easy for us to check the motion before outputting it to the console."
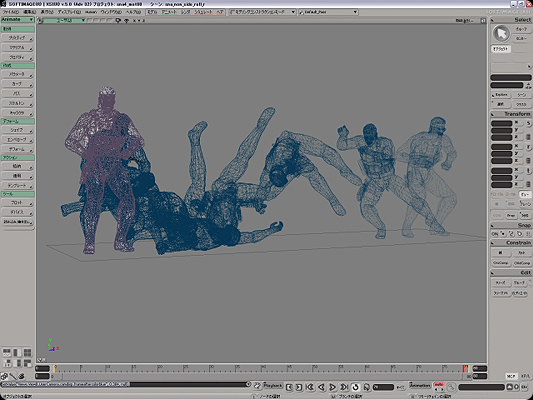
When creating body motions and facial animation, the team needed to create a number of motion variations based on a reference motion. If the reference was a motion pause or facial, they used animation mixer clips so that the expression presettings were saved in a library to make them easier to use. They then imported these presettings, applied the basic facial expressions, and added more detail. Mr. Yoshinaga said that effectively utilizing the animation mixer in this way enabled them to perform efficient work preparations.
During the game action, Snake goes through many different motions such as standing up, bending over and holding a gun. Snake needed to be able to hold a gun during all these movements. However, creating motion patterns for each of the different gun shapes was not realistic. Instead, first they created motion categories for weapons that had similar shapes, and set information about where the hand held the gun, known as "connect points", to each weapon. Then, the programmers performed a process that aligned the hand positions, which automatically linked the weapons with the motions and made the motions compatible with different weapon variations.
Modeling Size
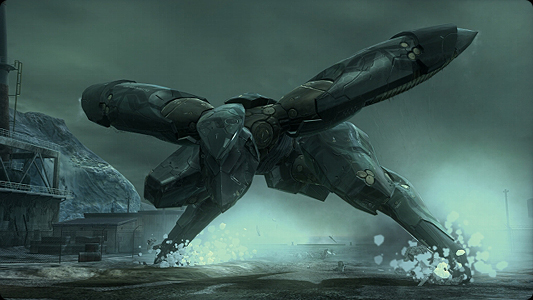
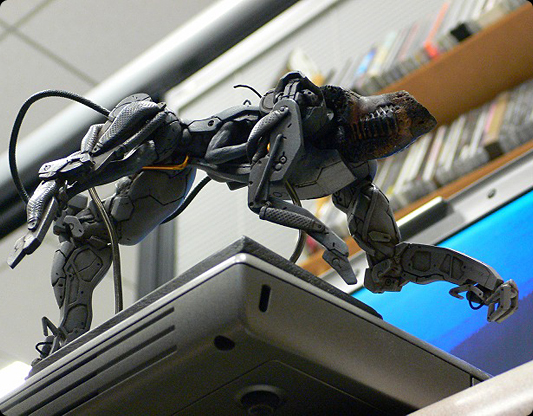
In MGS4, there are many guns, items and machines that have non-human shapes. The production direction for these machines was performed by Keiichi Umatate.

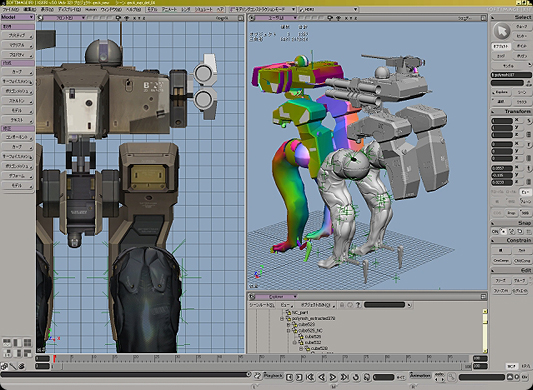
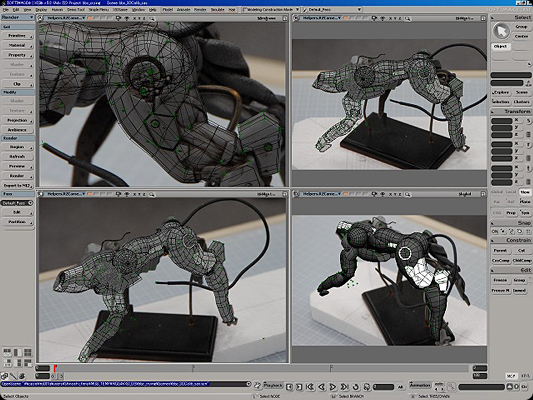
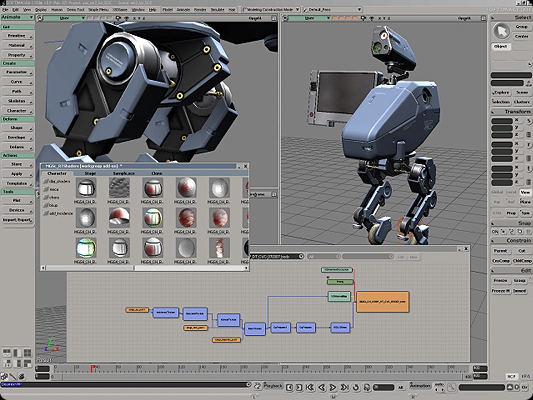
Modeling work screen for the Gekko machine model

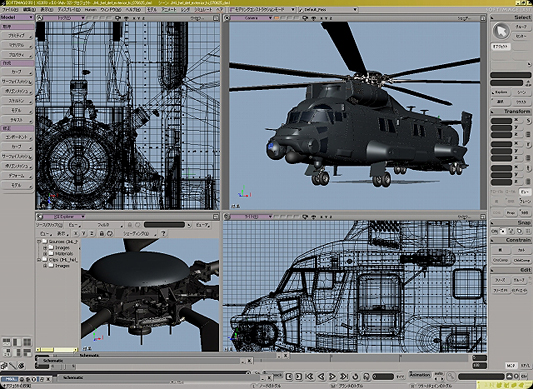
Large machine model with fine details
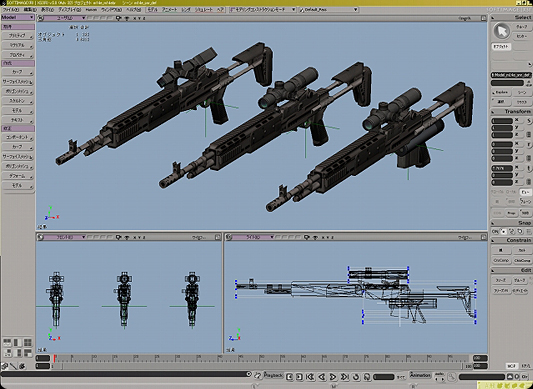
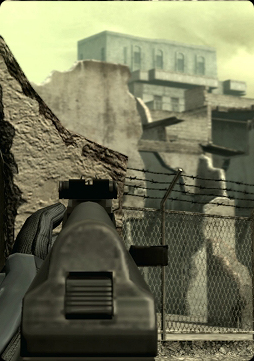
In the same way as character production, the team produced the machines by obtaining a high-res model for a normal map from a low-res model. Further, because all gun types supported LOD in runtime, they also created an LOD model for changing guns. There were over 70 gun types, with multiple LOD models for each type. Including the custom parts, quite a large amount of data needed to be prepared just for the guns. The gun is always at its most visible when the player switches to first-person shooter mode during the game, though the player might not even notice it. The team took these factors into account and put a significant amount of effort into the modeling.
The design and size of machine model data such as guns and cars were completely different. There were few cases where existing data could be reused, so the team was always dealing with the issue of data size.
Texture Setting for General Machines

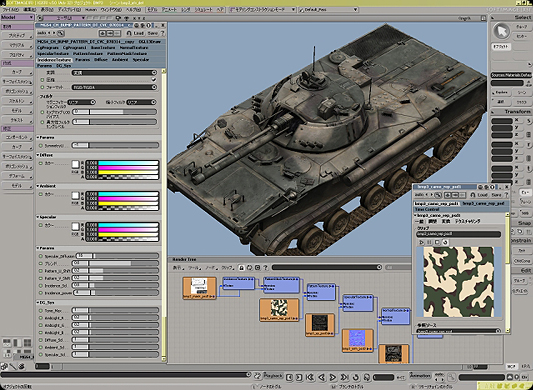
The shader used for the battle helicopter had basic specular control and incidence parameters. You can see in the render screen the texture structure that was used.
The maps that were applied were defuse, normal, specular, specular gradation and incidence mask. Note that to lessen the image calculation load, the same UV value was shared between them all.
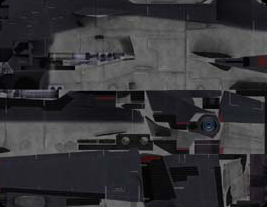
Defuse Map: Created based on the ambient occlusion obtained with Ultimapper and by adding condition information obtained with the render map. In addition to basic color tones, weathering and dirt is written onto the defuse map.
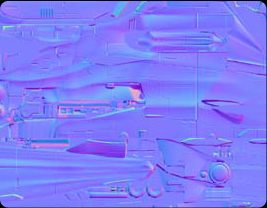
Normal Map: The normal map obtained with Ultimapper. Because this information is linked to the tangent colors of the model mesh, for the most part intermediate image editing is not performed for this mapping. In this image, you can check whether the bump map that was set in a high polygon model was also baked into the normal map.
Incidence Control Map: The incidence is masked and applied based on this map. For example, the inside of the air intake or cockpit parts are filled in with black and masked. Tinting is also possible to update the color and apply the incidence. In this example, an expression is used that reflects the blue of the sky
Specular Map: Created while imagining how light reflects when it hits metal. The areas that shine brighter are made whiter. You can darken the areas that you do not want to shine. Writing fine scratches that are difficult to express in the normal map onto the specular map is effective because the fine scratches react only to the areas that are hit by light.

Specular Gradation Map: Gradation for specular control. Redness is added in consideration of the reflection on this black battle helicopter. By adding contrast to the gradations for reflections, a more complex expression is achieved.
Modeling Using Calibration
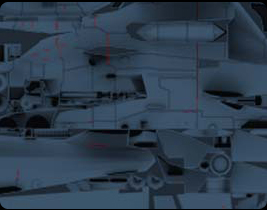
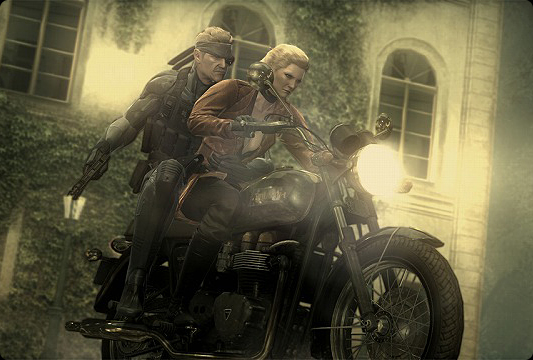
Bonneville T100 is a motorcycle made by the illustrious British manufacturer, Triumph. It also appears in the game. To create the data for this motorcycle, the team performed modeling using calibration (image-based modeling).
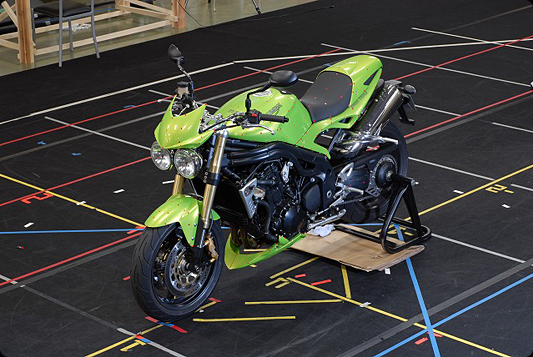
The team attached measurement markers on a motorcycle that they borrowed from Triumph. They took 16 photographs at 45-degree intervals in a concentric pattern. At the same time, the sound team recorded live-action engine, switch and starter motor sounds.
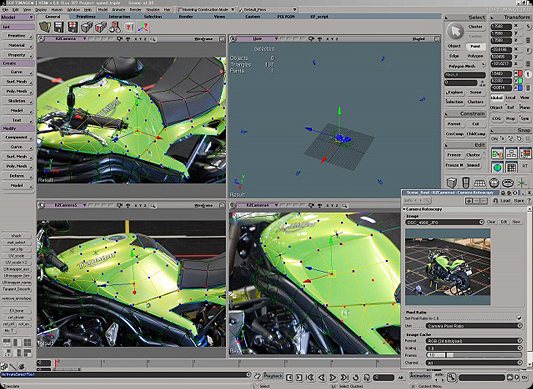
They used the image modeler to import the locator and camera information from the created data into XSI. For the imported camera information, they rotoscoped the same image as was used in the image modeler. Whether or not each camera position fully matched the model could also be checked from the image.![]()
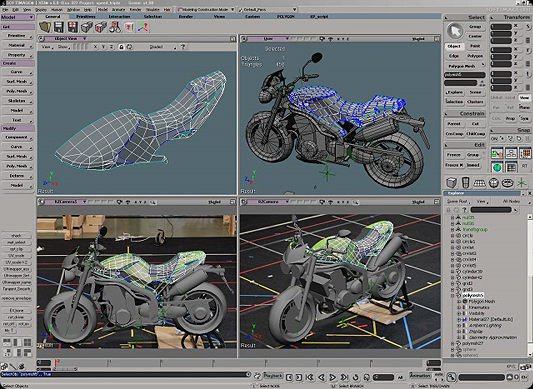
After setting the rotoscope, the team performed the modeling work. Because the camera position for each image was accurate, they were able to identify accurate positions. This enabled them to produce high quality models in a short period of time
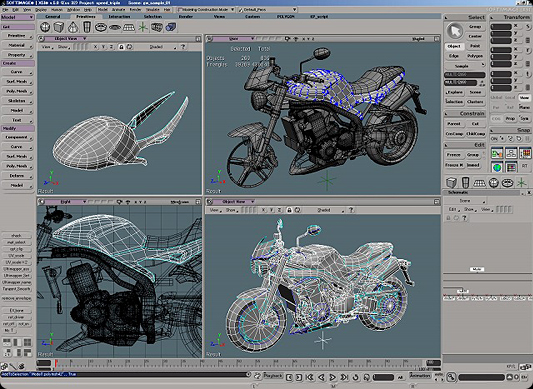
To express detail, they also modeled high resolution models for normal maps.
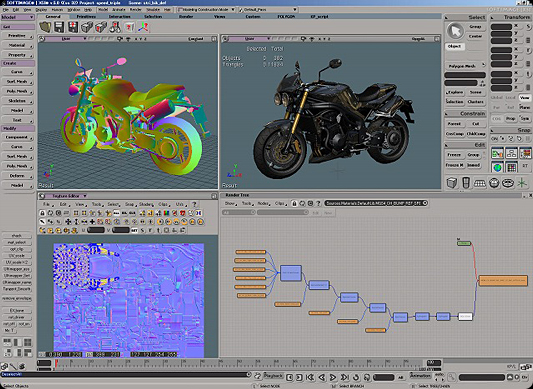
They used Ultimapper to create various textures from baked images. They then finished the data by performing settings for the real-time shader.
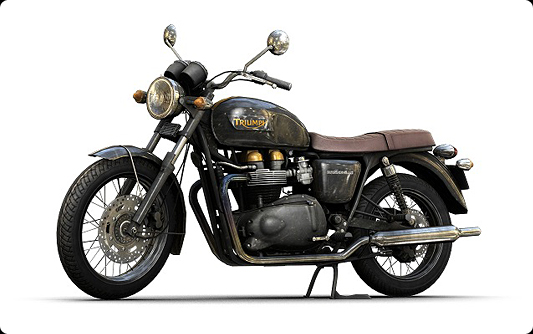
In this way, the team modeled the Bonneville in the game based on the calibration data.
They modeled most of the other machines and items based on setting documents, using the XSI functions and working step-by-step. But also, because the gun textures vary according to reflections, they designed their own real-time shader especially for guns, to make it easy to perform specula gradation control.
Mr. Umatate had the following to say about modeling with XSI. "I think that XSI's modeling function is highly compatible with the production process for normal maps, which are essential for next-generation consoles. Often we created a low resolution model and then used the subdivision surface to create a high resolution model. In this process, modeling with XSI was intuitive and efficient. Thanks to the XSI's non-destructive environment for data, we could perform trial and error operations to improve quality until we were satisfied with the results."
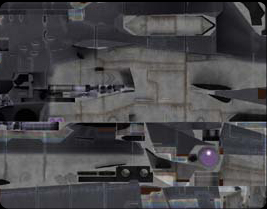
Background Modeling Process
At the beginning of the project, staff from the background group went to various locations both inside and outside Japan to shoot materials. In March 2006 they went to Morocco, in April they went to Peru and in June they went to Prague in the Czech Republic. In Japan, they shot photographs of steelworks and of giant flood containment silos under Tokyo. With these shots, the team wanted to capture the atmosphere and details of their surroundings, but they also wanted to use the photographs as materials and for creating texture. As such, they took over 35,000 photographs.
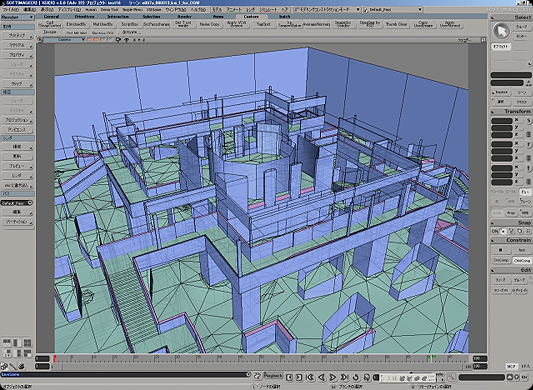
The background modeling process was as follows. First, the script group in charge of the map design created the rough model data. The data were given to Mineshi Kimura and Yutaka Negishi, who developed realistic data by correcting any parts that were structurally or pictorially inappropriate. They returned this concept model to the script group, who checked the game balance. Then, the team performed the actual modeling editing and material setting, and set the collision information. This brought the data close to completion.
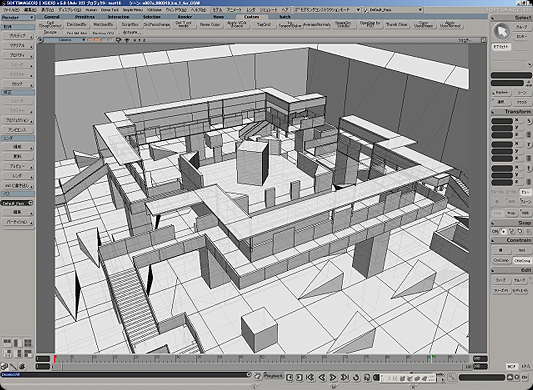
Background data in the concept map stage that was submitted from the script group.
![]()
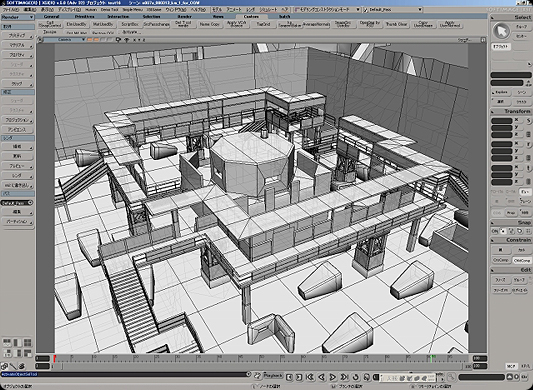 Background data with initial stage corrections added by the background group.
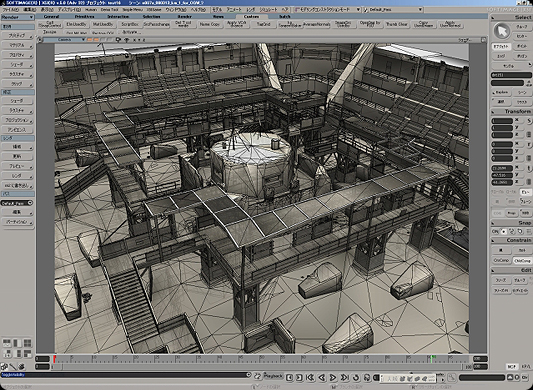
The final modeling stage. Texture setting and detailed modeling is performed in parallel.
Collision model data. These are quite rough data that are used as reference for players, enemies, animals or vehicles.
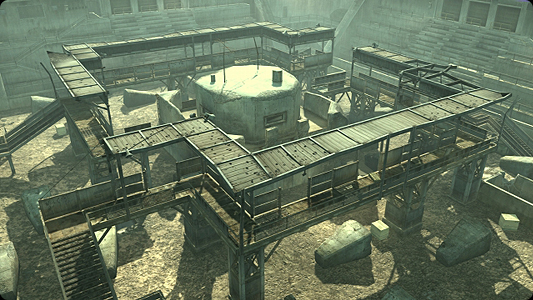
The final image on the PS3.
The team did not use LOD for the background data. They made partial use of LOD only for large volumes of trees or grass. 150,000 to 200,000 polygons were imported into the PS3 in each load. If the data exceeded 200,000, they were divided into separate loads.
Even when a low number of objects was expected in a scene, sometimes there were more than 5,000 objects, and sometimes the number approached 10,000. The team used XSI's NetView to manage such large numbers of objects. First, they created a management page for a small object list. Small objects registered on this page, such as bottles, frames and potted plants, could be easily positioned just by dragging and dropping them to the XSI background data.
A wide variety of attribute information was set for the objects that appear in the game. For example, objects for when guns are shot, sound effects when something is hit, physical properties, and OctoCamo information (changes that camouflage Snake's suit as he creeps alongside a wall). These attributes were easy to define on XSI by giving them names. The team added a Null inside the object node and then set the name, such as IRON_*** or WOOD_***. When these data were output to the game, the various reactions that were specified by the attribute information were shown.
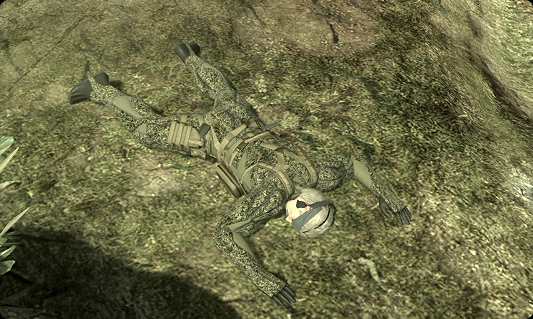
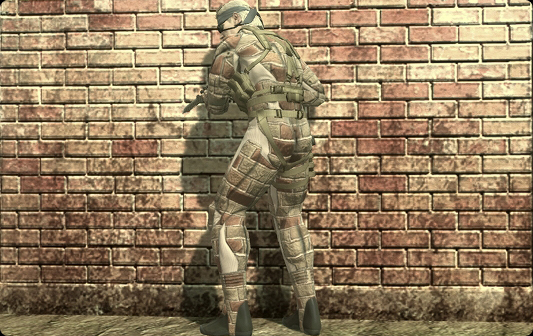
Example of OctoCamo changes
The team performed the advance baking of apex colors and light maps with XSI's render map. In general, they used Final Gathering to bake rough shading into the apex color. However, in the case of light maps, after significantly compressing the texture volume, this technique is not required in areas where the shadow buffer is active. The shadow buffer can be used much more in the PS3 than in previous consoles, so the background shadows and character shadows can co-exist in a non-destructive way. For this reason, in most cases real-time processing is used for shadows.
But in the shade, the normal map is less effective than in sunny areas. Another issue is that second and third order light expressions are also required, which the shadow buffer cannot keep up with. In response, the team set data known as LSC data to supplement the lighting texture. LSC data stores light positions and brightness information in an external file, which can then be used on the console. They performed the lighting settings by importing the background created with XSI into a lighting editor, an in-house tool that displays a preview that is almost the same as the image on the console. After adding colors and accents in a way similar to painting, they could perform a rough preview even while in the OpenGL condition. They could also perform quick and accurate previews on the console by compiling from the lighting editor.
In addition to lighting for these background models, the team also performed lighting for the characters. They set the point light sources and environmental lights to suit the atmosphere and colors of the background. After finishing this, the final job was to perform the settings for the OctoCamo. The game is notable for how the light intensity changes in different situations, such as for camouflage, in direct sun, in the shade and when light bulbs are broken.
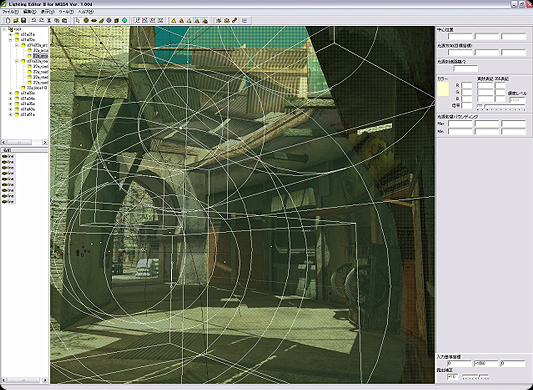
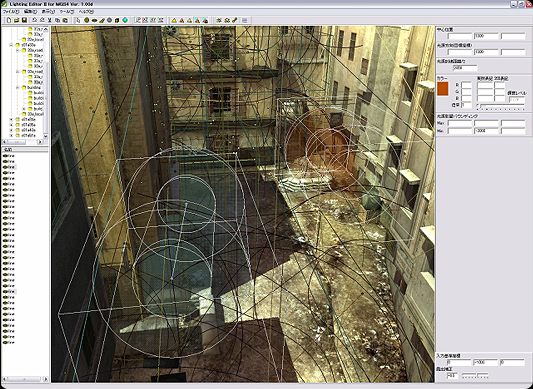

Work screens in the lighting editor
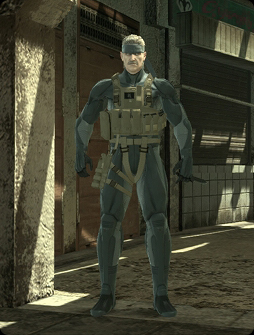
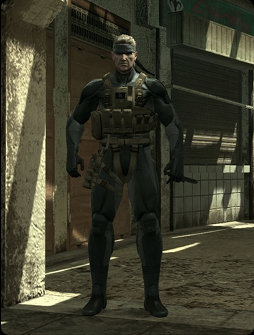
Comparison of lighting effects on a character (The left image is before lighting and the right image is after lighting)
Role of Programmers
Most of the programmers in MGS4 performed programming work related to game processing, while at the same time developing in-house tools to support production. They developed a wide variety of tools to make work easier for the designers. These tools include the previously mentioned lighting editor, a preview environment with the same quality as the console, and their own particle engine and particle editor. Kunio Takabe explained that turning the environments, expressions and request items that the designers ask for into reality is an important role for the programmers. This means that good communication and mutual understanding is very important.
Effects used in the game, such as depth of field, dust clouds, snow and camera blur, were also developed by the programmers. The team performed actual lens simulations for the fuzziness in the depth of field to accurately calculate the focal length, angle of view and F value. But in some scenes, if the accuracy was too good it created problems in the display. In such cases they used the old depth of field effect, which designers have used for many years to control the fuzziness.

The image on the left does not have camera blur while the image on the right does.

The image on the left does not have the depth of field effect while the image on the right does.
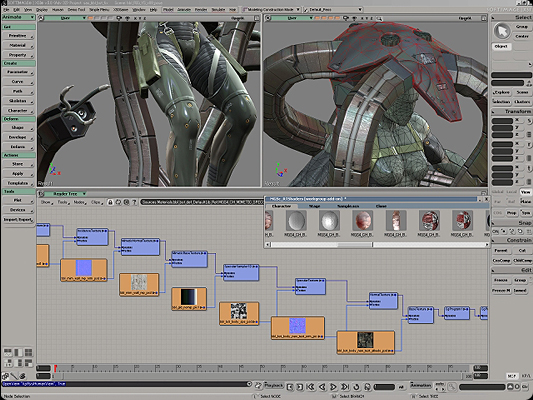
Since this project was for the next-generation console, a programmer dedicated to real-time shader production was also attached to the team. They used a real-time shader based on the cg language, because it can be used in both PS3 and XSI. The real-time shader work was started after the programmers submitted the basic shader. The team added functions and variations as required. By the end of the project they had developed over 150 different shaders, for characters, background and machines. For example, a derived shader was developed for expressing dirt (such as mud, blood or water) on a body. Further, by finely controlling dirt in apex units, the team achieved highly realistic expressions. A derived shader was also developed for Snake's OctoCamo, which was described earlier.
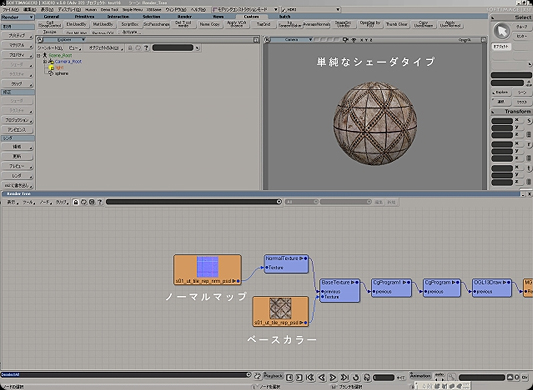
The simplest shader construction with a relatively light processing load.
Only base color and normal textures are used. In addition, apex colors are used within the shader.
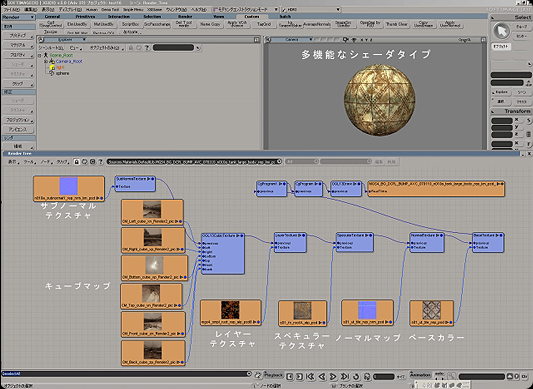
A shader construction with quite a lot of functions and a heavy processing load.
Because layers can be used, a second normal map called the subnormal can be used in combination with the first. It is a multifunctional shader that can also apply cube maps. The textures that are used are the base color, layers, normal, subnormal and specular.![]()
Real-time shaders that were set for machines and characters.
![]()
In real-time shader development, one problem was expressing water and the sea. The team developed seven or eight shaders just for water through a process of trial and error. These included shaders for murky water, swirling water and transparent water. Real-time shaders were also used for debugging. For example, by assigning a special shader, they could check in a preview whether any tangent baking had been forgotten.
Finally
Starting with Hideo Kojima himself, the MGS team directors perform strict quality checks. They make no compromises. For example, during production they made four changes just to Snake's face. Of course, since this was performed not in pre-rendering but in real-time processing, there was a risk that specification changes could impact the game system itself. But every team member was determined to raise quality with as many improvements as were possible in terms of time and technology.
Yuji Korekado, the program unit manager, described how they work together. "Instead of creating things systematically, Kojima Productions is more like a gathering of craftsmen who are dedicated to their work. Of course, we use a whole variety of techniques to produce better products, but in the final analysis, we produce our best results when the spirit and courage of our team members come together."
Of course, gamers have a very high expectation of the Metal Gear Solid series, which is so popular all over the world. All the team members knew it was their mission to produce a superb product and could feel the pressure to take the game to the next level. But everyone, both at Konami and at their partner companies, was very enthusiastic about MGS and highly motivated right up to the end of production. It was this that made the project such a success.
Looking back over the project, Mr. Negishi gave us the following final words. "All MGS4 staff members are confident that this is an excellent game that they can send out with pride to fans around the world. I think that being blessed with such an excellent staff was the most important factor in the project's success. But I also think that choosing XSI for the development of this next-generation title, which involves such high quality images and large data sizes, may have been a factor in our success. The flexible and robust XSI architecture, which supports as many quality improvements as time allows, is really wonderful. Useful functions such as Gator and the superior animation editing environment also significantly reduced the amount of work required in development."

The team at Kojima Productions, Konami Digital Entertainment
Yutaka Negishi, Design Unit Manager
Yoji Shinkawa, Art Direction Manager
Keiichi Umatate, Gun, Item and Machine Production Manager
Hideki Sasaki, Character Facial Setup Manager
Masahiro Yoshinaga, Motion ManagerMineshi Kimura, Background Production Manager
Takahiro Omori, 2D Production Manager
Masaya Kobayashi, Event Demo Manager
Kunio Takabe, Program Unit Technical Director
Yuji Korekado, Program Unit Manager
© 1987-2008 Konami Digital Entertainment Co., Ltd.
PlayStation and PS3 are registered trademarks of Sony Computer Entertainment Inc.
© Copyright Triumph Motorcycles 2008
"epic" is not enough to describe these great developers..
This comment is currently awaiting admin approval, join now to view.