[page=Introduction]
$589.99 is certainly a large fee for any piece of software. Even if you can afford it will you want to put down that much cash for one program. To all who can't/don't wish to spend the cash on Adobe Photoshop, do not worry, there is a free alternative. It's called The GIMP or just GIMP it carries almost as much power as Photoshop, but unfortunately often scares newcomers off due to it's lack of user friendliness. Don't worry though, a bit of reading will get you using GIMP in no time.
This is a quick guide to the basic tools of GIMP and their purposes.
[page=Tools]

This is the main tool box carrying all the common tools of GIMP. It will usually start on the right side of your screen, but it can be moved as to not block the image you are working on. Below I will provide a brief explanation of the various tools.

Selection Tools
- Rectangular Selection - For selecting rectangular areas.
- Circular Selection - For selecting circular areas.
- Lasso Selection - For selecting user defined areas.
- Color Selection - Selects all areas of a user defined color.
- Shape Selection - Selects a shape based on user defined points.

Various Common Tools
- Path Creator - Similar to the shape selector, but with more features.
- Eyedropper - Set color of clicked area as foreground color.
- Zoom - Zoom in and out of the canvas.
- Measure - Measures distance and angles.
- Move - Move the selection or entire layer.
- Resizer - Crop or scale the image
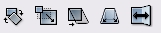
Scaling tools
These tools allow you to scale and rotate your canvas in various ways. I will not explain them now since they see little use for a beginner.

Fill Tools
- Paint Bucket - Fills canvas with foreground color.
- Gradient - Fills canvas with a color gradient.
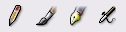
Drawing Tools
- Pencil - Draws hard edged brush strokes.
- Brush - Draws fuzzy brush strokes.
- Airbrush - Draws brush strokes with variable pressures.
- Pen - Draws brush strokes with realistic ink effect.

Eraser - Erase from specific layer or selection

Text - Write with choosen font, size, ect.
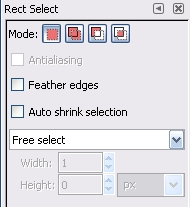
This is the tool info box. It is located under the tool selection area. Here you will be able to adjust the options for your tools. Depending on which tool you have selected, different options will come up.
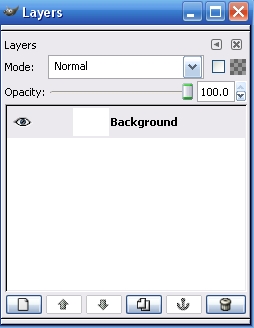
Layers are essentialy sperate canvases on top of eachother. They can be manipulated without effecting the other layers. So, I might have one layer with a background and another layer on top of it with a tree. I could then edit the tree without worrying about messing up the background.
Hit the icon in the lower left corner to create a new layer.
[page=Conclusion]
That is all for now. I hope this tutorial helped you get started with GIMP, and look foward to more updates to this tutorial.
UPDATE 3/26/07: The second part of this introduction is soon to be released.
Thank you for reading,
Salohcin
I cant wait until you post more! GIMP is such a confusing program!
Hard to learn, easy to master :D
GIMP rules. I got a fantastic new spray for cs now! Thanks for introducing me 2 it and hope u can bring out further help. Great work!
Where can i download it at?? i really am interestied in it... but i dont exactly get how to get it in the first place i just signed up so im still new to this whole site
Gimp.org
Any tips on working with the zoom? I really miss my scroll wheel zooming when I use GIMP.
use Control+scroll wheel.
GIMP is easily the best alternative to Photoshop, been using it for few months now and despite a few draw backs it practically can do what Photoshop does albeit requiring a bit of "know-how".
there is another free program called paint.net. Is this as good as gimp? they claim to have the same functionallity as CS2
Is he going to release the rest of this tutorial? I wish there was some sort of guide to GIMP or some sort of Manual. The original manual the creators of GIMP made was so confusing.