Augustin-Jean Fresnel was a French guy that explored physics & optical lenses and such to help the world accept the light wave theory (where light travels in waves). His explorations led to equations to help understand how light works by refracting, reflecting and amplifying / dampening on and through surfaces. For instance, he invented the Fresnel Lens which has circular ridges to refract and amplify light to create very effect spotlights. They were used in lighthouses to keep ships from crashing into shores during fog and night.
His equations turned into white papers on how to simulate Fresnel in computer graphics.
So, basically, he was a scientific bad-a**.
Ok, but what is Fresnel?
The main Fresnel equation used in computer graphics is how light interacts, reflects & refracts on and through surfaces. For instance, when you view an object directly, it's lit. But, when you angle the object more parallel to your viewing angle it seems to get brighter. Maybe slightly, maybe more. If the surface is rippled, the peaks of areas that fold over creating angles more parallel to your viewing angle seem to get highlighted a bit more.
If it's a reflective surface, the more parallel you get to the surface the more environment reflection you see off the top. As opposed to looking down more perpendicular to the water, you see through the water more. (This is reflection vs. transmission of light in water).
Non-transparent surfaces also have Fresnel. Usually, the material impacted messes with how the Frensel highlights the surface. But, even using a generic Frensel, you can end up with interesting highlights.
The red-shaded areas are Fresnel highlighting surfaces as their angles become more parallel to your viewing angle.
Stumbling Across Fresnel
In FUEL, Fresnel was mainly used to blend reflective textures to diffuse / colors. For instance, there was a variable called "fresnel" in the water shaders used to blend the reflective surface of water to the water color. As the water undulates (simulated by the normal map), the reflective surface reflects more or less depending on what curve of the wave it's on.
As you work on code, you just naturally start to pattern-match code, because you're trying to see if you can chuck code into sub-routines you can call to prevent having to bloat up your code with redundancy.
So, after cleaning things up, I started noticing the fresnel-like algorithm was used on reflective chrome / clear coats on vehicles to blend with their base coat / color. So, I renamed it to "fresnel", too, and created a small fresnel sub-routine for water and vehicles.
Then I stumbled across the velour highlighting function Asobo coded in an unused function. I used it to switch shadow highlights from reflections (which made things look wet) to soft velour (which made things look hazy and blended nicer with the scene). Then I realized it was actually the Fresnel function again, but with a different power for the pow().
This Fresnel stuff seemed to show up in various places, and created interesting results. So, I started digging into articles on Fresnel. I came across ones like this by Kyle Halladay, which helped explain what Fresnel is in computer graphics, and how to code it.
Understanding the Frensel Equation
For the code snippets in this article, I'll refer to the standardized variable names Asobo created in FUEL. But, here's a key to understand what I'm referring to if you're used to using other terminology:
- normal = N = your normal map texture
- eyevec = I = Incidence Vector = Viewing Angle/Direction
- sunvec = L = Light Vector = Light Direction
Let's look at our basic lighting function first, so we can then see how the Fresnel differs. We get the normal map and the light direction to determine what sides of objects are lit and unlit.
- sundot = NdotL = dot( normal, sunvec )
We then multiply that by the sun color to determine how the object is lit up:
- sun color * sundot
I wrote an article going into more detail on this. So, moving on to Fresnel, we use the NdotI; the normal by the viewing angle...
- eyedot = NdotI = dot( normal, eyevec )
Then we throw the eyedot through the start of the Fresnel equation...
- cosangle = 1 - eyedot
- fresnel = pow( cosangle, powamount )
I say the "start", because to complete the Fresnel, you usually run it through R0 modifications based on how much light can pass through and refract through a surface material.
- R0 = pow( 1 - refractionIndexRatio, 2.0f ) / pow( 1 + refractionIndexRatio, 2.0f )
If you've been following the coronavirus science, R0 = transmission rate; how many other people a person can spread the virus to. R0 = 3 means 1 person transmits to 3 others, which means exponential explosion of spread.
Getting back to the Fresnel, R0 is how much light transmits through a surface, and is calculated like this...
- R0 = pow( 1 - refractionIndexRatio, 2.0f ) / pow( 1 + refractionIndexRatio, 2.0f )
- fresnel = fresnel * ( 1.0 - R0 ) + R0
The Refraction Index Ratio is based on the material. For instance:
- Vacuum = 1
- Air = 1.000273
- Water = 1.333
- etc
You can google it to find a lot of science talk around this, but a Wikipedia article helps summarize it and also offers a nice index table for reference. (Spoiler Alert: we're not implementing RIR, so don't freak out.)
If we know the RIR of something, you can pre-calculate the R0 for the Fresnel equation to create an R0 lookup table. That's what Asobo did for water. I know, b/c I did the math...
- R0 = pow( 1 - 1.33, 2.0f ) / pow( 1 + 1.33, 2.0f )
- R0 = pow( 0.33, 2.0f ) / pow( 2.33, 2.0f )
- R0 = 0.020059312
When I used my R0 value vs. the one piped in from the game engine, I got the same results on the water.
So... a long-winded Fresnel equation can look like this...
- RIR = (whatever the value is for the material)
- R0 = pow( 1 - RIR, 2.0f ) / pow( 1 + RIR, 2.0f )
- eyedot = dot( normal, eyevec )
- cosangle = 1 - eyedot
- fresnel = pow( cosangle, powamount )
- fresnel = fresnel * ( 1.0 - R0 ) + R0
- fresnel *= (any modifier you want to apply for slight adjustment)
- fresnel = saturate( fresnel )
If you pre-calc the R0, it reduces to this...
- R0 = (whatever value you pre-calc'ed and pass in from a lookup table)
- eyedot = dot( normal, eyevec )
- cosangle = 1 - eyedot
- fresnel = pow( cosangle, powamount )
- fresnel = fresnel * ( 1.0 - R0 ) + R0
- fresnel *= (any modifier you want to apply for slight adjustment)
- fresnel = saturate( fresnel )
That's all fine and dandy, but the interesting part is.. you can get rid of the R0 if you don't know what it is, and still get good results. Because, what we're doing is just assuming we have an RIR of vacuum / air, which is 1...
- R0 = pow( 1 - 1, 2.0f ) / pow( 1 + 1, 2.0f )
- R0 = pow( 0, 2.0f ) / pow( 2, 2.0f )
- R0 = 0 / 4
- R0 = 0
Then you shove R0 of 0 into fresnel...
- fresnel = fresnel * ( 1 - R0 ) + R0
- fresnel = fresnel * ( 1 - 0 ) + 0
- fresnel = frensel * 1 + 0
- fresnel = fresnel + 0
- fresnel = fresnel
So, why does this matter? Because we can reduce the Fresnel equation down to it's basic components to add lighting highlights by assuming we're interacting with air instead of a material. This leaves us with...
- eyedot = dot( normal, eyevec )
- cosangle = 1 - eyedot
- fresnel = pow( cosangle, powamount )
Boom... basic Fresnel function. I removed the saturate() on it, because I actually use this as a pre-function for fresnel in FUEL that other more elaborate fresnels call and decide if they want to saturate() after doing further calculations on.
EG: for FUEL water, they add in the pre-calculated R0, so the HLSL code looks like this...
float Fresnel( float eyedotnormal, float powamount = 5 )
{
float	cosangle	= 1.0f - eyedotnormal;
float	fresnel = pow( cosangle, powamount );
return fresnel;
}

float FresnelWater( float eyedotnormal )
{
float fresnel = Fresnel( eyedotnormal );
float R0 = gWater.Settings1.w;
fresnel = fresnel * ( 1.0 - R0 ) + R0;
fresnel *= gWater.Settings2.y;
fresnel = saturate( fresnel );
return fresnel;
}
The eyedotnormal is created when my lighting routine does other light dots...
- float3 dots;
- dots.x = dot( eyevec, normal ) // eyedot
- dots.y = dot( sunvec, normal ) // sundot
- dots.z = dot( spcref, normal ) // spcdot // spcref = reflect( -eyevec, normal)
(NOTE: I try to stick with Nvidia's Cg/HLSL lit() function pattern, where .x = ambient dot, .y = sun dot, .z = spc dot, .w = not used. .x & .w are always returned as 1, so I only have lit return .yz for sun & spc dot treatment. I use the .y sundot for both sun and shadow colors in order for normal to look fine in shadows. So, I replace .x amb dot with eyedot to use for fresnels. I don't use .w, but I could load it with the dot( sunvec, eyevec) I use for sun-facing brightness later if I wanted to. We'll discuss sun-facing brightness later in this article.)
FresnelWater() calls the Fresnel() function to get the basic fresnel value, then runs it through R0 to modify it for water reflection interpolation / lerp'ing.
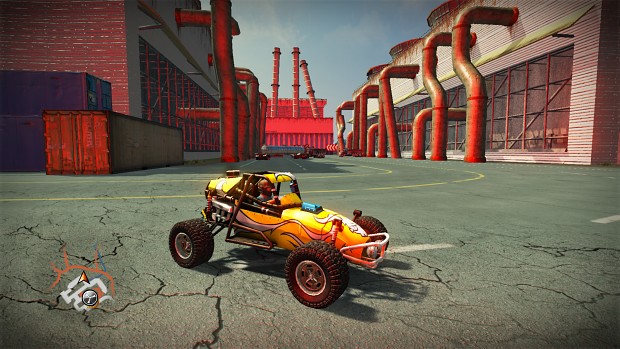
Vehicles run the Fresnel() through a min/max materials filter to create chrome and clear coats.
What's interesting to note is that Asobo used a pow amount of 5 for most everything. The velour highlight I found in their unused code was 3, but when I piped it through using default 5 it looks good, too. So, I just stuck with their default power amount of 5 for all Fresnel things in the shaders.
Fresnel All the Things!
By using the base Fresnel() formula, we can come up with an enhancement to light...
- light = sun color * sundot * shadow + shadow (sky) color * sundot + ambient color
- fresnel = Fresnel( eyedot ) // get base fresnel value
- fresnel = 1 + fresnel // turn it into a boosting multiplier
- light *= fresnel
What we did was create our main light value (sun + sky + amb), then "frost the tips" with a fresnel highlight. This simulates light intensity amplifying as the surface angle becomes more parallel to your viewing angle. On distant land, it makes it look like grass that's shining light off the tips more to create shiner edges on curves and such.
To test out our highlight, we can simply make the red channel of the light get impacted...
- light.r *= fresnel
So, we see our "frosted tips" fresnel highlights.
This adds more dimension to the landscape. So, as you're driving around, instead of noon-time hills looking flat, they now have some volume to them as the light varies as your viewing angle changes when going up and down hills, look around, etc.
Initially, I confined this to shadows. But, when I took the plunge to apply it to everything, it created a very nice impact.
Fresnel in shadows helps highlight the details of the landscape better.

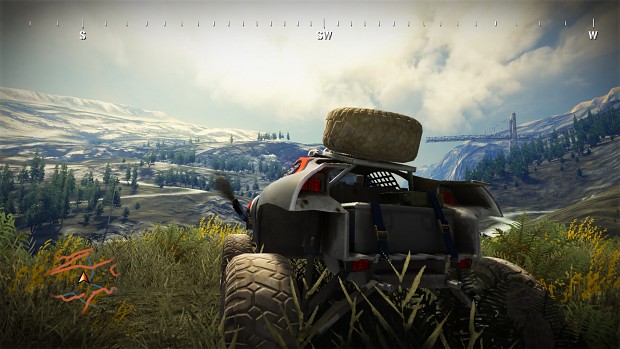
Fresnel on the landscape in the sun adds more contrast between dark dips and brighter cusps of curves. The grass in the mid-distance has lighter spots where the fresnel highlights. The Frensel also makes the tire textures pop a bit more.
But, why stop there?!
Spotlighting / Backlighting
After I slapped Fresnel highlights on everything, I then went "what would happen if I mess around with it for a bit?" So, I tried various changes... 1 - Fresnel, 1 / Fresnel, etc...
Then I stumbled across this...
- fresnel = Fresnel( 1 - eyedot )
Wait, wut? In the Fresnel() function, first thing we do is...
- cosangle = 1 - eyedot
So, if we call the function by sending it 1 - eyedot... we're essentially telling it to do...
- cosangle = 1 - ( 1 - eyedot ) = 2 - eyedot
What this does is skew the Fresnel to shine more the more perpendicular your view is to the surface instead of the more parallel your view is to the surface.
So, you get things like this...
The red-highlighted parts act like sunlight bouncing off surfaces and back towards the sun.. into the shadows.. and creating backlighting on things. The red highlighting has been boosted to demonstrate it in the image above. But, when we apply it to light.rgb...
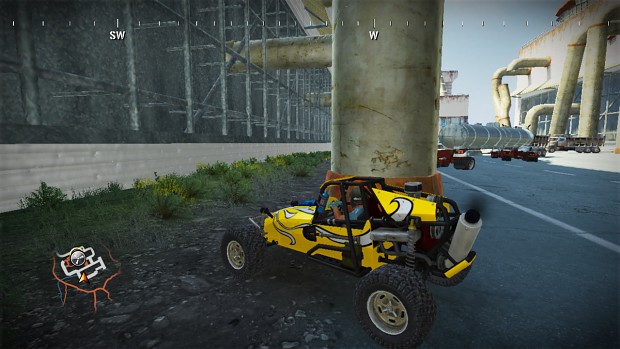
The left-hand highlight on the column is our normal eyedot fresnel enhancing the curve as it becomes more parallel to your viewing. But, the soft inner glow of the pipe is from a second Fresnel created using 1 - eyedot for a backlighting effect.
So, we have ...
- fresnel = 1 + Fresnel( eyedot )
- light *= fresnel
- backlight = 1 + Fresnel( 1 - eyedot )
- light *= backlight
The great part about the fresnel is that in some situations in the FUEL shaders, we already calculate it for reflection lerp'ing. So, I just use it for the extra fresnel highlighting. The backlighting is easy enough to calculate, because we already calculated the eyedot for fresnel, and now we're just re-purposing it.
But, wait.. there's MORE?!
Sun-Facing Brightness
So, we have all these dots...
- sundot = dot ( sunvec, normal )
- eyedot = dot( eyevec, normal )
- spcdot = dot( spcref, normal )
Hmmm... what would happen if we do this...?
- suneye = dot ( sunvec, eyevec )
- suneye = 1 + Fresnel( suneye )
- light *= suneye
The answer is this...
Oh dear god, what the hell?!
For starters, in the image I only multiplied the light's red channel, so I could see what it's impacting.
Also, let's break down what's happening.
We're getting a dot product of eye vector and sun vector, which means we're comparing a result of us (the camera) looking towards or away from the sun. Since the Fresnel function does 1 - suneye, it reverses it so the impact occurs towards the sun instead of away from it.
This simulates more light going into your eyes when you look towards the sun than away from it. Because when you look away from the sun, you see the light reflected back off things that's not absorbed. But, when you look towards the sun, you see the light reflected off things as well as light coming directly from the sun.
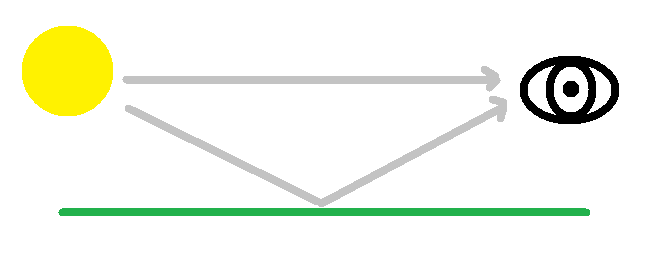
Looking towards sun, we get light bouncing off ground as well as direct light, so it's brighter.

Looking away from the sun, we just see the light bounced off of objects back towards us. So, not as bright.
It also simulates the earth having a massive sundot, where spots "under" the sun are brighter, and spots closer to the curvature of the earth away from the sun has the sunlight intensity drop off...
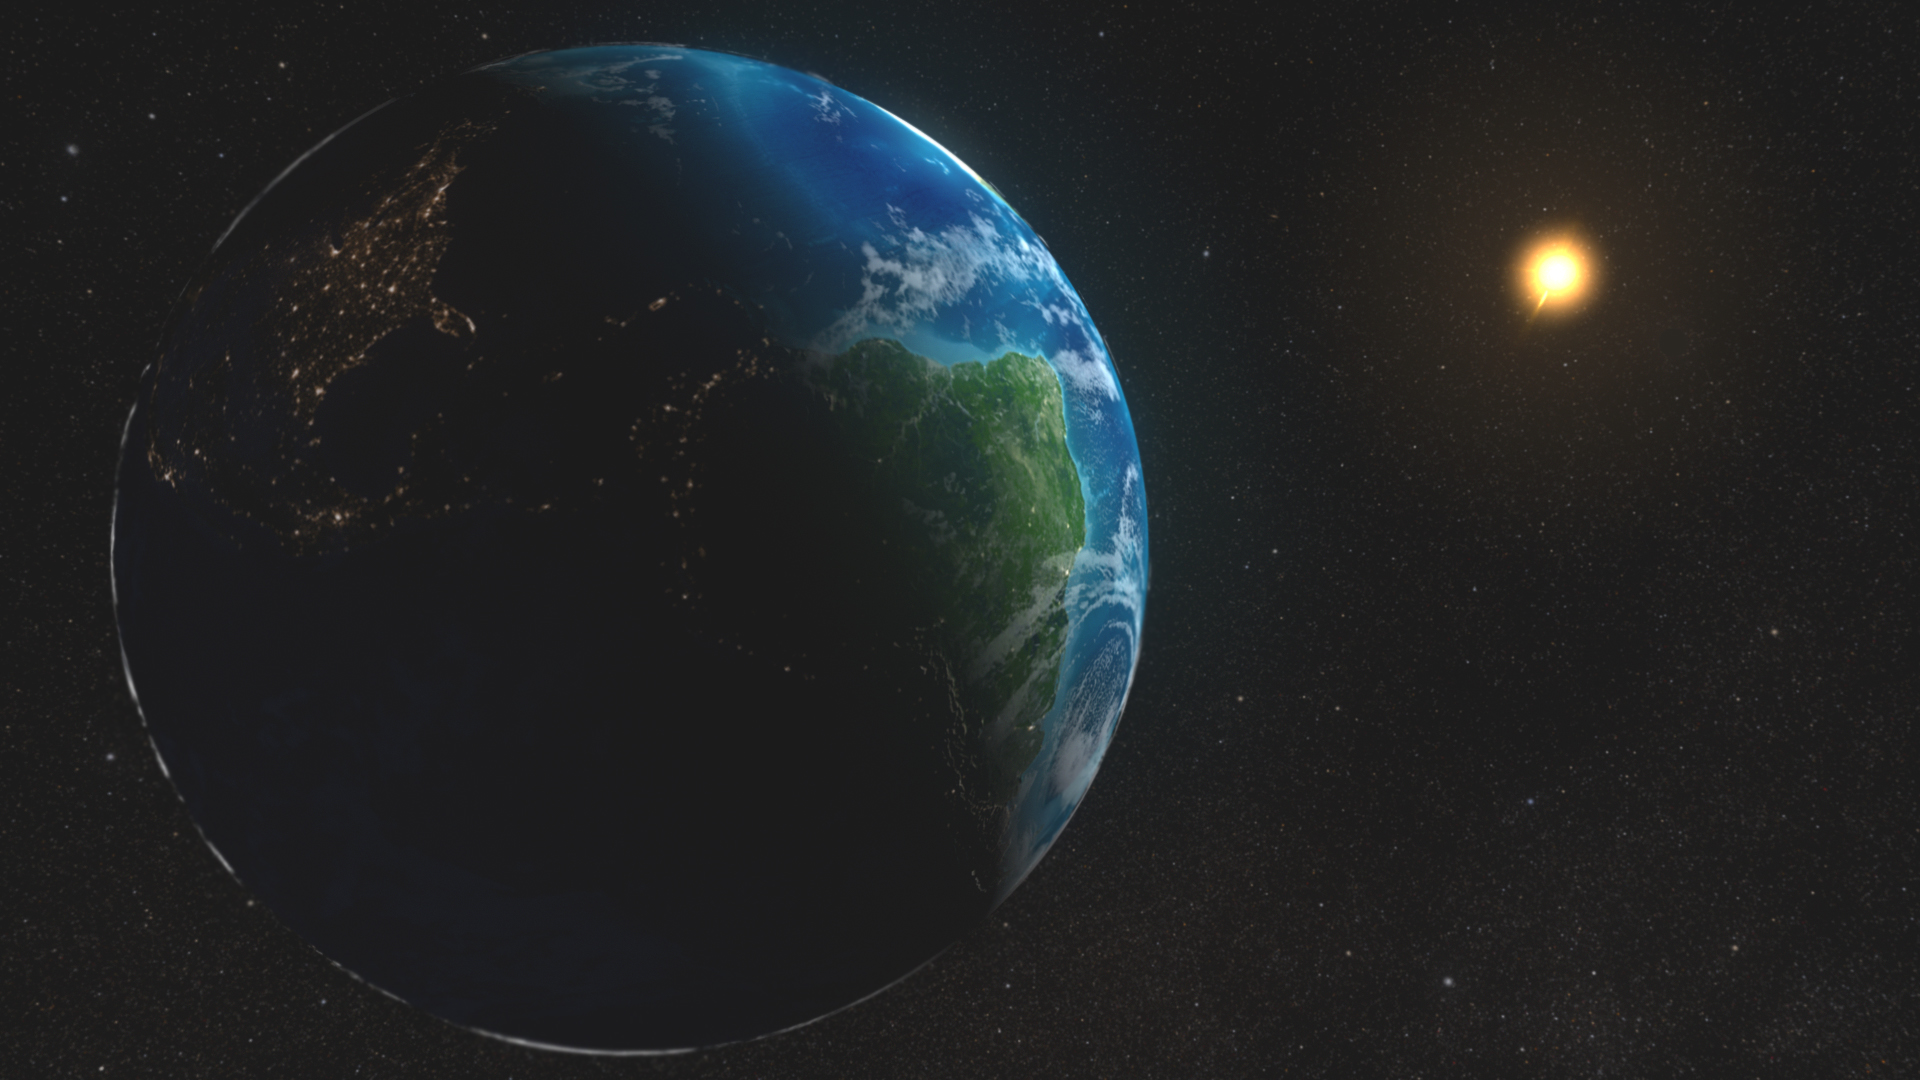
Image from space.com ... If the earth was just a basic orb in space, then the sun would create a sundot that darkened the back side, brightened the sun-facing side, and would have sun intensity drop off as it rounds the orb towards the dark side.
This sun-facing fresnel creates the illusion that we're actually on a round planet with a massive sundot impacting how the light plays off the surface like it's just a massive ball in space.
But, the problem is the result is too bright. But, that's ok. We can work with that, because a) we actually have a result, b) we can just tweak the value down. (A real problem would be if we didn't have any result at all, because then we'd have nothing to go on.)
So, we just add a modifier to the end result to tone down the amount...
- suneye = dot( sunvec, eyevec )
- worldlight = 1 + Fresnel( suneye ) * 0.05 // modifier to greatly reduce the impact
- light *= worldlight
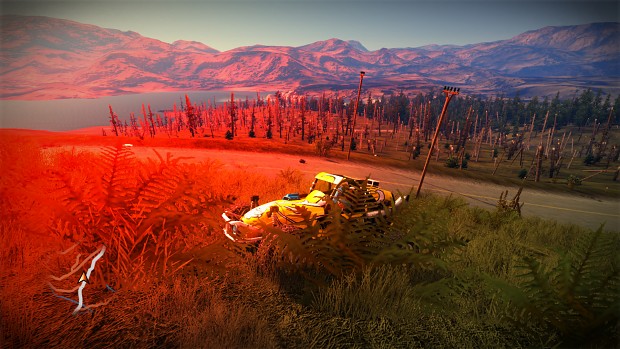
Now we get something like this...
The brightness coming from the left-hand side is the "world light" fresnel effect. It makes it look like the world is actually an orb in space, and the light starts to fade as it rounds the curvature of the earth as the sun rises and sets.
And this...

We're heading into the sun, and it's brightening up everything sun-facing to simulate our eyes taking in more light from sun as well as what's reflected off the surface of the planet.
What's interesting to note... Asobo created a similar effect using the horizon fog function. They had the fog be very thick, and when the sun was in it it created a very bright fogging / haze that blended into the ground. This is why sunrise & sunset looked really good in the default game.
But, the thick fog also covered up a lot of landscape. I toned down the fog a bit, and also made it use sky color to help blue up the sky some. But, it reduced this "world light" effect.
By adding it back in via a fresnel effect, we can keep the horizon fog low while getting back that nice sun-facing brightness.
Likewise, it also acts as a faux "eye adapt / adaptive brightness", which simulates the eye adapting to changes in light. FUEL already had that function built in, but I toned it down when it would make the scene too bright when going from shadows to light. I did so in the function, but also by softening the shadows (so they're not so dark). The eye adapt works with the sun-facing brightness to help blend the sun-facing to the overall scene.
Putting it all Together
These fresnel effects are impacting the final light result before multiplying it by the diffuse / color. But, to help them blend a bit better, I multiply them by the ambient occlusion value, which negates them more in AO areas. For the world light fresnel, I also added an option to multiply it by shadow amount, in case the end-user wants deeper shadows. (Some folks like softer shadows, others like deeper shadows. So, I made it a choice for the end-user via a flag in the setup file of the tweaked FUEL shaders.)
Here's the code from a main lighting #include in the shaders...
//------------------------------------------------------
// Fresnel Highlights
//------------------------------------------------------

// use fresnel from dot products to create various lighting effects


#if	( FRESNEL_BACKLIGHTS == 1 )
// faint spotlight that seems to emanate from vehicle
// simulating ambient light reflecting off it to brighten
// up other objects around it

float	FresnelBacklights( float dotsx, float occlusion )
{
float	backlight		= Fresnel( 1 - dotsx );		// get inverse fresnel
	backlight		*= occlusion * FRESNEL_BACKLIGHTS_AMOUNT;
	backlight		= 1 + backlight;		// make it a boosting multiplier
	return	backlight;
}

#endif


#if	( FRESNEL_WORLDLIGHT == 1 )
// enhances sun-facing viewing angle to simulate
// sun creating a massive, faint specular "spot"
// on the earth as it moves across the sky

float	FresnelWorldlight( float3 sunvec, float3 eyevec, float occlusion, float shadow )
{
float	suneye			= dot( sunvec, eyevec );
//suneye			= saturate( suneye );	// don't saturate.. creates a cut-off mid-way & drastically underpowers it
suneye			= Fresnel( suneye );
suneye			*= occlusion * 0.05 * FRESNEL_WORLDLIGHT_AMOUNT;

#if	( FRESNEL_WORLDLIGHT_SHADOWED == 1 )
suneye			*= shadow;
#endif

suneye			= 1 + suneye;			// make it a boosting multiplier
return	suneye;
}

#endif


#if	( FRESNEL_HIGHLIGHTS == 1 )
// velour-style "frosted tips" on surfaces that
// are more parallel to viewing angle
float	FresnelHighlights( float fresnel, float occlusion )
{
float	velour			= fresnel * occlusion * FRESNEL_HIGHLIGHTS_AMOUNT;
velour			= 1 + velour;			// make it a boosting multiplier
return	velour;
}
#endif


float3	FresnelEnhancements( float3 sunlight, float3 dots, float3 sunvec, float3 eyevec, float fresnel, float occlusion, float shadow )
{
#if	( FRESNEL_HIGHLIGHTS == 1 ) || ( FRESNEL_BACKLIGHTS == 1 ) || ( FRESNEL_WORLDLIGHT == 1 )

float	combined		= 1;

	#if	( FRESNEL_HIGHLIGHTS == 1 )
	float	highlight		= FresnelHighlights( fresnel, occlusion );
		combined		*= highlight;
//		sunlight.r		*= highlight;	// DEBUG to see what this highlights
//	return	sunlight;						// exit early
	#endif

	#if	( FRESNEL_WORLDLIGHT == 1 )
	float	worldlight		= FresnelWorldlight( sunvec, eyevec, occlusion, shadow );
		combined		*= worldlight;
//		sunlight.r		*= worldlight;	// DEBUG to see what this highlights
//	return	sunlight;						// exit early
	#endif

	#if	( FRESNEL_BACKLIGHTS == 1 )
	float	backlight		= FresnelBacklights( dots.x, occlusion );
			combined		*= backlight;
//			sunlight.r		*= backlight;	// DEBUG to see what this highlights
//	return	sunlight;						// exit early
	#endif

// combined enhancement will be 1.0+, but can over-saturate brightness,
// so cap it to keep from over-saturating
	combined		= min( FRESNEL_ENHANCEMENT_CAP, combined );
	sunlight		*= combined;
//	sunlight.r		*= combined;	// DEBUG to see what this highlights in total
#endif

	return	sunlight;
}
Important notes...
First, instead of multiplying each effect by the light separately, I combine all 3 into a single multiplier (combined) which I then use to multiply the light by. I do this to reduce the math.
EG:
Light is a float3. The fresnels are floats. So, if we did this...
- light * fresnel 1 = 3 multiplications
- light * fresnel 2 = 3 multiplications
- light * fresnel 3 = 3 multiplications
- 9 total multiplications
But, if we do this...
- combined = fresnel 1 * fresnel 2 * fresnel 3 = 2 multiplications
- light *= combined = 3 multiplications
- 5 total multiplications
Next, each effect needs to be it's own 1+value. We're doing separate boosts to the light. So, don't go 1 + (fresnel 1 * fresnel 2 * fresnel 3) .. you'll just end up with a very lackluster/ hardly noticeable effect as each fresnel dilutes the mix.
That said...with all effects combined, the highlighting can over-saturate the brightness. So, I set a cap amount via a min() function and a user-defined value. The cap works good when set between 1.5 & 2.0 for FUEL, but your shaders may be different. The idea is you want the highlighting to be noticeable, but don't want the effects to over-saturate and blind the user.
Finally, some dots get saturated while others don't. The fresnel dot( eyevec, normal) gets saturated. But, the dot(eyevec, sunvec) for world light doesn't. I found that saturating it created a noticeable cut-off seam that looked ugly. It was better for it to fade out naturally.
I call the FresnelEnhancements() function from pixel shaders for various objects. Mainly ones that have normal maps, because the fresnel and backlighting effects both require dot( eyevec, normal ).
Some objects, like clouds, don't have normals in FUEL. For those, I just use the Fresnel World Light.. b/c you don't need a normal for that, just an eye & sun vector. And, those are easy enough to generate.
Other objects don't need the fresnel effects, and look fine without them. Things like dust from tires, exhaust smoke, etc. The fresnel effects add math to the pixel shaders, so if we can avoid it while still looking fine then it's goods.
In the code, the #if flags are used to let the end-user turn on / off effects they want. You can rip that stuff out if you want to bake all effects in.
Wrap up
I'm not a rocket scientist or shader genius. A lot of what folks do in shaders is beyond me. I've reached my level of incompetence quite a few times trying to understand the FUEL shaders, and trying to understand white papers while seeing if I can implement something new in them.
I'm standing on the shoulders of giants with the FUEL shaders. They came with decent effects, like horizon fog, good sun & shadow colors baked in that look natural, etc.
What I like to do is dabble, find interesting things, then simplify them to be understandable and useful. So, hopefully this article helps you understand Fresnel. But, more importantly, how a few simple calculations can help enhance your game world. from "meh" to "wow!"
Making a game world look good is not just a "this one thing does it!" Nope. It's death of a thousand cuts. Every tiny little improvement adds to the overall appearance, creating a synergy where the sum is greater than the parts.