Portuguese/Português
Introdução:
Muitas vezes, as pessoas quebram a cabeça com coisas extremamente fáceis de serem feitas. Na modelagem, animação e todas as outras vertentes do modding não é diferente, muitas vezes temos que repetir o mesmo ato por diversas e diversas vezes até encontrarmos o problema e termos a solução. Ao iniciar um mod qualquer para GTA, por menor que seja você irá encontrar dificuldades, problemas que vão lhe aparecer e quaisquer outras coisas que tenham a capacidade de te tirar do sério, a colisão é uma delas, se não feita corretamente pode criar uma perda de tempo considerável, ela é mais que necessária, pois é ela que faz o personagem se manter onde está, e ter a capacidade de andar sobre o cenário, é ela que faz com que os carros não passem um por dentro do outro enquanto estão andando pelas ruas do jogo, então é sobre ela que vamos aprender.
Irei ensinar o básico, depois dele você vai testando novas possibilidades e estudando as já existentes, o que seria de um entusiasta se não fosse a curiosidade?
O que é preciso?
- Para criar uma colisão no 3DS Max é necessário utilizar plugins especiais, que podem ser adquiridos aqui
- O 3DS Max ou o G-Max, o 3DS é um programa proprietário e precisa ser adquirido através de compra para ser usado, já o G-Max pode ser baixado diretamente do site do desenvolvedor, aqui
- Um mínimo de conhecimento em modelagem básica e paciência.
Criando um arquivo de colisão no 3DS Max:
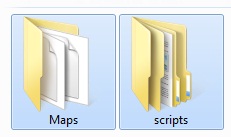
1- Após ter os programas baixados e instalados, extraia o conteúdo da pasta "KAMS_Max" para qualquer local de fácil acesso no seu computador e recorte esses arquivos da imagem abaixo.
2- Vá até a pasta principal do 3DS/G-Max e cole as pastas que acabou de recortar, substitua o que pedir. E pronto, você já tem os plugins instalados no seu programa de modelagem 3D, agora podemos partir para a criação da colisão.
3- Abra o seu programa, seja ele o G-Max ou o 3DS, o tutorial vale exatamente igual para os dois, ambos irão agir da mesma maneira, abrir do mesmo modo e terão os plugins instalados no mesmo local, obviamente cada um em sua respectiva pasta.
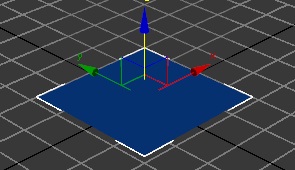
4- Com o programa já aberto, crie um "Plane" de qualquer dimensão. Certifique-se que ele está totalmente centralizado e acima da grade, se isso não for feito, você não conseguirá criar uma colisão satisfatória e seu personagem irá atravessá-la ao invés de colidir com ela. PS.: Isso vale para qualquer malha que você criar, lembre disso.
Dica: Ao abrir o programa, espere um pouco antes de tentar mexer nele, os plugins costumam abrir junto a ele quando são instalados e isso pode dar travamentos rápidos. Então aguarde um pouco para não ter problemas com travamentos maiores.
Dica 2: Se você não sabe como criar um "Plane", observe no menu lateral-direito do programa, perceba que há abas superiores, a sua provavelmente deve abrir na aba com um ícone de um martelo ![]() , usando o mouse, deslize a seta até a aba com essa figura
, usando o mouse, deslize a seta até a aba com essa figura ![]() . Procure nas opções o nome "Plane" - sem aspas - e utilizando o mouse e pressionando o botão esquerdo, deslize ele por uma das visões do programa puxando ao seu gosto para que ele seja criado. PS.: Isso é apenas uma dica para quem nunca mexeu no 3DS ou G-Max, esse tutorial não tem a intenção de ensinar a modelar usando esses programas.
. Procure nas opções o nome "Plane" - sem aspas - e utilizando o mouse e pressionando o botão esquerdo, deslize ele por uma das visões do programa puxando ao seu gosto para que ele seja criado. PS.: Isso é apenas uma dica para quem nunca mexeu no 3DS ou G-Max, esse tutorial não tem a intenção de ensinar a modelar usando esses programas.
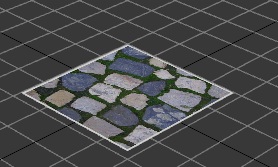
5- Texturize seu modelo, é aconselhável que dependendo do tamanho dele e de quantas texturas ele carregue, que você utilize o modificador "Unwrap UVW" para ter um melhor controle do tamanho e de quais partes da textura serão utilizadas sobre os locais específicos. Não ensinarei como texturizar, mas tendo o nome do modificador, você pode procurar outros tutoriais dessa natureza e aprender mais.
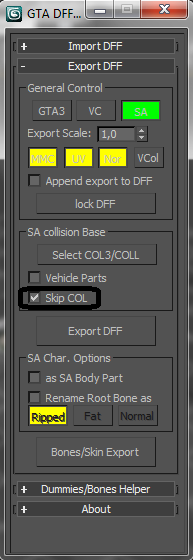
6- Vá na aba ![]() e em seguida procure a opção "DFF IO" - sem aspas -, iremos exportar agora o arquivo .dff que é o arquivo da malha do modelo.
e em seguida procure a opção "DFF IO" - sem aspas -, iremos exportar agora o arquivo .dff que é o arquivo da malha do modelo.
Ao abrir a janela do DFF IO, vá até "Skip COL" e marque essa opção e em seguida clique em Export DFF, na janela que abrir, você irá dar um nome ao seu .dff, lembre-se que é altamente aconselhável para evitar travamentos e erros, que você dê o nome ao .dff exatamente IGUAL ao nome que você deu a malha durante a modelagem, no caso do tutorial a malha ganhou o nome padrão de Plane01, e foi assim que eu salvei quando fui exportar o .dff.

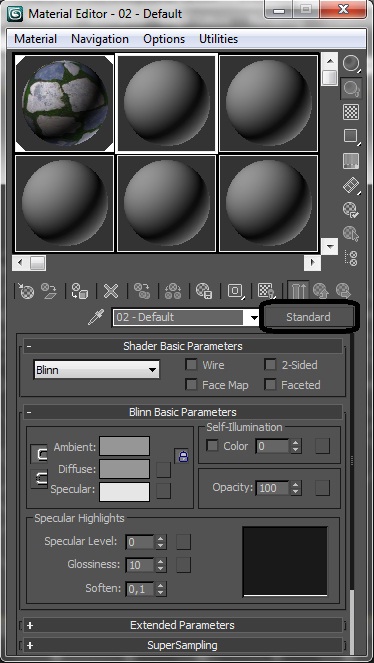
7- Agora, depois do arquivo salvo, abra o Material Editor, ele pode ser acessado através do atalho no teclado M, ou indo no ícone ![]() na barra superior.
na barra superior.
Com ele aberto, vá um novo material, como mostra na imagem, com o mouse, deslize a seta até a onde está escrito Standard, clicando em cima.
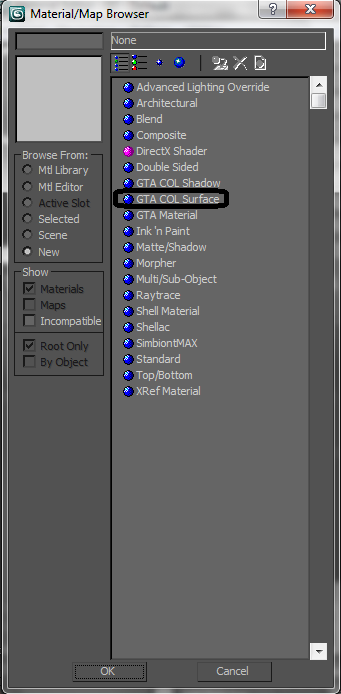
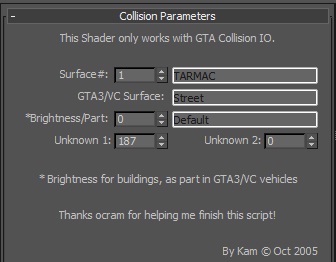
8- Você irá perceber que há novas opções no Material/Map Browser, são elas GTA COL Shadow, GTA COL Surface e GTA Material. Você escolherá apenas a GTA COL Surface, será com ela que iremos criar nossas colisão, depois de escolhida, você perceberá que os menus do Material Editor irão mudar, onde tem escrito Surface# você terá que escolher um número, cada número corresponde a um tipo de colisão, no nosso caso será o 1 que corresponde a uma rua ou pavimento.
9- Tudo feito, agora aplique a colisão no plane. Com ela já aplicada, agora volte no ícone ![]() e procure a opção Collision IO. Com a malha selecionada abra a opção.
e procure a opção Collision IO. Com a malha selecionada abra a opção.
Você irá escrever o nome exatamente igual ao da malha no espaço acima de Export, e onde tem Collision Mesh, você irá clicar com o mouse uma vez sobre e depois clicará com a seta em cima da malha que você está criando a colisão, deve ficar como na imagem.
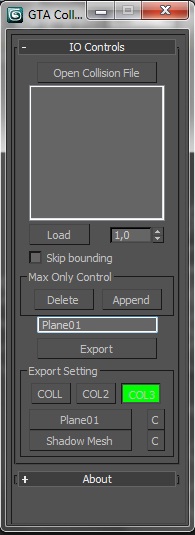
10- Agora exporte o arquivo .col para o mesmo local onde salvou o .dff e pronto, colisão totalmente criada e funcional. Lembre-se de manter a opção COL3 selecionada quando for exportar.
Observações:
- Esse tutorial é exclusivo para objetos estáticos, objetos que sejam articulados precisam de uma atenção maior, numa próxima chance irei ensinar como criar colisões com articulações para Grand Theft Auto: San Andreas.
- Esse tutorial não tem por objetivo ensinar ninguém a modelar modelos 3D no 3DS ou G-Max, então tenha em mente que você precisa de um conhecimento básico para que ele dê certo.
- Ao utilizar uma textura, lembre-se que quando for adicioná-la ao arquivo .txd para que possa abrí-la dentro de um editor de mapas ou no jogo, ela precisa utilizar uma dessas três extensões: TGA, PNG ou BMP, quaisquer outro tipo de formato de imagem não abrirá.
- Preste atenção, repita o processo quantas vezes for preciso, não se pode garantir 100% de acerto sempre, e é na tentativa que se consegue resultados.
- Objetos que tenha ondulações ou elevações podem ter problemas na hora de criar a colisão, repetir o processo é uma alternativa para organizar esses problemas que normalmente aparecem.
- Para importar seus modelos para dentro do jogo, você precisar colocá-los em arquivos .img, extensão do jogo. Esses arquivos estão localizados na pasta Models, cuidado ao modificá-los, modificações erradas podem causar travamentos e crashs, para colocar esses modelos nos mapas, você pode utilizar o MEd, que pode ter o download encontrado aqui
English/English
Introduction:
Often, people break their heads with things very easily made. In modeling, animation and all other aspects of modding is no different, we often have to repeat the same act over and over for until we find the problem and the solution. When starting a mod for GTA either, no matter how small you will encounter difficulties, problems that will appear to him and any other things that have the ability make you mad. Collision is one, if not done correctly can create a loss considerable time, it is more than necessary because it's what makes the character to stay where you are, and have the ability to walk on the stage, it's what makes the cars do not pass one inside the other while they are walking the streets of the game, then it's about her that we learn. I will teach the basics, you go after him trying out new possibilities and studying the existing ones, which would be an enthusiastic if not for curiosity?
What is needed?
- To create a bump in 3DS Max is necessary to use special plugins, which can be downloaded here
- The 3DS Max or G-Max, 3DS is a proprietary program and must be acquired through purchase to be used, since the G-Max can be downloaded directly from the developer's website here
- A minimum of basic knowledge in modeling and patience.
Creating a file collision in 3DS Max:
1 - Once you have downloaded and installed the program, extract the contents of the "KAMS_Max" to any accessible location on your computer and cut out these files from the image above.
2 - Go to the Main folder 3DS/G-Max and paste the folders you cut and replace. And voila, you have the plugins installed on your 3D modeling program, we can now move on to the creation of the collision.
3 - Open your program, G-Max or 3DS. The tutorial is worth exactly the same for both, both will act the same way, open the same way and have the plugins installed in the same folder of course each in their respective folder.
4 - With the program already open, create a "Plane" of any dimension. Make sure it is completely centralized and above the grid, if this is not done, you can not create a cool collision and your character will walk through it rather than collide with it. PS.: This applies to any mesh you create, remember that.
Tip: When you open the program, wait a bit before trying to touch it, plugins are usually open with him when they are installed and this can give fast crashes. Then wait a while to not have major problems with crashes.
Tip 2: If you do not know how to create a "Plane", look in the right-side menu of the program, realize that there are tabs above, its probably open the tab with an icon of a hammer ![]() , using the mouse, slide the arrow to the tab with that figure
, using the mouse, slide the arrow to the tab with that figure ![]() . Search the options called "Plane" - without quotes - and using the mouse and pressing the left button, slide it by visions. PS.: This is just a tip for those who never moved in 3DS Max or G-Max, this tutorial is not intended to teach the model using these programs.
. Search the options called "Plane" - without quotes - and using the mouse and pressing the left button, slide it by visions. PS.: This is just a tip for those who never moved in 3DS Max or G-Max, this tutorial is not intended to teach the model using these programs.
5 - Texturize your model, be advised that depending on the size of it and how it loads textures, you use the modifier "Unwrap UVW" to better control the size and texture of which parts will be used on specific sites. Do not teach you how to texture, but with the modifier name, you can find other tutorials of this thing and learn more.
6 - Go to the tab ![]() and then look for the option "DFF IO" - without quotes - we will now export the file. Dff file that is the model mesh.
and then look for the option "DFF IO" - without quotes - we will now export the file. Dff file that is the model mesh.
When you open the window DFF IO, go to "Skip COL" and check this option and then click Export DFF in the window that opens, you will give a name to his, remember that it is highly advisable to avoid crashes and errors, you name it to .dff exactly match the name you gave the mesh during the modeling, the tutorial in case the mesh was named Plane01, and that's how I saved when I export the .dff.
7 - Now, after the file saved, open the Material Editor, it can be accessed via the M keyboard shortcut, or going on the icon on the top bar.
Open a new material, as shown in the image with your mouse, slide the arrow to where it says Standard and click it.
8 - You will notice that there are new options in the Material / Map Browser, they are GTA COL Shadow, GTA COL Surface & GTA Material. You just choose the GTA COL Surface, will be with her that we create our collision, after you choose, you'll look that the menus will change the Material Editor, where he has written Surface# you have to choose a number, each number corresponds to a type of collision, in our case is the one that corresponds to a street or pavement.
9 - All done, now apply to the collision material in the plane. Already applied to it, now go back on the icon and look for the Collision IO. With the mesh selected you open the option.
You will write the name exactly equal to the mesh in space above Export, and where has Mesh Collision, you'll click with the mouse once and then clicks on the drop over the mesh that you are creating the collision, should be as shown.
10 - Now export the .col file to the same location where you saved the .dff and ready, fully established and functional impact. Remember to keep the option COL3 selected when exporting.
Remarks:
- This tutorial is exclusive to static objects, objects that are articulated need of greater attention, in a next chance I'll teach you how to create collisions with articulations for Grand Theft Auto: San Andreas.
- This tutorial is not intended to teach anyone to model 3D models in 3DS-Max or G-Max, so keep in mind that you need a basic knowledge so that it works out.
- When using a texture, remember that when you add it to the file .txd so you can open it in a map editor or the game, she needs to use one of these three extensions: TGA, PNG or BMP, any other image format will not open.
- Pay attention, repeat the process as often as needed, we can not guarantee 100% correct always and is trying it gets results.
- Objects that have ripples or elevations may have problems when creating the collision, repeat the procedure is an alternative to organize these problems which normally appear.
- To import their models into the game, you need to put them into .img files, extension of the game. These files are located in the Models folder, caution when modifying them, the wrong changes can cause crashes and errors to put these models in the maps, you can use the MEd, who may have found the download here
Obrigado por ler o tutorial, qualquer dúvida sempre use o Google como fonte primária, lembre-se sempre que ele é seu melhor amigo na procura de soluções, tente, explore, mexa, use a imaginação para conseguir bons resultados.
Thanks for reading the tutorial, in doubt use Google as a primary source, always remember that he's your best friend in finding solutions, try, explore, use your imagination to get good results.

:) Nice tutorial!
valeu, me ajudou muito
Ótimo cara :D
I have a 3d mesh cube in file .3ds.
I need only file .col, not 3d .dff or other.
I import this, I run from step 7, but the file is empty... :/
Sensacional muito bom =D