ATTENTION: new version up! If you downloaded this map before May 15 2010, then download it again
3 Player map for Blitzkrieg2 mod for zero hour
Designed for Release 3
Features a dynamic weather system, well as dynamic as, it will rain and thunder sometimes, and other times it's clear skies. Also features a day/night cycle, 1 day is 720 seconds long, or 12 minutes, IE the scale is 1 minute = 2 hours.
After having played quite a few excellent games, I think I have sufficient information to draw up a good strategic overview of the map.
![]()
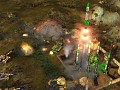
First off, we have the river, which affect all players, some more than others.
![]()
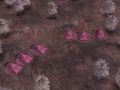
Here in red are the areas players may cross the river with ground forces. It goes without saying that controlling these crossing points is important, more so for player 3 who would be cut off from he rest of the map without these access points.
![]()
Highlighted in red are raised road and rail tracks. They create a perfect defensive barrier for who ever can control them. Because units can not shoot through them, but can move over them. This allows you to setup an amazing ambush point, by lining the back side with anti tank guns or tanks, supported by artillery, you can easily blast everything that treads over them with few losses.
![]()
Highlighted in red here, are important hills and ridges. High ground has been a focal point since man first started fighting, and in Blitz it's no different. Controlling these hills and ridge will allow you to setup anti tank guns and self-propelled guns who can use their range to blast enemies far off. Enemy forces will find it awkward to fire upon forces on top of the hill. (unless they're artillery of course ![wink.gif]() )
)
![]()
Here I have highlighted the major cities on the map. Any blitz veteran knows the importance of controlling cities. These cities are tightly packs and tanks will have a difficult time maneuvering within their boundaries, it's best to use infantry and light vehicles in these area.
![]()
Here we can see the areas of influence for each player. As you can see the ridge and city in the center create a power vacuum, which often becomes the predominant focus for each player.
![]()
The yellow and red star shows you where all the bunkers on the map lay. These bunkers can be garrisoned by infantry and create a hard point making it easier for you to defend your city once occupied.
![]()
The blue and yellow stars here show you the approximate location of every money generating building on the map. You can see they are mostly spread out, but there are a few packed into each major city.
![]()
This image shows you the general attack route for each player at the beginning of the game. Lines indicate generally, where major battles or operations take place.
![]()
Now that we have explained all that, we can get to the real meat and potatoes of the map.
Player 1 (blue area) has it easy in the sense most of his income is on his front door. This allows him to focus on the hills and empty areas which he'll have to cover to keep out those pesky enemies. But he will have to fight hard to control the raised road he shares with player 2 (black) He will also have to fight for control of the river with player 3 (yellow) This spot is best for an axis player, who can hide their base behind the wall of buildings and send out his large assault force to attack various regions.
Player 2 (black) has plenty of open space to build all his factories and move his forces about, but it comes at a price, there are nearly no choke points to speak of. he has a couple raised roads to aid in his defense, but will have to rely on a large highly mobile force to defend his fort. This spot is best for an allied player, who can drop his turrets down early on, and use his highly mobile forces from America to cover the whole area.
Player 3 (yellow) has it easy and hard at the same time. Every route to his base has a choke point along the way, how ever these are spread across the height of the map, which means he will have to spread his forces over a large area to cover all entrances. This spot is best for a soviet player, who can use his huge starting army and industrial output to blanket the area in forces and cover all points of entry.
Thats all I got for now, feel free to add your opinions of strategic value.
Moddb.com
Tanks to DirtyHarry and UNI for helping me test this map


 )
)


If you notice it's ever unathed, it's because I fixed a bug or tweaked a script for the day/night cycle ect. Just standby it doesn't take too long for it to get authorized.
Like this map? Cause if you do I have terrific news for you, SummerFire III warpath is under construction! All I can tell you at this point is; it will feature the same seamless mix of dense and open as SF2 Trident. It combines opportunity with strategic purpose and will surly keep the game fresh and exciting for countless rounds. It is a 700 by 700 4 player skirmish map. (SF2 Trident being 900 by 600 3 player) Perfect for FFA 2v2 and anything you can think off. Be expecting it to land sometime in February!
Is that real? Looks like the fires from the Hope to Princeton highway from eons ago. Amazing!
does this map support AI?