Tutorial originally written in French by Bouba l'Ourson. Mirrored here for archival purposes.
Skin creation
The best thing you ever have to do is reverse-engineer. That is to say take an already built autonomous nob, extract it, and understand its operation, and its tree structure.
Besides, there are enough tutorials on how to edit TGAs in toshop, so in this tutorial I don't worry about the graphics part.
Good for this tutorial, warm up your modems, because you are going to download I tell you. Here is a list of software that will make your life (and especially the skin edit) easier.
- - the wonderful note pad or notepad... still useful =)
- - A hexadecimal editor . I recommend the excellent HexWorkshop, downloadable in a version limited to 30 days
- - An image editing software . Photoshop is surely the best but it is expensive, it's up to you to get it, my tutorial on editing TGA will be in Photoshop.
Otherwise you are left with the more or less free solutions:
- Paintshop pro: sharewareJasc.com
- theGIMP completely freeware (since coming from LINUX)Gimp.org
- - Not mandatory, but frankly relaxing, Milkshape , this 3D editor allows you to import nodes, and so even if you don't want to touch 3D editing, it will at least help you visualize your personal skins quickly and well.chumba'luM sOfT
- - Winzip, for dummies, Winrar for those who want it =)
Winzip is sufficient to decompress and compact the nob, but Winrar (or Winace for that matter) has the advantage of allowing you to browse the files inside the archives, which allows you to edit a nob more easily, to check it better...etc, it's up to you to see which one suits you best. All 3 are shareware. - - Finally, of course you need Vampire (ha ha) but above all also the NodSDK from Nihilistic, whose editor of NOT, I named the super musty NOTEditor (prepare for bugs) this software is a crap in a RonRon box three stars, but no choice, Nihilistic left us no alternative.Just over here
That's it with this toolkit, you can go. =)
Well we left??? Go on...
1/ CLEAN AND CLEAR PREPARATION
First thing to do, make yourself a working directory, under vampire, or anywhere, but don't work directly on the files. In this directory, create one to put the resources.nob unpacked there, unpack it and go get yourself a coffee, because there's some for 150 Mega anyway.
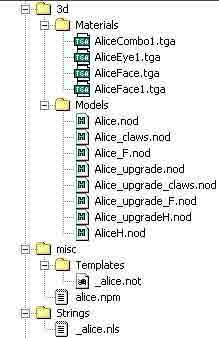
Textures (skins) can be found in
3D/materials/*.tga:
3D models in:
3D/models (arf logic)
Now create another directory (ex: SELFSKIN) where you will copy all the files useful for your creation, ie all those used by the original multiplayer model. Take for example lily. In 3D/materials you get all the files containing lily*.tga, in 3d/models you get all the lily*.nod files and you copy them into your SELFSKIN directory. You select them all then right click on them, properties and in the box that appears you uncheck read-only.
Rename them all according to the name of your skin, for example firegirl (mdr) being careful to keep the description, i.e. the lilyJacketCombo.tga file rename the FiregirlJacketCombo.tga so that you can always know which skin corresponds to which state. Also rename the .nods following the same process.
Now you have to assign the renamed textures to the models, and there it is up to you.
2/ HEX WORKSHOP
Either you edit the NOD under Hexworkshop, you will first find the names of the skins without the extension, in this very simple case, you rename the bytes with the name of your "new" (but not yet edited) skin, do that in the ASCII editor, unless you're so good at Hex that you speak it fluently. Avoid lengthy texture names, I don't know how many characters maximum you can place but already avoid biting on the name of the next skin. If by chance your name is shorter than the original skin, remove the excess bytes by setting zeros in the Hexa window (CF the screen shot below). Now your nod will automatically call the renamed skins.

the work window of HexWorkShop 3
3/ MilkShape
Either you go through Milkshape, in this case you just have to assign the textures to the models. I'm sure many of you will freak out when you open it. Don't panic, you are not being asked to create Bram's castle (Vlad Tepes) but just to reassign textures. Milkshape was not designed for vamp, it may be that importing some textures shit. Do file/import/vampireNOD and point to the nod file you want to edit, it opens in jesus position in working windows.
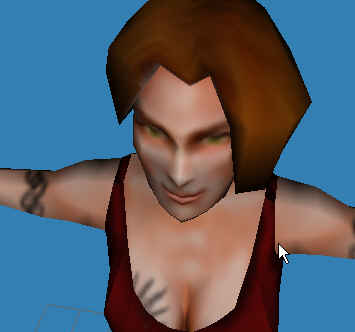
To simplify the view, make windows/show message caption, then on one of the work windows select 3D in the small drop-down menu that appears, then to finish right-click on the window and maximize in the menu. Right click again and put textured, and presto, you have your model in full screen.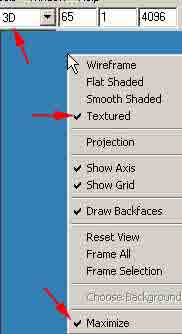
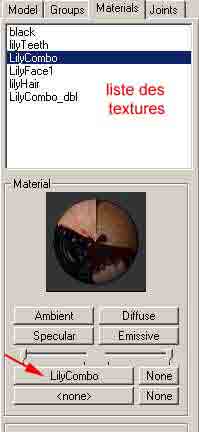
On the other hand, since you have renamed the TGAs, they do not appear. Your 3D model is naked. So in the edit bar, find the Materials tab and you should find your original textures (ie before renaming). Under this tab you have the list of all the textures, a preview on a ball, a light effect setting (Ambient, Diffuse, Specular, Emissive), strength sliders, then the name of the old texture on a button, click on it, a pop up offers you to choose another texture, point to the one that corresponds after being renamed. Do OK, and hop, on the working window you are now with the desired texture. Repeat this process for each texture. For the moment it does not change anything, you should find exactly the original model of the game. Otherwise, you have planted yourself (lol). You will also find textures in .nam, if they are present, bring them also in your SELFSKIN directory and rename the same. They are simple text files, so when you point them with Milkshape it will tell you error while downloading texture. It doesn't matter, then I have to admit that we haven't yet fully understood what these damn files are for. You will also find a black texture, it is only there to pretend to texture something that is not apparent (I think) do not touch it and at least leave it alone. Once all the textures have been remapped, do file/export/vampireNOD and save again on the SAME file. If you create a new file at the time of export you are going to have a lot of surprises, since Milk does not manage skeletons well (simplified characters serving as a reference for animations), I ended up like that with characters who would put fine a gangrel with tawny claws to forty two...arf...
That's it, the simplest thing is done. Eh !! the simplest you will say... well yes... paske now we move on to the software which should receive 5 stars at the Universal Daube Awards so badly coded and mounted in a hurry. Nihilistic (the vampire coders) promised us an SDK, they did it but it shows that they had other projects in mind. So here is THE NOTEditor, the software that allows you to create and edit templates for vampires.
4/ NOT EDITOR
First, what is a NOT, huh? Well, in fact it's the first file read by the game, it's the one that contains the elements to be linked. That is to say, it is this file that will tell vampire to take this 3D model, apply this animation to it in such a case, or take this object, give it such behavior (inventory object, decorations, etc.) . As you can see, NOTeditor is THE go-to software for guys who want to edit vampires. I can't stress enough that they coded NOTed' like barbarians, be careful save your job all the time, experiment, and be prepared to crash more than usual (ctrl-alt-supr RULEZ! !!).
Let's talk about serious things. Before opening NOTEditor, get the
global.
Multiplayer.not
in french.nob/misc/templates. Global.not, who cares, you just have to open it, that's all, I didn't quite understand why but I was told: "do it!", so I told you "do it". If you are asked why do like me =). Next, if you want to edit a character included in the basic multiplayer models of vamp, you will find what you are looking for in multiplayer.not, if it is one of the single-player characters passed into multiplayer, prefer french.not, because even if they are also in the SP directory of multiplayer.not, those of penguin are already in autonomous models, that will help you a lot.
Unfold French.not, you will get a subdirectory (child):
_player_MP_SB
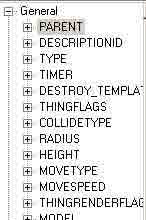
![]()
This is where all the info about the multiplayer models is, at least those retouched by Team Penguin . You locate your original model, which must be in third position in the not tree. You do create sibbling (the button circled in green on the shot) to create an exact copy of the template of the original template. You then do new template (the leftmost button) to create an empty not. NOW you save it by giving it a name. Then you do create child (the button just to the left of create sibbling) you name it
_player_MP_NOMDUNOUVEAUPERSO
After you double-click on parent in the list of tags (the tree structure on the right under NOTed'),
_players
click again on your .not it will tell you
The current template has changed, do you want to save the changes?
Take out a candle, pray a shot, and say yes, finally yes. It's good? so much the better. You should have lots of new TAGs under this child.
Find the sibbling you created at the beginning and move it to your new note, under _player_MP_gniagniagnia. Under this child, you should now find lots of tags as I said above. In fact, having put _players as a parent, makes your template an heir of the _players values of global.not (here's koa, this bastard serves).
In 2nd Tag, you should have
0005 82 DESCRIPTIONID
you double click on it and put the name of your model, in capital letters.
Finally (yes that's it we're getting there) you rename the sibbling that you imported from french.not (or multiplayer.not) in the format MP_NOMDUNOUVEAUPERSO then locate the tag 1010 4 MODEL FILENAME and instead of the
original
nod enter the name of your main node (normally nomduperso.nod tout court)
Save everything. So ! Your personal template is served =)
Obviously you will notice all the other tags. Some are for cheating, others for something else. As for example ACTOR_HEADMODEL, is used to define the nod of the head which is displayed at the bottom left during the games, often named nomdupersoH.nod . If you have re-skinned a character from the NPCs, who do not have a head, you can always change it thanks to this Tag, put lily in place of serena (serena gave me sorry) etc etc.. Search, test , and keep me informed of your many discoveries.
5/ EDITING TEXT FILES
This phase is surely the simplest. This involves writing 2 files of one line each. Open notepad
write MP_NOMDUNOUVOPERSO make one or two tabulations (TAB) then Nomduperso as you want it to appear in the skin selection window. Save the file with the name _nomduperso.nls
Then again in notepad, write MP_nomduperso make one or two tabulations then MP_NOMDUPERSO. Save this as myname.npm
6/ .NOB TREE
Refer to the shot, you will learn everything there. Then zip me all this WITHOUT COMPRESSION. Rename the .zip file to .nob....tadaaam...it's all good you're there....it's over.