Tutorial created by Zedar. Originally posted in French. Mirrored here for archival purposes.
Creating maps (beginners) with Embrace software
PART n°1: MY FIRST MAP
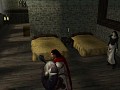
So you've downloaded the SDK, installed it, and want to create your first map. Well, first run embrace, as it's the first time you run it it asks for your preferences etc., don't touch anything just click OK (you can change the mouse mode if necessary: 2 or 3 buttons). You should know that embrace is based on QEradiant the quake level editor, it's a very easy to use and very powerful editor that gives a great rendering to your maps (this is not really the case with worldcraft which causes a lot of problems) the interface of embrace looks like this:
If your screen does not look like this, click on this icon: ![]() , it allows you to return to the original configuration which is the most efficient and the most efficient. Before describing the different windows we need to know what a map is, a map is a 3D object composed of smaller objects also in 3D called Brush, brushes are cubes or simple structures, embrace allows you to create different types of brush: cubes, spheres (very power hungry to use sparingly) cones and columns. You will therefore build your levels by associating brushes with each other to obtain more complex structures.
, it allows you to return to the original configuration which is the most efficient and the most efficient. Before describing the different windows we need to know what a map is, a map is a 3D object composed of smaller objects also in 3D called Brush, brushes are cubes or simple structures, embrace allows you to create different types of brush: cubes, spheres (very power hungry to use sparingly) cones and columns. You will therefore build your levels by associating brushes with each other to obtain more complex structures.
The different windows are:
-the console which displays all the information, everything you do, backups, problems encountered during compilation, etc. -The
camera which displays your map in 3D as in the game, to choose the mode display of the camera click on: ![]() , you have the choice between the wire frame view, with textures etc… the keys to manipulate the camera are the square of the arrows to move forward, turn, a and z to raise, lower the head and d and c to go up and down, the camera is represented on the 2D view by this symbol:
, you have the choice between the wire frame view, with textures etc… the keys to manipulate the camera are the square of the arrows to move forward, turn, a and z to raise, lower the head and d and c to go up and down, the camera is represented on the 2D view by this symbol: 
-The height window (Z) which displays the height of the selected brush, very practical window, it avoids having to juggle between the different 2D views
–The main window which displays a 2D view of your level, here the XY view which corresponds to the top view you can change the view of the main window (front, top and profile view) by clicking on this icon : ![]() . This window is the most important, it is where you will make your map, you can move there by right-clicking on it and going in the desired direction.
. This window is the most important, it is where you will make your map, you can move there by right-clicking on it and going in the desired direction.
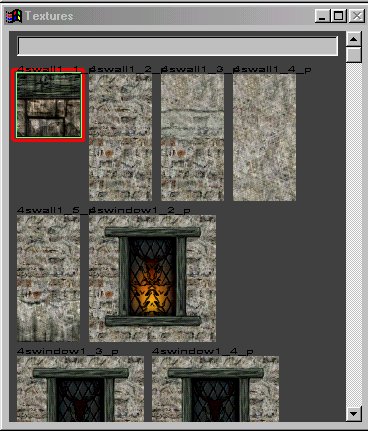
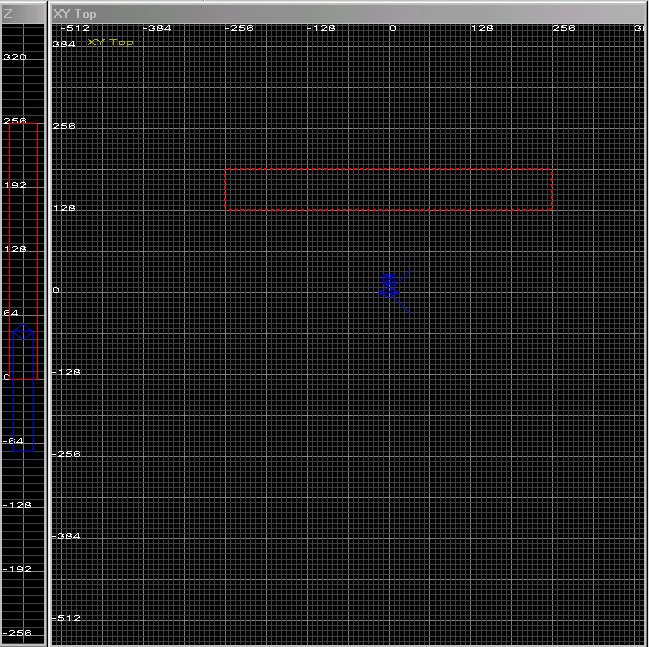
So we're going to start by building a cube, the simplest brush, for that it's very simple, just click and stretch to create what is represented in the 2D view as a square, you can then give it the height in the Z window by left-clicking above your brush and dragging upwards, this method works in all views and allows you to resize your brushes, so give your brush the following dimensions: 6 squares wide and 6 long (in the XY window) and 4 high (in the Z window) then you should have something like this:

You can move your brushes in any direction by left clicking inside. try to get the same as me, once this deselect your brush by pressing escape.
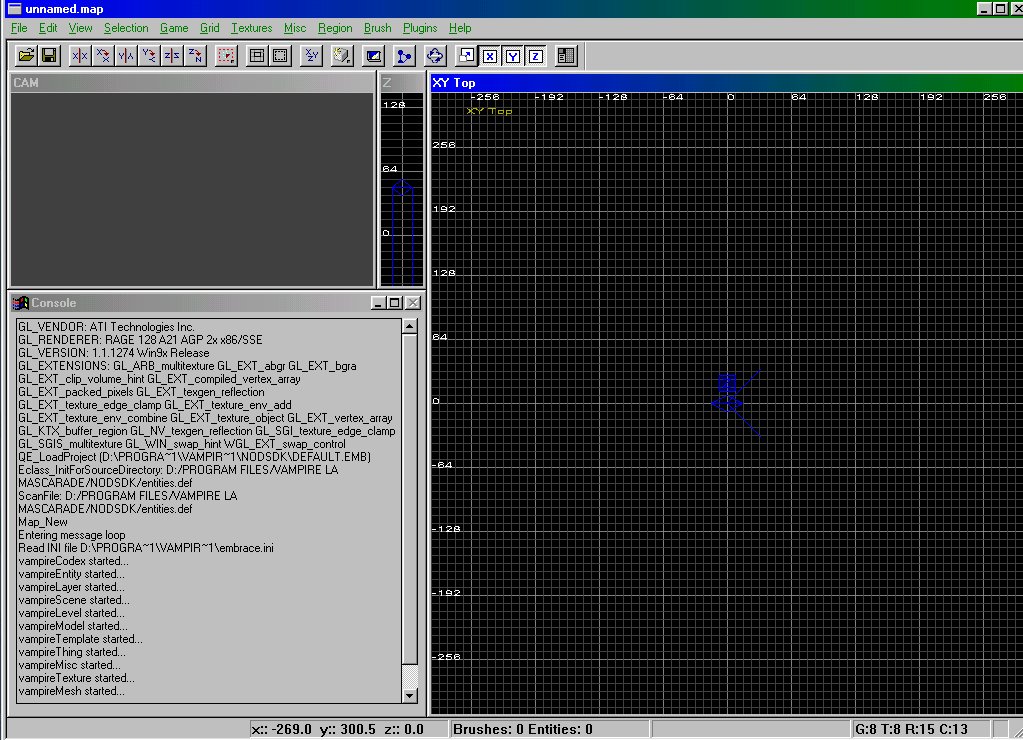
You should now see your cube in the camera, you can notice that it is "painted" in a checkerboard pattern, is that we have not yet associated a texture to it, to do this start by loading textures, open the textures menu at the top , the groups of textures are at the bottom, there is general, Prague, vienna etc., choose a group and check Load all textures and click on OK, then embrace loads the textures. To apply one to your brush, you must first select it by shifting left click on your brush in any of the views, then press T to open the textures window:
Then choose the one you like by clicking on it, you can see in the camera window that your brush takes on the chosen texture. Here you have created a nice cube, but it is not very useful.
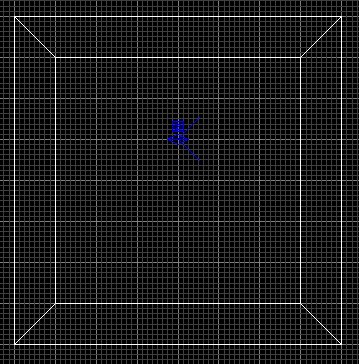
We are now going to transform this cube into a room, this is possible thanks to the hollow function, click on this icon: ![]() , embrace automatically create 4 walls, a ceiling and a floor:
, embrace automatically create 4 walls, a ceiling and a floor:
So you have a nice room, but (because there's always a but) you still can't use it, for that you have to make the floor "walkable" so that the PCs can walk on it, for that move the camera to inside the room and select the floor then click on S to bring up the surface inspector:
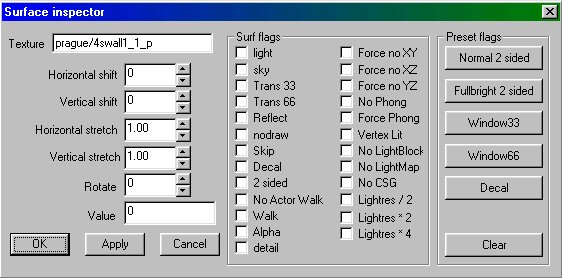
This menu allows you to modify the surfaces, to make them passable, to transform them into a sky, a mirror, to make them transparent, etc. To make your floor passable, tick Walk and click on apply then OK. Here you are almost at the end of your troubles, now you have to add a light otherwise your level will be dark, for that deselect everything and right click in the 2D view, in the drop-down menu click on ligth, you have just created a light place it on the ceiling, if you want to change the color of this light press N then pick color you can also change its intensity. We will then place a starting point for the players for this made as for the light and choose pleyrstar, playerstar0 and place the playenstart inside your room. Now we have to create a sector,
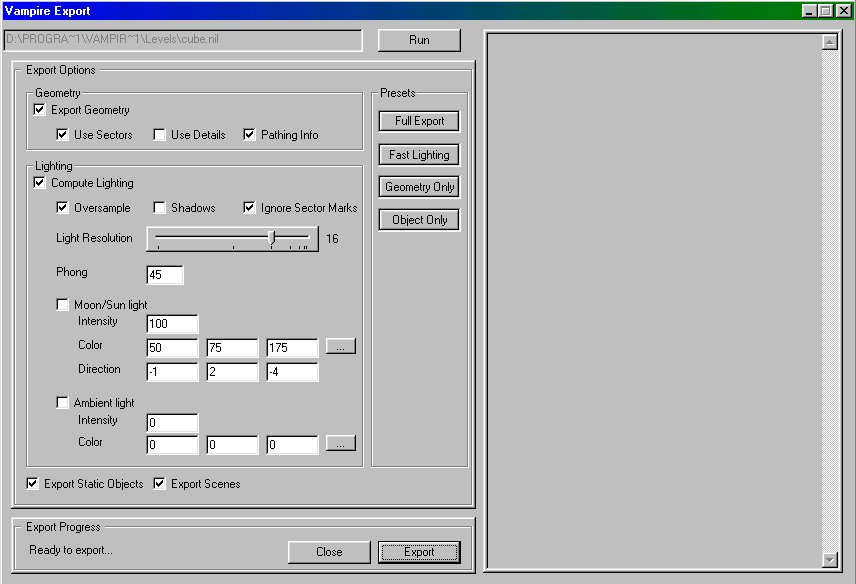
This is the compilation menu, indeed the file you created by saving (a .map) is not readable for vampire, for it to become so you must compile it into a .nil file, click on Full Export then export.
Once the compilation is complete you have the choice, either you click on run, then embrace launches vampire and you will only have to launch a new game to try your map, but in general its crashes and if it works it erases your autosave (!!!!!). Otherwise you click on close then in the Vampirechronicle folder you create a cube.nsc file and you put this inside:
location cube cube.nil null cube.nui mapcube 0x0
portal cube 0
flags 0x6
reviveloc cube 0
You have just created a multiplayer chronicle with your cube, to test it you just have to launch vampire, choose multi, LAN, create a game, select the cube chronicle and start
Either way, here's what you should see:

That's a lot of effort for an unfortunate cube, but with practice you will surely get a lot better.
PART 2: BRUSHES AND THEIR HANDLING
Introduction
As we have seen brushes are the basic constituents of your maps, we will therefore see the different types of brushes, as well as the possibilities offered by embrace to manipulate them, transform, clone, etc…
"Bevelling", cloning and manipulation in space
To illustrate these functions we are going to build a room, we have already seen that to build a room you could create a cube of the desired size and use the hollow function, you will soon realize that this technique has its limits, for this tutorial we will proceed differently. First create a wall 8 squares long, 1 wide and 4 high: (tips: to zoom in and zoom out on the 2D view use the Inser and Delete keys)
We are now going to bevel the edges of the brush, for this we have 2 possibilities:
-Use the Drag Edge function (in the selection menu) by pressing the E key, you will see blue dots appear at the corners of your brush, click on one of these dots and pull to obtain a bevel shape, do this on both ends and press E again to finish:

This function works in all dimensions and on any brush shape, it is very practical for making column bases for example-Use the Clipper function by clicking on ![]() , with this function we will dig the brush rather than stretching it, click on your brush to define point 1 then point 2 like this:
, with this function we will dig the brush rather than stretching it, click on your brush to define point 1 then point 2 like this:

The selection in yellow is the brush part that will be eliminated, embrace the defined starting from point 1 to point 2 by moving on the brush in a clockwise direction. Press enter to validate and do the same thing at the other end, then click again on clipper to finish, you should have this:

So here we are with a wall, we need 3 others, with your brush selected press the space bar to clone your brush, then press , ![]() your brush will rotate 90°, there are different ways to rotate:
your brush will rotate 90°, there are different ways to rotate:
-First thanks to the following menu:![]() ,
, ![]() the keys of the type perform a rotation from one axis to the other, the keys of the type:
the keys of the type perform a rotation from one axis to the other, the keys of the type: ![]() , gives you the image of your brush in a mirror according to the axis indicated, this menu and practical and fast its use is frequent but limited.-You can also use the selection menu, in the rotate part you are offered 3 types of rotation, each time 90° according to X, Y or Z, or arbitrary rotation or you choose the axis (or axes) and the angle.
, gives you the image of your brush in a mirror according to the axis indicated, this menu and practical and fast its use is frequent but limited.-You can also use the selection menu, in the rotate part you are offered 3 types of rotation, each time 90° according to X, Y or Z, or arbitrary rotation or you choose the axis (or axes) and the angle.
-Or thanks to the key ![]() , which allows you a completely free rotation, but can be more risky.
, which allows you a completely free rotation, but can be more risky.
We therefore rotated our second wall, so place it correctly in relation to the first then clone it again and rotate again and so on to have your four walls:
And here you are with four walls and some extra knowledge.
Cones, spheres and cylinders
Embrace allows you to brush other than cubes, let's first look at cylinders.
To make a cylinder first create a brush that will have the dimensions of your cylinder (this is also valid for spheres and cones), then go to the brush menu, there you can choose the number of sides of your cylinder from 3 (a triangle) has 9, or by clicking on arbitrary sided you can choose the number of sides.
To make a cone, go with your brush then in the Brush menu choose primitive, cone… enter the number of sides you want.
Do the same for a sphere by choosing sphere from the primitive menu.
Attention for a cone or a cylinder the number of sides is the number of sides at the base of the brush, so for a cylinder we display n+2 polygons for n sides and for a cone n+1 polygons for n sides, for a sphere the number of sides and that for a perimeter, the number of polygons will therefore be close to n², the spheres are therefore to be used sparingly and with a low number of sides (8, 12 at most);
The CSG subtract function
Let's imagine that you are making a wall with a door, you should brush for the door, brush for the wall to the right of the door, brush for the wall on the left then brush for the wall at the top, thanks to the substract function you normally create your wall, then you create your door then you put your door in the wall, having just selected the door click on: , ![]() the substract function will make a hole in your wall the size of your door, this is still much simpler, the subtract function is useful in many cases and allows real feats.
the substract function will make a hole in your wall the size of your door, this is still much simpler, the subtract function is useful in many cases and allows real feats.