This is a somewhat old tutorial on how to script dialogue in VtmR. It was created by Javokis. Note that there is a video tutorial linked bellow that goes over how to do this with the Java Eclipse IDE. I am mirroring this here since it's still a very valuable reference for creating dialogue files.
The best place to talk about making VtmR mods is currently the Planet Vampire discord.
ADDENDUM
This tutorial covers some basic java coding fundamentals about setting up a conversation. For more in-depth information, check out the video tutorial on Making Dialog and Quests. The following tutorials are using an old method that works for a lot of older computers still on the 32-bit architecture though still supports some 64-bit OS formats. For those who use newer computers that might not be compatible with the JDK_1_1_8.zip download may want to consider trying the video tutorials on Eclipse IDE instead. For more information, check out the Open Nod Development section here.
This tutorial will teach you a little about java (not much, just enough to finish our little project). You'll learn how to modify a chronicle and have it handle conversation scripts. You'll learn how to make a basic javascript, export it to .class, and apply it to an npc in-game using NOT Editor for the chronicle we modifed. The task we're going to do is to make the NPC we made in the Creating a Battle-Hardened Milkmade for Redemption tutorial say "Hello World" when players talk to her.
Due to the amount of various java editing/exporting programs that have their own various functions, I'll just teach you how to do java without any special software - just Notepad and Command Prompt.
What you'll need for this tutorial is the following:
JDK 1.1.8 - The Nod engine will only read this version of the java class compiler.
NOD SDK - So we can use NOT Editor
-First step is to download and run JDK_1_1_8.
-Now go to your Vampire - Redemption directory wherever that is installed.
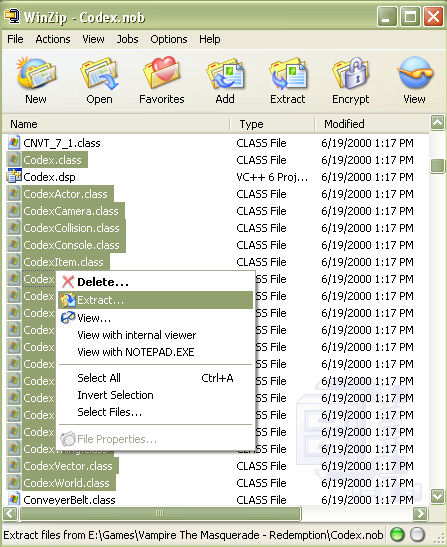
-Open Codex.nob with winzip in classic mode. Or use 7-Zip (It's free!).
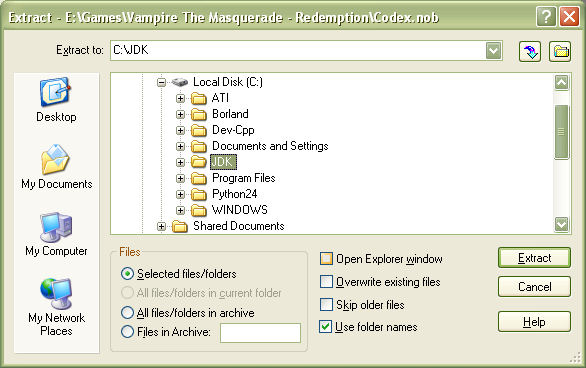
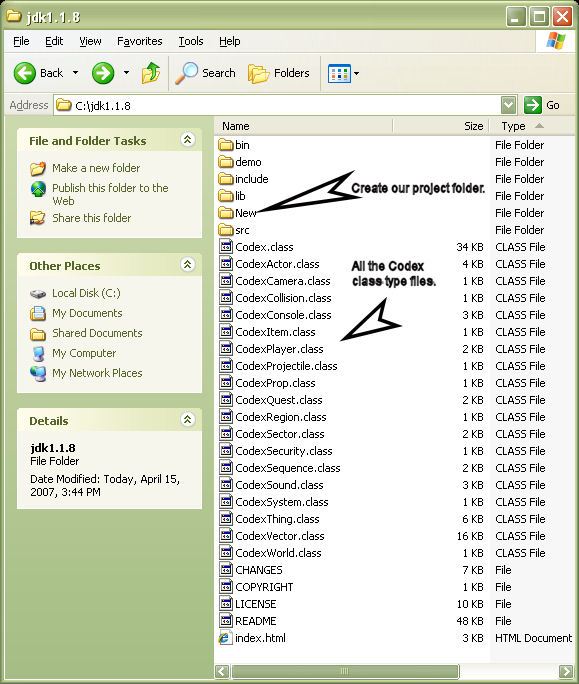
-Extract the files shown below into your newly installed JDK folder.
-Extract all .class files that start with Codex in their names.
-Within your JDK folder, let's create a project folder called New.
-By now, our JDK folder should look like this:
-We'll need to adjust our windows Folder settings so that windows will stop hiding known file extension.
-Go into folder options by clicking Tools from the menu strip and choosing Folder Options.
Note: Windows98 has it's Folder Options under view rather than tools.
-Now go into the view tab of Folder Options and uncheck the Hide Known File Extensions option.
-Go into the project folder we created and create a txt file.
-Name the file (with extensions) HelloWorld.java
-Open the file with Notepad
-First thing we need to type out is the class constuctor.
-The class should inherit Codex.class. This is how we do it:
public class HelloWorld extends Codex
{


}
-Notice that the class name matches the file name. This is CAP SENSITIVE.
-The extends part of the line tells us that our class will inherit Codex.class.
-The curly brackets will envelope all of our code. {} are very important.
-All of our code must be within those curlies {}.
-You can copy/paste my code snippits any time you want.
-Now we need to type in a method that the game engine will use to track clicking.
-The method is as follows:
void clicked(int guid, int clickerGuid, int captureID)
Explaination of clicked params:
guid - the ID of the owner of the script that was clicked on.
clickerGuid - the ID of the one who clicked on the object that owns this script.
captureID - the ID of the thing that is capturing our npc. Not Applicable here.
-Here's how the script should look now.
public class HelloWorld extends Codex
{
	public void clicked(int guid, int clickerGuid, int captureID)
	{

	}
}
-Make sure our script looks like this now. Take notice of the curlies {}.
-All we need to do is tell the engine what to do when our npc is clicked.
-Within the clicked method add the ExecuteConversation command, which will start our conversation.
The command works like so
ExecuteConversation(the clicker ID, the owner ID, "Convo Keyname", "ConvoFile.nco", CONV_XFLAG_WANTFEEDBACK)
In this case type out the command as follows:
ExecuteConversation(clickerGuid, guid, "HelloWorld", "HelloWorld.nco", CONV_XFLAG_WANTFEEDBACK);
-The CONV_XFLAG_WANTFEEDBACK could be changed, but that is not recommended.
-Remember to add a simicolin at the end of a command. Your code should now look like so:
public class HelloWorld extends Codex
{
	public void clicked(int guid, int clickerGuid, int captureID)
	{
		ExecuteConversation(clickerGuid, guid, "HelloWorld", "HelloWorld.nco", CONV_XFLAG_WANTFEEDBACK);
	}
}
-It is not enough to work yet. We need 2 more methods.
-The first method we'll add is to tell the engine our conversation has started.
-The engine can track events in conversations using the following method:
void convreached(int starterGuid, int curEvent, int curLine, int lineDuration, int speakerGuid)
Here's an explaination of the params of this method:
starterGuid - The ID of the one who started the conversation (The clickerGuid)
curEvent - This stores the current event contained within our NCO file that we will make later.
curLine - This stores the current convo line contained within our NCO file we will make soon.
lineDuration - I never messed with it, but I'm assuming it tracks the duration of the current speach line.
speakerGuid - This stores the ID of the current cast member speaking as inputted in the NCO file for each convo line.
-Just like any other method, you need a starting and ending curly bracket {}.
-Our code should look like so now:
public class HelloWorld extends Codex
{
	public void clicked(int guid, int clickerGuid, int captureID)
	{
		ExecuteConversation(clickerGuid, guid, "HelloWorld", "HelloWorld.nco", CONV_XFLAG_WANTFEEDBACK);
	}

	public void convreached(int starterGuid, int curEvent, int curLine, int lineDuration, int speakerGuid)
	{

	}
}
-The common thought behind use of this method is to setup our camera angles and track where the player is in the conversation.
-It is also used to track altered events like if a player made a conversation choice, this method can track it.
-We're just going to do the bare basics by setting a camera angle.
-We are not going to track any events or line #, just track convo start and end.
-First thing we have to do to setup a camera angle is to setup the cutscene.
-To do that we need to use the CodexCamera.SetupCutscene command.
-So type in the following within the convreached method.
CodexCamera.SetupCutscene(starterGuid, GetClassThing(), 0);
-The SetupCutscene command's three params works as follows:
CodexCamera.SetupCutscene([client ID], [First target ID], [Second target ID]);
-The client ID should always be the controller who initiated the click.
-There should always be a First or Second target or the camera wont know where to go.
-The camera always looks for 1 or 2 targets.
-Now we need to get the camera working using SetShot
-This is how SetShot works:
SetShot(int clientGuid, int shot, int angle, int distance, int side, float lerpTime);
Here's an explaination of SetShot params:
clientGuid - The one who should see the camera angle (the clickerGuid).
shot - the position of the camera relative to the targets.
angle - the height of the camera relative to the targets.
distance - the distance of the camera relative to the targets.
side - 0 or 1. 0 is usually the default. 1 can be set to switch the positioning of the camera.
lerpTime - the time in seconds this camera angle takes to reach the next camera angle. This can be used to have the camera MOVE around. 0 is instant.
-Now just type in the following to add the SetShot command:
CodexCamera.SetShot(starterGuid, CAM_SHOT_POV_A, CAM_ANGLE_MEDIUMHIGH, CAM_DIST_LONG, 0, 0);
-This will actually SET our camera angle during the conversation.
-Our code should look like this now:
public class HelloWorld extends Codex
{
	public void clicked(int guid, int clickerGuid, int captureID)
	{
		ExecuteConversation(clickerGuid, guid, "HelloWorld", "HelloWorld.nco", CONV_XFLAG_WANTFEEDBACK);
	}

	public void convreached(int starterGuid, int curEvent, int curLine, int lineDuration, int speakerGuid)
	{
		CodexCamera.SetupCutscene(starterGuid, GetClassThing(), 0);
		CodexCamera.SetShot(starterGuid, CAM_SHOT_POV_A, CAM_ANGLE_MEDIUMHIGH, CAM_DIST_LONG, 0, 0);
	}
}
-Now we need to have our script track a conversation ending so we can free the camera.
-We will use the void convended method. So add the method like so:
public void convended(int starterGuid, boolean bAborted , int returnValue)
{
}
Here's an explaination of the convended method's parameters.
starterGuid - ID number that can be traced all the way back to the clickerGuid in our code.
bAborted - tracks whether the player pressed Esc during the conversation. true or false.
returnValue - tracks a conversation choice value from the NCO file.
-All we're going to use out of this is the CodexCamera.Release command to free the camera at the end of the conversation.
-So just type in the command like so:
CodexCamera.Release(starterGuid);
-The starterGuid can be traced back to the clickerGuid in our code.
-This will release the camera for our clickerGuid.
-Our code will now look like so when finished:
public class HelloWorld extends Codex
{
	public void clicked(int guid, int clickerGuid, int captureID)
	{
		ExecuteConversation(clickerGuid, guid, "HelloWorld", "HelloWorld.nco", CONV_XFLAG_WANTFEEDBACK);
	}

	public void convreached(int starterGuid, int curEvent, int curLine, int lineDuration, int speakerGuid)
	{
		CodexCamera.SetupCutscene(starterGuid, GetClassThing(), 0);
		CodexCamera.SetShot(starterGuid, CAM_SHOT_POV_A, CAM_ANGLE_MEDIUMHIGH, CAM_DIST_LONG, 0, 0);
	}

	public void convended(int starterGuid,  boolean bAborted , int returnValue)
	{
		CodexCamera.Release(starterGuid);
	}
}
-That's it. We're ready to export this script.
-Save our HelloWorld.javascript and exit.
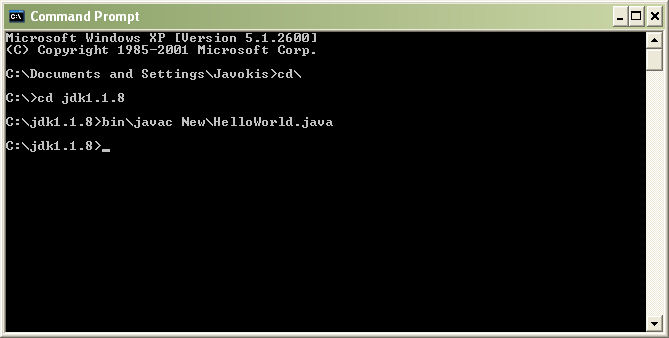
-Now go to your start button and navigate through programs/accessories.
-Find the Command Prompt.
-When command prompt starts type in
cd\
-then press enter.
-This'll make sure you're in the root of c:\>
-Now type in
cd jdk1.1.8
-or whatever the name you kept for you JDK folder installed.
-You should see something like c:\jdk1.1.8> if the folder was named correctly.
-Check your c: drive if you're unsure what the jdk folder was named as.
-Now type in
bin\javac New\HelloWorld.java
-Where bin\javac is our exporter and the New\HelloWorld.java is what to export.
-Remember that java is CAP SENSITIVE.
-HelloWorld.java is NOT the same as helloworld.java or HELLOWORLD.JAVA.
-Make sure all cases match in the actual filename.
-Make sure the extension is .java or the exporter gets angry.
-This is how Command Prompt should look if all went well:
-A new .class file should appear in your jdk1.1.8\New folder.
-Copy\Paste HelloWorld.class into the Codex folder of Vampire - Redemption.
-We're now ready to apply the script to our npc using NOT Editor.
-Start up NOT Editor
-Load up your _myproj.not file.
-Select your myproj_battlemilkmaid npc template
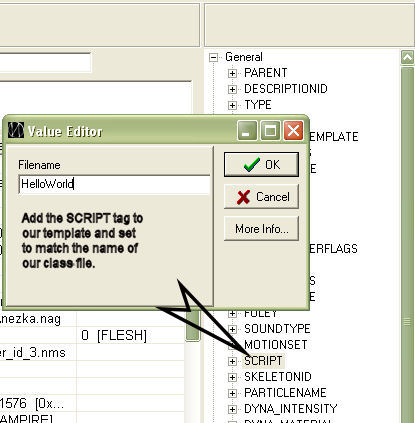
-Expand the General templats tag list and double left-click the SCRIPT tag to add it.
-Set the script tag value to match our class file name HelloWorld.
-DO NOT INCLUDE THE EXTENSION. Note: Also the SCRIPT tag name is cap sensitive.
-Now we need to set our npc actor flags to include TALK TO so she becomes clickable rather than just attackable.
-We may want to pause her AI so she wont attack any.
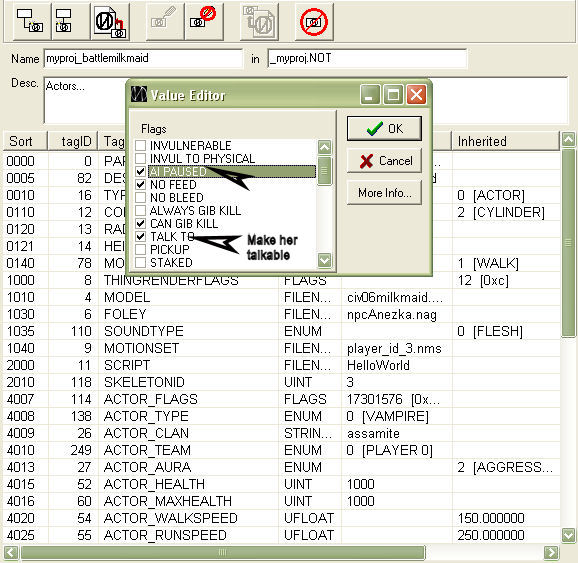
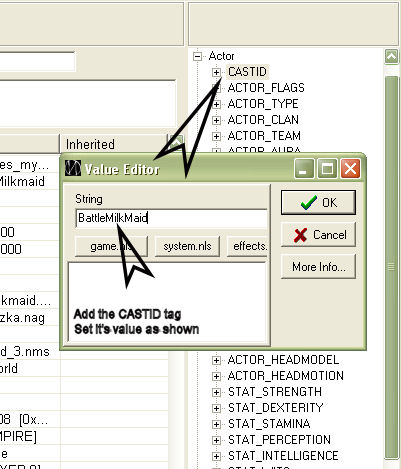
-Now let's apply the CASTID tag located under the Actor tags list.
-Once you're done Save the file and exit NOT Editor.
-We are still not ready to use her in-game. If you go in-game now, she wont do anything.
-Why? Because we don't have an existing conversation file, that's why.
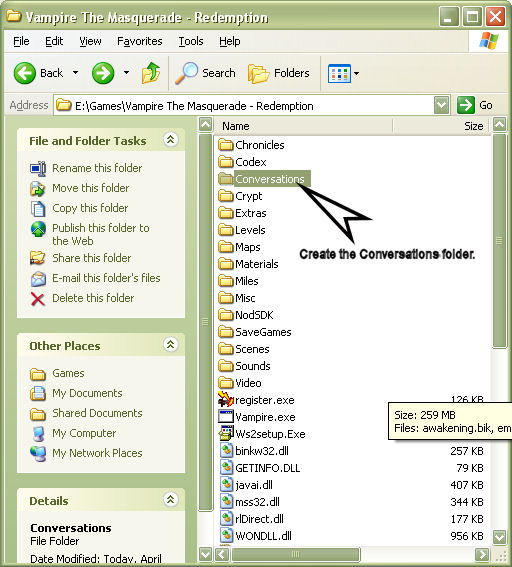
-First we need to create the Conversations folder within our main Vampire - Redemption directory.
-Now go into the new Conversations folder and create a txt file.
-Rename the txt default name to HelloWorld.nco
-Be sure that we configured our Folder Options earlier so that changing .txt extensions are possible.
-OK. Now it's time to open our .nco file with Notepad.
-The first line we need to type is the conversation ID name.
-Type in the following
CONVERSATION: HelloWorld 0
-The first param of CONVERSATION: is the name we inputted in ExecuteConversations command of our javascript.
-The 0 is unknown, but required.
-Now we need to identify the first event.
EVENT: ev_0
-The param used by the EVENT: indicater is a unique identifier.
-In the javascript convreached method, this would set the curEvent param to 0.
-You could use that as a reference for condition checks. (requires Java knowledge)
-Ok, now we need a LINE. This is a unique line ID and not the actual text itself.
-Well let's just type in something like this and maybe you'll figure this all as we go:
LINE: milkmaid_helloworld BattleMilkMaid
-This LINE command has two params.
milkmaid_helloworld was the line ID. This cannot have spaces.
BattleMilkMaid is the CASTID template tag look up name.
-If the CASTID can't be found the speakerGuid in our javascript will return 0.
-This will cause our camera to loose its target and thus not show right.
-Actually I noticed it always returns 0 even if the CASTID matches so that's why we use GetClassThing() instead.
-That's all we'll input for now.
-This should be enough to have something happen in-game, but let's wait till we're finished.
-The next step is to create an NVO file.
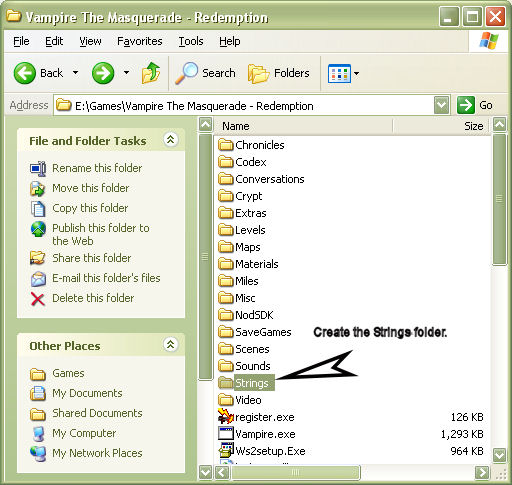
-This is where the action is so let's create another folder in our main Vampire - Redemption directory.
-Name the new folder as Strings.
-Go into the Strings folder and create thus another txt file.
-Rename the txt file as HelloWorld.nvo.
-Open the file in Notepad. Here we go...
-An nvo file is used to define your unique LINE identifiers from your nco file.
-Each line of an nvo is divided into three parts.
[Your LINE ID] [MP3 File to play] [Text to show for conversation when no MP3 file is played]
-The first two params MUST NOT have spaces in their names.
-So if you decide to use an MP3 file, it must not contain spaces in its name.
-The third param can have as many spaces as you want.
-So type in the following line into the NVO file:
milkmaid_helloworld - Hello World!
-We're still not ready to see this text in game.
-An NVO file can only be ran by a Chronicle's meta file (.NMF file).
-To start out basic let's just edit the meta file to Orsi's Mansion to include our new NVO file.
-Go into the Chronicles folder of the main Vampire - Redemption directory.
-To figure out what meta file a chronicle uses we need to open up the chronicle file iteself (a .NSC file)
-Open up MP_PrinceMansion.nsc file with Notepad.
-Look for the line that starts with metafile
-We will see that the metafile for Orsi's Mansion is MP_Salon.nmf
-Go open up MP_Salon.nmf file with Notepad as well.
-We will see the following lines of data within MP_Salon.nmf
NLS                     mp_salon.nls
CASH                  GoldBag GoldCoins cashus cashuk
NST                     mp_salon.nst
-Let's add the following line at the end:
NVO HelloWorld.nvo-The MP_Salon.nmf file should now look like so:
NLS                     mp_salon.nls
CASH                  GoldBag GoldCoins cashus cashuk
NST                     mp_salon.nst
NVO                    HelloWorld.nvo
-Save the MP_Salon.nmf file
-We're ready to test out our BattleMilkmaid in conversation.
-Start up the game and go to Multiplayer then LAN
-Choose Orsi's Mansion when you start a game
(Actually there are 3 chronicles that use the MP_Salon.nmf file)
-You could load up Orsi' Mansion, Rave Club, or Dark Age Inn.
-Either way, our Milkmaiden wont talk right unless she's somewhere where her NVO file is loaded.
-Spawn her up and notice she has the talkable icon when highlighted.
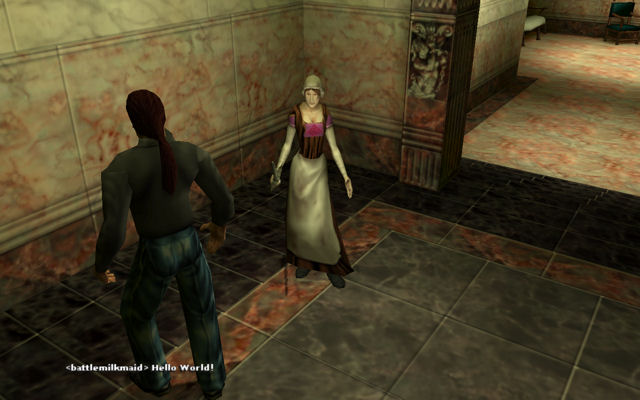
-Go speak to her and you should get this:
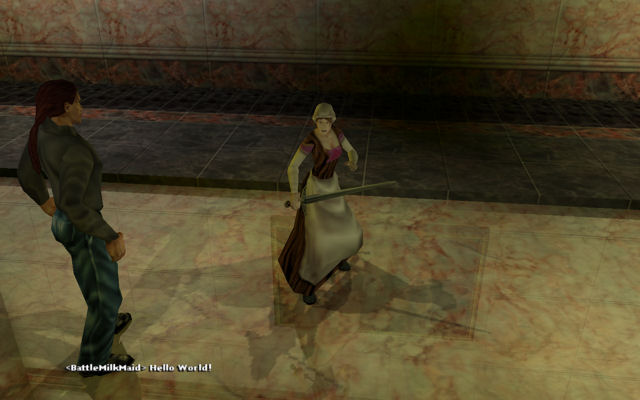
ENJOY!
-If the CASTID can't be found the speakerGuid in our java script will return 0.
-This will cause our camera to loose its target and thus not show right.
-Actually I noticed it always returns 0 even if the CASTID matches so that's why we use GetClassThing() instead.
Ok I discovered why the speakerGuid was always returning 0. The CASTID tag is never instantiated at point of Battle Milkmaiden spawn, but at point of location load time. Here's what you COULD do.
-Open your HelloWorld.javascript and change the
CodexCamera.SetupCutscene(starterGuid, GetClassThing(), 0);-To
CodexCamera.SetupCutscene(starterGuid, speakerGuid, 0);-Export and copy/paste the created class file to your Codex folder.
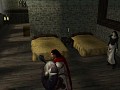
-Go in game and spawn your MIlkmaiden Warrior Goddess (or whatever you apply the SCRIPT tag to).
-Respawn yourself to that location by using the ST Location Panel.
-Now click your Battle Milkmaiden and the camera will not only work right, but she'll now show a proper talk animation.