This is a tutorial originally created by twisteddirt.com. It is reuploaded here for archival purposes. You can locate the Armadillo editor here.
How to make and use a Sky Cube.
First, you need to have a photo or a graphic rendering of the sky you want to use. You can make a sky cube yourself, using Photoshop or Paint Shop Pro or you can find sample Sky Cubes OR go to Yahoo and type in "skies sunsets clouds" and find plenty of usable photos.
2. Making your Sky Cube file.
[NOTE: To make a sky cube you'll need to download a copy of "Make Cub" from Rainbow Studios. The "Make Cub.exe" will make the "(yourprojectname).cub" file that goes in your project folder to render your sky.
There are 6 files that make a "cube file":The 6 images must be named as follows:
- a. north
- b. west
- c. south
- d. east
- e. top
- f. bottom
Put these images inside the "Make Cub" folder along side of the "makecub.exe".
- a. f0010001.tga - north side of sky
- b. f0020001.tga - west side of sky
- c. f0030001.tga - south side of sky
- d. f0040001.tga - east side of sky
- e. f0050001.tga - top - looking straight up
- f. f0060001.tga - bottom - looking straight down
(image should be black - you never look down)
3. Editing the .ini file.
The tutorial that comes with "Make Cub" will say "Do not edit the "yourcubfile.ini" sample file.", but you can edit it.
- a. You can change the name from "yourcubfile.ini" to the name of the project you are making it for, such as: "Red_Bud.ini" or
"G-out.ini".- b. The .ini file's default settings only let you use half of your sky image, but you can change that by modifying the numbers inside of it.
The zero's, as in "Figure-1a", won't let it render more than 50%.
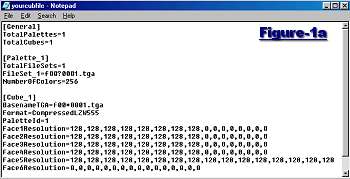
Change the zero's to "128"'s, as in "Figure-1b", to make it render 100% of your image and save.
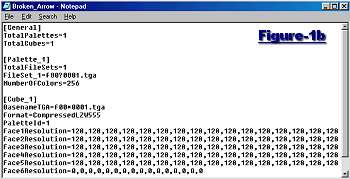
[NOTE: Changing these numbers could possibly stretch or blur your sky. Use caution when modifying any file. ]
Copy the .CUB file to your track's project folder.
Now go into your project's .SCN file and edit it, and change the Cube File Name to your .CUB file like this:
[SceneInfo]
SceneName="(yourprojectname)"
NumberOfWaypointRaces=0
LogProgress=F
EventType=National
DefaultStartPosition=3456.0,2.5,3456.0
DefaultStartDirection=0.0,0.0,1.0
[Environment]
TerrainFile=tender-chicken-2.trn
[Change the next line]
CubeFile=yourcub.cub
TerrainWidth=5
Now go into your project's .INI file and edit it so it looks something like this:
[ResourceFiles]
[Change the next line to reflect the # of "FileSet's"]
TotalFileSets=8
RootPath=e:\tracks\(yourprojectname)
FileSet_1=(yourprojectname).tdf
FileSet_2=(yourprojectname).esb
FileSet_3=(yourprojectname).scn
FileSet_4=(yourprojectname).trn
FileSet_5=(yourprojectname).seg
FileSet_6=(yourprojectname).tga
FileSet_7=(yourprojectname)S.tga
[Add the next line so Armadillo will bundle your .cub file]
FileSet_8=(yourcub).cub
OutputFilename=e:\tracks\(yourprojectname)\(yourprojectname).env
Now simply go into Armadillo, open your project, and bundle.
[NOTE: Your new sky will not be visable in Armadillo. You must bundle and check it out in the game. ]
'a'ohe mea hele hikiwale ma'alahi = Nothing comes easy.....
Aloha, Maui_cool