This is a tutorial originally created by twisteddirt.com. It is reuploaded here for archival purposes. You can locate the Armadillo editor here.
Placement Map Tutorial
by Maui_cool
[This tutorial is for people who have some knowledge of photo editing programs such as Photoshop & Paint Shop Pro and the MCM 2 Track Editor "Armadillo".]
Making a Placement Map
Placement maps are used, in an MCM2 track, to put a particular kind of vegetation exactly where you want it to be. The following steps will show you how to make one in the easiest possible way.
1. Create a "New" 24-bit black image in your photo editing program at 1280x1280 (pixel) resolution in "RGB Color".
2. You need to "Index" the colors you'll be using to place your vegetation by:
[ NOTE: I strongly suggest you use Paint Shop Pro for indexing your colors because it is a lot easier to use than Photoshop, as you'll see (below) in the Photoshop section. ]
In Paint Shop Pro, at the top:
Click:
- "Colors"
- "Greyscale"
Then click:
- "Colors"
- "Edit Palette"
- "OK" (to convert it to 8 bit indexed color)
3. The "Edit Palette" box will pop up which will have 256 color squares. The first square , in the top left corner, will be "0" - DO NOT change it, leave it black - then 1, 2, 3, etc across the top.
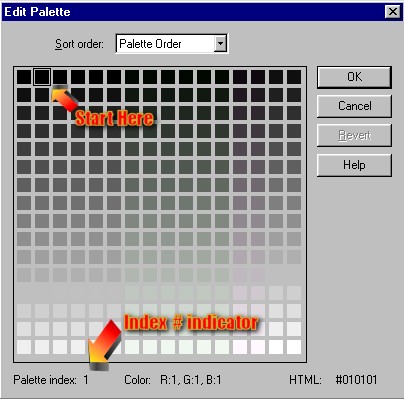
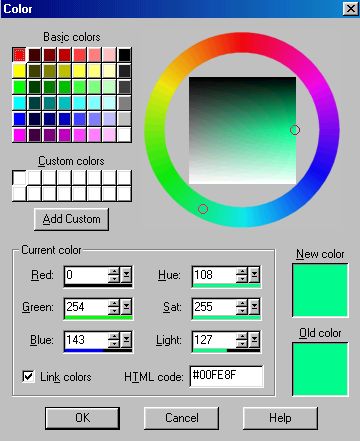
You can change the color of each square by double clicking it, causing a "color picker" to pop up and picking the color you want for that square/vegetation.
In Photoshop:
- A. Import the dismap of the track
- B. Rotate it 90 degrees counter clockwise (CCW)
- C. Choose "All" from the "Select" menu
- D. Copy & Paste it into the 1280x1280 - it will center itself
- E.Click:
-
a. Image
-
b. Mode
-
c. Indexed Color
-
d. Click "OK" to flatten layers
- F. The "Indexed Color" box will pop up
-
a. Select "Exact" from the drop down box next to "Plalette"
-
b. Select "Custom" from the drop down box next to "Forced"'
- G. In the "Forced Colors" box, choose the colors for the ".est file" you have choosen to use.
- H. Click "Save" when you're done and put it in the default folder that it gives you. Give it the name of the .est (vegetation) file you are using, such as "Forest" and click "ok".
[ NOTE: You can make "Indexed Color Plalettes" for each of the .est (vegetation) files and save them for future use and never have to go through this process again.]
- Making the indexed colors available to apply.
In the "Color Panel" box, which should be the second box from the top - on the right [if you haven't customized your layout]:
- A. Click the "Swatches" tab.
- B. Click the little arrow on the right side of it
- C. Choose "Replace Swatches" from the list
A file box will pop up - in the "Files of Type" drop down box - choose "Color Table (*.ACT)" - D. Click on the file you just saved
Now you can use the indexed colors for applying your vegetation.
4. Each palette index color corresponds directly to the vegetation list in the .est file you're going to use on your track. So color "1" will be vegetation "1", color "2" will be vegetation "2" and so on.
If you look at one the .est files (open with WordPad), which are in your "TrackEditor/EcoSystem" folder, you will see "Vegetation_1" ... blah blah blah .... "Vegetation_2" .... blah blah blah... such as:
[EcoSystem]
Description="Dry Desert"
Method=Auto
PlacementBmp=NONE
NorthAngle=0.0
ProbabilityTga=none

[Vegetation_1]*
Name=DrySaguaro01
BillboardName=DryDesert_LOD3.tga
MeanHeight=30.0
MinHeight=25.0
MaxHeight=35.0
MeanRadius=6.0
MinRadius=5.0
MaxRadius=7.0
ULeft=4
URight=84
VBottom=217
VTop=3
UCenter=49
MeanSlope=20.0
StandardDeviationSlope=3.0
MeanAltitude=0.5
StandardDeviationAltitude=0.5
UsePlanarLighting=0
BlendLODs=0
NumCollisionObjects=1
CollisionObject1=GEOMETRY

[Vegetation_2]
Name=DrySaguaro02
BillboardName=DryDesert_LOD3.tga
MeanHeight=18.0
MinHeight=16.0
MaxHeight=20.0
MeanRadius=3.0
MinRadius=2.0
MaxRadius=3.5
ULeft=134
URight=182
VBottom=166
VTop=3
UCenter=160.5
MeanSlope=25.0
StandardDeviationSlope=4.0
MeanAltitude=0.5
StandardDeviationAltitude=0.5
UsePlanarLighting=0
BlendLODs=0
NumCollisionObjects=1
CollisionObject1=GEOMETRY
Each .est file (Desert, Tropical, Forest, etc.) has different amounts of vegetations in them, so make sure you give each piece of vegetation, you want to use, a color.
These vegetation entries (#'s) correspond to the palette index colors you pick for your placement map. The colors you choose on the palette is up to you. The particular color you pick does not matter.
In other words, if you look inside "DryDesert.est" you will see that "Vegetation_4" is DryTumbleweed. So, everywhere you paint a pixel on your placement map using the color you gave "Vegetation 4/index 4" you will get a dry tumbleweed on your project.
Keep in mind that the palette index STARTS WITH ZERO, NOT ONE. ALWAYS make palette index "zero" BLACK and use that as your background color. DO NOT assign any shades of black or white to the vegetation.
Placement Map "No Veg."
Placement Map "With Veg."

Veg. Reference Screenshot
5. Now that you have indexed the colors for the .est file you'll be using, take your track's dismap and:
-
A. Resize your dismap to 256x256.
B. Turn it 90 degrees counter clockwise (CCW).
D. Copy & paste it into the center of your 1280x1280 placement map.Here's a way to center it:
- Shrink your 1280x1280 by "Zooming Out" (under the "View" tab) and move it to the bottom right of your photo editor.
- When clicking "Paste", DO NOT move your mouse, then "left click" twice.
- It will paste it perfectly into the center of the 1280x1280, if you haven't moved it.
6. "PAINTING":
- Make a "New Layer" - call it whatever you want.
- Choose the "Airbrush" and set the "Brush Size" to 1 pixel.
- "Zoom In" on the dismap in the center so you can see exactly where you're placing your vegetation.
- Now you can start applying vegetation to your Placement Map.
[ NOTE: "1" pixel equals "1" piece of vegetation - "2" pixels equal "2" pieces of vegetation, etc.]
[NOTE:One thing you can do, to know exactly what the vegetation your placing looks like, is to:
- Paint each vegetation color in a line off to the side of your track, on flat ground, spacing them apart.
- Render them in armadillo.
- Take a screenshot of them.
- Crop it to just the row of vegetations.
- And use it for reference when you're placing them.]
7. "SAVING":
- Click "Save as" from the file menu.
- Name it (yourprojectname)_place.bmp.
- Choose "Windows or OS/2 Bitmap (*.bmp")" format.
- Put it in the folder where your track is located - usually your "Projects" folder.
[NOTE: When you want to edit it again, edit the "PSD or "PSP" formatted version, then save as a ".bmp" and "Overwrite" the existing file. ]
8. Open Armadillo, open your project and generate your trees & vegetation.
[IMPORTANT NOTE: You will not see the results of the placement map in the editor until you save and reload your project in Armadillo.
- Click the "File" tab.
- Click save.
- Re-open your project. ]
- [ Note: You will not have to use as many vegetations as without a placement map. Set the number at 3000, then see if all of your color pixels have vegetation where you placed them. You can check this by:
- Open your project in Armadillo.
- Click the "Hand" at the bottom right.
- Slide your cursor straight up, which will move you forward across your track (which is the direction they are rendered in), until you can see the edge of your track.
- If the vegetation doesn't make it to the edge in that area, add to the number of vegetations to generate - if they go beyond where you intended, reduce the number of vegetations.]
'a'ohe mea hele hikiwale ma'alahi = Nothing comes easy.....
Aloha, Maui_cool
Probability map tips and info
 begin by refering to this excerpt from the ReadMe.txt included in the Armadillo_1_0_157.zip update:
A "probability map" is a normal Photoshop 24-bit image that defines the probability of a tree showing up at a given location on the terrain. It does NOT guarantee a tree will go there, but it CAN prevent a tree from going there. To make a Nats probability map: Create a 24-bit TGA at 1280x1280 resolution. Pure white colors yield high probability of a tree going there. Black yields zero probability a tree will go there. 128,128,128 grey = 50% probability and so on. It works just like a displacement, only brightness equates to higher probability of tree placement rather than terrain height. Once you've painted your map, rotate it 90 counter clockwise. This is dumb. There is a bug I can't fix tonight. Save the 24-bit targa in the same folder as your armadillo project, named the exact same as your base project name, with a "_prob" attached to the file. For example: You have a project named myfirst.prj Name your probability map myfirst_prob.tga Paint your prob maps BLACK everywhere you DO NOT want trees to show up ever, such as on your track. Also, paint your prob maps black everywhere you place 3D models and DO NOT want trees to show up sticking through the object.
The info in the excerpt above is straight forward; refer to it for the basics. The explanation below was realized from mistakes I made while learning to use probability maps I hope they help you with your designs.
The 1280x1280 pixel image represents more than just the track tile. This is not made clear in the read me. While the familiar Displacement and Texture maps used in Armadillo are sized per tile the Probability map is sized for the whole MCM2 environment or universe.
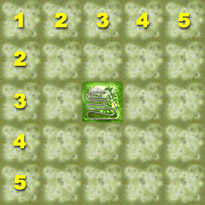
This is an example of my Starwatch Staircase Nationals Track design illustrating how the 1280x1280 pixel area is subdivided into a 5x5 grid of 256 pixel tiles. The main track tile is in the center surrounded by the perimeter tiles which are in turn surrounded by the boundary tiles.
You may have noticed that the readme makes no mention of Stunt, Enduro, Baja, or Tag layout instructions. This is what works for me:
Use a 1536x1536 pixel image with a 6x6 pixel grid. You may already be aware that the 513x513 pixel Stunt, Enduro, Baja and Tag Displacement maps you design are used to create the equivalent of four tiles, rather than one, in the MCM2 environment.
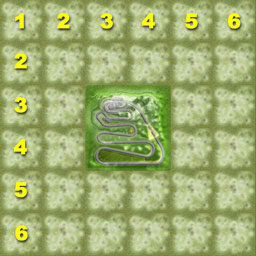
This is an example of my Starwatch Staircase Enduro Track design illustrating how the 1536x1536 pixel area is subdivided into a 6x6 grid of 256 pixel x 256 pixel tiles. The main track tile is centered in a 512 pixel square surrounded by the perimeter tiles which are in turn surrounded by the boundary tiles.

This is a too scale example of a 1536x1536 probability map I have used successfully. It is very simple but it works just like it is supposed too.
Notice that I have followed the instructions in the Readme.txt; The image is oriented 90 counter clockwise compared to the Displacement or Texture maps.
Is there a 257 or 513 size grid?
No, The grid uses 256 rather than 257 pixel increments. The 257 and 513 pixel displacement maps use the extra pixel wide strip help blend the edges when tiling. Trim a pixel wide strip off the the right side and bottom edges of the displacement maps. Paste the maps together to use as guides for registering trees to the terrain features.
I hope this tutorial was helpful. Please contact me with any comments or questions... I would love to hear from you.
Probability Map Tutorial
by Maui_cool
[This tutorial is for people who have some knowledge of photo editing programs such as Photoshop & Paint Shop Pro and the MCM 2 Track Editor "Armadillo".]
Pure white colors yield high probability of a tree going there. Black yields zero probability a tree will go there. 128,128,128 grey = 50% probability and so on. It works just like a displacement, only brightness equates to higher probability of tree placement rather than terrain height.
1. Make 4 480x480 24-bit tga images - 2 solid black, 2 solid white.
2. Put the black images in your "TextureMaps/Ontrack" and "TextureMaps/Edgetrack" folders.
3. Put the white images in your "TextureMaps/Offtrack" and "TextureMaps/Edgetrack" folders.
4. Start up Armadillo and open the track you want to make a probability map for, click the "Texture Maps" tab. ![]()
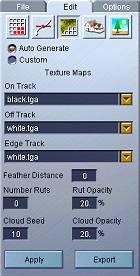
5. Selections:
- In the "Ontrack" dropdown box, select "Black".
- In the "Offtrack" dropdown box, select "White".
- In the "Edgetrack" dropdown box, select "White".
- Reduce the "Number Ruts" to "0".
- Reduce the "Feather Distance" to "0".
[NOTE: You can also make the "Egdetrack" black if you don't want vegetation close to the edge of your track path.]
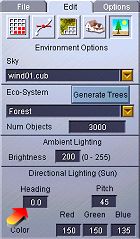
[NOTE: You can get rid of the shadows, rendered by the directional lighting, by clicking the "Environment Options" tab ![]() and changing the "Heading" to "0", then clicking "Generate Trees" - do this before you click "Apply" under the "Texture Maps" tab.]
and changing the "Heading" to "0", then clicking "Generate Trees" - do this before you click "Apply" under the "Texture Maps" tab.]
6. Click "Apply" - your track path should be black and everything else should be white.
7. Click the "Export" button, located near the bottom of the "Edit Textures" panel, give it a name - (yourtrack)_prob - and export it a folder you can find easily.
8. Now exit the editor WITHOUT saving. Doing this will leave your track as it was before you opened it.
9. Open a photo editing program - such as Photoshop or Paint Shop Pro - and import it. The size will be 960x960 so you'll need to resize it to 256x256. You also need to "rotate" it 90 degrees counter clockwise (CCW).
10. Create a 24-bit .TGA at 1280x1280 resolution that is pure black.
11. Copy & Paste the 256x256 image into the "center" of the 1280x1280 image.
Here's a way to center it:
- Shrink your 1280x1280 by "Zooming Out" (under the "View" tab) and move it to the bottom right of your photo editor.
- When clicking "Paste", DO NOT move your mouse and "left click" twice.
- It will paste it perfectly into the center of the 1280x1280, if you haven't moved it.
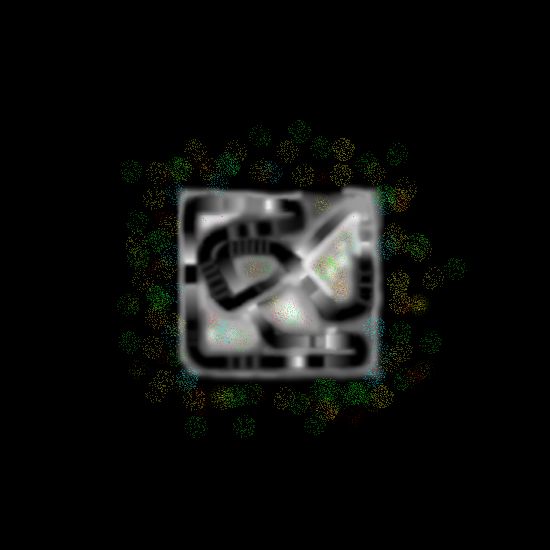
Should look like this.
[NOTE: You will now be able to customize your prob map by adding different shades of white or grey to the "ontrack" area or the surrounding area of the track where you want vegetation to go. Also, paint your prob maps black everywhere you place 3D models and DO NOT want trees to show up sticking up through the object.]
Final Product
12. Saving:
- Save it as a 24-bit tga image.
- Make sure you name your prob map: (yourtrackname)_prob.tga
- Put it in the folder where your track is located - usually your "Projects" folder.
Quality tracks are not easy.....
Aloha, Maui_cool