Things you need :
* gmax or 3DSMax6 and higher
* BF2/2142 , a texteditor or the BF2Editor and a mod to play with.
* textures or the ability to make them. The game requires DDS textures in
DXT1 or DXT5 format. Tools for conversion can be downloaded for free at
Developer.nvidia.com
Look
for 'nvdxt.exe' - a small command line tool or a plugin for your
favourite graphics program. Alternatively you can reuse textures from
BF2/2142 , but we will not cover this in this tutorial. I have
provided textures for a start.
Part One: a basic box with one color layer.
Note: gmax hints are coloured in green
I extracted this quick and dirty tutorial from a post i made a few months
ago. It should give you at least hints on how to setup your material
manager and manage a successful export of your first static object to
BF2/2142:

gmax
users should launch gmax using the 'BF2 gamepack' shortcut created by
the gmax tools installer. Alternatively you can create a shortcut to
gmax and append this to its properties:
gamepacks\\Battlefield2\\splash.bmp -i
gamepacks\\Battlefield2\\gmax.ini -p gamepacks\\Battlefield2\\plugin.ini
-t "Battlefield2 Game Tools"
*************************************************************************
Lets create a simple box 
. Prepare a folder in /objects/staticobjects/myBox and put a texture in
there, preferably some wood or metal. Lets do this all in your mod.
Here i have provided a small DDS wood texture in case you don't have one handy:
Schoeldgen.de
gmax: in addition to the above DDS texture for the game you should also download the according TGA file for gmax display:
Schoeldgen.de
I assume you have setup your BF2 Tools for Max/gmax according to this thread :
Bfeditor.org
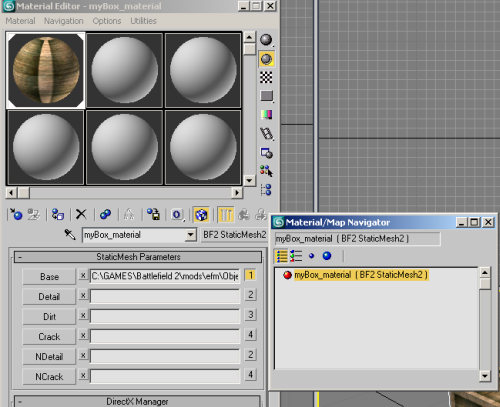
Launch Max and open the Material Manager and make one material using the
BF2Staticmesh2 shader by pressing the 'Standard' button and selecting
the 'BF2StaticMesh2' entry from the following list. Press 'Base' in the
first line of the new Material and point the Base texture slot to the
above mentioned texture. Leave the Detail slot empty for now , it can
later be filled at will, but you'll need a second UVMap for it. Here's a
view of the Material Manager with the setup for this simple box:
gmax
users: Open the Material Manager and press the 'New' button. Select
'BF2StaticMesh2' from the following dialog. Press the 'Base' button and
browse to the 'myBox.tga' texture.
Note that the scale for BF2 models is metric and the scale from Max to BF2
is 10:1 . Either use the metric setup and use 0.1 for the units or use
GenericUnits, where 10 units make 1 meter ingame. To create a box with 1
meter edge length in the game you will need to make a box with 10
generic units edge length in Max/gmax. This can be done easily with the
'Keyboard entry' rollout .
Create a box with the Max primitives
and assign the material to it (leave the box selected and from within
the Material manager press 'assign material to selection' ) . Convert
the box to 'Editable Mesh' and give all faces the Material ID 1. Now all
faces should have the texture on it. gmax users press the 'Apply' button in Material Manager to force the material on the mesh.
Leave the box selected and run the 'Static/Building' wizard from the BF2 utilities. Do this only ONCE.
Your box doesn't have a collisionmesh yet, we need to add it. Select the
'myBox__Anchor' object (its a dummy helper) and clone it with max'
standard function, renaming the clone to 'nonvis_' .
Now clone your original box , rename it to 'col0' and parent it under the nonvis_
dummy. ( This is done with the 'select and Link' button in max, more
about that in this thread :
Bfeditor.org )
Now clone the 'col0' box to a 'col1' and a 'col2' box, all are parented
under the same 'nonvis_' dummy. Here's a view using the "Select by
Name" window (button in the top toolbar) of the complete hierachy:

You're now ready to export this simple model. You should export it into your
mod into the same folder you created above : Enter '/staticobjects/'
(without the quotes ) into the export path and uncheck the box adjacent
to ''Custom lightmap Uvs". Press "Export Object" . A new folder 'myBox'
will be created inside /objects/staticobjects and it will be called
after your object. It contains a subfolder /meshes with the staticmesh
file, a samples file for lightmapping with the editor and a
collisionmesh.
gmax users now need to assign the acccording DDS texture before export. Open
the material manager again and manually change the extension of the
BASE texture from 'tga' to 'dds' . You are now ready to export. The
object will loose its texturing in gmax but this is normal. gmax can't
display DDS textures.
Its now ready to be examined in the BF2 Editor. Your first task should be to map
materials to it. Open the box in object editor by browsing the resource
window and doubleclicking the box. Now find the 'Default' tweaker where
you find an entry called 'Map Materials' . Open it and assign a wood
material to your box. Save the object.
If you only want to use a
texteditor its best to clone an existing tweak file and rename it and
its contents to match your static. Keep in mind to code in the material
'wood' ( ID 15 in BF2 )
Place it on a test map , pack your mod and go ingame. There you go 
--------------------------------------------------------
Creating a static Part II:
In this follow-up we'll add a Detail channel to our box from Part I of
this tutorial. A Detail channel has higher resolution and we can add a
normal map to our object. For this purpose i've provided 2 new textures:
Schoeldgen.de which is a small whitish texture and
Schoeldgen.de which is the texture for the NDetail slot, our 'bump/normal' map.
The Detail channel also provides for glossiness in its alpha channel. I've
updated the texture from Part I for an alpha channel and you should
probably download the new texture here:
Schoeldgen.de
gmax users find the TGA textures for viewport display here:
Schoeldgen.de
Schoeldgen.de
Download all textures and put them in the folder of our object. Optionally you
could place all textures into a subfolder or a dedicated /textures
folder for all your staticobjects. The exact location really doesn't
matter much as long as it is within the /objects folder.
Ok, after making sure of the location of the textures lets start by loading
the 'myBox' scene into Max and open the Material Manager. What we want
to do now is to move our wooden texture to the detail channel and add a
new color texture, the 'dirty_white_c.dds' you just downloaded. Color
and Detail channel are multiplied so a white color texture will not
affect the Detail texture very much but only adds a little dirt to it.
You could also use the dedicated 'dirt' channel but for a simple object its
really not necessary. DICE mostly used the COlor channel for basic
coloring and the Detail channel for the structure. If you take a closer
look at existing textures you'll often find black & white detail
textures to blend into the colors imposed by the Base channel.
Press 'Base' and browse to the 'dirty_white_c.dds' texture. ( gmax users do use the 'dirty_white_c.tga' texture instead)
Note how the box in the viewport turns all white when we replace the
original texture. Now press the 'Detail' button and browse to the
'myBox.dds' texture. ( gmax:'myBox.tga' )
Hmm, after assigning it nothing in the viewport has changed ? Thats
because the 'BF2StaticMesh2' shader can only display one map channel at a
time. To switch to another channel you can press the little number on
the right of the texture in Material Manager. Initially it is set to
display channel 1 but you can press the little '2' in the Detail
texture row to switch over to display the detail channel. Before closing
the Material Manager lets quickly add our bump texture by pressing the
'NDetail' button and assigning 'myBox_b.dds' to this texture slot. (you guessed it: gmax users take 'myBox_b.tga' instead )
Note the little '2' in the row - this means that the NDetail texture
will also map on channel 2 so both 'detail' and 'normal-detail' will use
channel 2.
If you tried to switch to channel 2 already you will
have noticed that the box turns into an ugly brown or something, the
wood texture seems to have gone. But don't worry thats only because our
object has no uvmap on channel 2 yet. Thats what the material manager
should look like after assigning all our textures:

Close the material manager with channel 2 selected and select your box mesh
if not done already. Add a new 'UVW Map' modifier, switch it to 'Box'
and look for the 'Map channel' setting in its rollout. Enter a '2' into
the channel and notice how the box gets its structure again.

Collapse the UVW Map modifier on the mesh.
Everything looks good, lets export the box once again. We don't need to change
anything in the code but we can use the editor to look at our improved
box. Note how some depth is added by using the detail channel with its
bump map.
Our
gmax friends need to open the Material Manager again and manually
change the '.tga' to the '.dds' extensions in all texture slots before
export.
Things you can try:
* Change the tint of the color texture and notice how it affects the overall toning of the object.
* Use other textures for the detail channel, like brickstones or a metal
surface. Try to adjust your color texture so that the object looks natural.


This comment is currently awaiting admin approval, join now to view.
Hi, i just complete this tutorial but it is suppose the player go by the object? It should be blocking the player instead of letting pass by. Something i miss? Please reply, thanks.
nevermind, made it to work fine, thanks anyway!