Trip to the Zone Reshade presets for S.T.A.L.K.E.R.: Anomaly. Read the description and watch the video, please.
Trip to the Zone is a pack of 3 presets made by using Reshade. The main goal of these presets is to make the game a little bit more pretty, in the visual aspect of course.
It should be very optimized, I get more than 60 FPS when I´m using this. One thing that I made is to disable Anti-aliasing, SMAA and SSAO from the game options because these presets have similar effects and having the game and Reshade working with those settings activated I was getting 45 FPS almost all the time. It´s something that I recomend for this and also for every game if you are having problems. If you can´t get close to 60 FPS, even when you did this, I´m sorry but your PC can´t handle it well.
Download the Reshade app from his official website and open it. Also extract the folder that you found inside the RAR wherever you want.
![Tutorial1]()
Now that you have Reshade open, go to the botton and select "Browse"
![Tutorial2]()
You need to go where you have Anomaly installed. Inside of the folder, you will see the folder called "bin", open it. Now you will see this. Select the "DX" that you are using when you launch the game. Mine is "AnomalyDX11.exe".
![Tutorial3]()
Now that you have selected the "DX" that you use, this will appear in the Reshade app. Select "Microsoft DirectX 10/11/12". (If you have selected "AnomalyDX9.exe", you need to select "Microsoft DirectX 9". For those using DirectX 8, I don´t think the presets will work like it should be, sorry)
![Tutorial4]()
Now this is new and also very good to use. Select "Browse". Now you need to go inside the folder that you have extracted from the RAR before and select one of the ".ini" files. With this, every pack of effects that my presets are using will be installed.
![Tutorial5]()
These are the packs. Make sure you have everything the same as the picture. (There is a legacy pack at the botton activated, leave it like that). Now start the install.
![Tutorial6]()
Once the install is done. You need to do this: Select the ".ini" files that you have inside of the extracted folder and the PNG called "layer". Next, go to where you have anomaly installed. Enter inside the folder "bin" and now you will see "reshade-shaders". Go inside of that folder and put the ".ini" files inside the folder called "Shaders" and the PNG inside the folder called "Textures".
![Tutorial7 1]()
Open the game and you will see a bar at the top of your screen. If you see that, that means you have Reshade in your game. To open the Reshade menu, press the key "Home". Skip the tutorial if you want, that´s optional. These are the effects that my presets will use. Make sure you have everything like the picture Now, you see the bar where it says "Trip to the Zone (3) [By Ultimatedunkel_030]? Click on that.
![Tutorial8 1]()
Here you will see something like this but you need to do one thing. You need to copy the location where you have the "Shaders" folder. You know, inside you game folder, go to the "bin" folder, select the "reshade-shaders" folder and open it. Now open the folder "Shaders" and while you are inside of that folder copy the location and paste it inside the Reshade menu. Because I´m using Escape from Pripyat 3.0 Mod Pack (it´s not required for this tutorial), my location is F:\EFP GAME\EFP\bin\reshade-shaders\Shaders Once you have done that, you will see my presets there. Select whatever you want to use and it will load it.
![Tutorial8]()
One more thing. Go to "Settings". Here you can customize some things. You should change the keys options, for example, to toggle Reshade off and on or to select quickly another preset inside the game. I also enable "Load only enabled effects" and the "Perfomance mode", but that´s up to you.
Now, load a save file or make a new game. Remember that "README" file you saw in my RAR? Read it, you will find some commands to give it the last touch to the game. Once inside the game, press the key "º" (See the key Esc? The key just below is the one you need to use) and you will see the console. There you need to copy all the commands you see in the "README" file. This will make edits into the enviroment lighting. Also don´t forget to change the "Basic light settings". Copy all the same values from the PNG called "Settings3" you found inside the RAR. Doing this, the presets will look like it should be.
That´s it! Now you have Reshade installed with my presets. Have fun and remember, you can change the settings of the effects or deactivate them if you don´t like something.
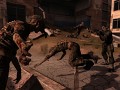
Here´s a preview of this.


![Trip to the Zone Reshade presets [Made by UltimateDunkel_030]](https://media.moddb.com/images/downloads/1/237/236786/Trip_to_the_Zone_Thumbnail.png)
A solid 8! Great when you want a "Next-Gen" Reshade preset, not over saturated with effects, not too vanilla.
Recommending for when wanting a ambient change reshade.
Thanks.
Привет. Поставлю тебе 10 просто потому что ты не поленился и сделал большую статью и еще видео :)
Thank you for that.
Sex
O_o
looks good! thanks
Does this drop Fps?
depends if you have a high end pc or low end pc
It drop a little bit. One thing you should do is to disable Anti-Aliasing, SSAO and SMAA because the presets have similar effects and having the game and Reshade working with those settings on, you will have less FPS.
A proper ReShade guide! Thank you!
Thanks. Took me a while to make it but yeah, better than nothing