In the early stages of game development, it's sometimes too early to showcase some gameplay. Especially when you are working on a 3D game in a small team. However you want to start the promotion early on in the process. Let me assume you do not have the money nor the resources to pull of a high-end CGI trailer, but you still want to deliver a decent teaser trailer shortly. In this article would like to share my experiences with 'camera mapping' while creating a teaser for my studio's upcoming horror game 'Horrinth'.

What Is Camera Mapping?
At first I wasn't aware this technique existed and is frequently used in many TV-series. This is mostly used to fake 'helicopter flights' going over New York City for example. So what does camera mapping exactly do? It's actually really simple. You take a beautiful photograph or take a piece of concept art that has a certain amount of 'depth' in there. You can make this 'flat' image come alive with just a few basic 3D, texture and animation skills, resulting in a smooth camera motion 'through' the photograph and/or picture.
Pro's
- Very fast method to capture an awesome scene.
- Low rendering times.
- Fast and easy texturing.
- No lighting required.
- Low modeling and animation skills required.
Cons
- Only great for a 'fly troughs'. (Or you have to become very creative).
- Not really possible to turn the camera (projected from 1 side).
- You need great high resolution art / or artist to create something worthwhile.
- Artist needs to be aware about 'moving objects' for separate layers.
Design The Teaser
Before you start camera mapping, you should definitely design your teaser first. It sounds logical, but some parts could become very complicated if you do not have the 'complete idea' about the teaser.
My Example:
Horrinth is about demonic possession and takes place in a large Labyrinth. To stay in control of your character you have to keep 'breathing'. If you fail to do this, the top labyrinth will drop on you.
I liked to tease this concept, so I suggested we made a large labyrinth hallway, and have the camera travel (in a walking motion) to the end of the labyrinth path. While doing so, the top labyrinth would rapidly fall down, mixed with awesome sound effects and uprising soundscapes. This would hopefully set the 'tone' of the game.

Use Some Awesome Concept Art or Photographs
So I asked my concept artist 'Kerim' to create a layered set piece like this, and he provided me with a collection of layered images. I will explain why I needed layers in a moment. For the best result I would advise to use a very high resolution photo or concept art, because moving the camera straightforward is actually 'zooming in' on the picture.

How Did I Use Camera Mapping?
When the concept art was done, I was able to start camera mapping this flat (2D 3500x7000px) image and magically turn it into a 3D world.
I used blender for this task, because it's open-source and there were some tutorials explaining this technique really accurate.
First you place your image on the camera projection view, because we want to create some models simulating the image 'depth'. Modeling certain assets in the image is best done when viewing through camera perspective. In my case, I had to create models of the walls in order to move along them with the camera.
1. Camera View
If you take a look at the first example in the picture below, you can see the selected models are exactly in line with the walls in the picture. Moving the camera along these walls would already create depth. It doesn't matter if the models look weird beyond camera view, because we will only record the camera perspective.
2. Models & Depth Amount
In the second example you can see how these models are very simple and seem like a disastrous mess ;). That is totally fine, but I had to create an actual hallway. My advise would be to create a set of models (for example the amount of walls) and restructure them from Camera perspective. I repeated this process until I had the desired 'length' of the hallway.
3. Subdivide & Camera Resolution
When you 'project your image from view' and use these projections as textures you have to keep the size dimensions (resolutions) of the picture. Don't forget the camera also needs these dimensions before projecting them on the models. If you want to have the best result, I recommend subdividing these models, so the projection has more 'data' (polygons/faces) to calculate the image more accurately as seen in example three.
After these projections, you can change the camera perspective to a more cinematic resolution (1920x1080). By doing this, you will also create more camera freedom, so it's possible to move the camera up & down without immediately reaching the borders of the picture (example three).
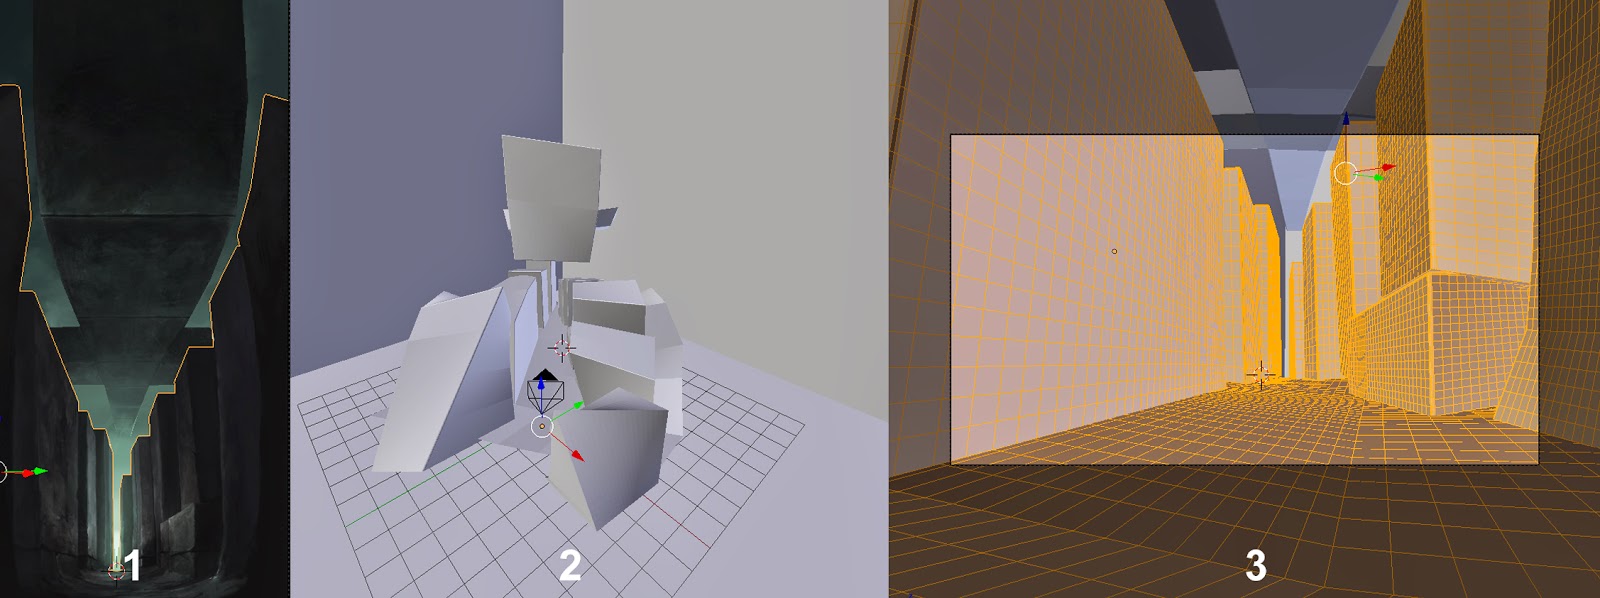
(Camera view, Models, Subdivide & Camera resolution)

(models in line with the picture)
Layering Images Is Important
When I was trying this camera mapping technique, I discovered a problem when you do not layer these images as separate textures. As you can see in the example below, the floating walls in this drawing are showing up again when the camera moves through. This would be resolved if the background is drawn on a separate layer and used as texture on the background model.

Simple Key-Frame Animation
When you are done mapping the scene you can easily animate the camera through the scene with simple keyframes. It's up to you what you want to record and where the camera moves as long as it keeps moving forward. I decided to simulate a walking animation. It took me a while to figure out what's best, and I still think it needs some improvement, but we had to release the teaser trailer.
Eventually we used 'Final Cut Pro' to edit the video and used some subtle effects while my brother created the soundsfx & soundscapes. You can take a look at the final result in the video below.
Concluding
Most of the camera-mapping techniques are best explained by guys like "Blenderguru" especially in this tutorial. In my opinion camera mapping is a nice and easy way to create a teaser sequence rather fast. You could also consider chaining different scenes together, or have more elements moving in the scene, all what is within your creative boundaries. Maybe it's not the best way to create a cool teaser, at least its a fast and effective one!
Do you have any cool and easy to use tools or techniques for trailer creation?
/Koen
Find Me On:
Gamasutra: Gamasutra.com
Twitter: @KoenDeetman
Facebook: Koen.Deetman
Company: KeokeNInteractive
Find Horrinth On:
Twitter: @Horrinth
Facebook: Horrinth
Website: Horrinth.com

pretty cool. learned something new.
Thank you!