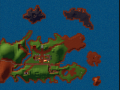
Map export
MMEditor allows to export the maps as .OBJ files. That allows to import it in almost any 3D Modelling tool.
Map rendering
Blender was used to make the renders. (Cycles render)
Import
After OBJ file is imported the mesh will be too huge for the viewport. To go around that I scale the model down using the following values: x: 0.003, y: 0.003, z: 0.003.
Camera
Since there is no need for perspective when rendering maps like that I set the camera to use orthographic mode / projection. Then place it above everything and rotate 90deg downwards.
The map is of rectangular shape and it seems as if it is enough to just capture it entirely with the camera. However after a while I noticed that the maps rendered like that will make the party seems to be offset on the minimap, so some adjustments will be needed in order for the maps to match the party's position. To do that I used the Background function of the camera to place the old map as a reference behind the mesh and made the adjustments so that both maps line up.
The result of adjustments can be seen on the final maps, the borders on the right and the bottom sides is the padding that was necessary for the party's movement to match the minimap.
Lighting
To light the map 1 sun of yellowish color, angled in a way to get shades on the terrain was used. The shadows were lightened using a world light of blueish color. The shadows were disabled completely to keep it similar to the original.
Geometry
For each map the geometry for objects and terrain was separated. Then both were rendered separately. That was used to be able to use different filters for objects and terrain during post processing step.
Post processing
Post processing was mostly done using Krita since it allows to use adjustment layers which help a lot with tweaking the final image.
The object and terrain layers were separated on 2 groups.
For terrain images 1 adjustment layer was added - Random pick. The filter allowed to blur / distort the edges of terrain in order for it to look more organic (the same is noticeable on the original minimaps).
For object images 1 adjustment layer was added - Levels. The filter helped to make the objects brighter and more prominent on the map, otherwise they would have blended with the terrain much easier.
The other filters affect all layers: contrast, saturation, sharpness. All of them are used to help to match the original look.
Export
Afterwards all maps are exported as PNG files. For Might & Magic to correctly process the map it is required to make it of indexed color. GIMP can help with that but I noticed that TinyPng online service does a really great job in color map generation so I used it to optimize the images and make them use indexed color palettes. Then the maps were converted to .BMP format and imported into a new LOD file using MMArchive.