Angry_Beaver
David joined
I've been editing games as long as I've had them. I can Map, Model, Skin, Texture, Animate, and Code. I'm that lovable little woodland rodent that'll help anyone who needs it as long as I can find time. David "(Very) Angry Beaver" Gillen. I bought the HL Platinum pack and UT, both mostly responsible for my lack of social life. Between the two games I spent years learning and bouncing between communities. Nothing really changed untill HL2 though. A brand new engine and PC. Ever since I've been teaching, learning, and having fun trying to finish things that I started, and coming up with too many ideas to do so.
portfolio - angry-beaver.net
steam - Angry_Beaver
vdc - Angry_Beaver
My Blogs
The article intended for this week has been postponed due to technical issues, not that any of you knew what it should be, but vague hints must be extended to imply future dates instead. And anyone who doesn’t know what I’m talking about just smile and nod as I’m going to move onto some of the fundamentals of Texture Alignment.
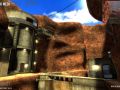
So the first thing to address is why bother, why should texture alignment even be an issue. You’ve got the texture right and you’ve got it on the wall so you’re done, wrong. Proper texture alignment really is nothing more than a detail and polished but it’s the kind of detail and polish that makes the difference to a finished product. Let me show you a room made by someone who doesn’t do any texture alignment compared to someone who does everything needed. As seen below the difference in spending the 15 second to align the textures makes a world of difference. The area still looks low quality but that’s just due to lack of detail what’s there looks infinitely better and that’s why you should spend time aligning textures.
Members.shaw.ca
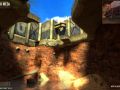
So there are some essential things when it comes to texture alignment, and pretty much every single last one is found in the Face Edit Panel, (The multi colored cube on the left, the one you really should know by now). Realistically their all self explanatory fit, stretches a texture to fit, L makes the textures left edge align to the edge of the brush, rotation rotates the texture. It all applies to texture alignment. The only tool valve is hiding form you is one of the best. Alt + Right Click. When you have a face selected Right clicking will apply all its attributes, when holding down Alt it will apply all the attributes and also align the texture so that it matches up with the other texture to looks seamless. In the previous picture you can see how the texture looks continuous round the corner, that’s what the Alt + Right Click did. As you can see a valuable time saver to align textures, the only drawback it has is that it creates a custom texture projection direction.
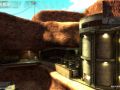
Now the term “Texture Projection direction” Is probably one most people haven’t heard of and when they figure out what I’m talking about they’ll probably realize they didn’t know what to call it before then. There are 2 default projections, World and Face. The world projection means that the texture is lined up in the X Y or Z axis and then just put onto the face. Think about it like a projector. If both are lined up neatly you get a nice square; however, if you slope the screen then the image looks stretched. The same thing happens to the textures in Hammer, it even goes so far as projecting on the back of the screen sometimes. The Face projection ALWAYS aligns the projector and screen up properly. So no matter what way you rotate the screen it’s projected from the right angle, so text is never backwards and the image is never stretched. To World is useful when you wish to keep things lined up, for example a concrete floor that has several rises and falls that needs to look continuous. When aligning toFace the slight slopes in the edges would show up as the textures slowly become misaligned. But a toWorld projection means that while they are technically stretched that they will still line up. Displacements take the base projection of a face then map a vertex onto that layout. So you should always align your faces properly before displacing them. Below is an example picture of what the difference is between toWorld and toFace.
Members.shaw.ca
So really let’s address the biggest point of texture alignment, and that’s what we’re aligning it to. Alignment is all about the edge of the brush and the transition to the next brush/face/texture. A texture with no discernable edges or details cannot really be aligned because doing so serves no purpose; however, add an adjacent face with the same texture and they should be aligned to each other for appearances sake. When a texture has a trim for the top and bottom, align the bottom of the texture to the floor and the top to the wall. If the rooms too high then use a version without trim or make the wall out of several brushes for each section of trim with top/middle/bottom textures. If you’re using a tile on the floor, align it so the tiles line up with the walls. If you have a metal edge around something pick a metal that has a pronounced ridge and align that all the way round the edge. Take the time and make sure that the edges of the texture make sense with what you’re aligning them to, don’t simply slap on a texture and call it done. There will be more specifics on alignment in the higher classes of texture alignment. Class dismissed.
Groups
Black Mesa Dev Team
26 members Developer & PublisherThe team behind the infamous, long awaited Black Mesa mod and game.
Post a comment
Canadian Eh?
Not by birth, Born in England, but I passed tha Canadian Test so I've got a little piece of paper that prooves I am.