In this article by Steven F. Daniel, author of Xcode 4 iOS Development, we will:
- Explore and use the different notification methods
- Learn how to generate alerts to notify the user
- Learn how to go about using action sheets to associate with views
- Handle alerts via sounds and vibrations
 The iPhone provides developers with many ways in which they can add informative messages to their applications to alert the user. We will be looking at the various types of notification methods, ranging from alerts, activity indicators, audio sounds, and vibrations.
Exploring the notification methods The applications on the iPhone are user-centric, meaning that they don't operate without a user interface and don't perform any background operations.
These types of applications enable users to work with data, play games, or communicate with other users. Despite these, at some point an application will need to communicate with the user. This can be as simple as a warning message, or providing feedback or even asking the user to provide some information.
The iPhone and Cocoa-Touch use three special methods to gain your attention and are explained below:
CLASS
DESCRIPTION
UIAlertView
This class creates a simple modal alert window that presents the user with a message and a few options.
Modal elements require the user to interact with them before they can proceed. These types of elements are displayed (layered) on top of other windows and block the underlying objects until the user responds to one of the actions presented.
UIActionSheet
These types of classes are similar to the UIAlertView class, except that they can be associated with a given view, tab bar, or toolbar and become animated when it appears on the screen. Action Sheets do not have an associated message property; they contain a single title property.
System Sound Services
This enables playback and vibration and supports various file formats (CAF, AIF, and WAV Files) and makes use of the AudioToolBox framework.
Generating alerts There is no doubt that you will need to incorporate alerts into your applications. These can be very useful to inform the user of when the application is running, and can be a simple message such as memory running low, or that an application or internal error has occurred. We can notify the user in a number of ways using the UIAlertView class, and it can be used to display a simple modal message or gather information from the user.
Time for action - creating the GetUsersAttention application Before we can proceed with creating our GetUsersAttention application, we must first launch the Xcode development environment.
- Select the View-based application template from the project template dialog box.
- Ensure that you have selected iPhone from under the Device Family dropdown, as the type of view to create.
- Next, you will need to provide a name for your project.
- Enter GetUsersAttention and then choose a location where you would like to save the project.
Once your project has been created, you will be presented with the Xcode interface, along with the project files that the template created for you within the Project Navigator Window.
What just happened? In this section, we looked at the steps involved in creating a View-based application for our GetUsersAttention application. In the next section, we will take a look at how we can add the AudioToolbox Framework into our project to incorporate sound.
Time for action - adding the AudioToolbox Framework to our application Now that we have created our project, we need to add the AudioToolbox Framework to our project. This is an important framework which will provide us the ability to play sound and vibrate the phone.
To add the new frameworks or additional frameworks into your project, select the Project Navigator Group, and then follow these simple steps as outlined below:
- Select your Project within the Project Navigator Window.
- Then select your project target from under the TARGETS group.
- Select the Build Phases tab.
- Expand the Link Library with Libraries disclosure triangle.
- Then finally, use the + button to add the library that you want to add; if you want to remove a framework, highlight it from the group and click on the - button. You can also search for the framework if you can't find it in the list shown.
If you are still confused on how to go about adding these frameworks, refer to the following image, which highlights what parts you need to select (highlighted by a red rectangle):
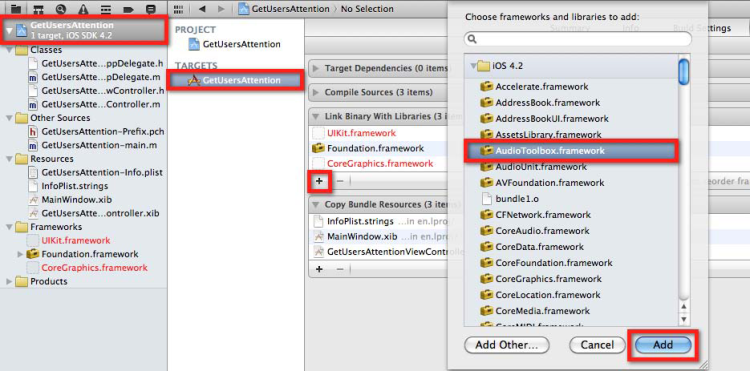
(Move the mouse over the image to enlarge.)
What just happened? In the above section, we looked at how we are able to add frameworks to our application. We looked at the differences between the MediaPlayer and AudioToolbox frameworks, and the limitations of the two.
Adding frameworks to your application allows you to extend your application and utilise those features in your application to avoid reinventing the wheel. When you add frameworks to your application, the system loads them into memory as needed and shares the one copy of the resource among all applications whenever possible.
Now that we have added the AudioToolbox.framework to our project, our next step is to start creating our user interface. In the next section, we will be taking a look at how we start to build our user interface and create events.
Building our user interface User interfaces provide a great way to communicate with the user in order to either obtain information or to display notifications. A good interface is one that provides a good consistent flow throughout your application as you navigate from screen to screen. This involves considering the screen size of your view. In the next section, we look at how to add some controls to our view to build our interface.
To obtain further information about what constitutes a good user interface, Apple provides these iOS Human Interface Guidelines which can be obtained at the following location: Developer.apple.com.
Time for action - adding controls to our View We will be adding five button (UIButton) controls which will be handling our actions to display alerts and Action Sheets, playing sounds, and vibrating the iPhone.
- From the Object Library, select and drag a (UIButton) Round Rect Button control onto our view. Modify the Object Attributes of the Round Rect Button control and set its title to read "Show Activity Indicator".
- From the Object Library, select and drag a (UIButton) Round Rect Button control onto our view. Modify the Object Attributes of the Round Rect Button control and set its title to read "Display Alert Dialog".
- From the Object Library, select and drag a (UIButton) Round Rect Button control onto our view. Modify the Object Attributes of the Round Rect Button control and set its title to read "Display Action Sheet".
- From the Object Library, select and drag a (UIButton) Round Rect Button control onto our view. Modify the Object Attributes of the Round Rect Button control and set its title to read "Play Alert Sound".
- From the Object Library, select and drag a (UIButton) Round Rect Button control onto our view. Modify the Object Attributes of the Round Rect Button control and set its title to read "Vibrate iPhone".
If you have followed everything correctly, your view should look something like the following screenshot. If it doesn't look quite the same, feel free to adjust yours:

What just happened? In the above section, we looked at how we are able to use the Object Library to add controls to our view and customize their properties in order to build our user interface. In the next section, we will take a look at how to create events to respond to button events.
Creating events Now that we have created our user interface, we need to create the events that will respond when we click on each of the buttons.
We first need to create an instance of our UIAlertView class, called baseAlert, which will be used by our Show Activity indicator event and will be used to dismiss the activity after a period of time has lapsed.
Open the GetUsersAttentionViewController.h interface file and add the following highlighted code as shown in the code snippet below:
#import
@interface GetUsersAttentionViewController : UIViewController
{
UIAlertView *baseAlert;
}
@end
We could have declared this within our GetUsersAttentionViewController.m implementation file, but I prefer to declare it in this class as it can be referenced throughout your application.
You will notice from the code snippet above that we have made reference to two delegate protocols within our GetUsersAttentionViewController.h interface file; this enables us to capture and respond to the button event presses used by our Action Sheet and Alert Views. This will become apparent when we start adding the code events for our Alert Views and Action Sheets.
Time for action - implementing the Show Activity Indicator method When you are performing tasks which are taking a period of time, you will want to provide the user with some form of notification. For tasks for which we are not sure how long it will take, we can use the UIActivityIndicatorView class, which provides us with and is represented as an animated spinner graphic.
The default size of the Activity indicator is a 21-pixel square, but can be changed to 36-pixels by using the UIActivityIndicatorViewStyleWhiteLarge style. In this section, we will look at how to go about implementing this class, combined with the UIAlertView control:
- Open the GetUsersAttentionViewController.m implementation file.
- In the action event which you created for the Show Activity Indicator button, add the following code:
// Displays our progress indicator with a message
- (IBAction)showProgress:(id)sender {
// initialize our Alert View window without any buttons
baseAlert=[[[UIAlertView alloc]initWithTitle:@"Please
wait,\ndownloading updates...." message:nil delegate:self
cancelButtonTitle:nil otherButtonTitles:nil] autorelease];
// Display our Progress Activity view
[baseAlert show];
// create and add the UIActivity Indicator
UIActivityIndicatorView
*activityIndicator=[[UIActivityIndicatorView
alloc]initWithActivityIndicatorStyle:UIActivityIndicatorView
StyleWhiteLarge];
activityIndicator.center=CGPointMake(baseAlert.bounds.size.width
/ 2.0f,baseAlert.bounds.size.height-40.0f);
// initialize to tell our activity to start animating.
[activityIndicator startAnimating];
[baseAlert addSubview:activityIndicator];
[activityIndicator release];
// automatically close our window after 3 seconds has passed.
[self performSelector:@selector(showProgressDismiss)
withObject:nil afterDelay:3.0f];
} - Next, we need to create an event to dismiss the progress indicator. Create the following showProgressDismiss event and add the following code:
// Delegate to dismiss our Activity indicator after the number of
seconds has passed.
- (void) showProgressDismiss
{
[baseAlert dismissWithClickedButtonIndex:0 animated:NO];
}
What just happened? In the above section, we looked at how we can use the UIAlertView alert class and the UIActivityIndicatorView classes to provide the ability to perform animation within our view. We also took a look at using the startAnimating method to start animating our activity indicator.
Next, we declared and instantiated an instance of our UIAlertView dialog and then declared and instantiated an instance of the UIActivityIndicator class and positioned this to be centred within our alert dialog.
We then made a call to the startAnimating method, which will display the activity indicator and cause the activity indicator graphic to start animating within our alert window.
After we have added this to our alert window view, we then need to release our activityindicator object once it has been added to the alert view, and then set up a delay to dismiss our activity view after a period of three seconds has lapsed, by calling the showProgressDismiss method.
You can call the stopAnimating method to stop the activity view from animating, but you will need to remember to set the hideWhenStopped property if you want to permanently hide the activity view.
Finally we created our showProgressDismiss method to dismiss the activity indicator after a number of specified seconds lapsed by our showProgress event when the number of specified seconds has lapsed within the afterDelay property.
When using alert dialogs that don't contain any buttons, these don't properly call back to the delegate and therefore don't auto-dismiss correctly, as we have seen in our example, so we need to manually call the dismissWithClickedButtonIndex:animated: method which will close our alert dialog and stop our activity view from animating.
Have a go hero - adding a second activity indicator Now that you have a good working knowledge of how to go about creating activity indicators and using these within your application, the task will be to add a secondary activity indicator. This will need to display a message after the downloading updates message stating that the updates are being finalized:
- You will need to create another instance of the activity indicator.
- Next, you will need to add the activity indicator to the base class view.
- Finally, set up a delay and create a new method to dismiss the activity indicator after a delay of five seconds has passed.
Once you have that working, you will have mastered how to create an application that contains more than one form of notification to grab the user's attention. This lets the user know that updates are being finalized.
Time for action - implementing the Display Alert Dialog method Our next step is to implement our displayAlertDialog method. This method will be responsible for displaying an alert message to the user when the Display Alert Dialog is pressed. The user will be able to respond to the buttons displayed, which will dismiss the dialog:
- Open the GetUsersAttentionViewController.m implementation file.
- In the action event which you created for the Display Alert Dialog button, add the following code:
// Handles of the setting up and displaying of our Alert View
Dialog
- (IBAction)displayAlertDialog:(id)sender {
// Declare an instance of our Alert View dialog
UIAlertView *dialog;
// Initialise our Alert View Window with options
dialog =[[UIAlertView alloc] initWithTitle:@"Alert Message"
message:@"Have I got your attention" delegate:self
cancelButtonTitle:@"Cancel" otherButtonTitles:@"OK",nil];
// display our dialog and free the memory allocated by our
dialog box
[dialog show];
[dialog release];
}
What just happened? In the above section, we looked at how we can use the UIAlertView alert class to display a series of buttons and display a message based on the button pressed. We started by declaring and instantiating an instance of the UIAlertView class with a variable dialog. We then initialise our alert view to display the required buttons which we would like to have displayed and then display the dialog and release the memory used.
You will notice when we declared our UIAlertView class, it comprised of a number of parameters that are associated with this control.
These are explained below:
ALERT PARAMETERS
DESCRIPTION
initWithTitle
Initializes the view and sets the title that will be displayed at the top of the alert dialog box.
message
This property sets the string that will appear within the content area of the alert dialog box.
delegate
Contains the object that will serve as the delegate to the alert.
If this is set to nil, then no actions will be performed when the user dismisses the alert.
cancelButtonTitle
This sets the string shown in the default button for the alert.
OtherButtonTitles
Adds additional buttons to the sheet that are delimited by commas as shown:
otherButtonTitles:@"Out to Lunch",@"Back in 5 Minutes",@"Gone Fishing".
Responding to Alert Dialog Button presses In order for us to be able to capture the button that the user has pressed, we use the clickedButtonIndex method of the alertView property. This provides the button index of the pressed button and starts from 0. In the following code snippet, we look at how we are able to capture and respond to the actions when the user presses each of the buttons.
To get started, open the GetUsersAttentionViewController.m implementation file and create the following delegate function underneath the displayAlertDialog method:
// Responds to the options within our Alert View Dialog
-(void)alertView:(UIAlertView *)alertView
clickedButtonAtIndex:(NSInteger)buttonIndex
{
// String will be used to hold the text chosen for the button
pressed.
NSString *buttonText;
// Determine what button has been selected.
switch (buttonIndex)
{
case 0: // User clicked on Cancel button
buttonText=@"You clicked on the 'Cancel' button";
break;
case 1: // User clicked on the OK button
buttonText=@"You clicked on the 'OK' button";
break;
default: // Handle invalid button presses.
buttonText=@"Invalid button pressed.";
}
// Initialise our Alert Window
UIAlertView *dialog=[[UIAlertView alloc] initWithTitle:@"Alert
Message" message:buttonText delegate:nil cancelButtonTitle:@"OK"
otherButtonTitles:nil,nil];
// display our dialog and free the memory allocated by our dialog
box
[dialog show];
[dialog release];
}
In the above code snippet, we declared a delegate method which handles the button presses and retrieves the index of the button which was pressed. We declare an NSString variable buttonText, which will be used to store the title text to be displayed by our UIAlertView.
In order to determine the index of the button which was pressed, we perform a switch statement and then set up the buttonText variable with the associated text. Finally, we declare and instantiate a UIAlertView object, which will be used to display the greeting for the button which was pressed. We then display the dialog and then finally release the memory used.
If we wanted to retrieve the selected button using its text property, we would do so as shown in the following code snippet:
NSString *buttonTitle=[actionSheet buttonTitleAtIndex:buttonIndex];
if ([buttonTitle isEqualToString:@"OK"])
{
buttonText=@"You clicked on the 'OK' button";
}
Finally, we looked at another way in which we can derive what button has been pressed. We declare an object NSString buttonTitle, which retrieves the text label for the button pressed on the action sheet. We then use the isEqualToString method to perform the comparison.
Have a go hero - adding additional buttons and creating the events I will let you put into practice what you have just learnt.
Our application needs some additional buttons to be added to our Alert Dialog, and also needs to have the necessary code created to display the associated messages based on the button pressed. One way to do this would be as follows:
- Locate the displayAlertDialog method
- Add the necessary buttons to create within the otherButtonTitles property, separated by commas
- Locate the alertView:(UIAlertView *) method
- Add the necessary buttonText messages within the switch statement based on the buttonIndex of the button
Once you have that working, you will have extended your application to handle multiple buttons.
Using Action Sheets to associate with a view Action sheets are very similar to alerts in how they are initialized, and how the user responds to decisions. However, action sheets can be associated within a given view, tab bar, or toolbar and are animated when they become associated with the view onscreen. Action sheets also provide a separate button which is displayed as bright-red to alert the user to potential deletion of information.
Time for action - implementing the Display Action Sheet method Action sheets provide the user with a variety of options to choose from. For instance, if a user was sending an SMS and there was a problem with it being sent, an action sheet will pop up asking the user if they want to Try again or Dismiss:
- Open the GetUsersAttentionViewController.m implementation file.
- In the action event which you created for the Display Action Sheet button, add the following code:
// Displays our Action Sheet
- (IBAction)displayActionSheet:(id)sender {
// Define an instance of our Action Sheet
UIActionSheet *actionSheet;
// Initialise our Action Sheet with options
actionSheet=[[UIActionSheet alloc]initWithTitle:@"Available
Actions" delegate:self cancelButtonTitle:@"Cancel"
destructiveButtonTitle:@"Close" otherButtonTitles:@"Open
File",@"Print",@"Email", nil];
// Set our Action Sheet Style and then display it to our view
actionSheet.actionSheetStyle=UIBarStyleBlackTranslucent;
[actionSheet showInView:self.view];
}
What just happened? In this section, we added some code that will be called when the button Display Action Sheet is pressed. What this code is doing is declaring and instantiating an object actionSheet based on the UIActionSheet class.
We then initialise our action sheet to display the required buttons which we would like to have displayed and then apply the action sheet style, then display the action sheet into the current view controllers view by using the showInView:self.view method.
You will notice when we declare our action sheet, that it comprises of a number of parameters associated with this control, which are explained below:
ACTIONSHEET PARAMETERS
DESCRIPTION
initWithTitle
Initializes the sheet with the specified title string.
delegate
Contains the object that will serve as the delegate to the sheet.
If this is set to nil, the sheet will be displayed, but pressing a button will have no effect except dismissing the sheet.
cancelButtonTitle
This sets the string shown in the default button for the alert.
destructiveButtonTitle
The title of the option that will result in information being lost. This button is represented in bright red. However, if this is set to nil, then no destructive button will be displayed.
OtherButtonTitles
Adds additional buttons to the sheet that are delimited by commas as shown: otherButtonTitles:@"Item 1",@"Item 2",@"Item 3".
As of iPhone OS 3.0, action sheets can include up to seven buttons while maintaining the standard layout. If you happen to exceed this, the display will automatically change into a scrolling table view control, with the ability to add as many options as you need.
Responding to Action Sheet Button presses In order for us to be able to capture the button that the user has pressed we use the clickedButtonIndex method of the actionSheet property. This provides the button index of the pressed button and starts from 0. In the following code snippet, we look at how we are able to capture and respond to the actions when the user presses each of the buttons.
Create the following delegate function located under the displayActionSheet method:
// Delegate which handles the processing of the option buttons
selected -(void)actionSheet:(UIActionSheet *)actionSheet
clickedButtonAtIndex:(NSInteger)buttonIndex
{
// String will be used to hold the text chosen for the button
pressed.
NSString *buttonText;
// Determine what button has been selected.
switch (buttonIndex)
{
case 0: // We selected the Close button
buttonText=@"You clicked on the 'Close' button";
break;
case 1: // We selected the Open File button
buttonText=@"You clicked on the 'Open File' button";
break;
case 2: // We selected the Print button
buttonText=@"You clicked on the 'Print' button";
break;
case 3: // We selected the Email button
buttonText=@"You clicked on the 'Email' button";
break;
case 4: // We selected the Cancel button
buttonText=@"You clicked on the 'Cancel' button";
break;
default: // Handle invalid button presses.
buttonText=@"Invalid button pressed.";
}
// Initialise our Alert Window
UIAlertView *dialog=[[UIAlertView alloc] initWithTitle:@"Alert
Message" message:buttonText delegate:nil cancelButtonTitle:@"OK"
otherButtonTitles:nil,nil];
// display our dialog and free the memory allocated by our dialog
box
[dialog show];
[dialog release];
}
In the above code snippet, we declare a delegate method which handles the button presses and retrieves the index of the button which was pressed based on the order in which they were added. We declare an NSString variable buttonText which will be used to store the title text to display by our UIAlertView. In order to determine the index of the button which was pressed, we perform a switch statement and then set up the buttonText variable with the associated text. Finally, we declare and instantiate a UIAlertView object which will be used to display the greeting for the button which was pressed. We then display the dialog and then finally release the memory used.
Just in the same way as we did for alerts, if you want to retrieve the selected button using its text property, we would do so as shown in the following code snippet:
NSString *buttonTitle=[actionSheet buttonTitleAtIndex:buttonIndex];
if ([buttonTitle isEqualToString:@"Close"])
{
buttonText=@"You clicked on the 'Close' button";
}
In the above code snippet, we looked at an alternative way by which we can derive what button has been pressed. We declared an object NSString buttonTitle, which retrieves the text label for the button pressed on the action sheet. We then used the isEqualToString method to perform the comparison.
Customizing an Action Sheet Action sheets can take on numerous different user interface (UI) styles which are derived from the UIBarStyle class and can be applied to the actionSheetStyle property as demonstrated below:
actionSheet.actionSheetstyle=UIBarStyleBlackTranslucent;
This code renders the action sheet in a translucent black style. If you wanted to inherit the style of the views toolbar provided to which you have applied a style, you could use the UIActionSheetStyleAutomatic or if you preferred to go for a more solid-black classy finish, you could use and apply the UIActionSheetStyleBlackOpaque style:

Time for action - handling alerts via sounds and vibrations Before we can play any sound or perform vibrations on our iPhone, we must first import the AudioToolBox library so that we can make use of its properties and methods:
- Open the GetUsersAttentionViewController.m implementation file and add the following highlighted code as shown in the code snippet below:
#import "GetUsersAttentionViewController.h"
#import "AudioToolBox/AudioToolBox.h"
@implementation GetUsersAttentionViewController - Our next step is to implement our playAlertSound method. This method will be responsible for playing a short 30 second sound when the Play Alert Sound button is pressed. In the action event which you created for the Play Alert Sound button, add the following code:
// Plays an Alert Sound
- (IBAction)playAlertSound:(id)sender {
SystemSoundID soundID;
NSString *soundFile = [[NSBundle
mainBundle]pathForResource:@"Teleport" ofType:@"wav"];
AudioServicesCreateSystemSoundID((CFURLRef)[NSURL
fileURLWithPath:soundFile],&soundID);
AudioServicesPlaySystemSound(soundID);
} - Our next step is to implement our vibratePhone method. This method will be responsible for making our phone vibrate when the Vibrate iPhone button is pressed. Enabling the ability to provide feedback via vibration is a very simple and painless technique and all that is required is to pass a System Sound ID value to the AudioServicesPlaySystemSound method as we will see in a minute.
- In the action event which you created for the Vibrate iPhone button, add the following highlighted code:
- (IBAction)vibratePhone:(id)sender {
AudioServicesPlaySystemSound (kSystemSoundID_Vibrate);
}
Now that we have finally created the necessary methods within our application to enable us to play sounds and vibrations, our next step is to build our application, as shown below. - We are now ready to build and compile our GetUsersAttention application. The screenshot below shows the output from each of the buttons when they are pressed:

So there you have it. We have explored five different ways in which we can communicate effectively with the user. By implementing these methods into your own applications, you will not only make your application more user-friendly, but it will also look more professional.
What just happened? In the above section, we looked at how to implement sounds and vibrations in our application to grab the user's attention. In order for that to happen, we declared a variable called SoundID which will be used to refer to the sound file. Next, we declared an NSString soundFile variable which will contain the path to the sound file location by using the NSBundle class method mainBundle which corresponds to the directory location where the sound file Teleport.wav is located and use the ofType method to identify the type of sound file we want to play.
Once we have defined our path, we use the AudioServicesCreateSystemSoundID function to create a SystemSoundID that will be used to actually play the file.
This function takes the following two parameters: CFURLRef and fileURLWithPath. The CFURLRef parameter points to the location where the file is kept. The second parameter is a pointer to the SystemSoundID class that will be used to store the memory address of the file. The fileURLWithPath method returns an NSURL object which is what our CFURLRef is expecting.
Once we have set up our SoundID properly, all that is required is to play the sound which is achieved by passing the SoundID variable to the AudioServicesPlaySystemSound method.
We finally passed the kSystemSoundID_Vibrate constant variable to our AudioServicesPlaySystemSound method to allow our device to handle ibrations which have been defined within the AudioToolBox.h header file.
Summary In this article, we learned about the different types of notification methods and modal dialogs which we can use to communicate effectively with the user.
We also learned how to go about using alerts and Action sheets and how to set the UI appearance of the Action Sheet using its various styles.
We finally looked at the two non-visual means by which we can communicate with the user by using sounds and vibrations using the AudioToolBox framework. Simply by using this framework, you make your applications more exciting and easily add short playing sounds and vibrate the iPhone.
Xcode 4 iOS Development Beginner's Guide Use the powerful Xcode 4 suite of tools to build applications for the iPhone and iPad from scratch