Requirements:
Character Animation Model - Updated 9-7-2019 - Mega
Character Animation Model - Updated 9-7-2019 - Media
Character Animation Model - Updated 9-7-2019 - Drop
Character Animation Model - Updated 9-7-2019 - Google
Official 3d Max to MOW Exporting Plugins Link
Gerrys Mod to 3D Max - Google Drive
Gerrys Mod to 3D Max - Dropbox
Garry's Mod to 3D Max - Media Fire
Combine Pack Updated on 23-8-2019 Media Fire
Combine Pack Updated on 23-8-2019 Mega
Combine Pack Updated on 23-8-2019 Google Drive
Combine Pack Updated on 23-8-2019 Drop Box
Introduction:
Well I packed all my animation files in which the base files for animations are:
Final Animation Model (Modified).max
Final Animation Model (Original).max
Where for sample I placed files as follows:
New WIP 7 Best Bolt Rifle Animation - LIE - ALT.max
New WIP 7 Best Bolt Rifle Animation STAND - ALT.max
New WIP 9 Best Bolt Rifle Animation SQUAT - ALT.max
Perminantal 4 - IDLE - ALT.max
And for original animation check the folder:
Final Basic Idle and Bolt Action NEW - Copy
but its an obsolete method now and its hard as hell, Its just to have the taste of how I start animations.
Now back on topic the following image set will explain how to do the basic animation for which I will explain basics first:
-All animations are in the folder:
C:\SteamLibrary\steamapps\common\Men of War Assault Squad 2\resource\gamelogic.pak\properties\animation\human
and here is also an folder of idle animations and there is also an interesting folder:
C:\SteamLibrary\steamapps\common\Men of War Assault Squad 2\resource\gamelogic.pak\properties\human_fsm
In human_fsm there is set of files of animation actions with tags which is linked with human_anm.ext in:
C:\SteamLibrary\steamapps\common\Men of War Assault Squad 2\resource\gamelogic.pak\properties\animation\human
Which have set and sequence of animations.
For example if you go to die.inc in human_fsm folder there is argument :
{State "swim_dying"
{fromTagged "swim"}
{transit "dead"}
{tag "dying"}
}
In this code you can see the trigger is swim, it define which action it carry or you can add extra function or create whole new argument, like instead of swim, it could be fly, sit etc, depend on death from which action you want to trigger it.
Where in human_fsm it trigger by:
{blend "pose_die_water" {pose <⥯¥àì ¥â ¯®§ë!> end}}
Pose define animate played on action mention in blend which define the action to be performed, as you can replace any pose with any of your animation file like:
{blend "pose_die_water" {pose "Game Over" end}}
OR
{blend "pose_die_water" {pose "They_Got_Me" end}}
So blend is the action where pose name the file which animation will play upon.
To add new set of animation or configure current animations you have to make changes in these folders and files.
Configuration:
To change the animation speed and aspects, you have following common commands in human_anm.ext in:
C:\SteamLibrary\steamapps\common\Men of War Assault Squad 2\resource\gamelogic.pak\properties\animation\human\
Commands:
- Speed = Define the pace of animation played upon, 1 = 100% faster, you could change it by 0.01 or 0.1 etc depend on your animation style (which is in contrast of frames you span animation in 3D Max).
- Resume = It resume the animation which interrupted by another action, for example if you created bolt action animation but its also applying on SMG, to eliminate that hurdle (because current animation set is limited), just put the resume command before that animation, it will eliminate that bolt action animation on SMG and it will only played at the time where SMG stop firing (due to rapid fire action, where second fired bullet eliminate the action of first fired bullet by the milliseconds it fires), which give a pretty realistic look to it and it also used for other actions like hit or run etc etc.
- dynamicSpeed = it defines the difference of speed same weapon fired from, like you want to give animation to the minigun which at first need cylinders rolling, so you can give 1 at start of animation which slows its speed, but with barrage of bullets start firing it increases its pace.
- Smooth = it is also speed adjustment command but compare to speed it increase or decrease the speed at lower margin like speed 1 is like smooth 0.1.
- movement = it make the animation played during action, its like opposite to resume, as in resume action disrupt by the other action, but in movement it trigger with the action and played till action last long, like walk, run, rotation etc etc.
- file = by file command you can force your custom animation to replace the default animation, it a shortcut also to simply replace your desired animation.
- pinback = used for the gun on back action at time of swimming
- pinback 2 = used for look around with throwable object
Examples:
{sequence "mgun_stan_charger2" {speed 0.7}}
{sequence "Cannon_zis3_gunlayer" {speed 0.9} {resume}}
{sequence "Cannon_pdr25_charger_fire" {speed 1.1} {dynamicSpeed {0 7 2}}}
{sequence "Cannon_pak40_gunlayer" {speed 0.95} {resume} {smooth 0.03}}
{sequence "cover_from_snipe_gun" {movement} {speed 1.25} {smooth 0.8}}
{sequence "cover_from_snipe_gun_for_wind" {file "cover_from_snipe_gun.anm"}}
{sequence "lie_rotate_r45" {movement}}
{sequence "swim_fast_empty" {pinback}}
{sequence "llook_throw_item_begin" {pinback 2}}
{sequence "llook_throw_item_end" {pinback 2}}
3D Max Animation Setup:
- Now lets talk about the core of tutorial which is 3D Max Animation settings: first start with sample models for basic animations and how it played in game.
- And to practice open any of it, they got minor differences:
Final Animation Model (Modified).max
Final Animation Model (Original).max
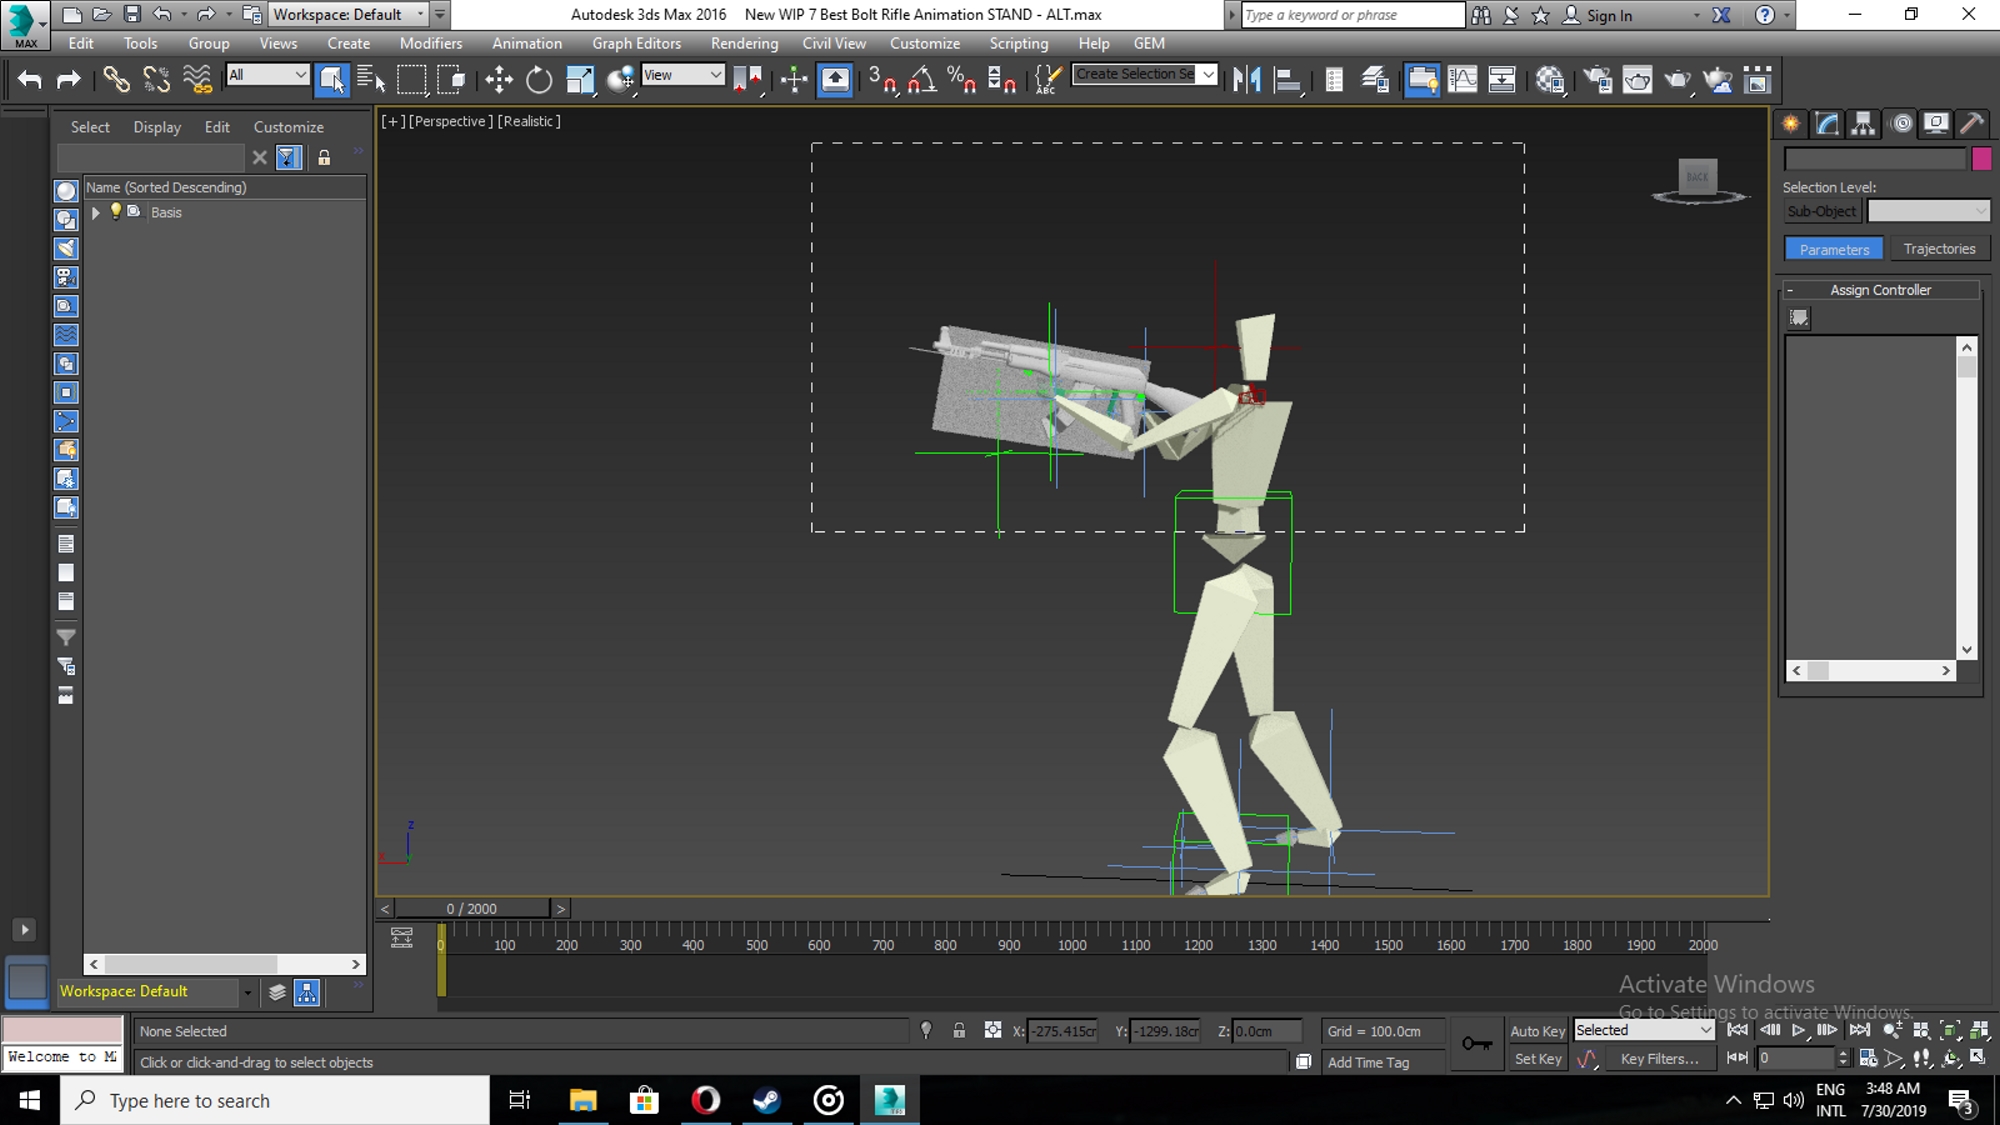
Now for basic have look at following pictures:
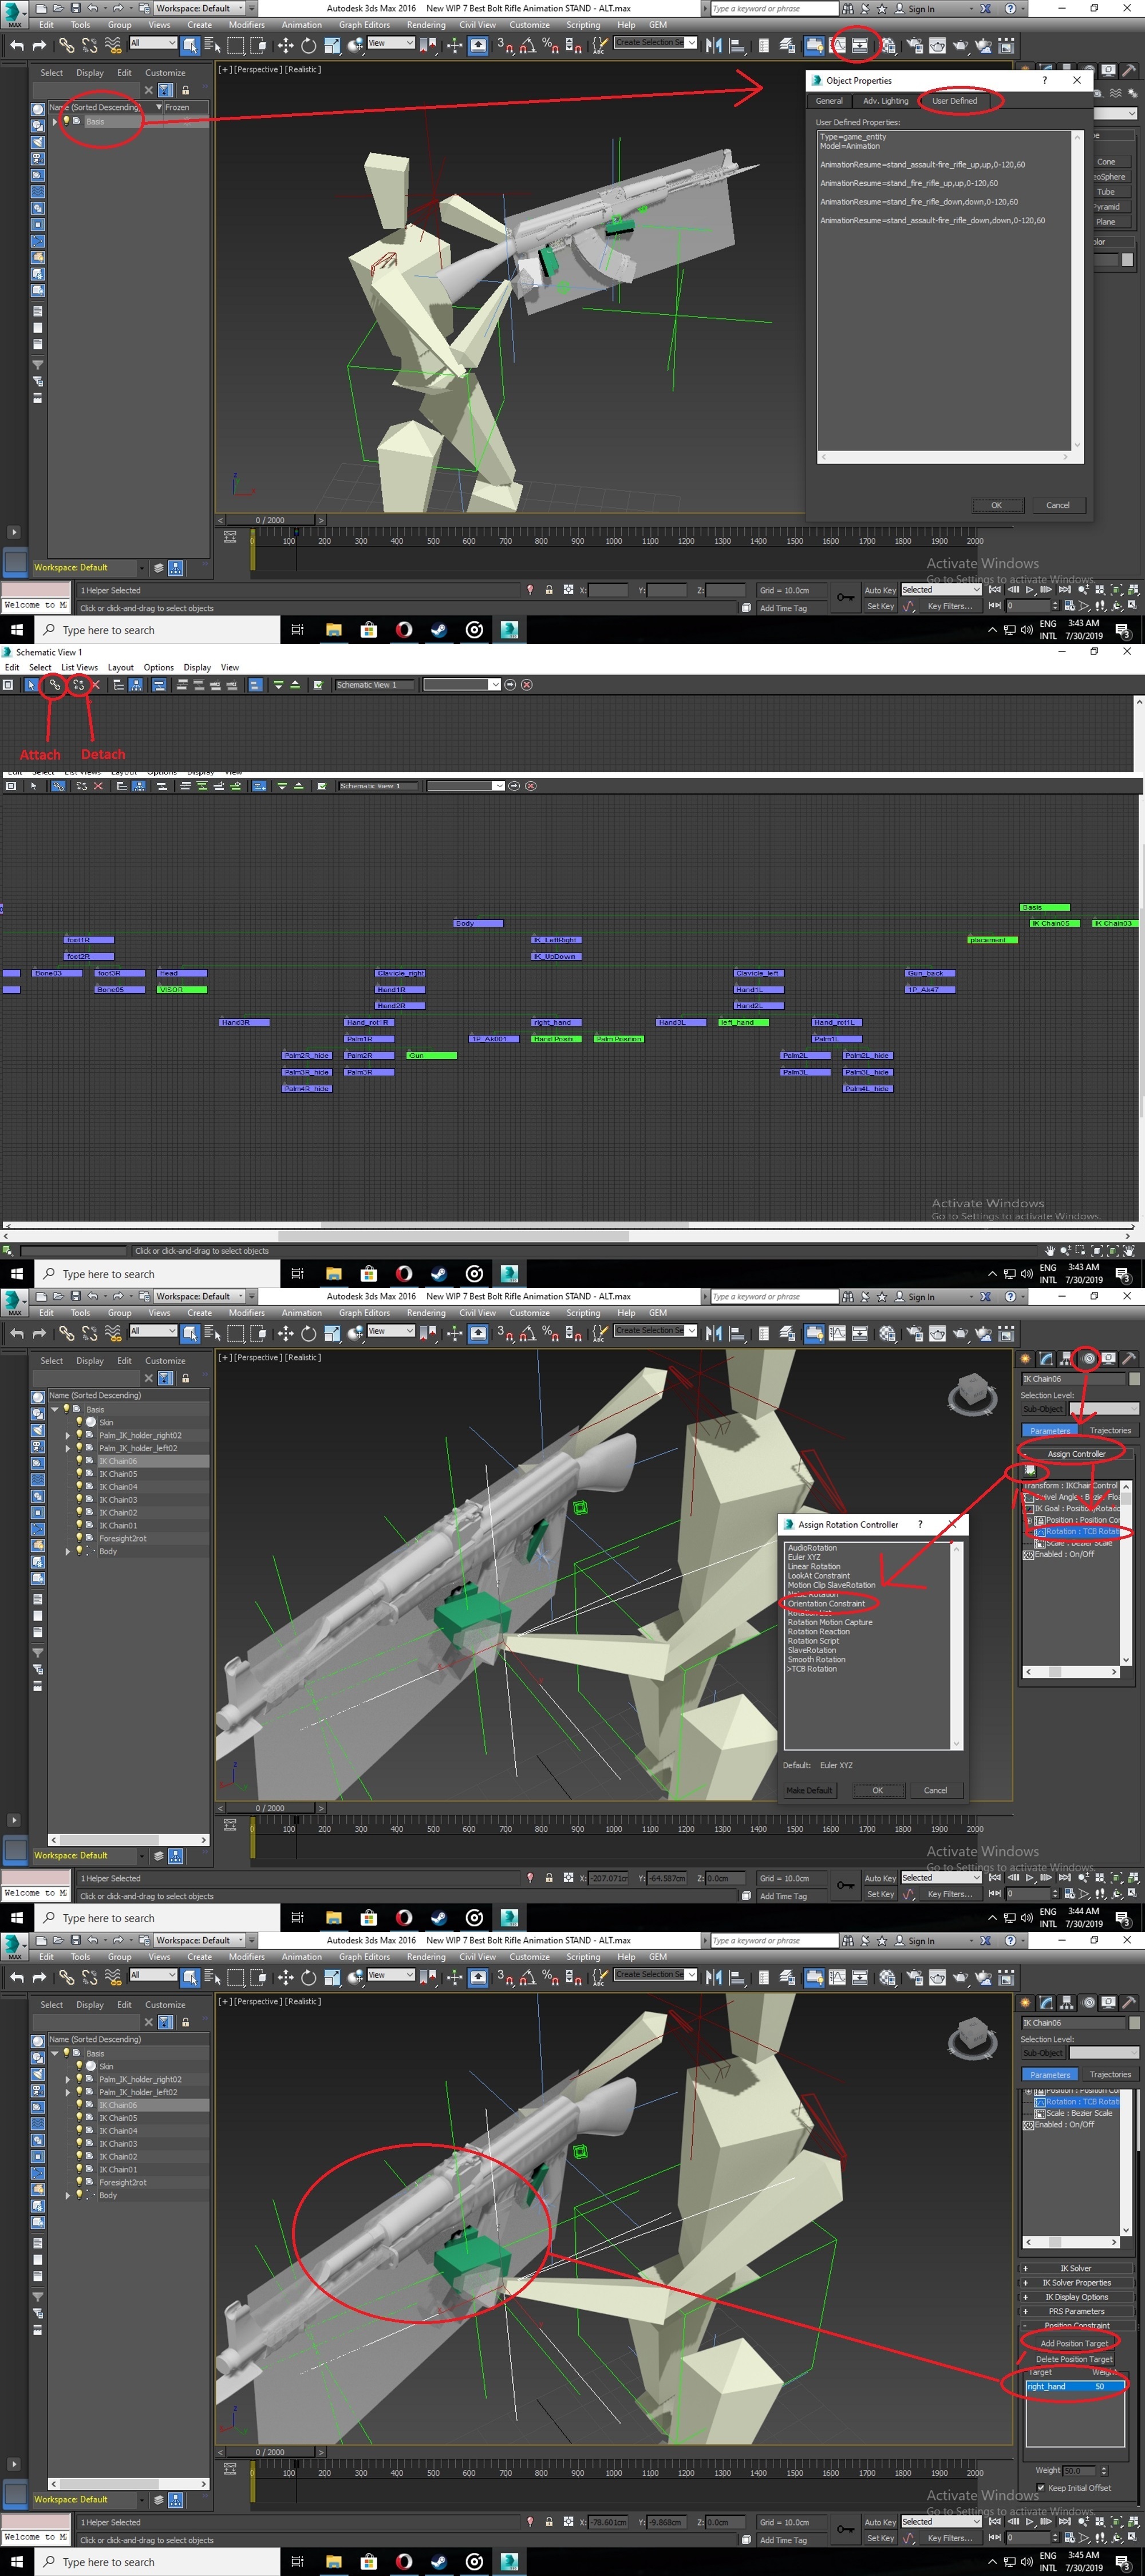

-First of all try to understand the difference between RESTRICTION of BONES movement by Position Constraint and Orientation Constraint.
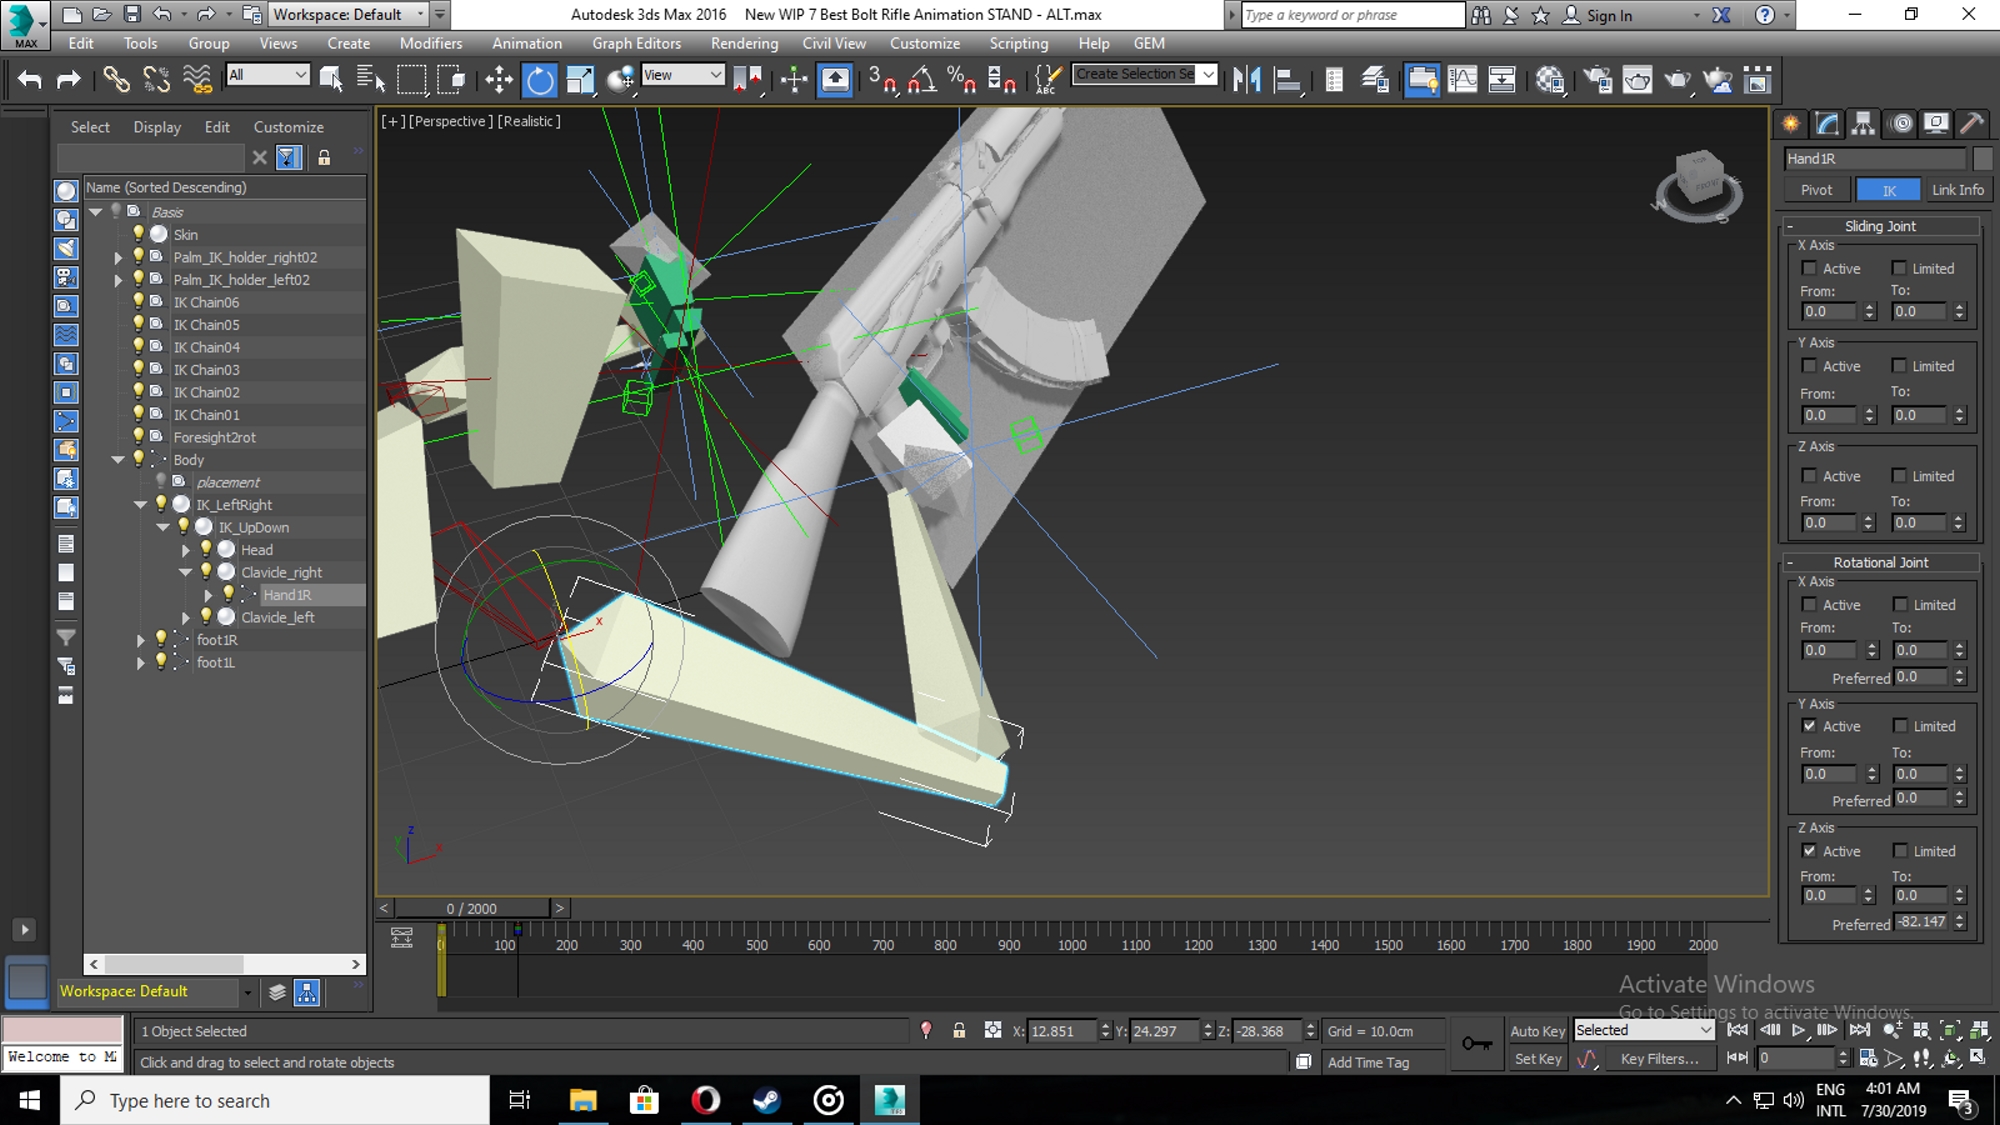
-As to perform error free animation you cant change RIGHT_HAND attachment from "Hand2R" in SYSTEMATIC to any other bone, or else it will display wrongly in game, but by connecting it with "Hand2R" in systematic it will cause its movement to be only with "Hand2R", but if you want to apply animation where hand_right move with any other bone or even want to have two separate bone movement together other than right_hand use POINTERS, restrict that bone movement with pointers while don't change its position in SYSTEMATIC.
-Now attach that pointer to the bone you want to play animation with, so by that the pointer which I named as GUN give animation the the the the right_hand while it keep attached with "Hand2R".
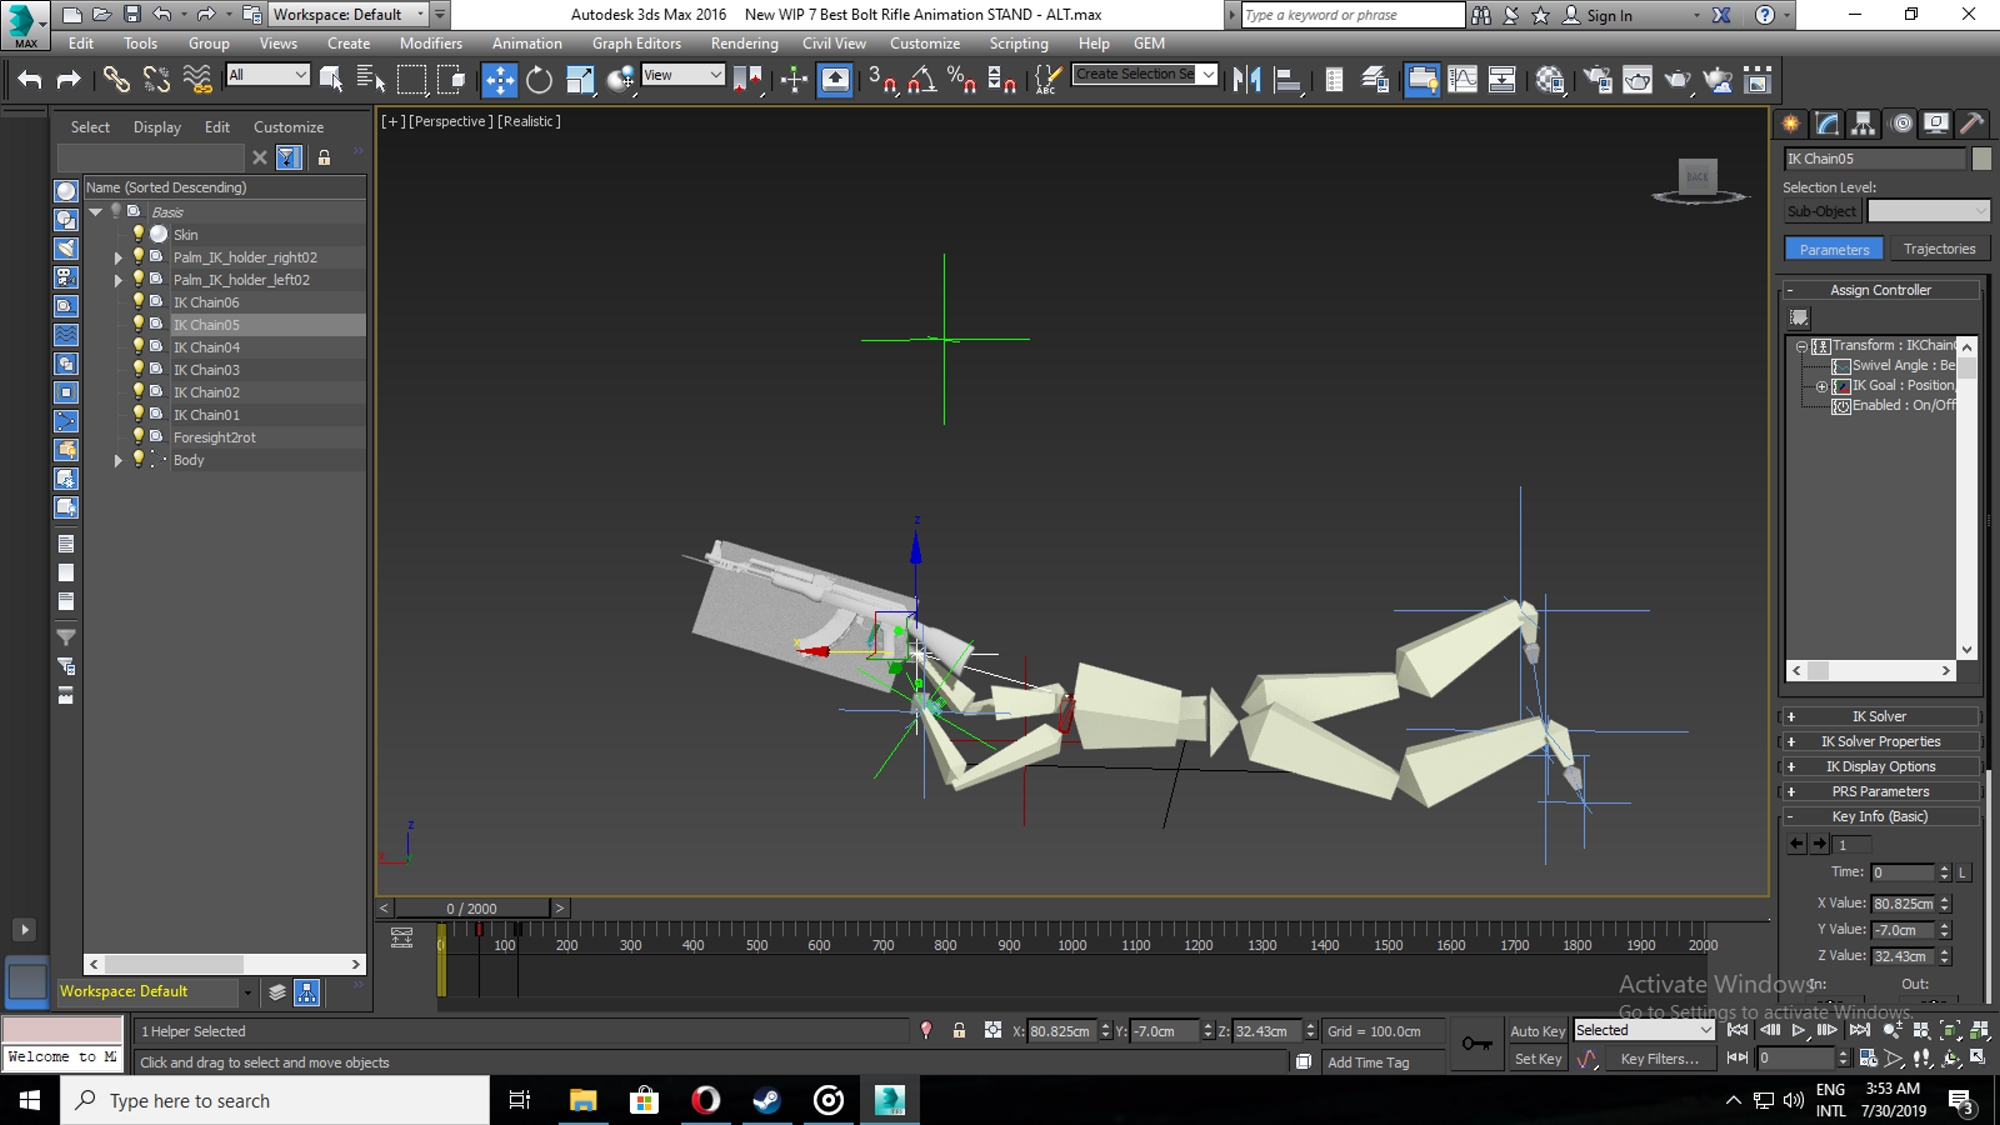
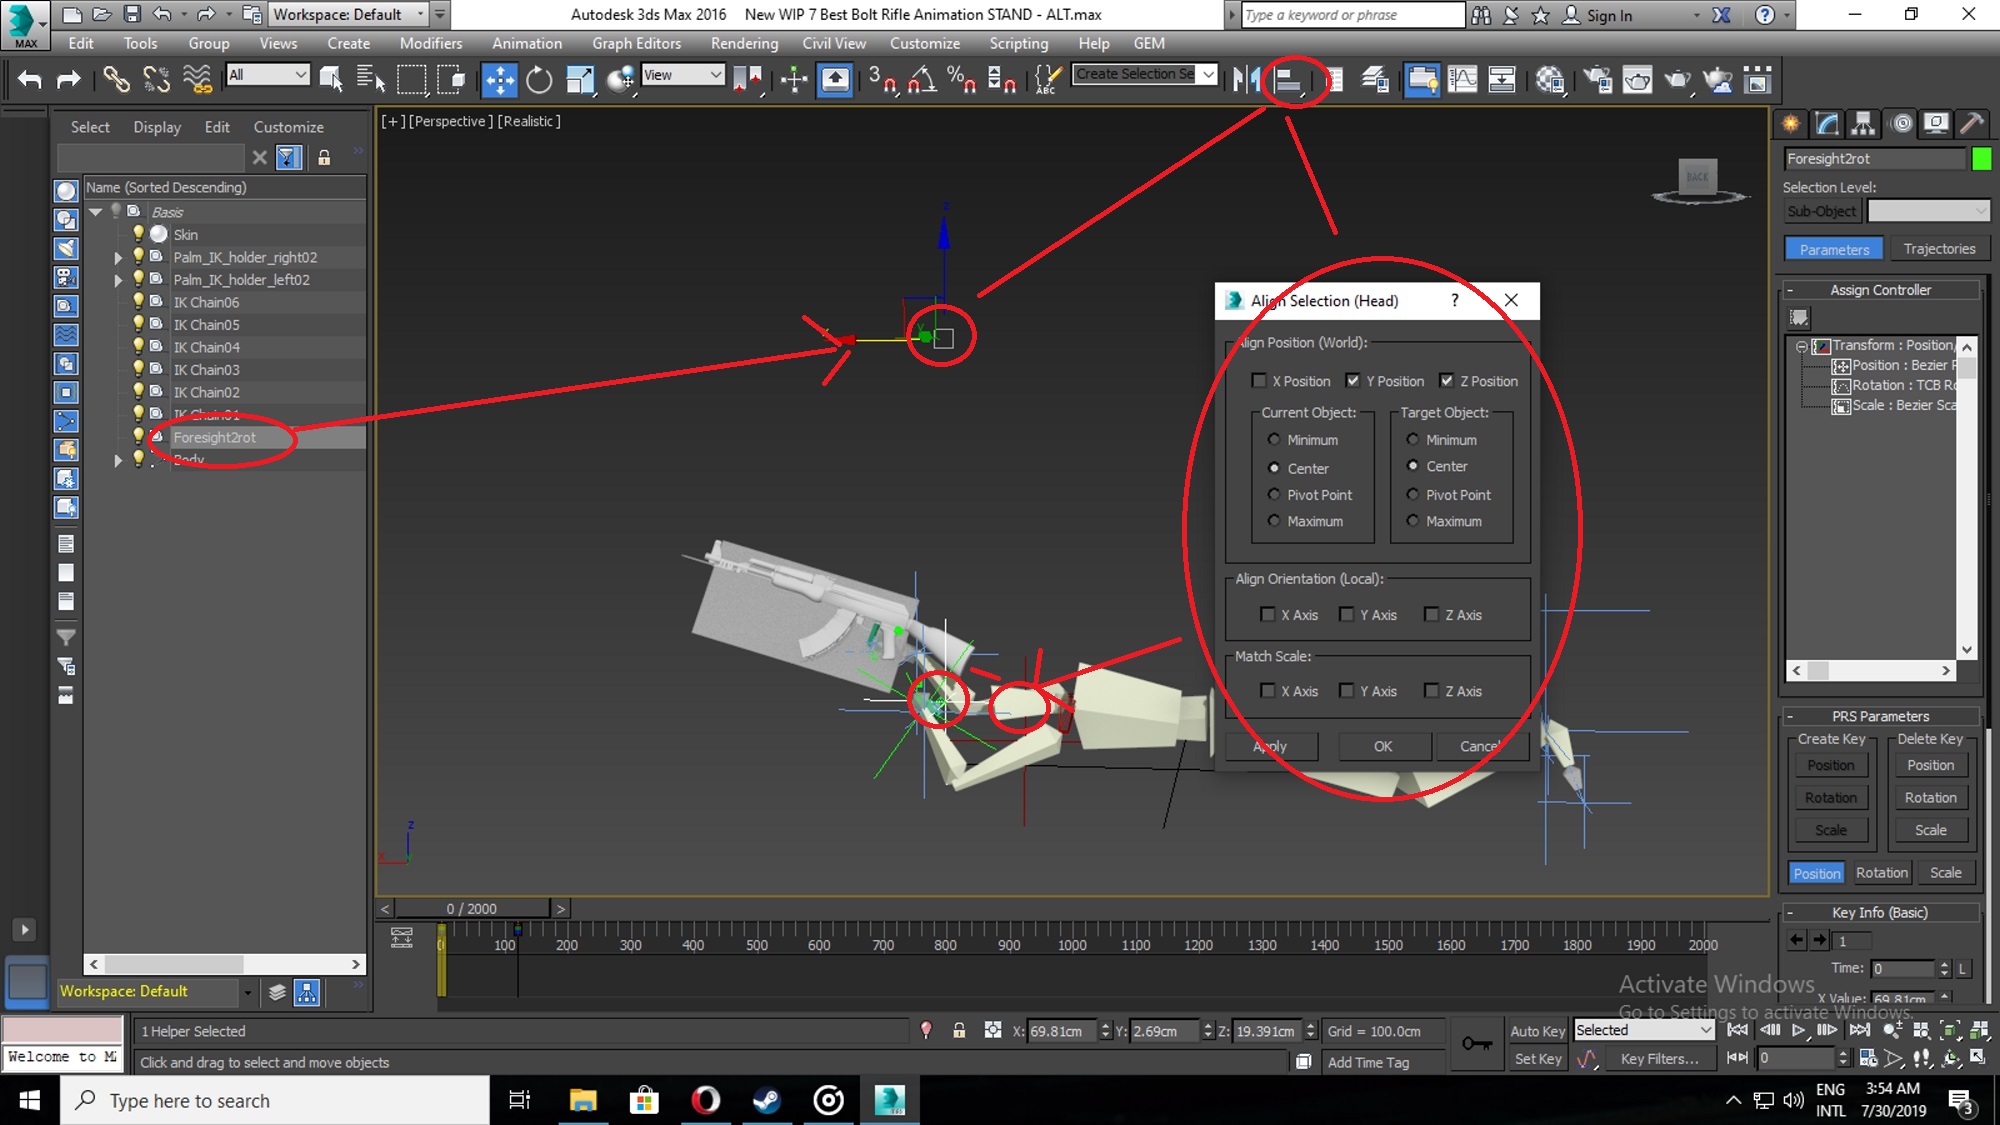
-I also attached two additional pointers in right_hand and restrict their movement with it, while the pointer which RIGHT_HAND is attached called "Palm Position" and "Hand Position", after setting the gun with other bones than "Hand2R", align with IK Chain05 with "ALIGN TOOL" by PIVOT POINT to the "Hand Position" pointer and Palm1R alignment to the "Palm Position" to get the hand on trigger in animation as the right_hand move with different bone, so just consider these pointers as dummy to get the positing of IK Chain05 and Palm1R straight to the TRIGGER of your weapon.
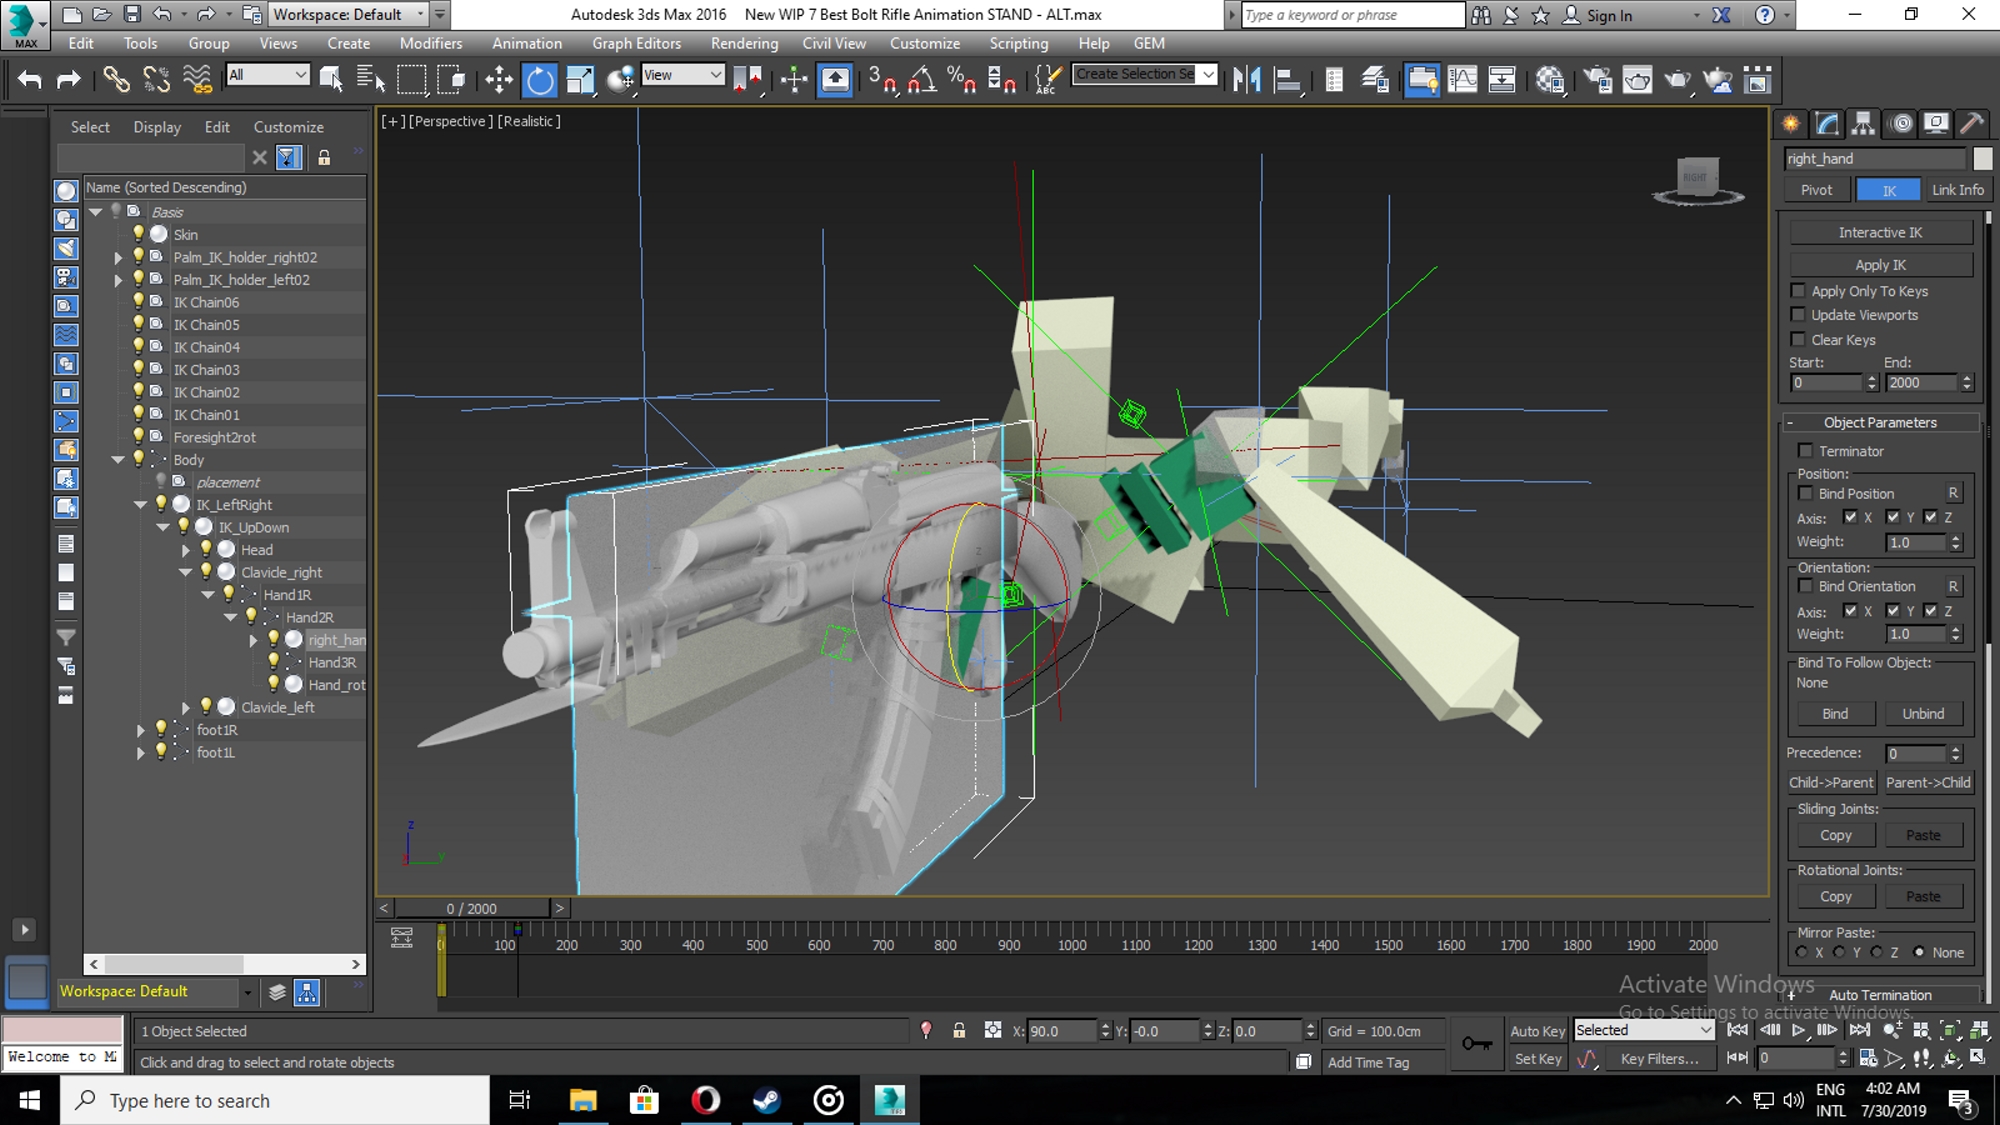
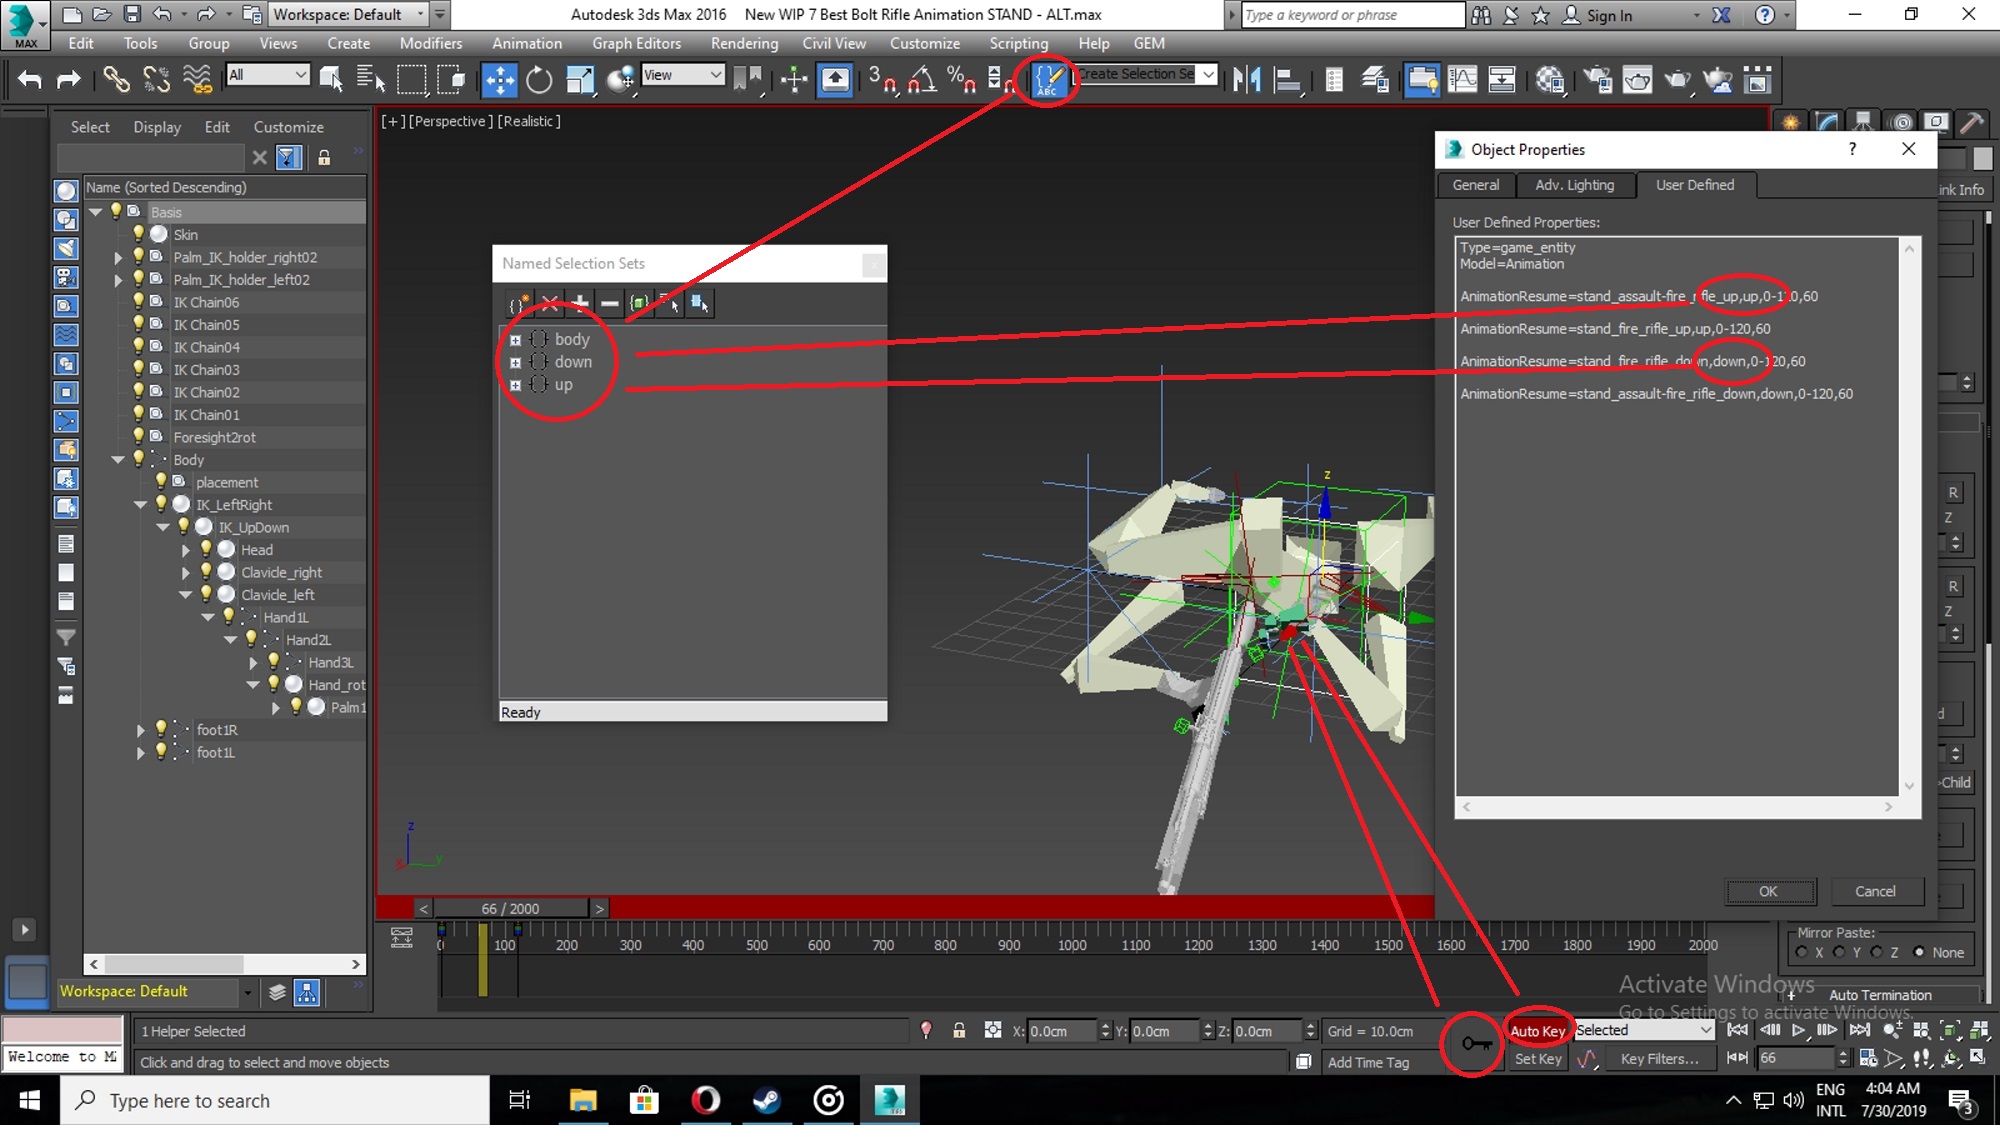
-As those whom followed my previous tutorials have knowledge about basis and animation exporting, in basis we define animation name and what we are exporting and where, it mention animation type, name of animation, range of animation and speed of animation, now go to schematic to review the linking of objects, where right hand defines as the gun in game, which I attach dummy rifle to get the idea that where gun will placed in game compare to 3d Max.
- But here is a catch, in game there is two type of animation, one is for firing a weapon or throwing grenade and one is for other actions.
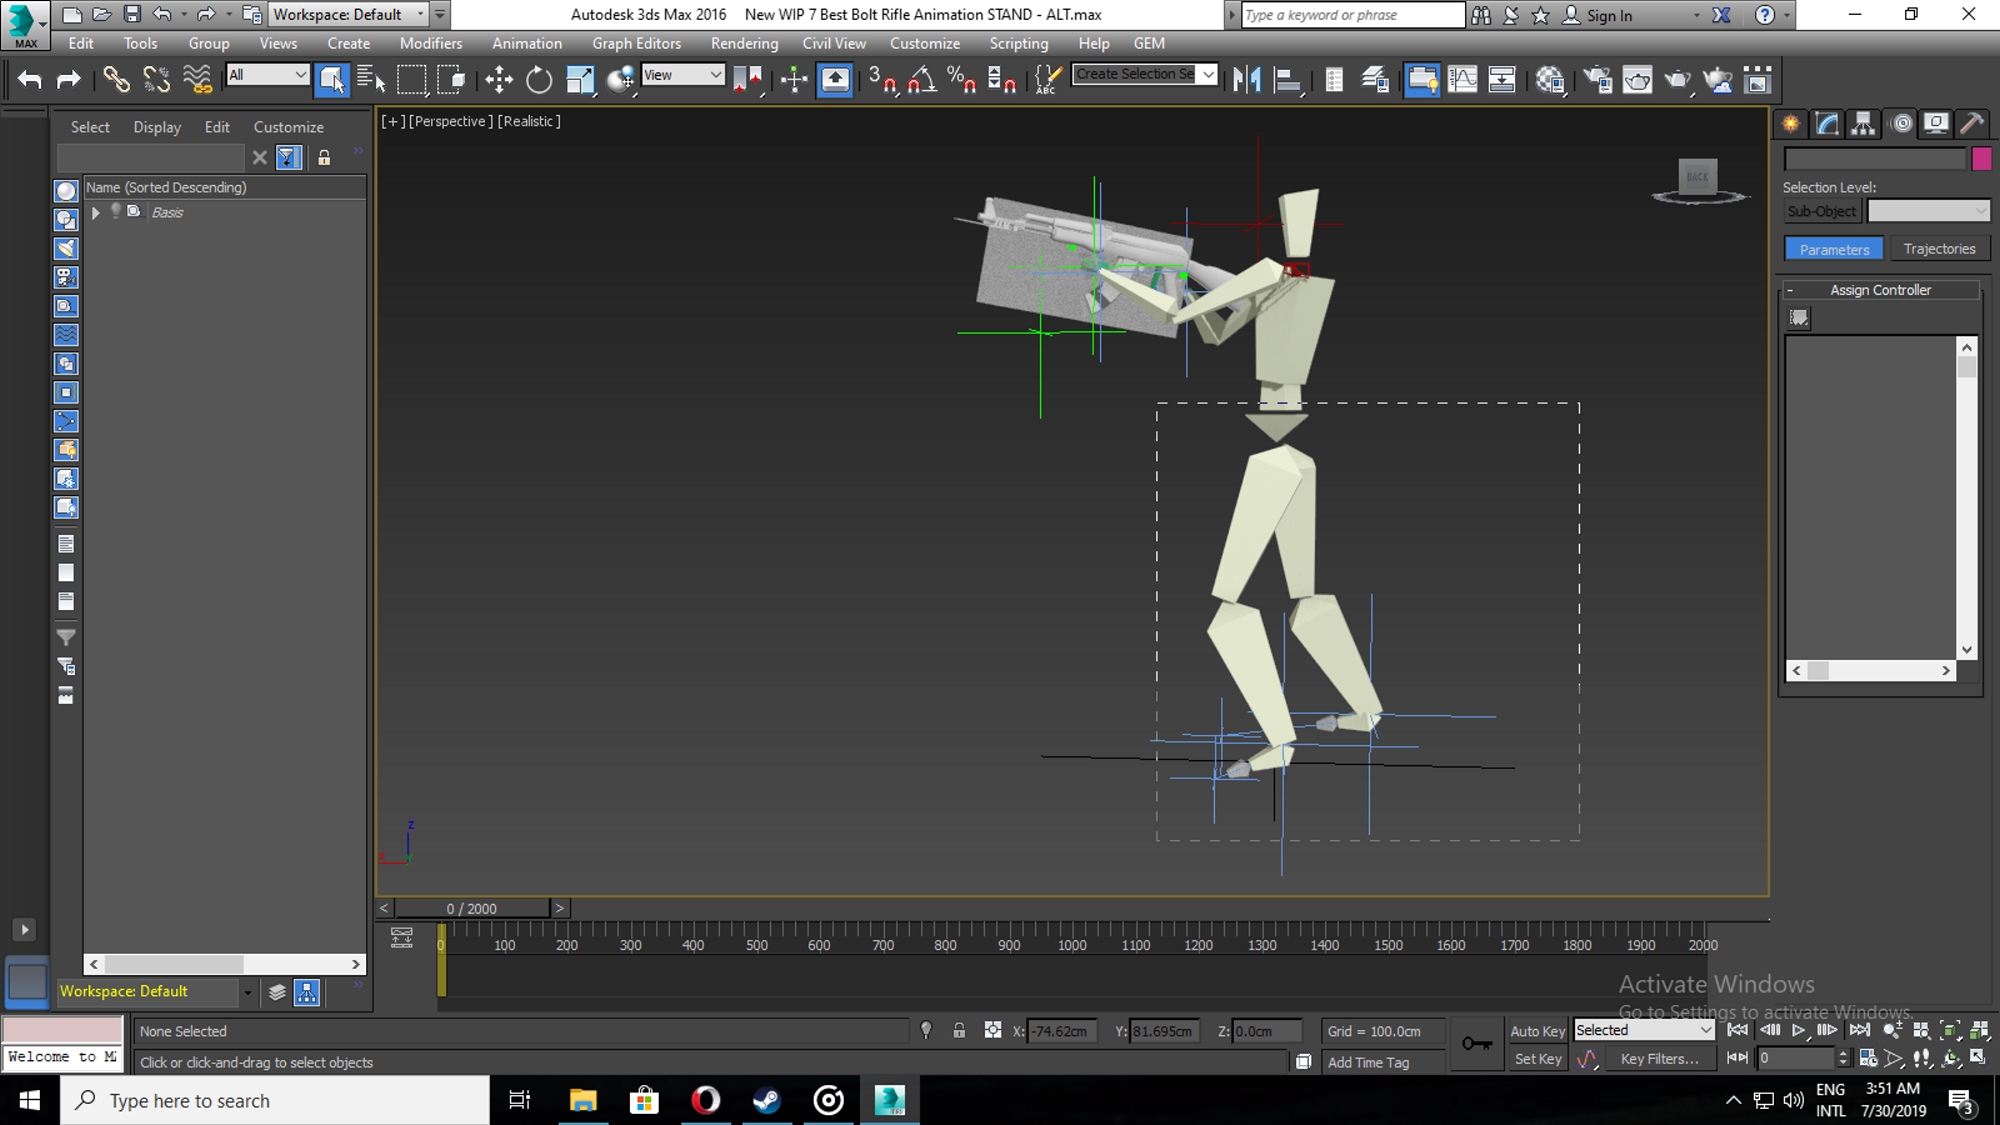
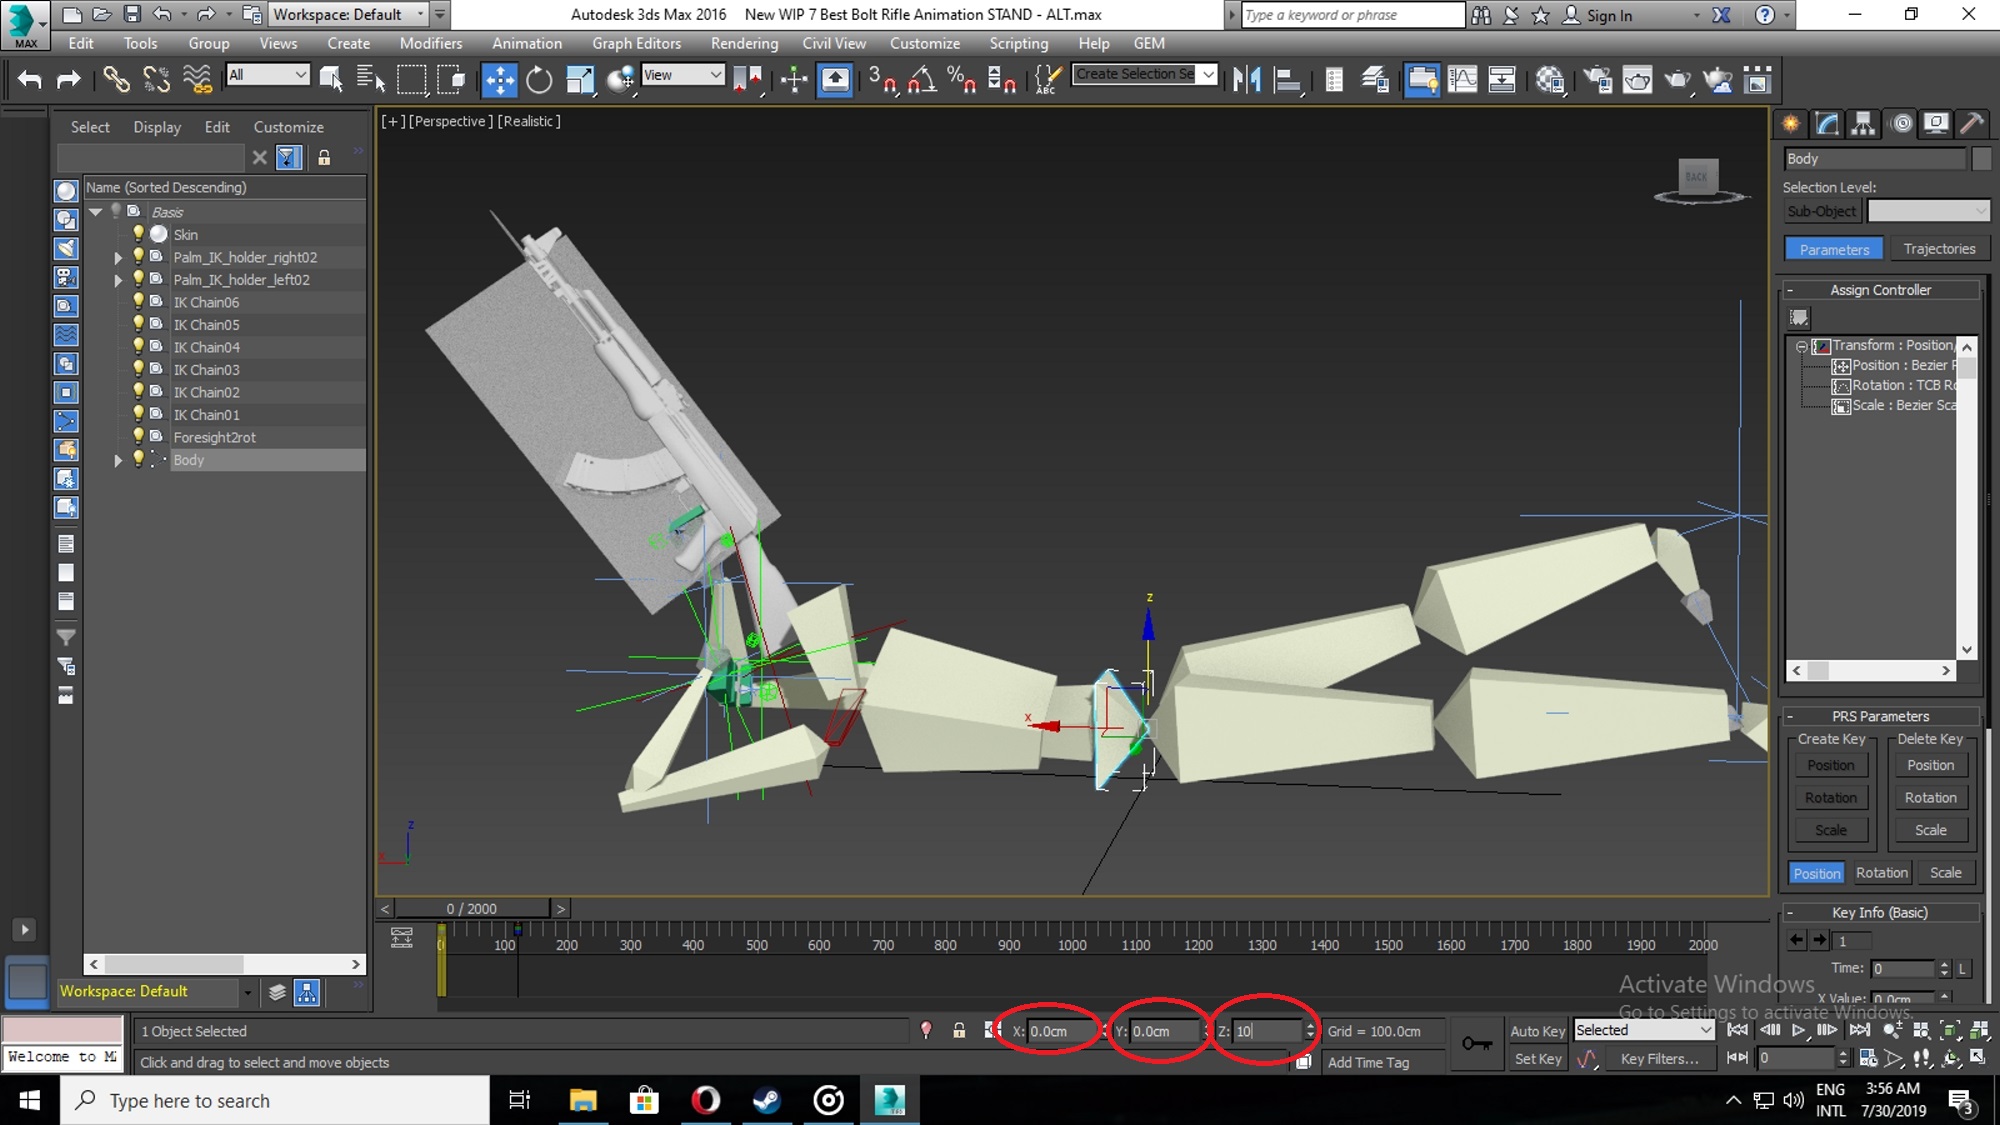
- To firing position animation the position of GUN defines the aiming position in game so make sure its straight to the X axis at 90 "Degree to get the in game animation straight so does for GRENADES.
- To have animations like idle etc you don't need to place GUN exactly at X axis at 90 "Degree, as in such animation it where AIMING is not involved that position doesn't matter
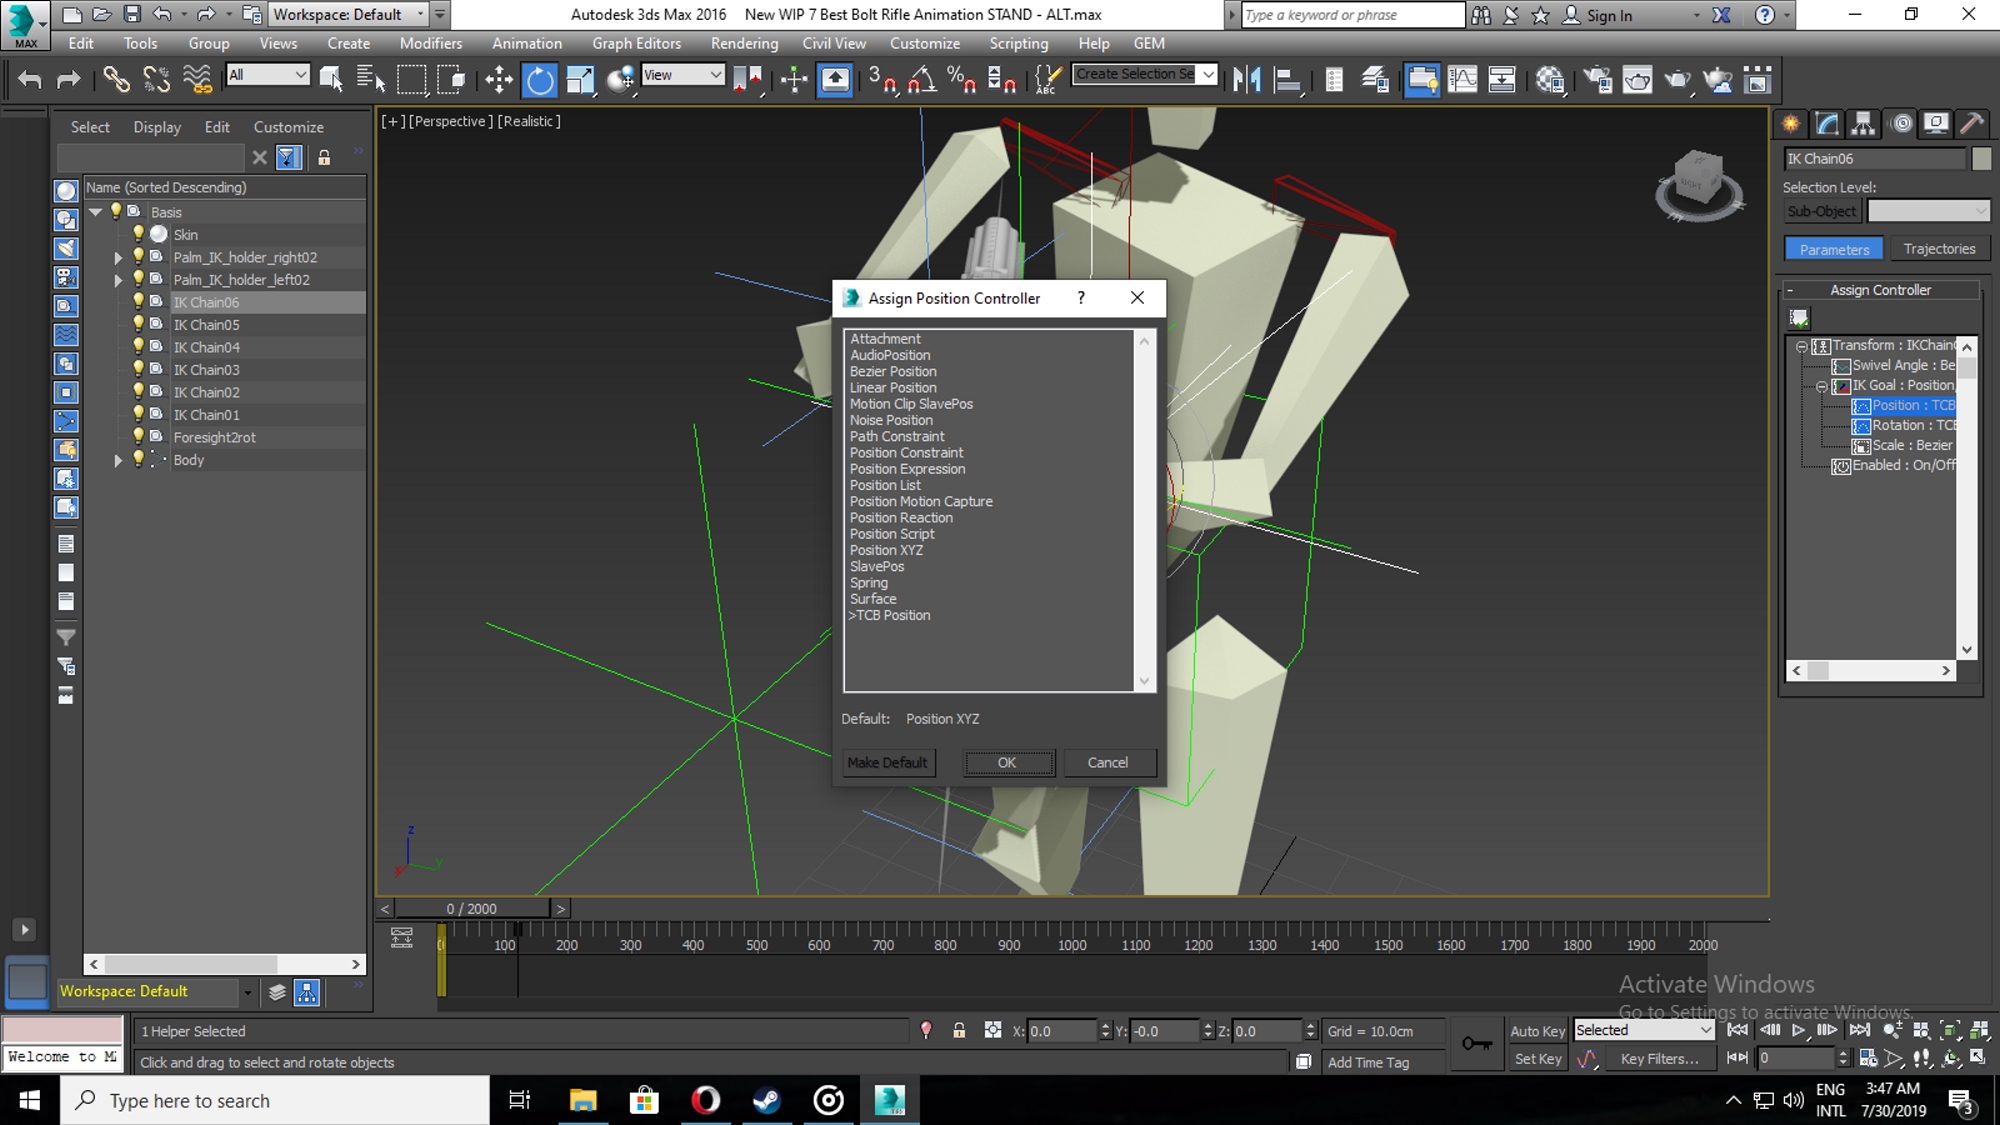
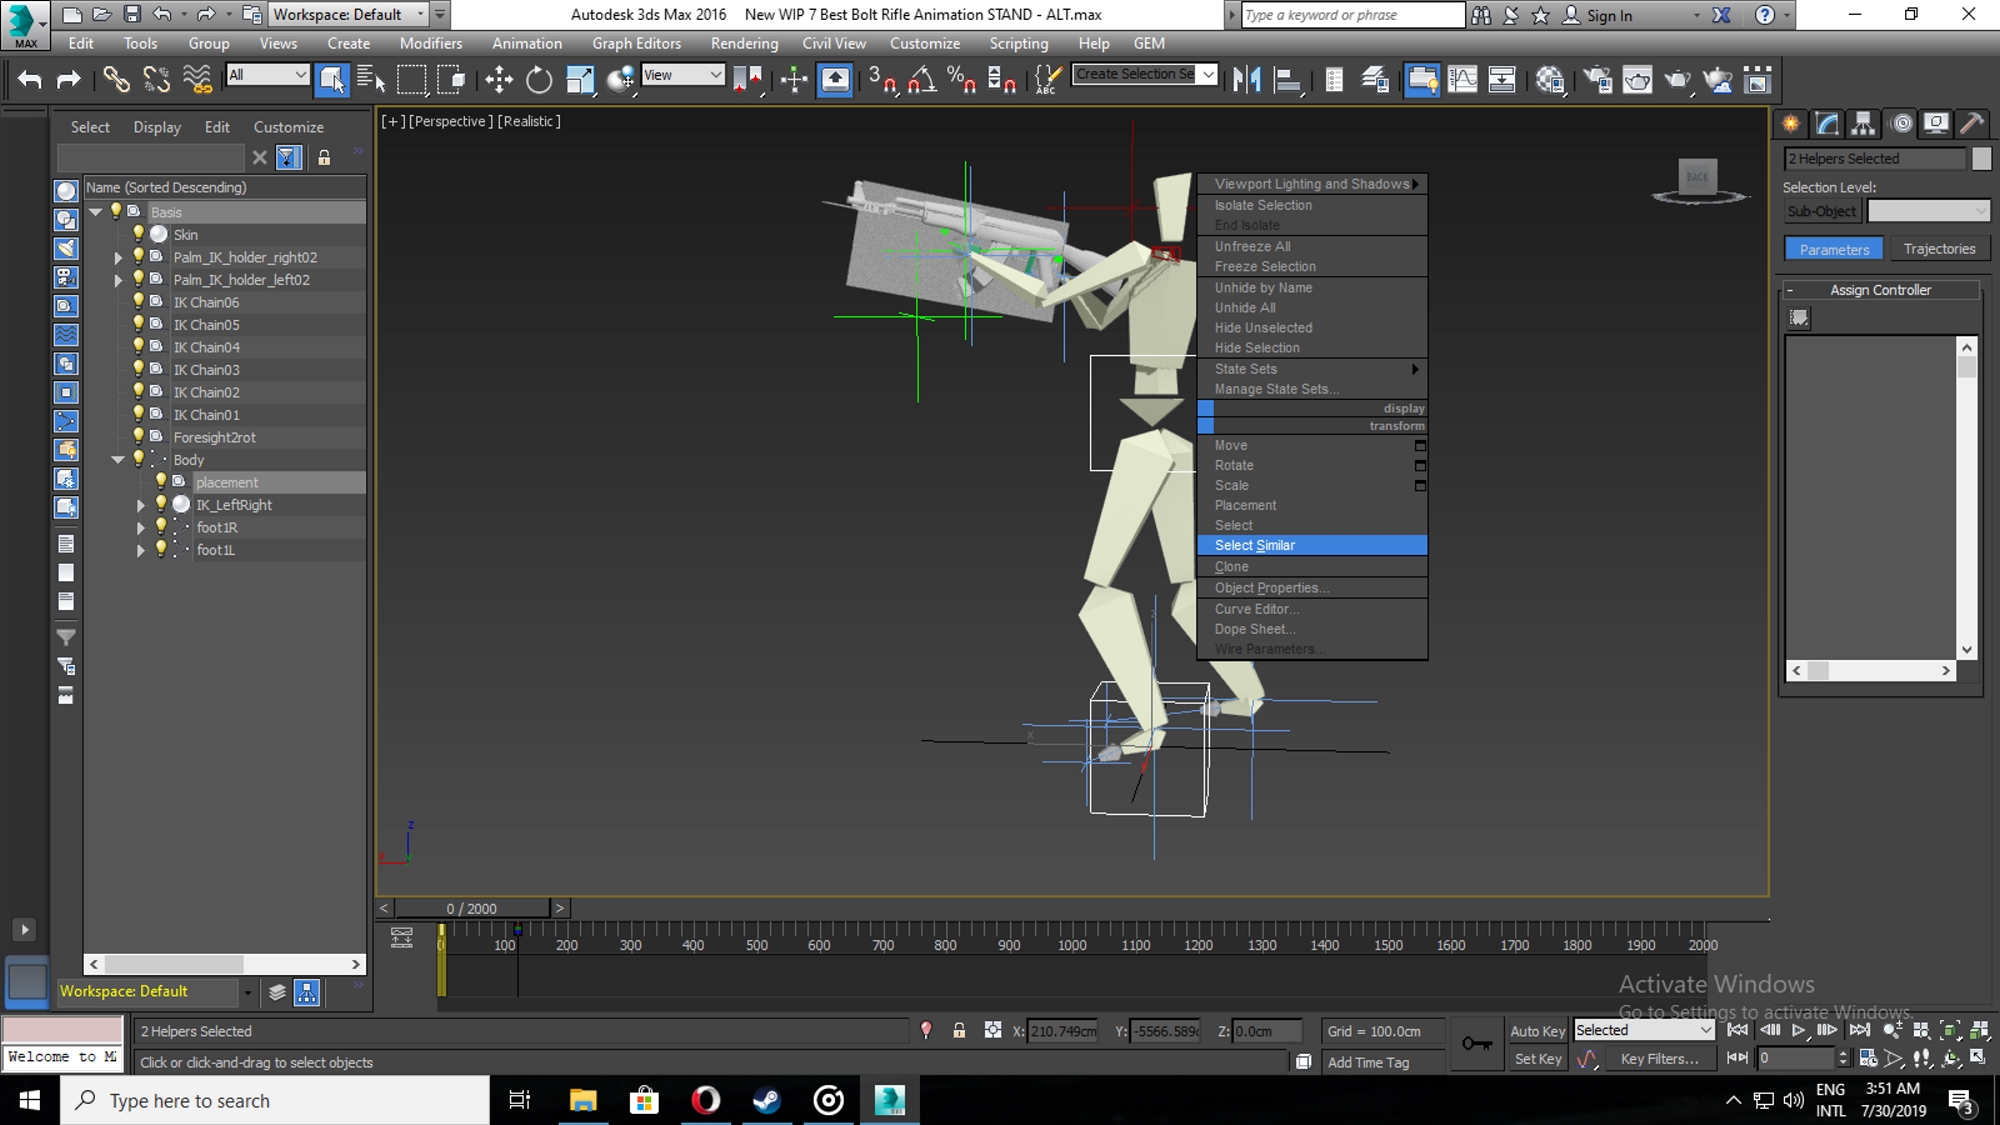
- Where you can also restrict the movement of one object with another without linking them for easy animation, by going through tools in second picture for constraining placement and rotation of of object align with another.
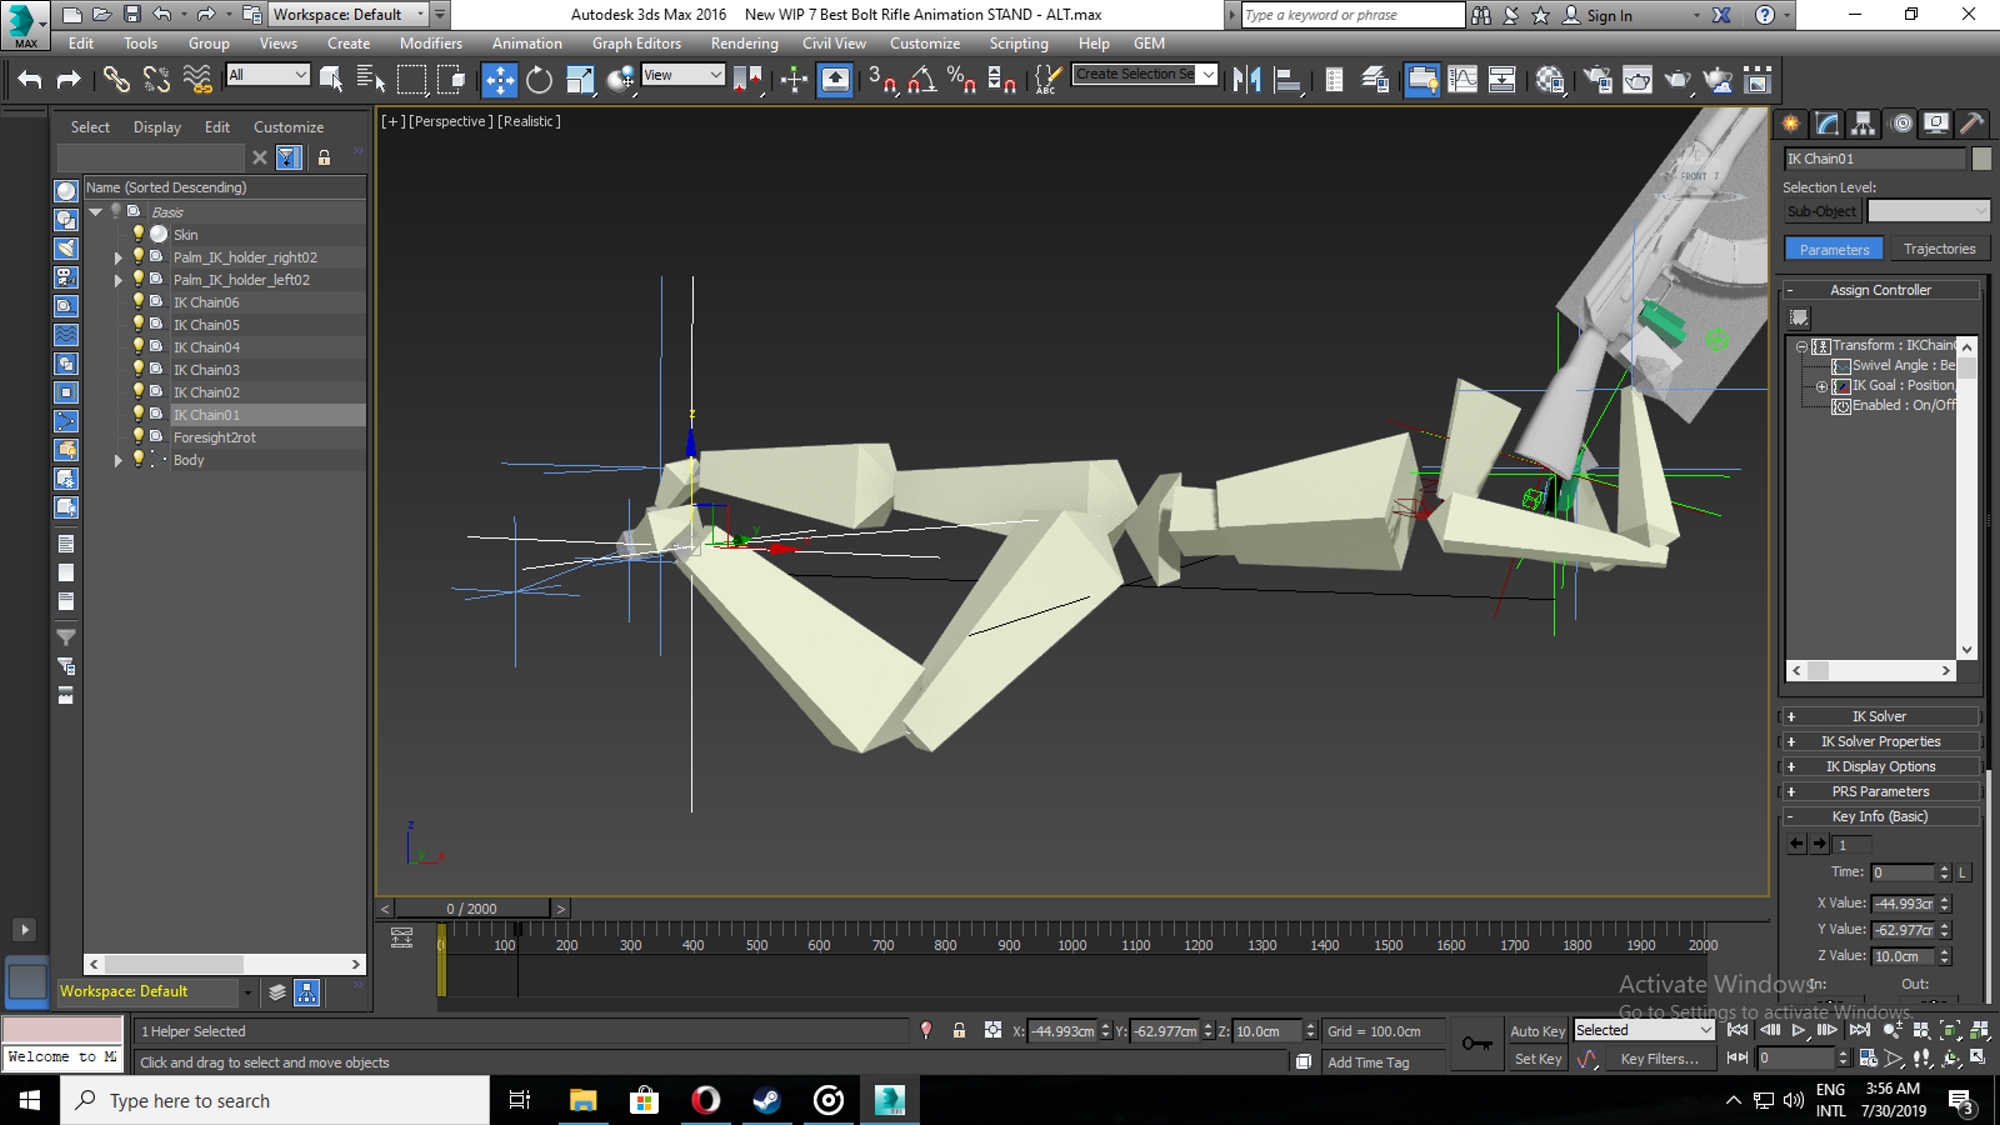
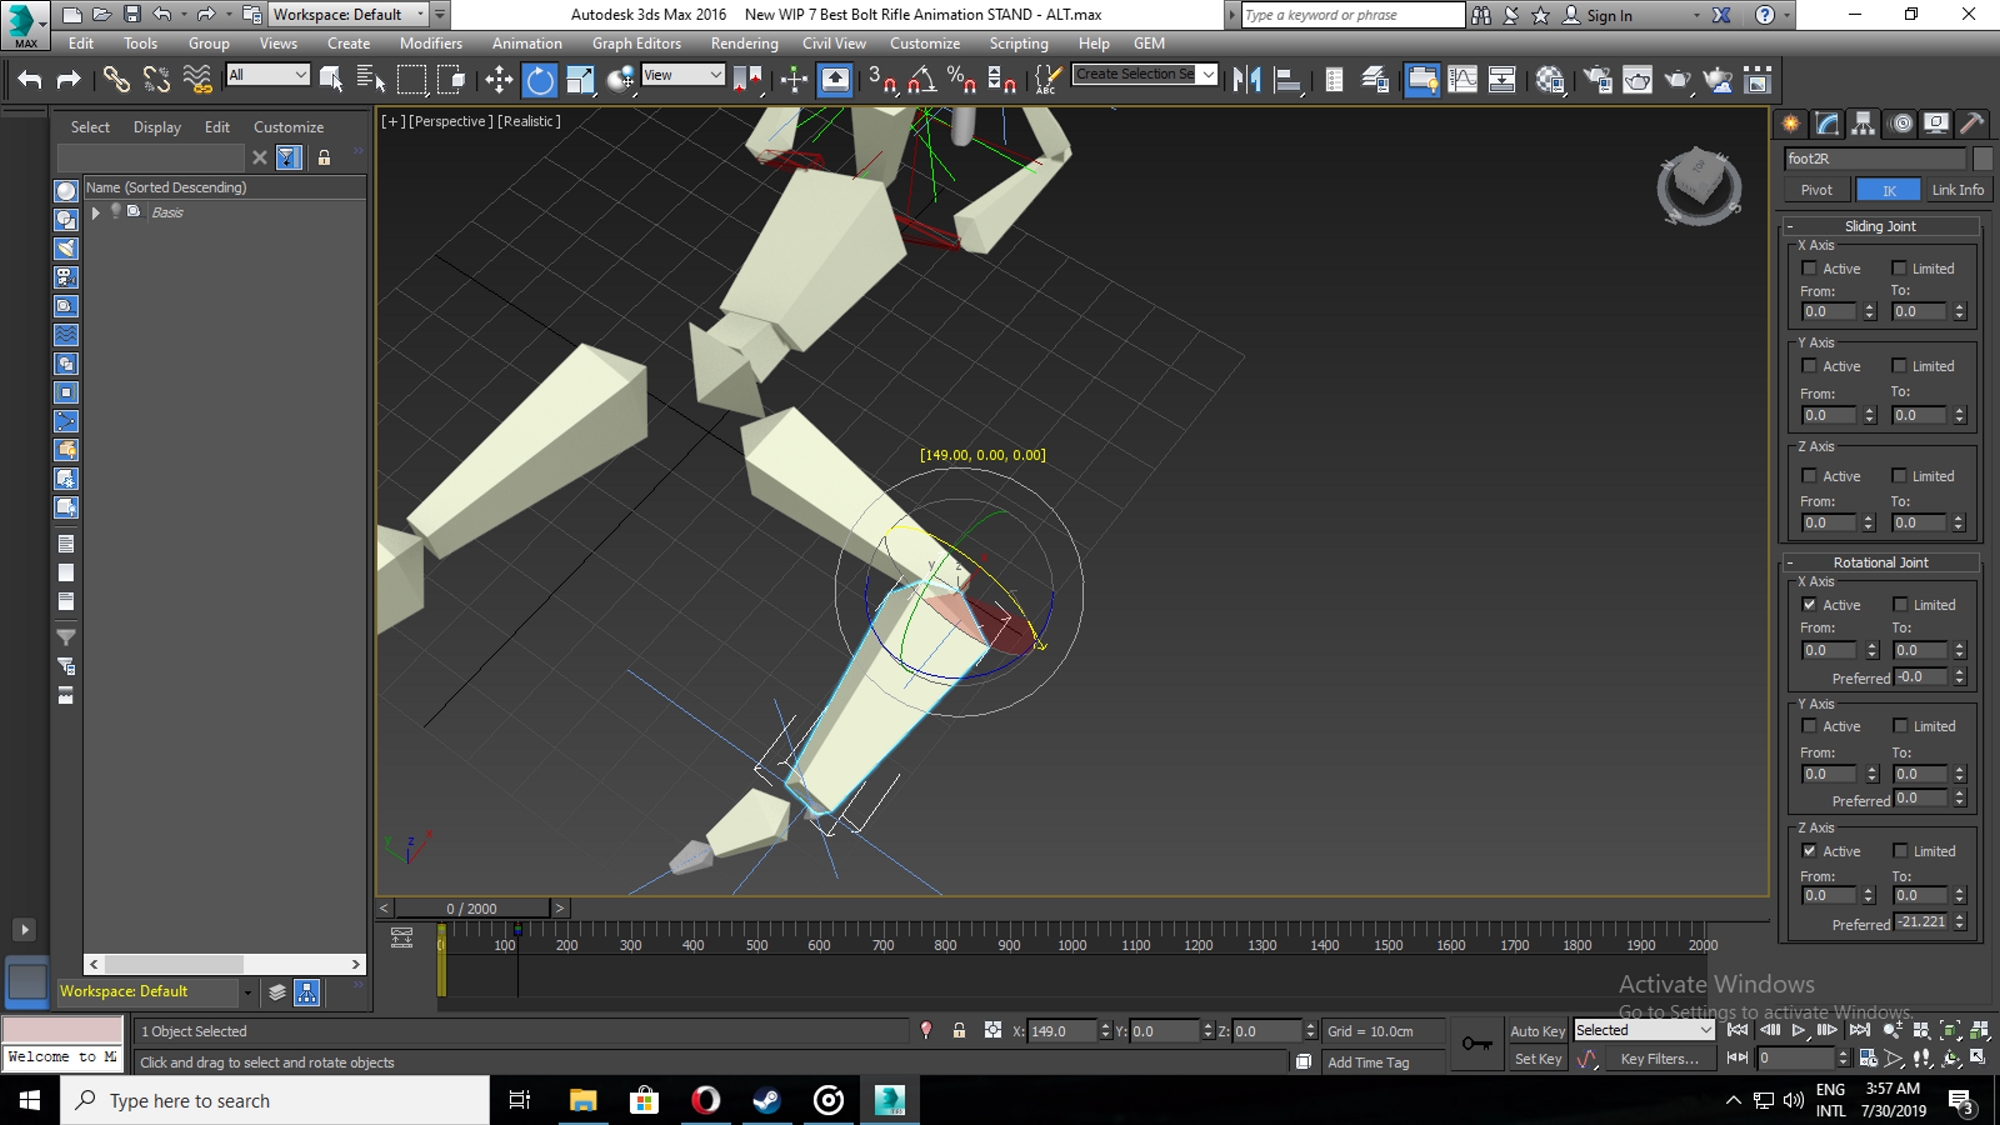
- Now lets have a look at bones restriction, as the skeleton is rigged for basic animation, but to perform advance you have to manually make changes in order to have better animation.
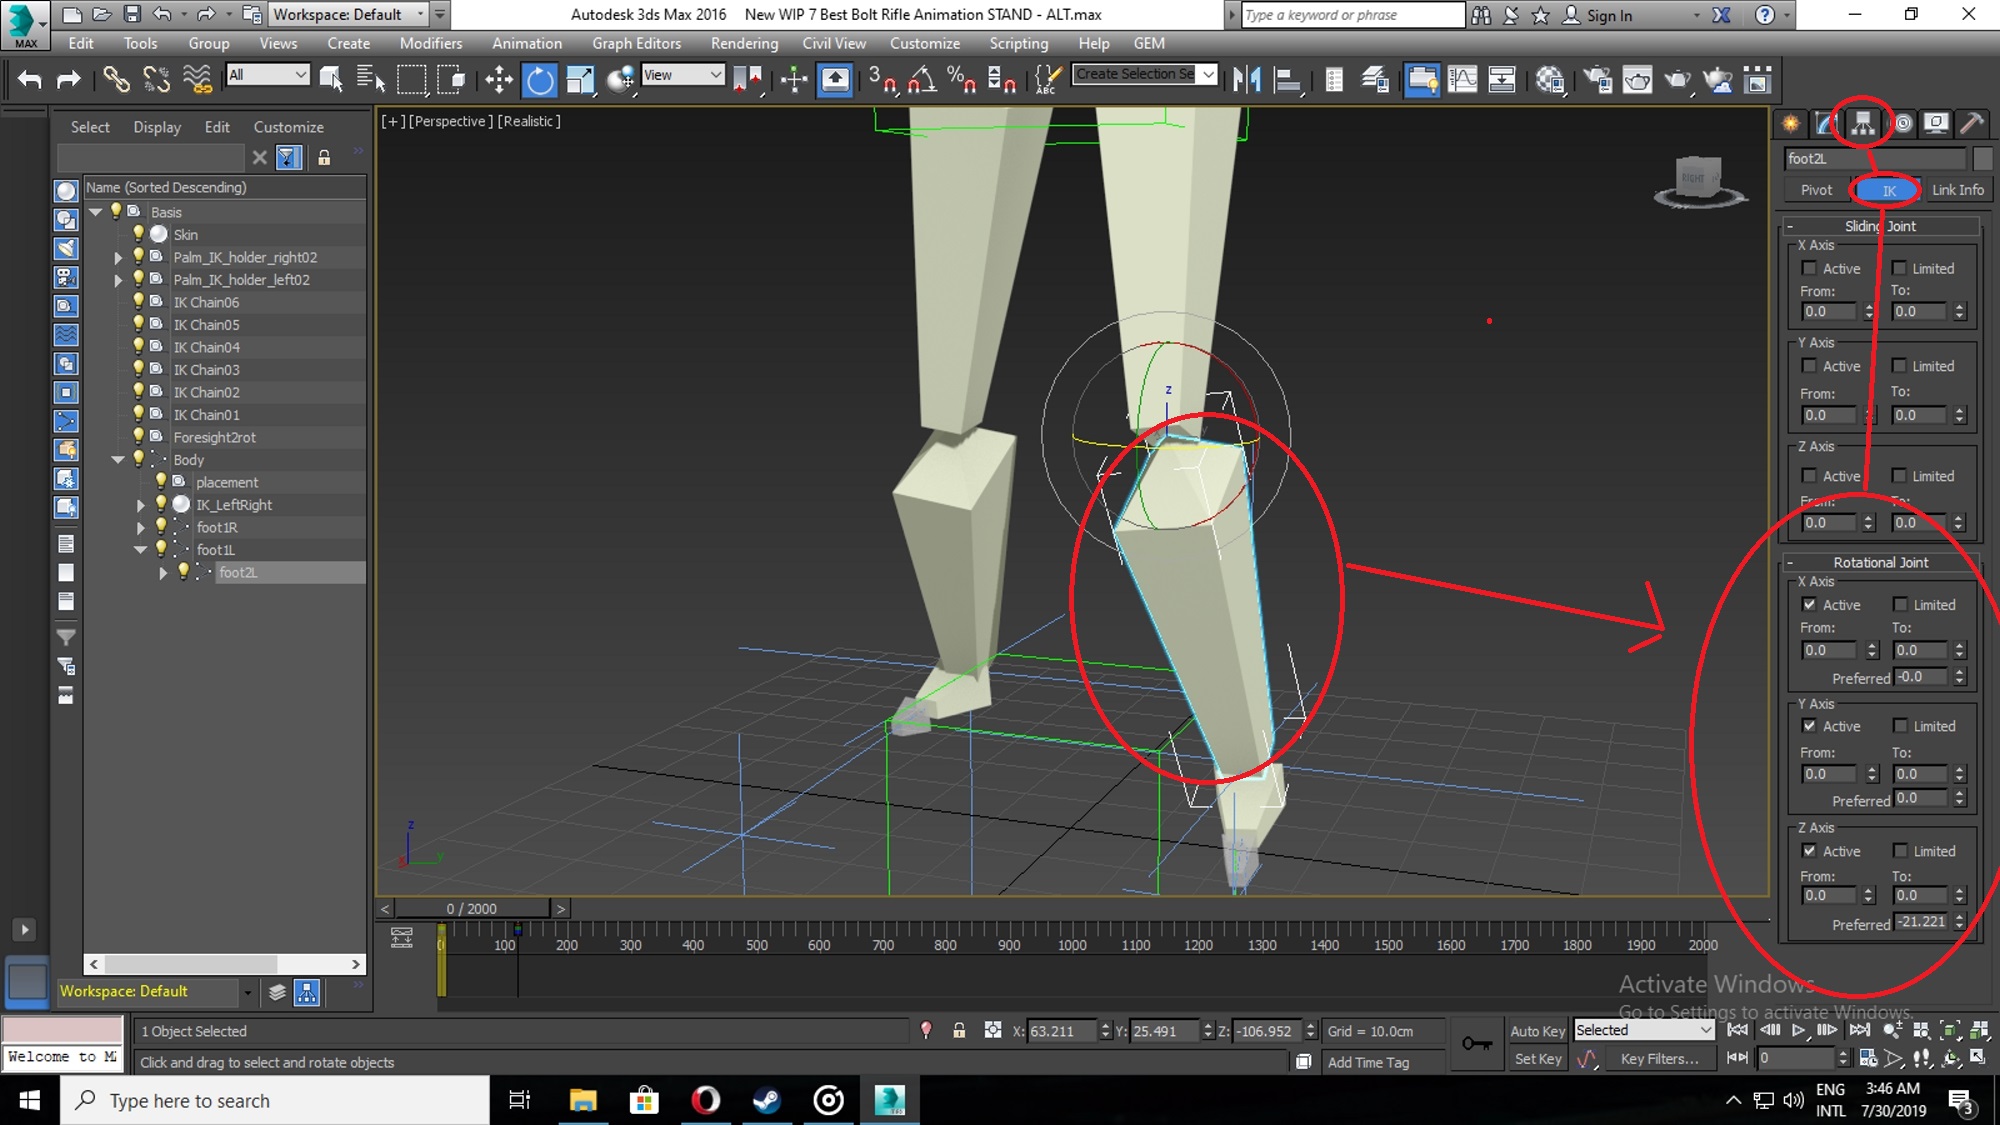
- As can be seen that all bones dimensions are limited and restricted with CHAINS, so to break that chains UNCHECKED the following axis x,y or z to rotate or move bones according to your animation, you can chose either any of X or Y or Z or all of them to unrestricted depend on your animation requirement.
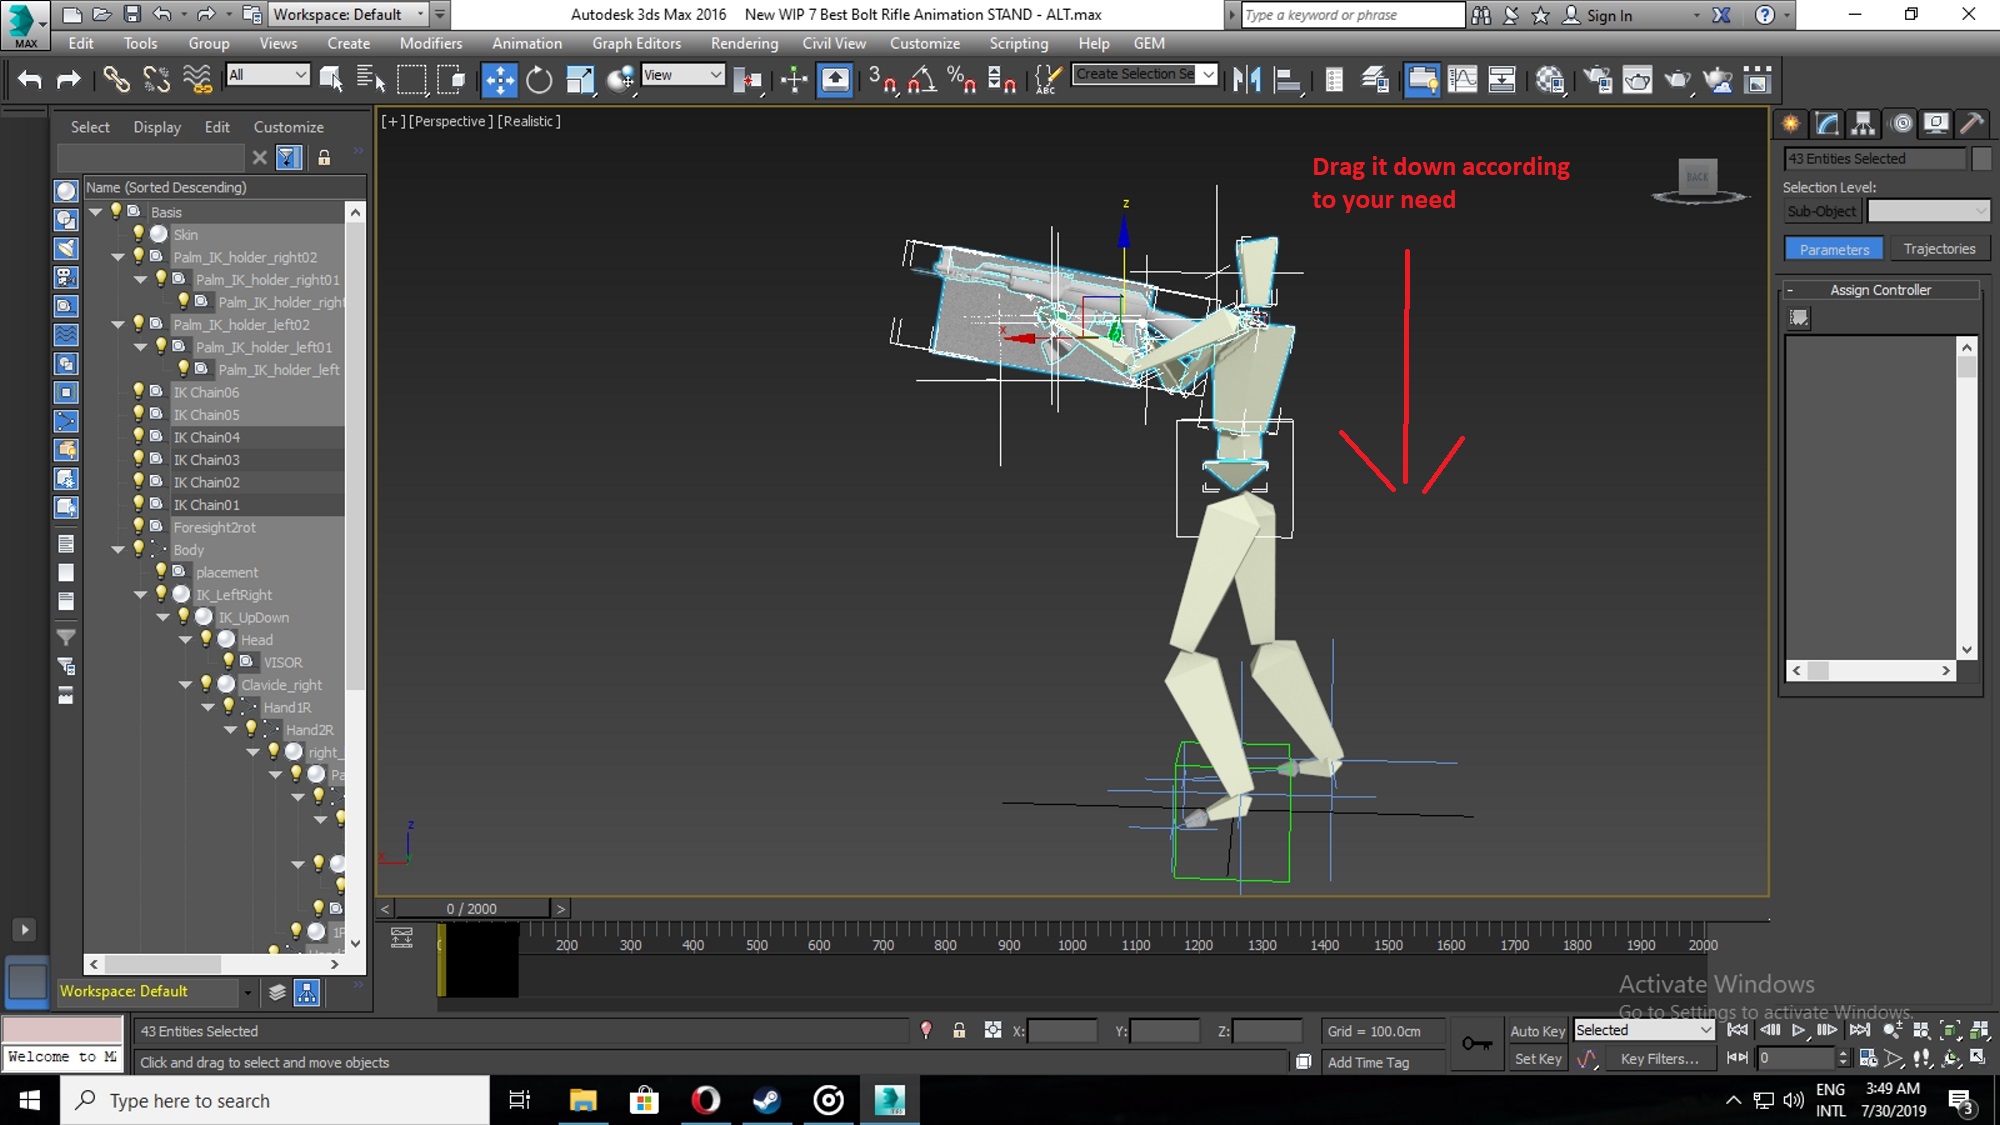
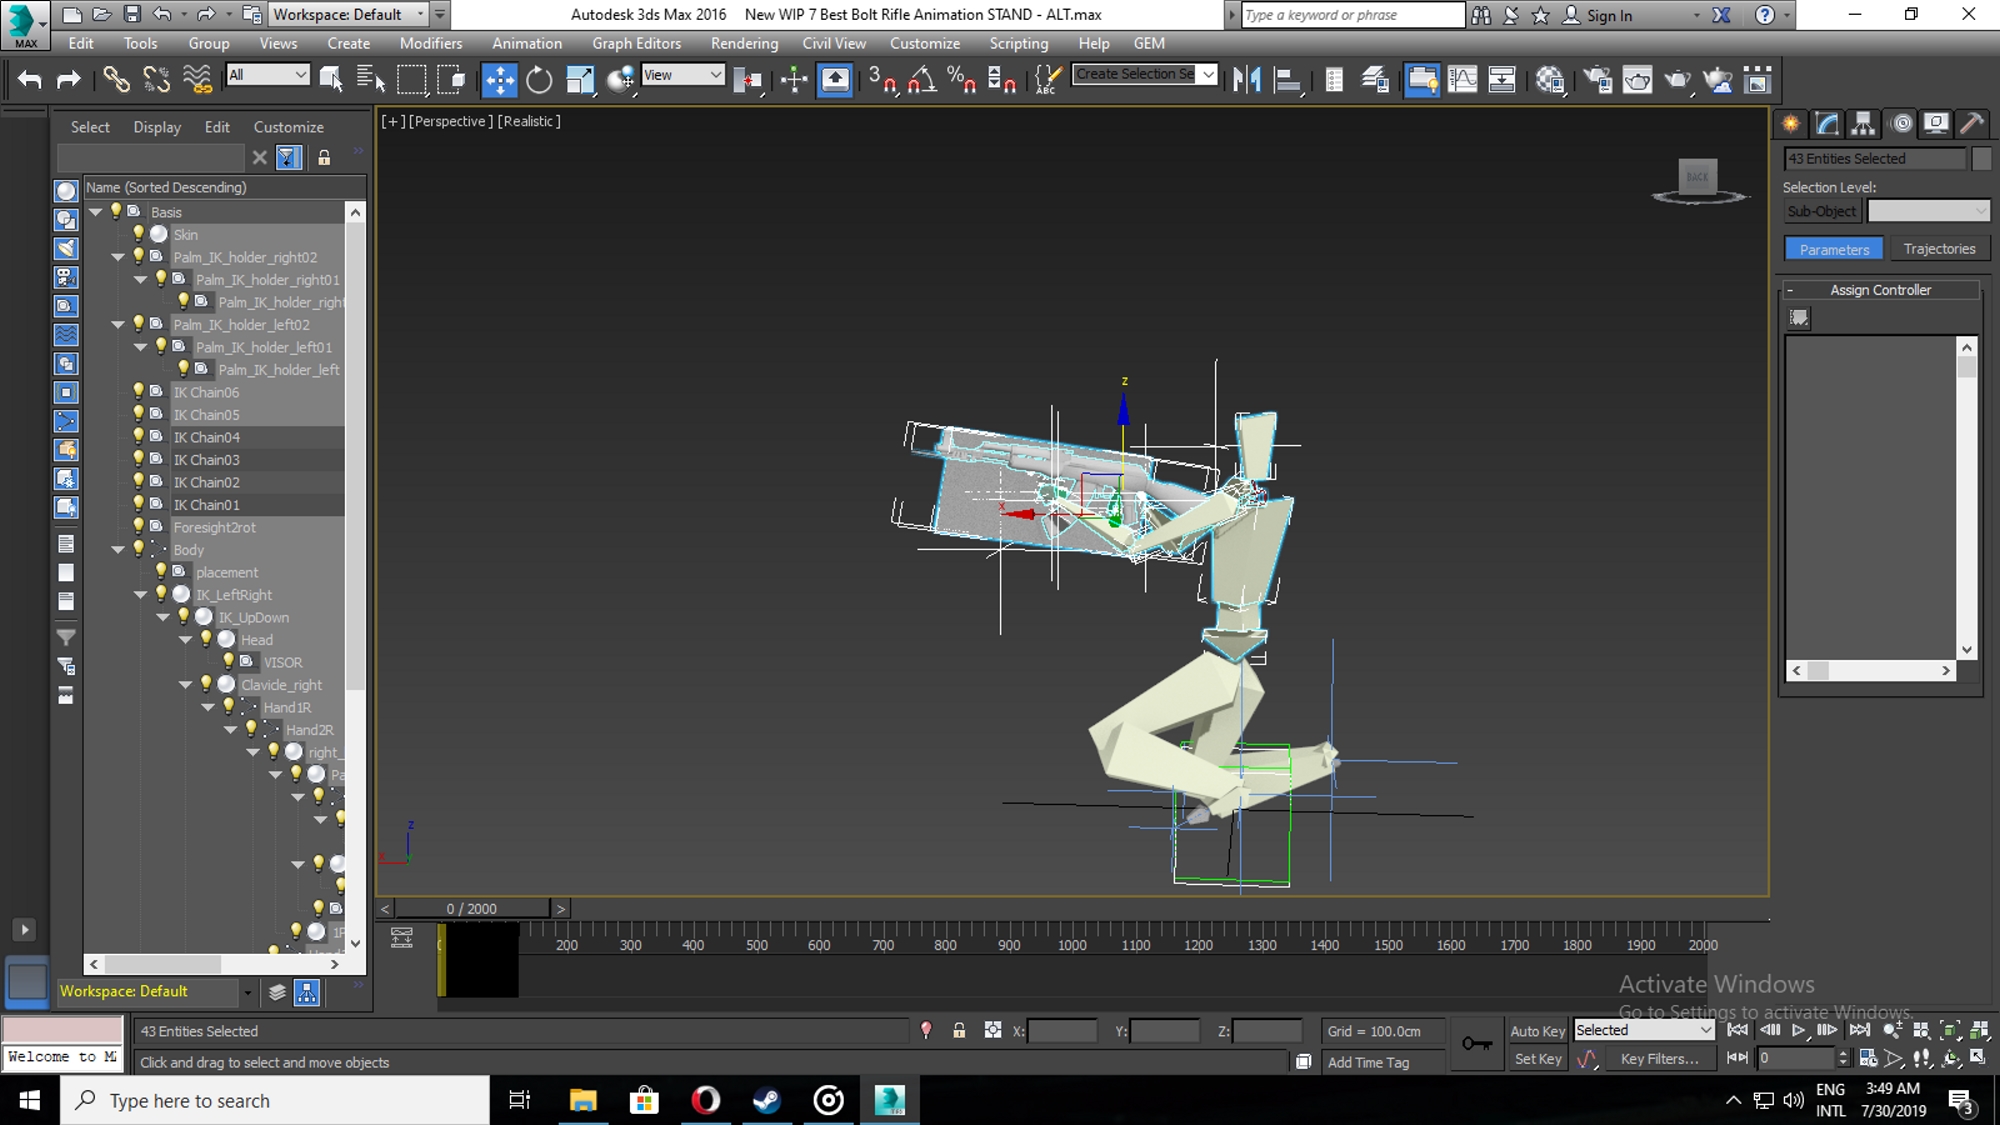
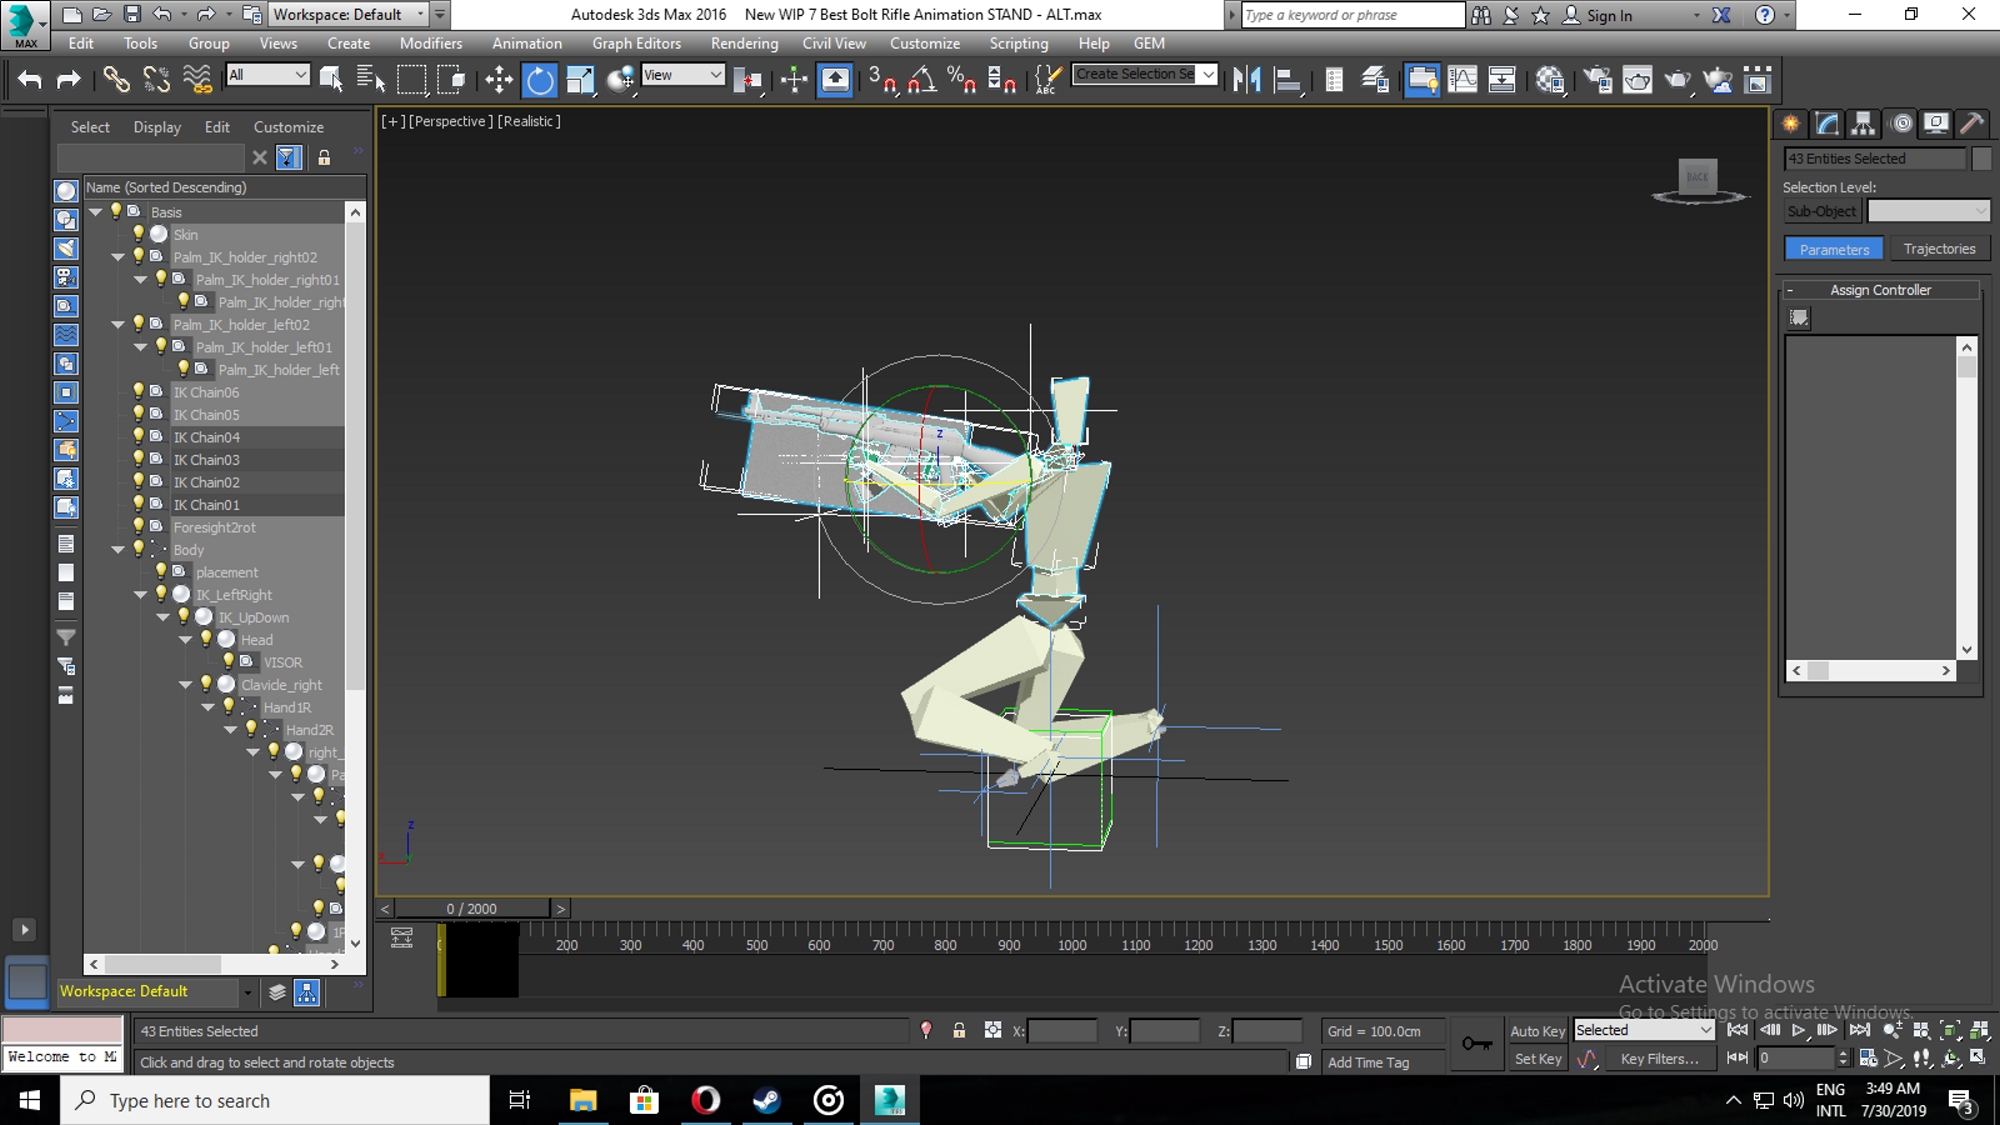
- Now lets have a look at basic animation tactics and before that let me define keys again for anyone whom not following previous tutorials, there is a button at lower right which say autokey and symbol of key, when you click auto key, it start recording movement of every object you move, but before that you have to set default animation like select all object you want to play animation upon and click on key at start of your frame range 0 and end of your frame range 120 (depend on yours), where in middle of those keys like at 60 you can start recording movement by autokey and once you done click on autokey again to stop recording where from setting key at start and end of animation will let the character adjust it self to default position without any errors (you can perform any span of interval with in range line first interval of animation at 30 second at 40 third at 80 etc).
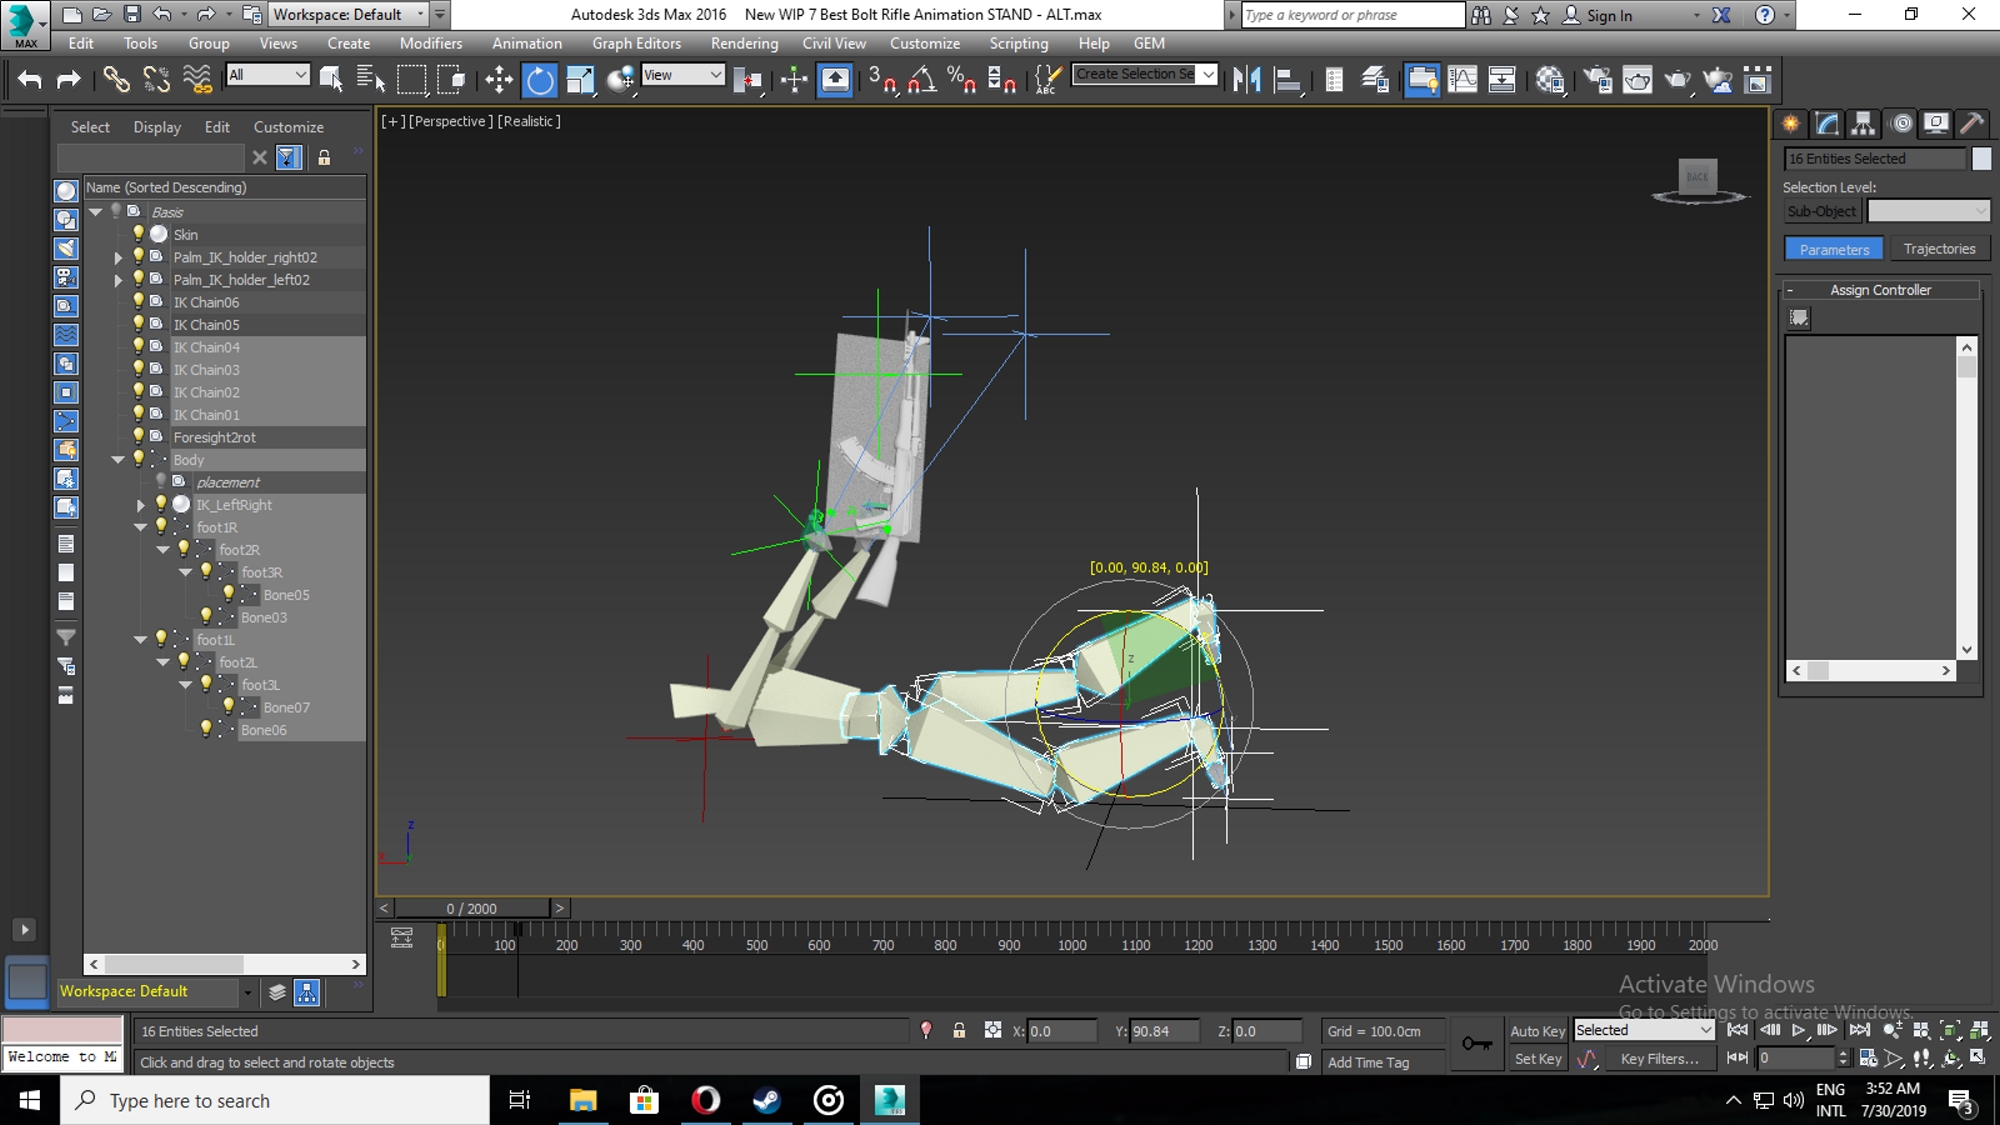
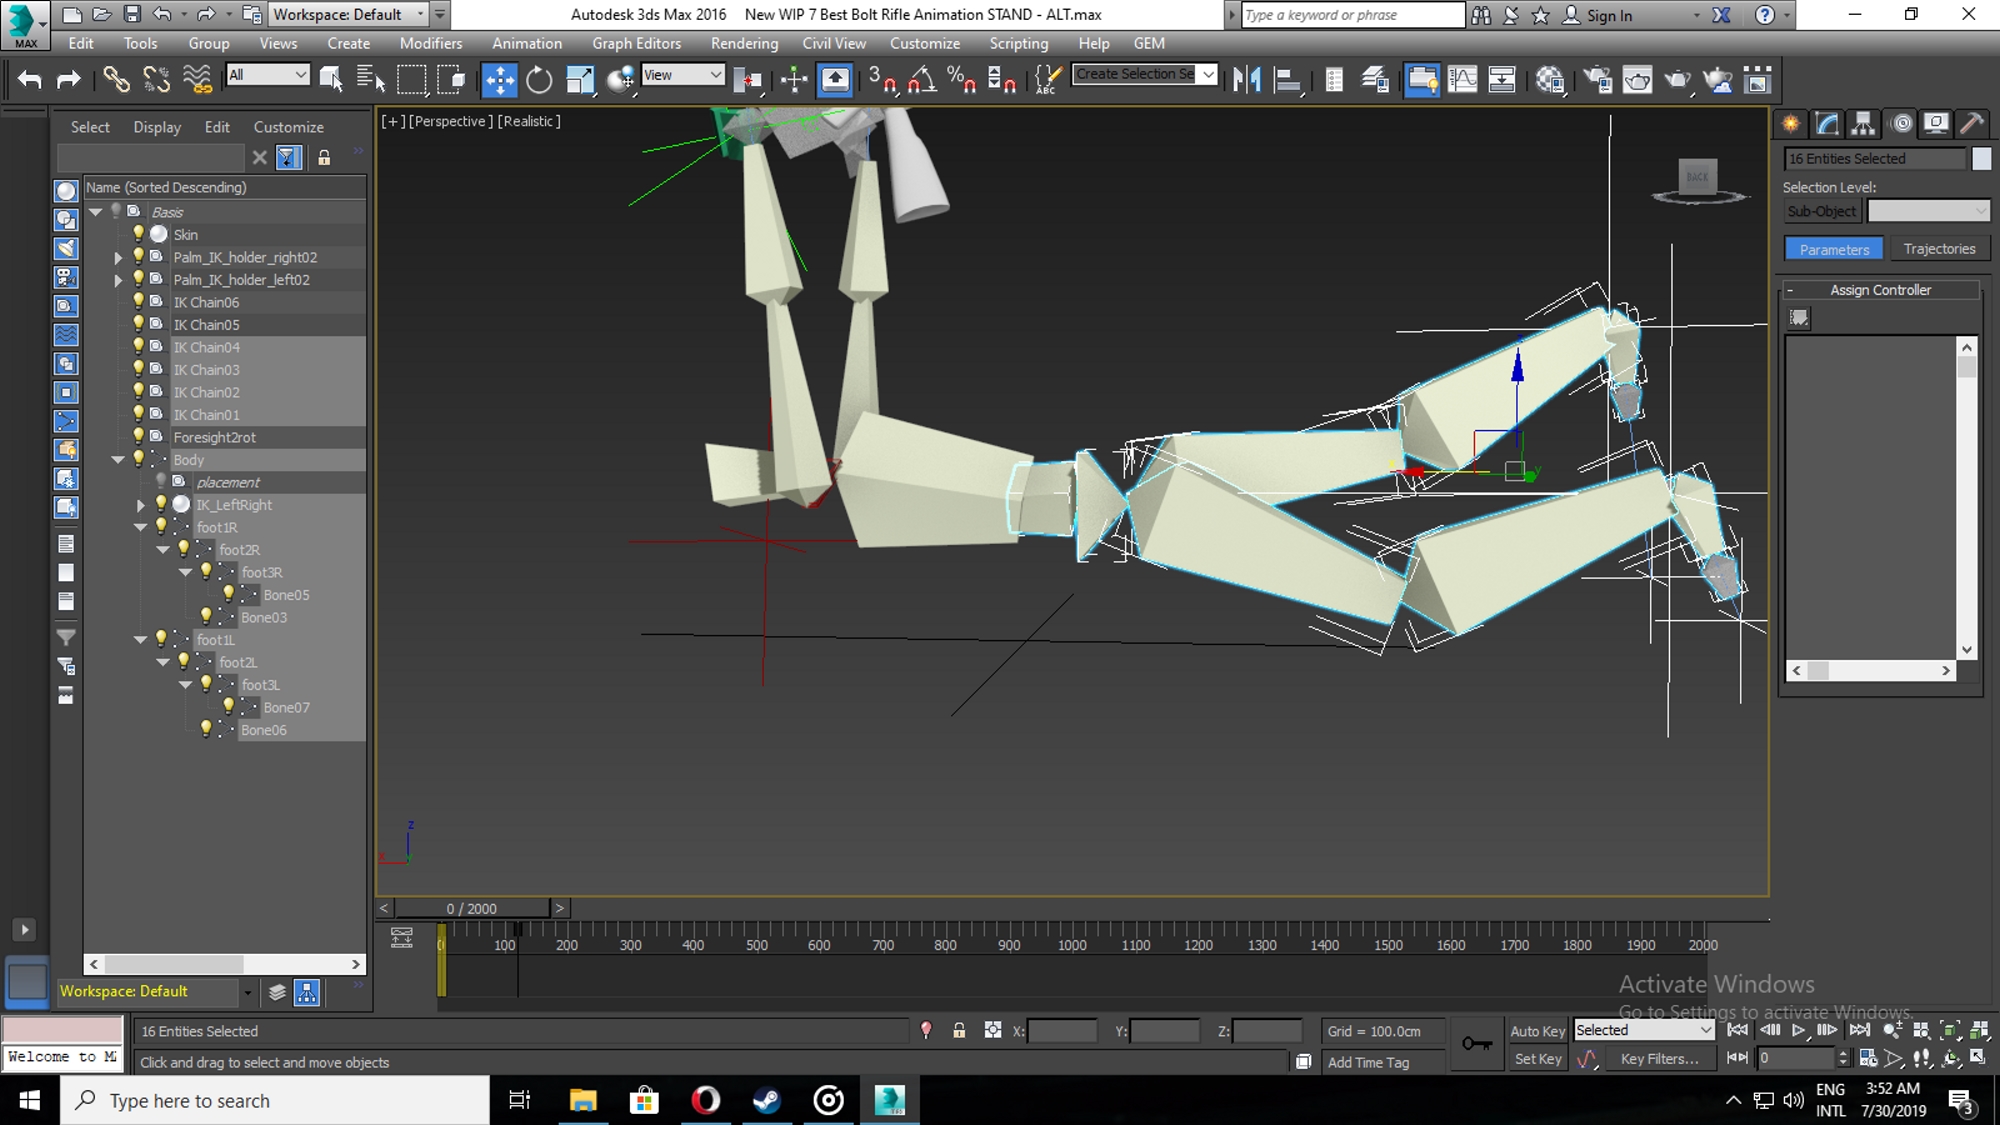
- where for lie and squat animation and lie animation review sample files and following pictures:
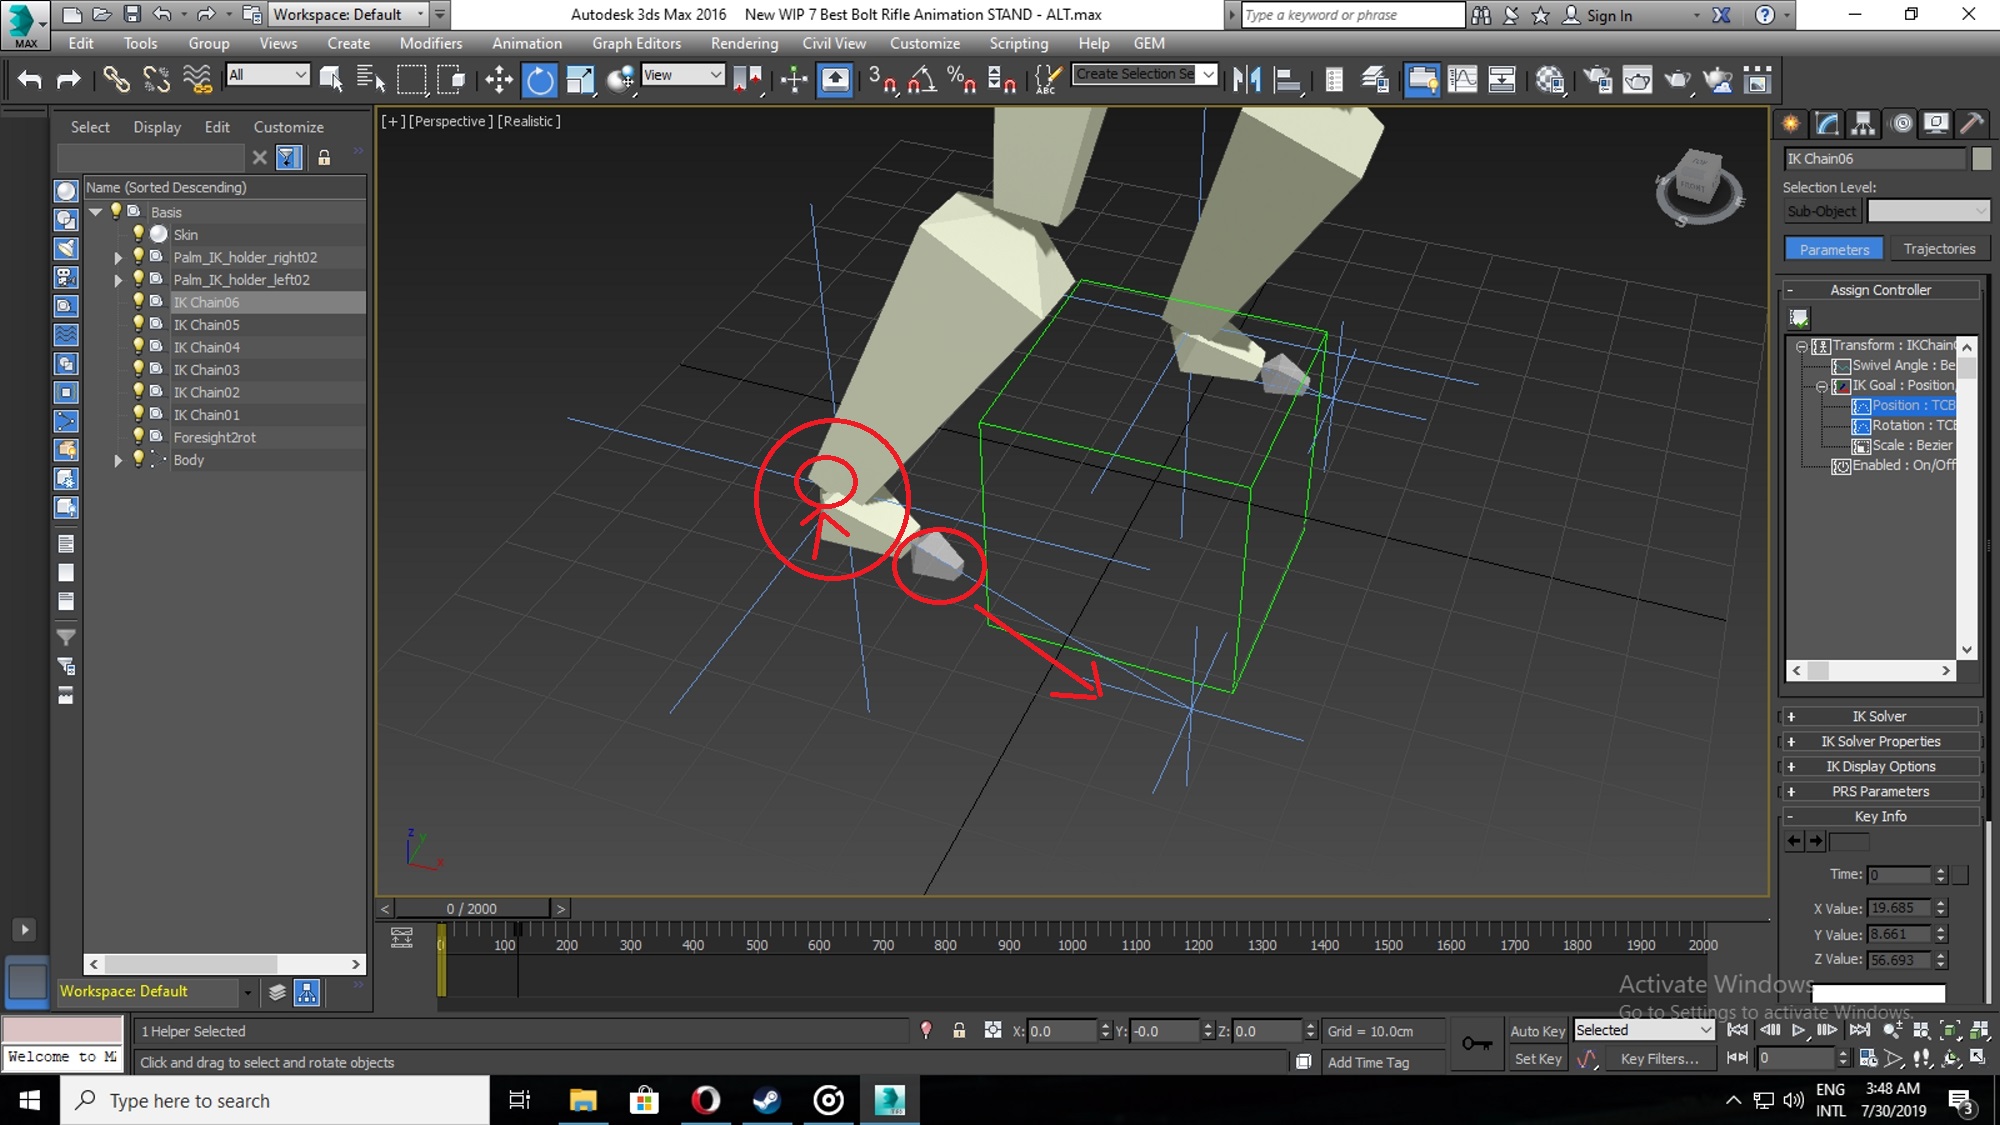

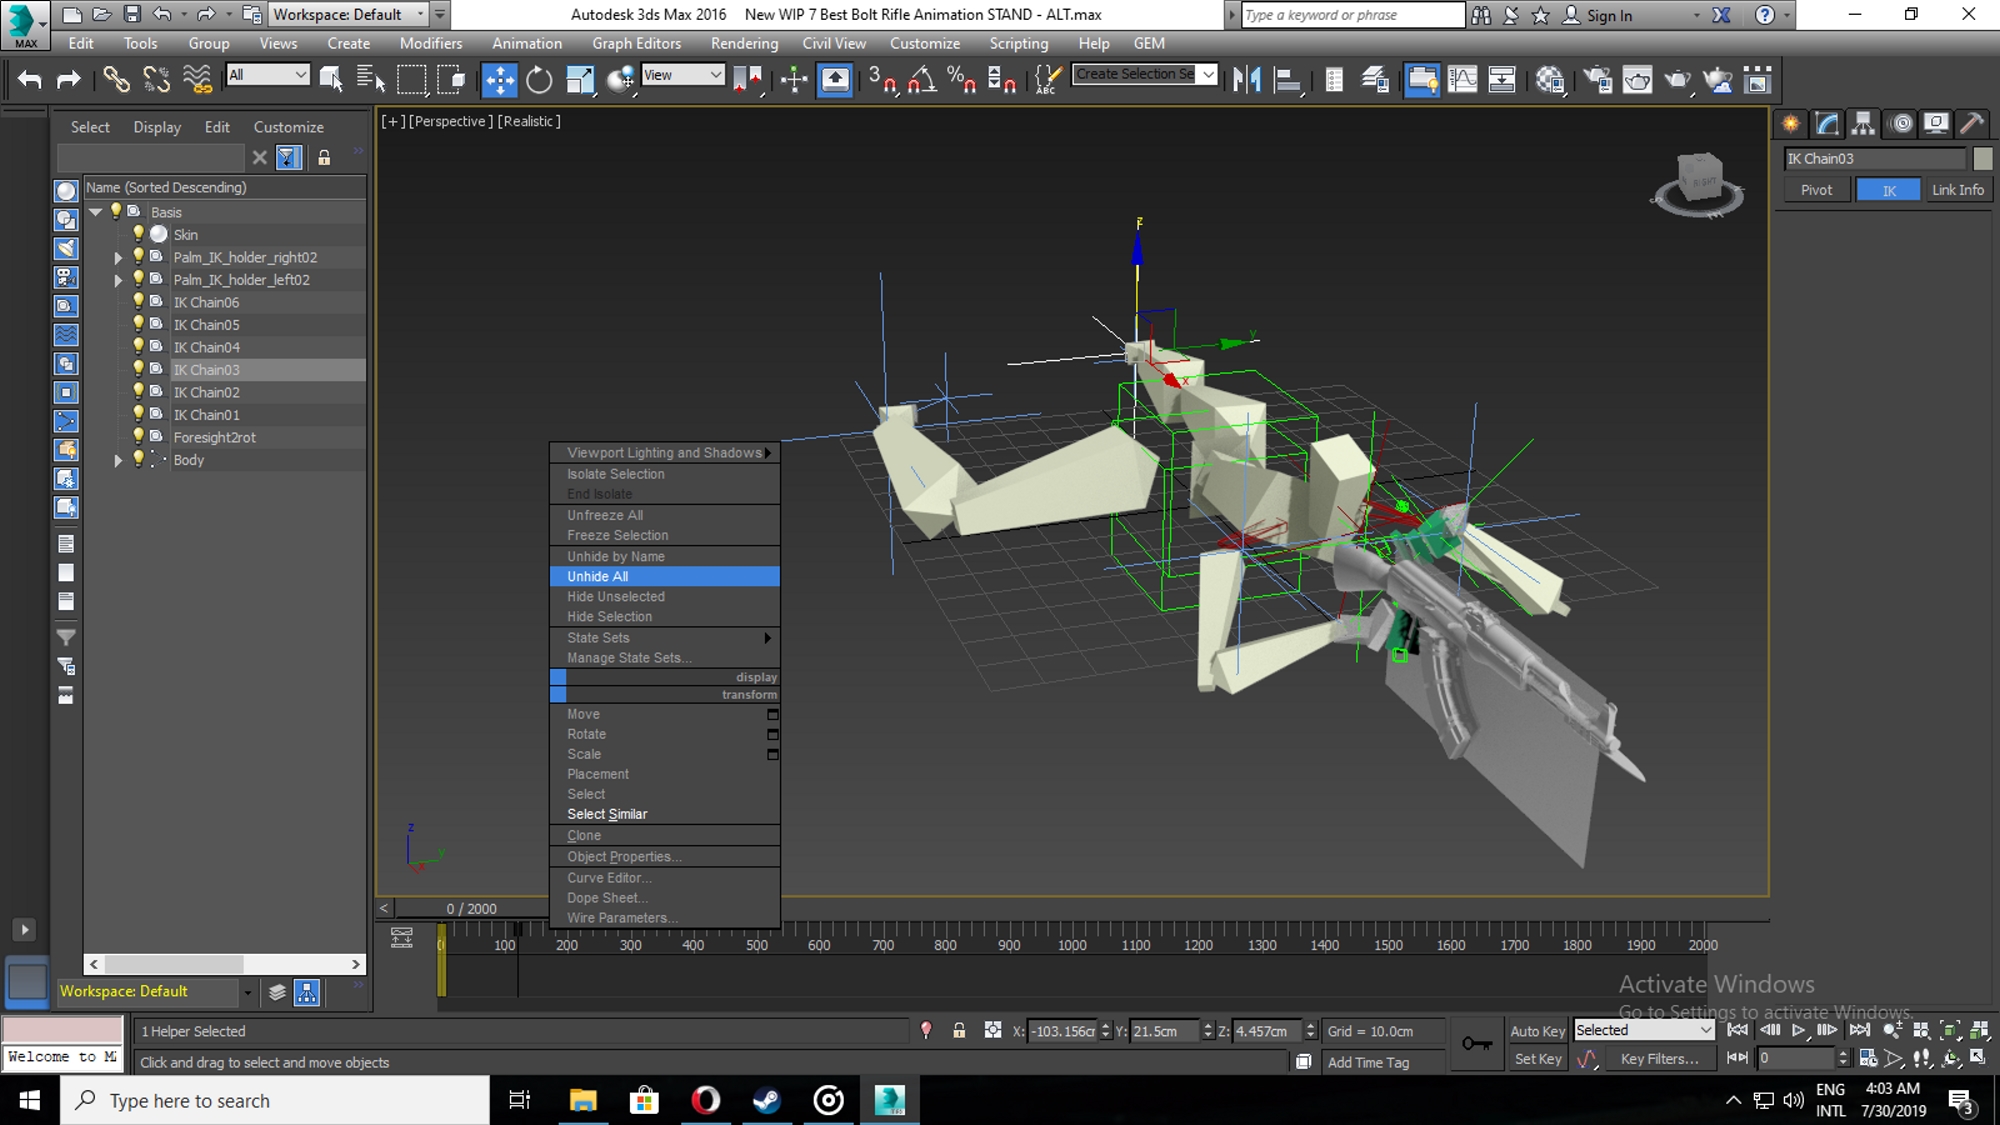
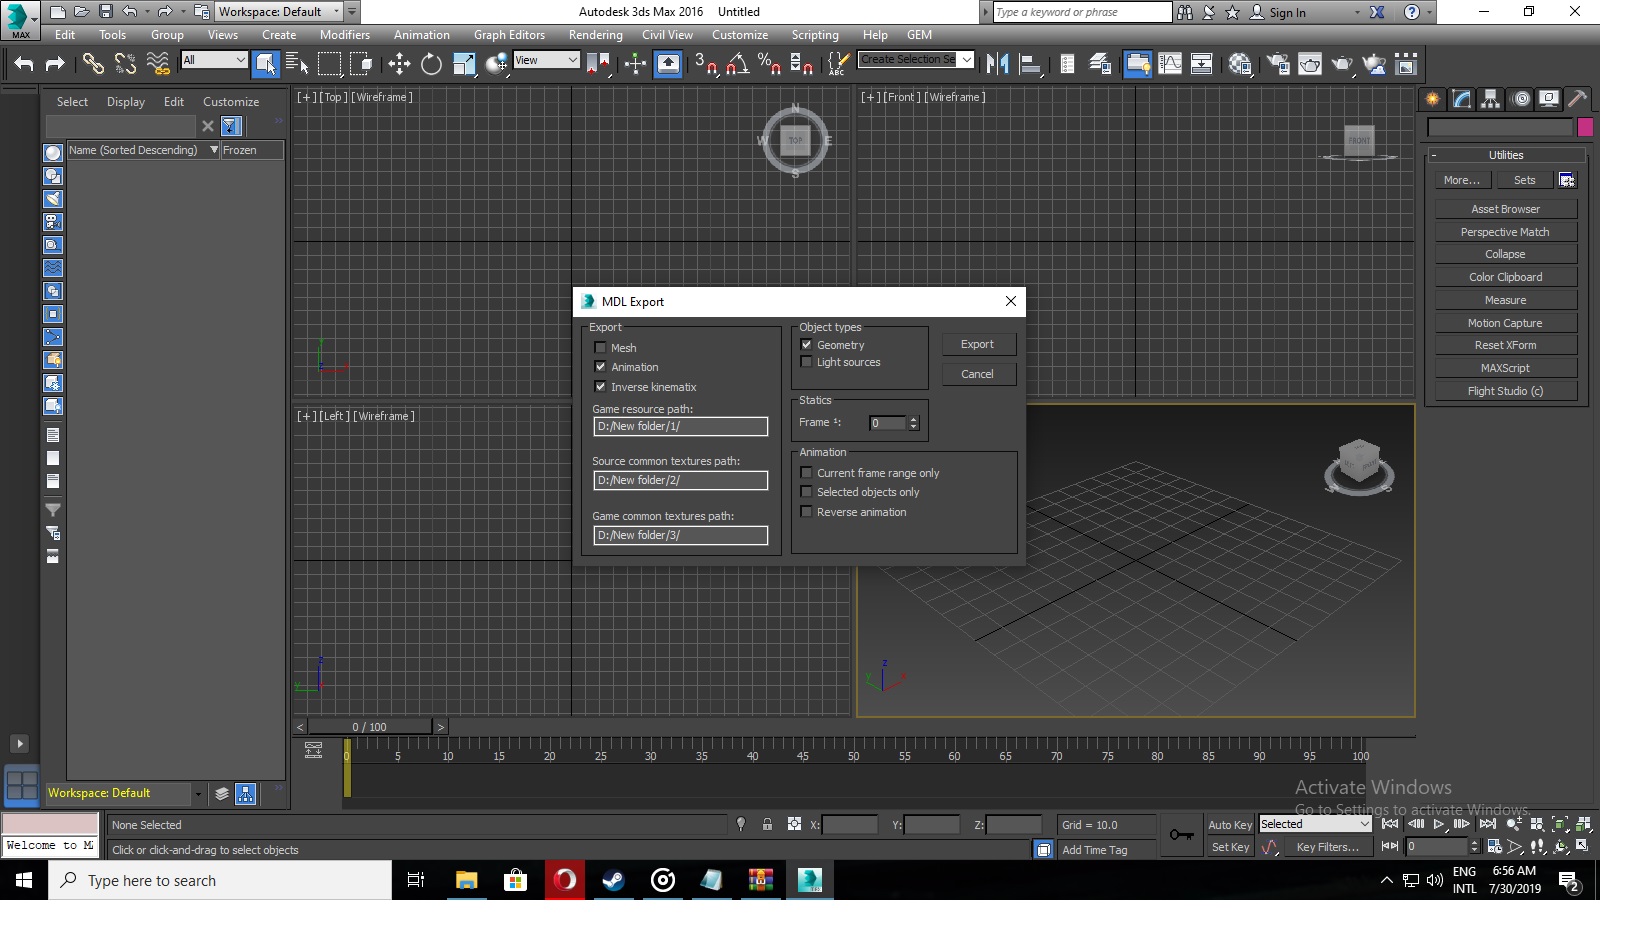
After completion of your animation extract them with provided plugin as .MDL with following options in check, for easy porting extract them directly to your mod folder cause to check it in game you have to go MOW Editor again and again.
- Finally test it in game to have bad ass soldier action of all time Ou0.
Additional Notes:
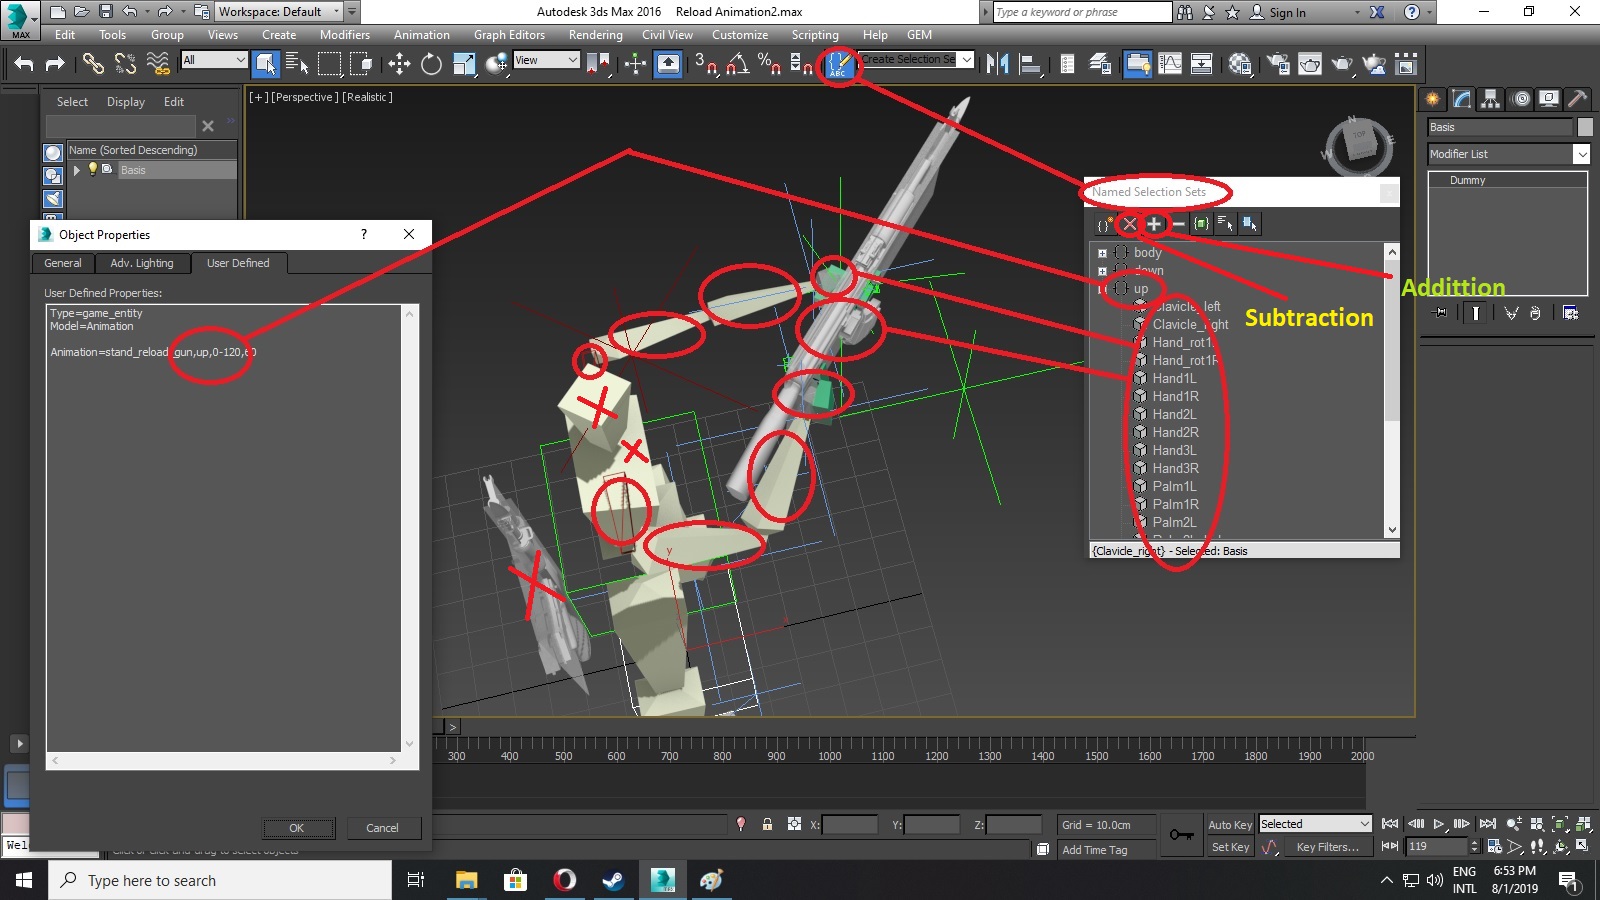
-You can also integrate specific body part animation, like hands only, or chest only, or head only, or legs only animation in default game animation by mentioning that particular body parts only in "Named Selection Set" while you can subtract and add any animated body bone by following:
-So if you just select the hand animations only, then rest of body animation will remain to DEFAULT game animation while the hands move according to your animation, so does same goes for legs and other animations.


Thank you very much.
Welcome :).
This comment is currently awaiting admin approval, join now to view.
Do you mind revising this tutorial in the near future? It would be great to have it remade to be more understandable and organized. Good tutorial on the basics though!