Programming Grapple Knight has been an interesting experience due to it being the first commercial title I will have worked on, as well as the first game I will have coded using Unity. In this article I'll talk about the programming behind some of the gameplay and visual effects.
Springs
Springs are what is used to simulate the rope physics of the grappling hook chain. Below is a basic equation for calculating a springs force, this equation can be further simplified or expanded by applying forces based on how much the springs are allowed to change direction, or altering parts of the equation such as how the attracting/repulsing force scales based on distance between its masses.
Fv = Mv.Normalised x (Mv.Length - SpringLength) x SpringConstant
At the time that this article was written the current method for using the spring force equation is moving each object connected to its springs by the calculated force. This doesn't truly emulate rope physics as the chain does not build or retain momentum and merely settles into a resting position. So why use springs if we aren't using them for a more realistic simulation?
Grapple Knight has over time gone through multiple changes in design. Earlier builds would keep you moving in the air when you fired your grapple hook rather than just when it was retracting (a change we made that might end up being reverted after some tweaks) and some currently unused gameplay ideas would feature and be affected by it more prominently. Having the chain act in this simplified way makes debugging and testing a lot of these changes much easier, as having the rope affected by more realistic physics means needing more complicated checks such as 'is this chain taut and cannot extend further?' rather than is the end of the chain X away from its source.
Furthermore, while additional complicated checks would have to accompany more realistic physics, the system that the grappling hook runs on wouldn't require many (if any) changes allowing the system and its gameplay to be fleshed out before graphical effects.
Texture Atlases
A texture atlas is a single texture made up of multiple smaller textures, as many as you can fit into a power of 2 (i.e. 256 x 256, 512 x 512, etc) sized image. The reason for using a texture atlas is that depending on the hardware the program is running on (mobile devices in particular) its usually more efficient to load a single larger texture file rather than multiple smaller ones.
Another aspect of texture atlases that makes them desirable to use is reducing the amount of memory used for textures. Most of our tile textures have dimensions of 38x38 which is not power of 2, while it is possible in some engines to use non power of 2 textures our graphics cards are optimised for dealing with power of 2 textures.
When presented with a non power of 2 texture, Unity will scale it up to the closest power of 2 texture size. This proves to be a large problem when dealing with sprites as it will cause them to become blurred. This could be fixed by adding a buffer of white space to our sprites and only drawing the 38 x 38 section, however, it both wastes a lot of empty texture space and causes large issues with what I'll get into next.
Tiling
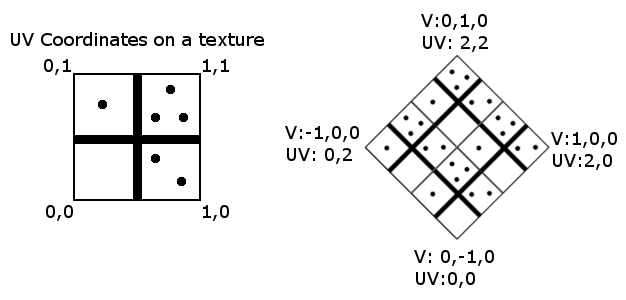
The above image demonstrates a quad of vertices comprised of a position in space and UV coordinate that maps to a location a texture. When rendering textures, UVs can be set to be treated in two different ways: clamping and wrapping. Clamping will clamp any value outside the 0-1 space into its range, while wrapping will wrap the pixel being accessed back to the other side of the texture once it passes a multiple of 1.
As I mentioned earlier, if we had tried to fix the problem by adding a buffer space, we wouldn't be able to tile our texture as the added buffer would get drawn too. This would mean that many more vertices would be required in our sprites as tiling would have to be done with additional quads.
So how do we prevent a sprite from running into that buffer space or the adjacent textures in the atlas when we attempt to tile it? Thankfully the maths to do this is incredibly simple when using shaders (a rendering step where effects can be applied to the vertices/pixels being rendered).
int IUVX = (int)i.uv.x;
int IUVY = (int)i.uv.y;
// Get the Atlas Information
AUV = i.Tangent;
// Make sure that the UVs aren’t Negative
if(i.uv.x < 0)
i.uv.x = 1 – ((IUVX – 1) – i.uv.x);
if(i.uv.y < 0)
i.uv.y = 1 – ((IUVY – 1) – i.uv.y);
// Get the integer portion of the UVs again after the negative check
IUVX = (int)i.uv.x;
IUVY = (int)i.uv.y;
// Set UV back to 0-1 range
if(IUVX != 0)
{
if(i.uv.x == IUVX)
i.uv.x -= IUVX – 1;
else
i.uv.x -= IUVX – 0;
}
if(IUVY != 0)
{
if(i.uv.y == IUVY)
i.uv.y -= IUVY – 1;
else
i.uv.y -= IUVY – 0;
}
// Scale the UVs down to the dimensions of the atlased texture in UV space
i.uv.x *= AUV.b;
i.uv.y *= AUV.a;
// Offset the UVs by the position of the atlased textures (0,0) position in the atlas
i.uv.x += AUV.r;
i.uv.y += AUV.g;
UV: A 0 to 1+ coordinate as if the texture being used was only the one we wanted.
AUV: The X and Y is a offset for the UV coordinates of the texture we want, the Z and W is the percentage of the atlas the texture takes up.
Making sure you have access to the information about the original size of the texture thats part of the atlas and where it is in the atlas within the shader can be a little troublesome. This is because you need that information at a floating point number accuracy the same or greater as your UVs that passing it to the shader through data such as the vertex colour won't work (we make use of the vertex tangent chuck of our vertex data as it has enough accuracy and is otherwise unused).
What the above equation basically does is convert whatever UV value we have for the pixel that's being drawn back to a 0-1 range and then scale that by the percentage that its original texture takes up in the atlas and then offsets it to its position.
Thank you for reading, in the next article I write I'll talk about designing and programing our enemy AI and our platforming physics, but for now look forward to the next article where our environment artist will talk about his experiences and how the look of the game has changed over time.