
Rebel ships swoop towards the steel grey Imperial behemoth before them. Small one man snub fighters dwarfed by the moon sized monstrosity ahead. The Rebel pilots are well aware of their chances of success, they didn't need the pre-mission briefing to tell them that there was but a slim hope. The size of the thing before them makes that all too clear, but hope there was.
After a series of devastating engagements with Imperial forces the Rebels had at last managed to score some significant victories against their vastly superior enemy. The Empire was not an invincible foe, and no matter how intimidating the massive battle station ahead of them was. There was hope. Victory here will mean a crippling blow to the Imperial war machine. Failure, the possible end of the Rebellion. Best not to think about failure. As their cockpit windows fill with the oppressive grey mass of the Death Star, the Rebel pilots peel off and dive into a storm of emerald green laserfire.
ROUND 1: MOS ESPA
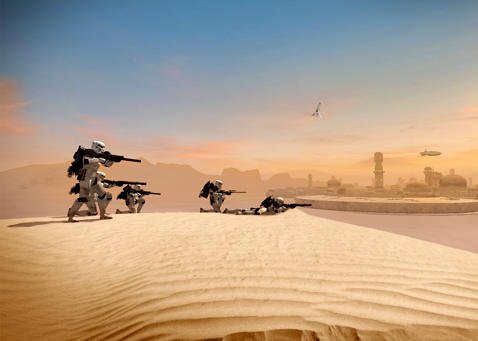
This was a significant turning point in the early stages of the war. Rebel forces occupying the sleepy Tatooine town of Mos Espa successfully managed to repel an invading force of crack Imperial Sandtroopers who were working their way up from the south. The fighting was fierce with the main street turned into a fiery maelstrom of smoke and blasterfire, the engagement soon headed south as Rebel troops pushed the enemy back to the palace ruins where some of the most fierce action of the battle took place. The conflict was finally won when a Rebel scouting squad managed to outflank the enemy cutting them off from their last remaining foothold in the town, and with that the Imperial troops were finally vanquished.
ROUND 2: JUNDLAND WASTES
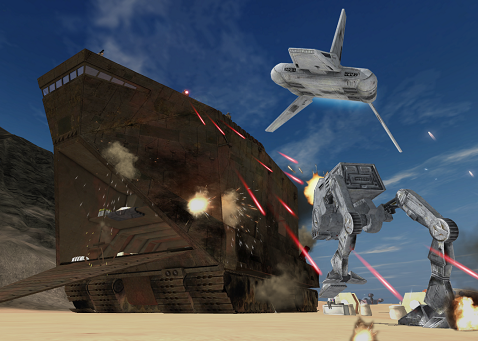
The mission was clear, occupy the Imperial forces in the area long enough for some significant intelligence assets to get off world. Sounds easy enough until you find yourself in the sights of a hulking Imperial Sentinel landing craft. Once the Rebel forces in the Jundland Wastes made themselves known to the Imperial troops searching the area, they threw the full force of all the weapons they had at their disposal at the Rebel positions, making short work of the Rebels in the north with devastating strafing runs from the air with the Sentinel, and fast moving well co-ordinated attacks from the ground. The northern town of Motesta fell quickly and the Rebels had to swiftly fall back to the Tusken camp in the hills.
Other units fell further back to the wrecked Sandcrawler close to the centre of the region. This command post would make a highly defensible location that the Imperials would want to take before heading further south. The Rebels were ready for the Imperial forces when they arrived, and despite throwing everything at the Sandcrawler and the Rebel's small but powerful MLC-3 mobile artillery units stationed in the area, had a lot of trouble taking this strategic position, losing several of their valuable Sentinel craft in the process. Eventually a second Imperial Squad took the initiative to hijack another Sandcrawler in the area, and using it as a boarding craft finally overwhelmed the Rebel forces stationed there, who were then forced to fall back to Anchorhead.
Having a hidden cache of weapons at this location meant that the Rebels were able to mount a considerable defence of this area repelling all of the formidable weaponry the Imperials could hurl at them, destroying Sentinels, Imperial Scout Walkers and taking out infantry units that managed to infiltrate the compound. The Rebel commander then noted an ion storm brewing on the horizon. If it reached them and disabled all their equipment they'd be defenceless, making an already dire situation only worse. Intelligence reports indicated the assets they were protecting had left the planet safely. So their work here was done, and so the Rebels made a strategic withdrawal before the storm hit, allowing them to fight another day, but resulting in an Imperial victory.
ROUND 3: BATTLE OF YAVIN
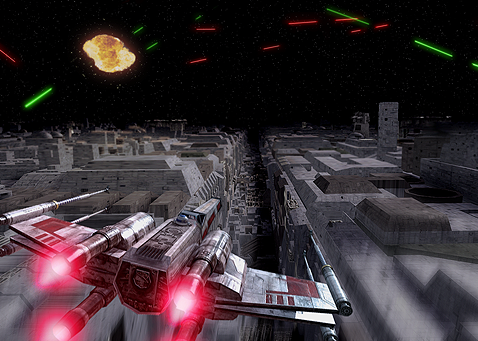
Finding their primary base under threat from the Empire's latest technological terror, a brave squadron of Rebel pilots went up against the best the Empire could throw at them. The plan was simple, destroy several key installations to expose a vulnerable weakness in the Imperial battle station's design. The odds however were stacked against them. And when the older battered Rebel ships came up against the Empire's newer, faster and more manoeuvrable TIE fighter craft, it looked like all would be lost. But despite heavy casualties the pilots stayed the course and took out their targets, and before the Imperial pilots knew what was happening an attack run had commenced down the trench that would lead to the key target that could end this battle most swiftly. The Rebel pilot's aim was true and a devastating blow was dealt to the Imperial war machine, and a significant victory for the Rebellion.
And so at last the Nations in Conflict 2nd First Strike Campaign has commenced. The Rebels have scored an early lead, but with all the battles being so close and so hard fought, that could all change next week. A strong start to the campaign, and great to see players working well together as well co-ordinated teams resulting in some intense battlefield action. We hope to see more players in the coming weeks, so if you haven't joined up already get involved and sign up here:
If you missed out on the action you can get a little taste of it from this excellent video feed of the Jundland Wastes round as provided by community member CAAM.
Until next time,
May the Force be with you.

Um... Pay no attention to the Trooper leaping to his doom around the 25 minute mark in the video. Nothing to see here. Move along....Move along...
That was loads of fun! Looking forward to the next round. :)